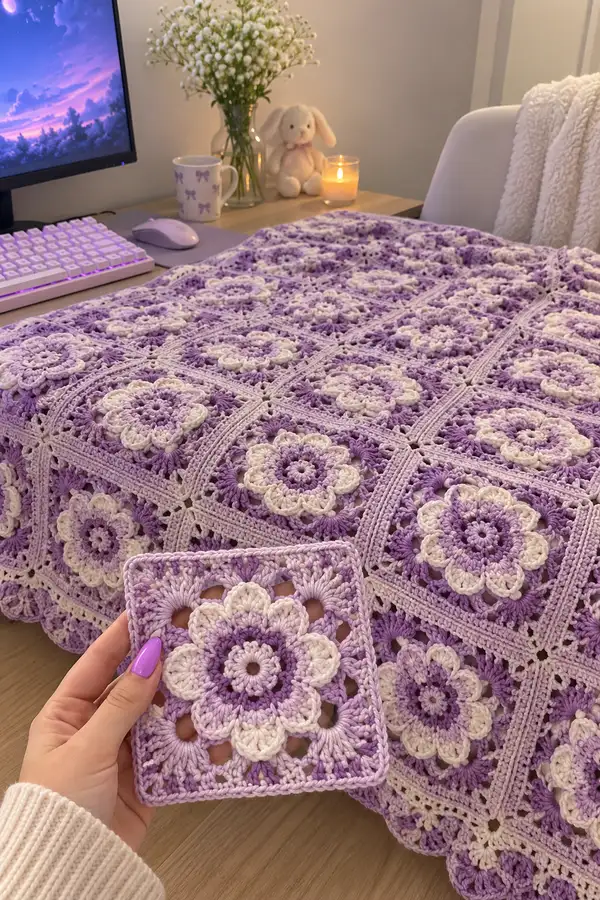
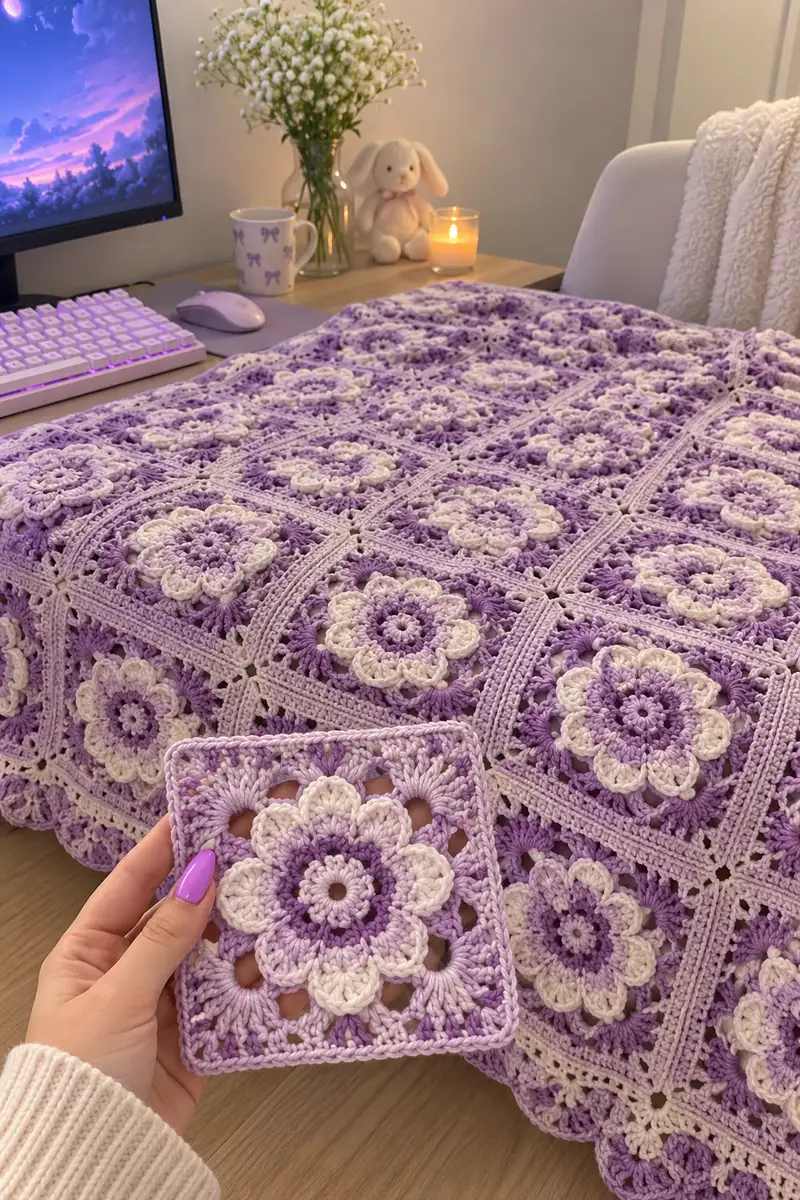
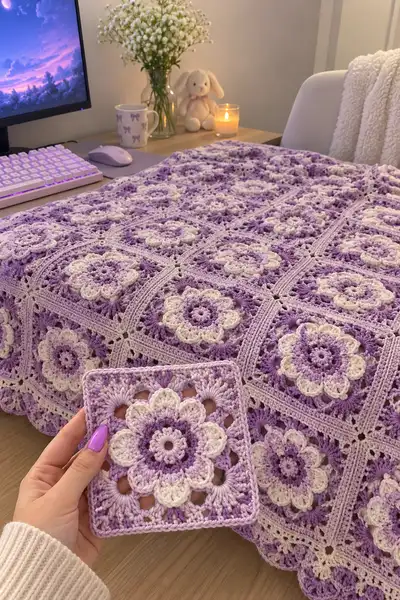
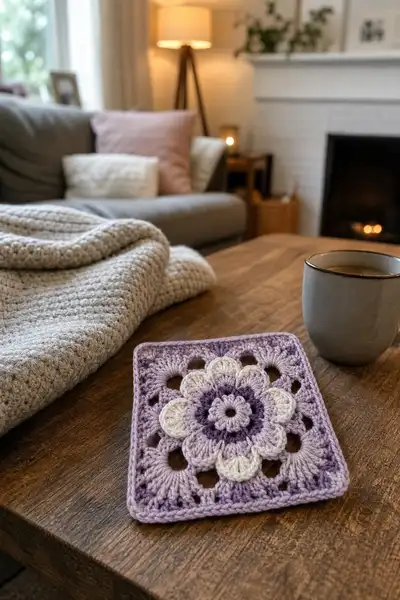
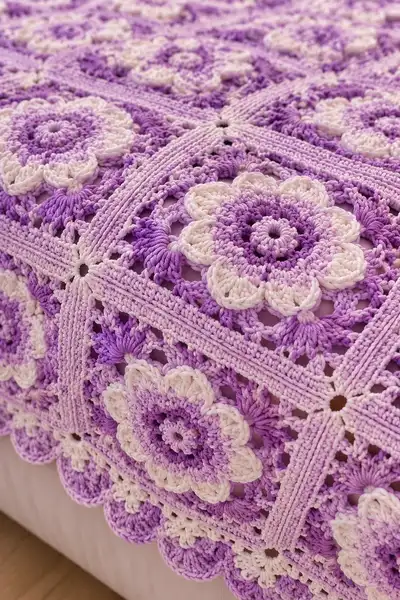
Wrap your bed in a calming field of lavender with this layered flower granny square bedspread pattern. Each square features a raised 3D floral bloom in soft cream, lilac and deep lavender, framed with delicate openwork and a scalloped edge. The pattern includes step-by-step instructions to create each motif, join them into panels, and work a multi-row border for a finished bedspread worthy of a cozy bedroom. Perfect for gifting or creating a serene bedroom focal point.
Progress Tracker
0% Complete
— Motif (Layered Flower Granny Square) :
Round 1 :
Using Deep Lavender (Color A). Make a magic ring, ch3 (counts as dc), work 5 dc into ring. Pull ring closed. Join with sl st to top of ch3. (6)
Round 2 :
Ch3 (counts as dc), 1 dc in same stitch, 2 dc in each st around. Join with sl st to top ch3. (12)
Round 3 :
Ch3 (counts as dc), 1 dc in next stitch, (1 dc, inc) repeat around to create gentle expansion: (1 dc, 2 dc in next st) x6. Join. (18)
Round 4 :
Change to Mid-Lilac (Color B). Ch3, (2 dc, inc) x6 — work 2 dc then 2 dc in next st — to expand. Join. (24)
Info :
Change colors by finishing last pull-through of the previous stitch with new color to avoid a visible jog. Place a stitch marker in the first stitch of each round to keep track.
Round 5 :
Ch3, (3 dc, inc) x6. Join. (30)
Round 6 :
Ch3, (4 dc, inc) x6. Join. (36)
Round 7 :
Ch3, (5 dc, inc) x6. Join. (42)
Round 8 :
Ch3, (6 dc, inc) x6. Join. (48)
Info :
Rounds 1-8 create the round base for petal placement. The 48-stitch round divides evenly into 8 segments (48/8 = 6) which gives eight petal anchor points. Keep tension even so petals sit uniformly.
Round 9 :
Change to Soft Cream (Color C). Ch1, sc in same st, *ch3, skip 5 stitches, sc in next st*; rep from * to * around to create 8 ch-3 spaces. Join with sl st to first sc. (8 ch-3 sps, 8 sc anchors)
Info :
These chain spaces mark where each petal will be worked. Count carefully: you should have 8 chain-3 spaces evenly around the circle. If you have fewer or extra, check earlier increases.
Round 10 :
Working in BLO of Round 8 (so petals sit proud). Join Color B (Mid-Lilac) in a ch-3 space. Ch2 (counts as hdc), 7 dc cluster in same ch-3 space: (hdc, 7 dc) all in same ch-3 sp; sl st to top of first stitch to close petal. *Move to next ch-3 sp and repeat petal cluster. Repeat for 8 petals*. Fasten off color B. Petals are surface-on-top clusters; base stitch count remains 48 (clusters worked into ch-3 spaces).
Info :
Petals are worked into ch-3 spaces and do not alter the round stitch count. Work clusters loosely enough to create a soft petal curve. Use your finger to shape petals as you go to even the bloom.
Round 11 :
Re-join Soft Cream (Color C) behind petals (work in same ch-3 spaces but on base round): Ch1, sc into each sc anchor across the round (8 sc), and where petals are attached work (ch3, sc) into each ch-3 space to create small lacy loops between petal clusters. Continue around and join with sl st. This round acts as a lacy spacer and still references 48 working points around the round (48 base anchors).
Round 12 :
Switch to Mid-Lilac (Color B). Working behind the petal layer (into the base round 8 stitches), *ch5, skip 3 sts, sc in next st* to create elongated chain fans for the square shaping that will follow. Repeat around; you will create 8 elongated ch-5 fans aligning between petals. Join. (8 ch-5 fans)
Info :
Rounds 9-12 establish your layered bloom and create openwork that will ease into square shaping. If your petals look crowded, loosen tension on Round 10 petal clusters by using a slightly larger hook for just that round if needed.
Round 13 :
Change to Soft Cream (Color C). To begin turning the circle into a square, start shaping at four quadrant points. Locate four roughly equidistant chain-fan spaces (every other fan). In each quadrant fan work: *(sc, ch4, sc) into fan* to form a corner chain space; between corners, work 1 sc into each base chain-fan to maintain sides. Work carefully so you now have 4 corner ch-4 spaces and even sc along sides. Join. (4 corners + sc along sides)
Round 14 :
Ch2, 1 hdc in same st, then along side between corners work (hdc in next 6 sts), then in corner work (hdc, ch3, hdc) in corner ch-4 sp; repeat around. This creates the first rounded corners and evens the side lengths. Join. (Stitch counts will vary depending on your ch counts but maintain equal stitches on each side.)
Info :
At this stage counts are based on side shaping rather than a strict circular stitch count. Keep track of stitches between corners: aim for equal numbers on each of the four sides for a neat square. If one side is tighter, distribute extra hdc evenly to balance.
Round 15 :
Working in Mid-Lilac (Color B). In each side between corners: *ch1, sc in next 2 sts; ch3, skip 2, sc in next 2 sts* to make a delicate mesh along the sides. In corners: (sc, ch5, sc) to enlarge corner spaces. Join. You will have 4 enlarged corner ch-5 spaces and consistent mesh along each side for the square frame.
Round 16 :
Switch to Soft Cream. Work 2 rounds of sc evenly around the square, placing 3 sc into each corner ch-5 to create a solid frame base. Round 16 is 1 sc all around; Round 17 repeat 1 sc all around to build the frame. When finished, the stitch count is now measured per side: e.g., if you have 16 sc per side after corners, total will be approx. 16 x 4 = 64 sc (example counts will vary slightly based on your earlier mesh).
Info :
Work these sc rounds in the round without turning. Use them to square up the motif edges. If your square feels slightly circular still, add one more sc round to even it out before continuing to detail rounds.
Round 17 :
Change to Deep Lavender for a decorative ribbed band. Ch1, sc in BLO around for one round to create a subtle ridge. Join. If your side stitch count is 16 per side, total = 64 sc (BLO).
Round 18 :
Same color (Deep Lavender). Ch2, hdc in each st around to build height for joining. Join. (If 64 sc previous, this makes ~64 hdc)
Info :
Use Bloom or Puff stitches for accent. If you prefer a flatter motif, replace any puff stitch instructions with 3 hdc cluster instead. Check that all squares block to the same size before joining.
Round 19 :
Switch to Mid-Lilac. Work a decorative fan round: *skip 1 st, 5 dc in next st (fan), skip 1 st, sc in next st* repeat around. This round creates soft textured corners and side fans. Join.
Round 20 :
Change to Soft Cream. Ch1, sc in next st; *in each fan work (sc, ch3, sc) centered on the fan; in each sc anchor work sc*; repeat around. This adds lacy corner wells that will help when joining squares later. Join. Count will depend on fan placements; aim to have balanced stitches along each side.
Info :
At this point each square features a layered center bloom, a framed square edge and small lacy corner spaces. Make a gauge sample of one square and block it to the intended size before making multiples so all squares match.
Round 21 :
Working in Deep Lavender. Ch3 (counts as dc), 2 dc in same st, *skip 2 sts, (3 dc in next st) repeat across each side; in corner ch-3 spaces work (3 dc, ch3, 3 dc) to keep corners open. Join. This produces a bold ridge across the edges. Resulting stitch count across the square is variable by side—expect roughly 20 dc per side including corners.
Round 22 :
Change to Mid-Lilac. Ch1, sc in each dc and ch space around to tidy edges; work 3 sc in each corner ch-3 space to square corners. Join. For estimate, if side ~20 sts, total ~80 sc around.
Round 23 :
Switch to Soft Cream. *Ch5, skip 3 sts, sc in next st* to create 8 small open arches set evenly around the square; this gives the airy feel in the finished spread. Join. The decorative arches do not significantly change the underlying structural stitch count.
Info :
If you want more prominent negative space like the pictures, deepen the ch arches to ch7 on this round. Keep all squares uniform if you change the size of these arches.
Round 24 :
Work 2 rounds of even sc in Mid-Lilac to produce a square frame that will be used for join-as-you-go connections. In each corner work 3 sc to keep the corner bulk. Join and fasten off. After these rounds a typical square will measure approximately 6.5-8 inches depending on yarn and tension.
Info :
Make a sample square and measure it blocked. This will help you calculate how many squares are needed for your bed size. For example, a 7" square requires ~12 x 12 squares for a generous throw; a bedspread may require more depending on coverage.
— Joining Squares (Join-As-You-Go or Sew) :
Round 25 :
Decide whether to join-as-you-go (JAYG) or make all squares then sew. For JAYG: place two squares with right side facing and, with Mid-Lilac, attach with sl st through back loop only of finished frame and front loop of new square to create a flat seam. Work across one side placing sl sts into each sc to connect. Repeat to join more squares into a row. Use this method to build rows and then join rows together.
Info :
JAYG yields the neatest join with minimal bulk. If sewing later, use a yarn needle and mattress stitch with mid-lilac into the final frame round to make seams invisible. Pin each square alignment carefully to keep centers aligned.
Round 26 :
If sewing separately: With yarn needle and Mid-Lilac, line up squares right sides together and whip or mattress stitch through corresponding stitch posts on the solidity frames (two to three stitches per corner) until row is complete. After each seam, press flat with light steam while blocking to set join.
Round 27 :
When joining rows, start one row at a time and keep tension of the joining yarn even—too tight will pucker the blanket, too loose will leave gaps. Aim for a seam that is slightly firmer than blanket fabric but not tight. Join all squares into panels no larger than 6 x 6 squares before assembling full spread to keep handling manageable.
Info :
Mark the center and corners of the full blanket layout before joining so you can track pattern repeat and color distribution. Use blocking to square partial panels if needed before final assembly.
Round 28 :
After completing join rows, work a single round of Mid-Lilac sc around the entire joined panel to unify the seams. Where seams meet at intersections work (sc, ch1, sc) to create little open stars that echo the motif centers in the photos. Join and fasten off.
Info :
This unifying round makes the joined grid look like a single continuous piece rather than many separate squares, and the ch1 corners at intersections create a small visual hole consistent with the pictured bedspread.
— Central Panel Bands and Reinforcement :
Round 29 :
With Deep Lavender, work 3 rounds of hdc evenly across the whole assembled panel to create a slightly raised cross-band grid between square seams. Work evenly across seams; the hdc ridges will read as shallow ribs. These rounds produce a raised crossband that adds structured drape. Join after each round.
Info :
These hdc rounds help bedspread drape neatly and hide seam edges. If your finished blanket is large, work these rounds on panels before final assembly to keep even tension.
Round 30 :
Switch to Soft Cream and work 1 round of sc to tidy the hdc bands. Place three sc in each corner to maintain square corners. Join and fasten off.
Info :
At this stage your spread is assembled. Lay it flat and check for any large gaps. If you see holes at joins, reinforce with several mattress stitch passes or add small decorative closures like tiny bobble stitches to pull edges together subtly.
— Outer Border Rounds (Work Around Entire Assembled Panel) :
Round 31 :
With Mid-Lilac, join yarn at any outer corner. Ch1, work 3 sc into corner, then sc evenly along side into each stitch and seam post including around the edges; in corner work (3 sc, ch3, 3 sc). Work all four sides. Join. This creates a substantial outer frame. If required, adjust the number of sc between corners so sides are even. If your panel width has N stitches across, total = N + corner extras.
Round 32 :
Ch2, 1 hdc in each sc across; in corner ch-3 work (hdc, ch3, hdc) to keep corners flexible. Join. This builds height for shell rounds to come. Work two rounds of hdc if you prefer a sturdier border base.
Info :
Maintain even number of stitches along every side. If needed, add an extra hdc in a few places to distribute stitches evenly; the visual line will be straighter if sides have the same stitch count as each other.
Round 33 :
Change to Soft Cream. Work a shell round: *skip 2 sts, 5 dc in next st, skip 2 sts, sc in next* repeat across the side, in corner put (sc, ch3, 5 dc, ch3, sc). Join. This makes a wide scallop suggestion used later for the edge detail.
Round 34 :
Mid-Lilac. Ch1, sc in each st and into shell posts to secure shell edges. In corner posts work 3 sc to maintain square. Join. This tidies shellwork and readies shaped edging.
Round 35 :
Deep Lavender. To add layered scallops, *in each shell from Round 33 work (ch3, 3 dc, ch3) anchored into the center stitch of the shell; sl st into next sc to move on.* Repeat across sides and in corners maintain (3 dc ch3 3 dc). Join.
Info :
These contrasting scallop layers offer the visual pop seen along the skirted edge of the bedspread in the photos. Adjust scallop depth by adding dc clusters if you want larger waves.
Round 36 :
Soft Cream. Work one round of sc across edge to step the transitional color for the final decorative scalloped finishing rounds. Join and fasten off deep lavender if not used further.
Round 37 :
Work decorative picot loops in Mid-Lilac around the edge: *ch4, sl st into 3rd ch from hook (picot), sc in next 3 sts* repeat around to create little points. Join. This creates a delicate beaded edge that echoes the center petal shapes.
Info :
Try the picot round on a sample corner to ensure the picots sit flat; adjust chain length if your yarn/pattern causes curling.
Round 38 :
Final scallop (Soft Cream): *In each mid-side area work (sc, ch2, 7 dc, ch2, sc) in selected stitch to form a large scallop; space scallops so they occur roughly every 10 stitches along each side. In each corner work (sc, ch3, 9 dc, ch3, sc) for a larger corner scallop. Join and fasten off.*
Round 39 :
Weave in all ends and perform a gentle light blocking. Use pins to shape scallops and petals, steam lightly and leave to dry to maintain shape.
Info :
Blocking is essential for this pattern to produce smooth square edges and to flatten the base so the 3D petals sit naturally. Do not over-stretch when blocking.
— Decorative Accent Rows (Optional Rows to Increase Bed Coverage) :
Round 40 :
If you need to increase size between motif panels, work a repeated pattern of mesh bands across the assembled spread: With Mid-Lilac ch4 and dc clusters to create lattice bands; repeat this for as many rows as needed to reach desired dimensions. Example band: ch3, 3 dc in next sp, ch3, skip 3, sc; repeat across the edge and join at ends. Work 3-6 such bands spaced with sc rounds to taste.
Info :
These bands are useful when you want to add inches to width or length without making additional motifs. Use color swaps to create subtle stripes or set off the central motif grid.
— Detailed Technique Info :
Info :
Puff stitch technique: Yarn over, insert hook in stitch, yarn over, pull up a loop; repeat 3-4 times in same stitch (for this pattern 3-4 loops is comfortable), yarn over and pull through all loops on hook, ch1 to close puff. Keep tension loose enough to allow the puff to be fluffy but not so loose that it gaps.
Info :
Working petals on top of the base round: Always anchor clusters into spaces (ch-sps) rather than individual stitches to keep petals uniform and avoid changing stitch counts of base rounds. This strategy lets you build surface texture while keeping the structural foundation identical for joining squares.
Info :
Color changes: Carrying a color inside the square frame is possible but will add bulk. I recommend fastening off and rejoining for color changes on surface petal rounds for a cleaner look and to keep edges flat.
Info :
Gauge & sizing: One finished blocked motif measures approximately 7 inches square with DK/light-worsted yarn and 4.0 mm hook. Adjust hook size to get the square you want; document your personal gauge and multiply to determine how many squares you will need to cover a bed surface.
— Assembly and Finishing :
Round 41 :
After joining panels and completing border, steam-block entire blanket. Pin scalloped edge snugly to form the even scalloped shape. Allow to cool completely to set the stitches. This final block ensures the blanket drapes elegantly across a bed and the scallops are even along the perimeter.
Info :
Consider adding a lightweight backing (cotton muslin) to the underside if you want a warmer, less open blanket. Basting the backing to the wrong side with large stitches keeps it removable and washable.
Round 42 :
Optional: Decorative corner flowers. To match the photos' extra corner decorations, work a small 8-petal motif and sew it to each corner of the assembled blanket. Use the same petal pattern but in mini version: make magic ring, ch3 + 5 dc (6), inc rounds to 24 then one petal round worked into ch-2 spaces and secure. Sew into corners with matching yarn.
Info :
Secure all seams and weave ends at least 2-3 inches into the work. For a professional finish, use yarn the same color as the frame round when sewing seams to hide joins.
Round 43 :
Final inspection: Lay the spread on a flat surface, inspect seamline for any missing joins or loose loops, and use a small crochet hook to tidy small gaps by pulling through a few stitches. Trim loose ends after weaving in securely.
Info :
For laundering, prefer gentle hand wash or delicate machine cycle in a laundry bag, and air dry flat to maintain shape and avoid stretching the scalloped edge.
Assembly Instructions
- Assemble squares into rows first, working join-as-you-go or mattress stitch seams; align petals and frames so color distribution is balanced across the spread
- After rows are complete, join rows together the same way: work from the center out or from one edge to another to keep tension even; pin seams before final sewing
- Attach the outer border by working rounds in the same color sequence shown starting from Round 31, placing 3 sc in each corner to keep corners square and even
- Work outer scalloped rounds last, pinning scallops to a blocking board for even spacing; steam set the scallops gently and let cool before unpinning
- Weave in all yarn tails by threading them through several rows of stitches on the wrong side; trim close to the fabric for a neat finish
- If adding sewn corner flowers, place them symmetrically and baste in place, then sew using small secure stitches through several underlying rounds to avoid detaching
Important Notes
- 💡Use stitch markers at the first stitch of each round and at corner starting points to prevent counting mistakes
- 💡Stuff petals lightly with finger shaping when necessary to keep them softly raised and avoid flattening during blocking
- 💡When joining squares, maintain even tension; too tight joins will pucker the blanket and too loose joins will gap
- 💡Block each motif gently and consistently so that all squares are the same size before final assembly
- 💡Carry color carefully (or fasten off) to avoid added bulk inside the frame rounds which can make seams lumpy
- 💡Work joining and border rounds on small panels if the full blanket is too large to handle comfortably
- 💡Keep a note of the number of stitches per side after the square frame rounds so you can replicate exact counts for each square
- 💡Test the final scallop on a small sample to ensure it lies flat; adjust chain counts if scallops curl
This layered lavender blooms bedspread brings a calm, floral elegance to any bedroom. Each square is a little work of art, and putting them together becomes a relaxing, meditative process. The 3D petals and scalloped border give an heirloom look while remaining practical and washable. I hope you enjoy every stitch of this project—it's the kind of pattern that invites you to slow down and savor the handmade process. 🧶💜
What is the finished size of this bedspread?
Finished size depends on square size and number of squares. With a 7" blocked square, a 12x12 layout yields approximately 84" x 84" (a generous throw). Adjust squares and layout for different bed sizes.
Can I use different yarn weights for this pattern?
Yes—switching yarn weight will change the finished square size and the overall coverage. Use a hook 1-2 sizes smaller than yarn recommendation for a firm fabric. Make a gauge square and calculate how many motifs you will need accordingly.
Do I need to join-as-you-go or can I sew squares?
Both methods work. JAYG creates a flatter seam and is faster for many crocheters; sewing gives more control over alignment. Choose based on comfort; the pattern provides notes for both methods.
How much yarn will I need in total?
Yarn requirements vary by bed size. For a queen/king bedspread, expect to use roughly 2000-3000g total across all colors. Smaller throws will need proportionally less; make a single square and weigh it to estimate total yarn needed per square then multiply by number of squares plus border yardage.
How do I keep petals from flipping up or flattening?
Work petal clusters with slightly looser tension than the base round and shape them with your fingers. Light steam blocking helps set the petals. If needed, tack the underside of petals to the base using small blind stitches to keep them in place.
Can kids use this bedspread?
This bedspread uses surface petals and openwork; if making for children, ensure yarn is machine washable and secure all ends. Avoid decorative accessories that could be pulled off. Embellishments should be sewn tightly or omitted for durability.
How do I prevent color bleeding when washing?
Pre-wash small skeins of colorfast yarn if concerned, or wash the finished blanket on a gentle, cold cycle with mild detergent. Air dry flat to preserve shape and scalloped edging.
What if my stitch count is off?
If a square has an incorrect stitch count, it is best to undo to the round where the count was correct and fix the mistake. Using markers at corners and counting frequently helps prevent this. For minor differences, you can distribute extra sc evenly on the side to compensate.
Stay in the Loop!
Get notified when we release new free crochet patterns and join our crafting community!