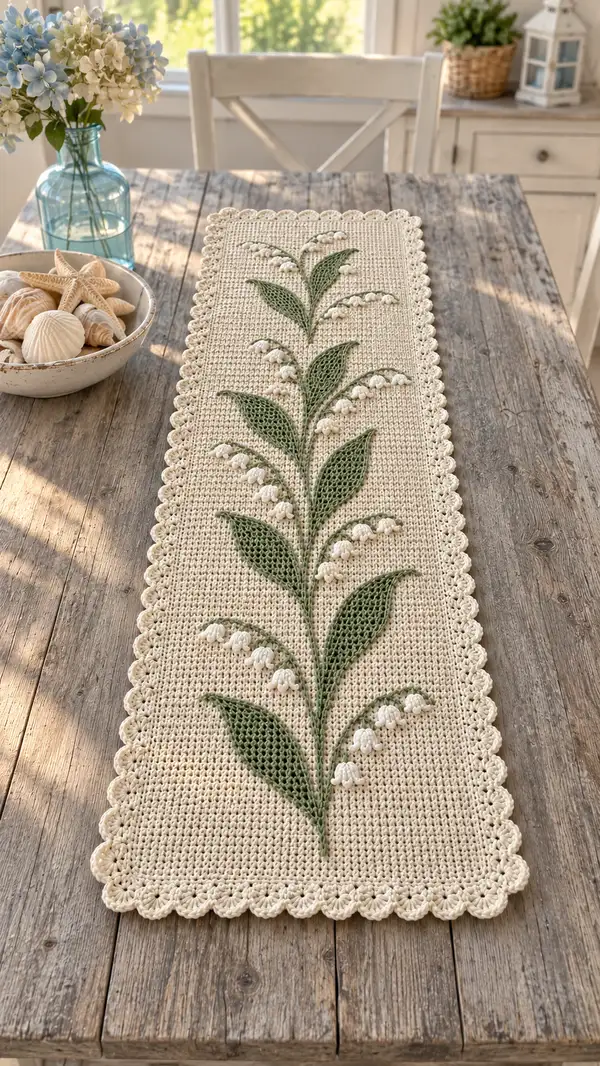
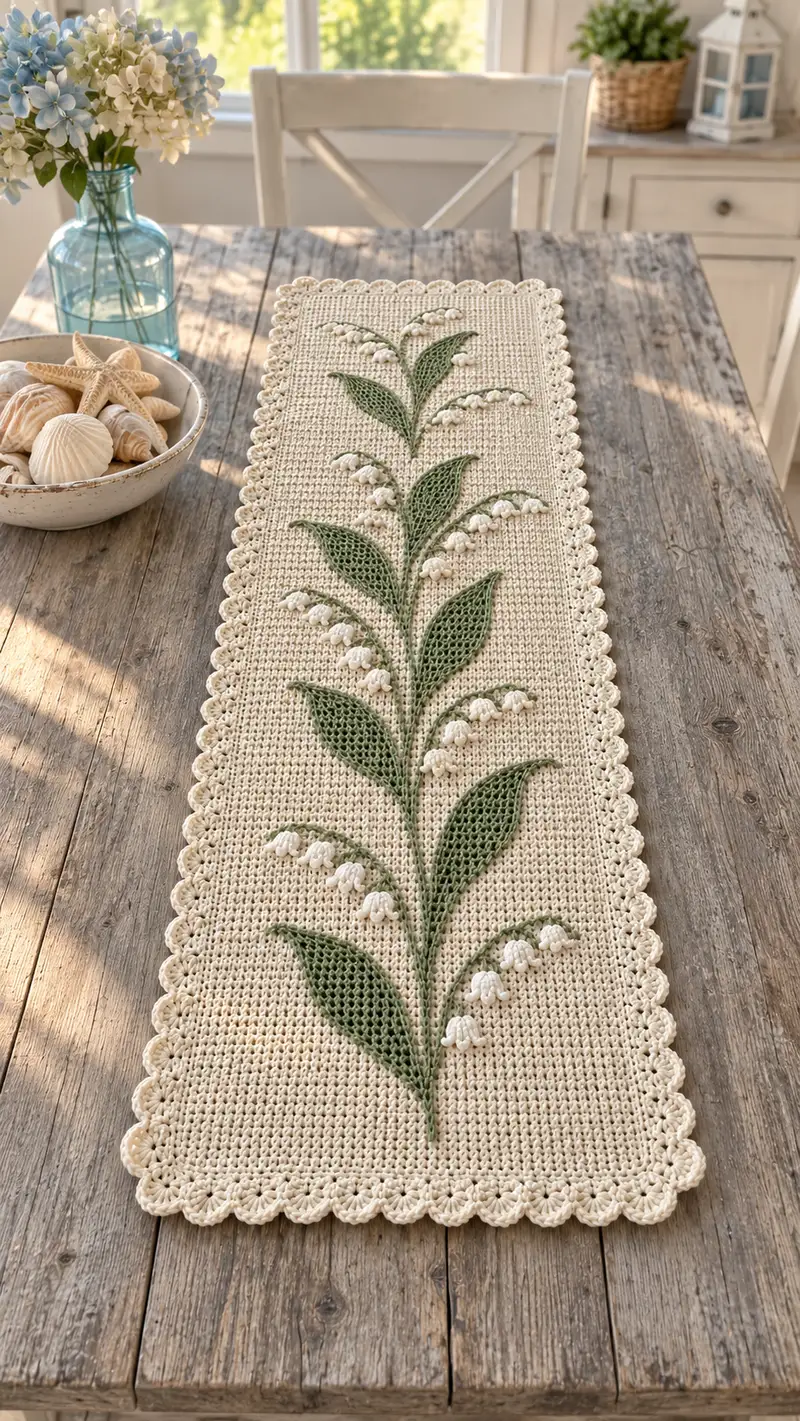
A delicate spring table runner featuring a central Lily of the Valley vine appliqued onto a warm cream crochet ground. The runner has openwork green leaves, tiny bell-shaped white flowers, and a pretty scalloped edge. Worked flat for the panel with appliqued stems, this piece adds a light, vintage-inspired touch to farmhouse and coastal tabletops.
Progress Tracker
0% Complete
— Notes & Gauge :
Info :
Gauge is not critical for appearance, but consistent tension matters for width and border fit. Using 4.0mm hook with worsted cotton, you should get roughly 18 sc = 4" across. Finished runner in photos measures approximately 13" wide by 48" long. Adjust foundation chain and number of rows if you want a different size.
Info :
This pattern works in two stages: 1) the rectangular base panel worked flat in rows of sc; 2) appliques made separately (leaves, stems and bell flowers) sewn on and then a scalloped border crocheted around the entire rectangle. Work panels with even tension and block before attaching appliques.
— Base Panel :
Materials :
Using cream worsted cotton and 4.0mm hook. Foundation chain will be 121 ch to produce 120 sc across (adjust multiple of 6 for border shells). Final width after blocking ~13" (adjust chain for desired width).
Round 1 :
Ch 121, sc in 2nd ch from hook and in each ch across (120)
Info :
Turn at the end of each row. Count stitches every 10 rows to ensure no accidental increases or decreases. Place a marker at the first stitch of each row if necessary.
Round 2 :
Ch 1, turn, sc in each st across (120)
Round 3 :
Ch 1, turn, sc in each st across (120)
Round 4 :
Ch 1, turn, sc in each st across (120)
Round 5 :
Ch 1, turn, sc in each st across (120)
Info :
Check your edge tension: if sides pull in, try a slightly larger hook for the base or work the first and last st of every row more loosely. Correct edge tension early to keep sides straight.
Round 6 :
Ch 1, turn, sc in each st across (120)
Round 7 :
Ch 1, turn, sc in each st across (120)
Round 8 :
Ch 1, turn, sc in each st across (120)
Round 9 :
Ch 1, turn, sc in each st across (120)
Round 10 :
Ch 1, turn, sc in each st across (120)
Info :
At this point you have established the fabric. Block the panel lightly to square it and ease any curling before continuing to the full length. This helps when placing appliques later.
Round 11 :
Ch 1, turn, sc in each st across (120)
Round 12 :
Ch 1, turn, sc in each st across (120)
Round 13 :
Ch 1, turn, sc in each st across (120)
Round 14 :
Ch 1, turn, sc in each st across (120)
Round 15 :
Ch 1, turn, sc in each st across (120)
Info :
Measure progress: Aim for a final length of approx 48" (122 cm) by completing about 80–90 rows depending on yarn and tension. In this pattern we will work 80 rows for the photographed size, then adjust with extra rows if you prefer longer.
Round 16 :
Ch 1, turn, sc in each st across (120)
Round 17 :
Ch 1, turn, sc in each st across (120)
Round 18 :
Ch 1, turn, sc in each st across (120)
Round 19 :
Ch 1, turn, sc in each st across (120)
Round 20 :
Ch 1, turn, sc in each st across (120)
Info :
Optional texture: If you want a slightly taller texture for the background, substitute every 10th row with hdc across. Do this symmetrically to avoid an obvious banding effect.
Round 21 :
Ch 1, turn, sc in each st across (120)
Round 22 :
Ch 1, turn, sc in each st across (120)
Round 23 :
Ch 1, turn, sc in each st across (120)
Round 24 :
Ch 1, turn, sc in each st across (120)
Round 25 :
Ch 1, turn, sc in each st across (120)
Info :
Mark the center line of the runner: fold lengthwise and place a removable marker or pin at the center stitches and rows. This will be your guideline for placing the center stem of the Lily of the Valley motif.
Round 26 :
Ch 1, turn, sc in each st across (120)
Round 27 :
Ch 1, turn, sc in each st across (120)
Round 28 :
Ch 1, turn, sc in each st across (120)
Round 29 :
Ch 1, turn, sc in each st across (120)
Round 30 :
Ch 1, turn, sc in each st across (120)
Info :
Stop and count rows: after round 30 you should be approximately 18" in length depending on stitch size. For the pictured design, continue to 80 rows total before completing base panel.
Round 31 :
Ch 1, turn, sc in each st across (120)
Round 32 :
Ch 1, turn, sc in each st across (120)
Round 33 :
Ch 1, turn, sc in each st across (120)
Round 34 :
Ch 1, turn, sc in each st across (120)
Round 35 :
Ch 1, turn, sc in each st across (120)
Info :
If you prefer a looser, more drapey base allow one hook size larger and reduce rows until you reach desired length. Remember the applique sits on top; large gauge changes will alter visual proportions.
Round 36 :
Ch 1, turn, sc in each st across (120)
Round 37 :
Ch 1, turn, sc in each st across (120)
Round 38 :
Ch 1, turn, sc in each st across (120)
Round 39 :
Ch 1, turn, sc in each st across (120)
Round 40 :
Ch 1, turn, sc in each st across (120)
Info :
When you reach about 40 rows, you should decide the vertical placement of motif segments: the vine in the photo is centered lengthwise and travels from near one short end to the other with even spacing for leaves. Sketch or mark where each large leaf will be placed (approx every 10 rows in our layout).
Round 41 :
Ch 1, turn, sc in each st across (120)
Round 42 :
Ch 1, turn, sc in each st across (120)
Round 43 :
Ch 1, turn, sc in each st across (120)
Round 44 :
Ch 1, turn, sc in each st across (120)
Round 45 :
Ch 1, turn, sc in each st across (120)
Info :
For a longer runner, continue to 90-100 rows. For the photographed size we will stop at Round 80 and finish the base before applique. If you stop earlier, remember to adjust applique placement proportionally.
Round 46 :
Ch 1, turn, sc in each st across (120)
Round 47 :
Ch 1, turn, sc in each st across (120)
Round 48 :
Ch 1, turn, sc in each st across (120)
Round 49 :
Ch 1, turn, sc in each st across (120)
Round 50 :
Ch 1, turn, sc in each st across (120)
Info :
Halfway through the length, re-check centering marks. Place a contrasting stitch marker at the center stitch of several rows to guide stem placement later when sewing the vine.
Round 51 :
Ch 1, turn, sc in each st across (120)
Round 52 :
Ch 1, turn, sc in each st across (120)
Round 53 :
Ch 1, turn, sc in each st across (120)
Round 54 :
Ch 1, turn, sc in each st across (120)
Round 55 :
Ch 1, turn, sc in each st across (120)
Info :
When base panel is complete (we stop at Round 80 for the sample), fasten off leaving a long tail for the first border round, or leave attached if you prefer to start border directly from the working yarn.
Round 56 :
Ch 1, turn, sc in each st across (120)
Round 57 :
Ch 1, turn, sc in each st across (120)
Round 58 :
Ch 1, turn, sc in each st across (120)
Round 59 :
Ch 1, turn, sc in each st across (120)
Round 60 :
Ch 1, turn, sc in each st across (120)
Round 61-80 :
Ch 1, turn, sc in each st across (120) — continue rows until you reach round 80 (120)
Info :
Fasten off and block the panel well. Pin to a rectangular shape and steam or wet block as appropriate for your yarn to square the runner before applique. Allow to dry fully.
— Lily of the Valley Stem (Surface Stem & Cord) :
Info :
We will create a long central stem using a braided chain or a surface-crocheted cord to match the central line on the photo. This cord will be sewn or surface-crocheted to the centerline of the panel.
Round 1 :
Using green yarn and 3.5mm hook, ch 60 (or measure to match panel center length from near one short end to the other, adjust ch accordingly)
Round 2 :
Sl st in 2nd ch from hook and each ch across to create a tidy cord. Fasten off leaving long tail for sewing. (60 sl st)
Info :
Alternatively, make an I-cord with a small double-ended crochet hook or create a chain-stitched row and twist into a rope. Aim for a cord thickness that sits slightly raised above the base panel so leaves and bells can be sewn around it.
Round 3 :
Lay the cord along the centerline of the blocked panel. Pin in place with rust-proof pins. The cord should be anchored at both ends and where leaves attach.
Info :
Sew the cord using mattress or whip stitch with the long tail so the seam is invisible on the front. Keep stitches small and neat. This becomes the backbone for leaf and bell placement.
— Large Leaves (Make 6) :
Info :
Each large leaf is worked flat in green yarn (use 3.5mm for crisp edges). The shape is an elongated pointed leaf with open lattice center created by alternating dc and ch spaces to echo the photo's airy look.
Leaf 1 — Round 1 :
Ch 14, sc in 2nd ch from hook, sc across to last ch (12 sc), turn (12)
Leaf 1 — Round 2 :
Ch 1, sc in next 2 sts, (hdc in next, dc in next, ch 3, sk 2, dc in next, hdc in next), sc in last 2 sts — shaping begins (12)
Leaf 1 — Round 3 :
Ch 1, turn, sc in first 2, sc in next, dc in ch-3 sp, ch 3, dc in same ch-3 sp, sc in next, sc in last 2 (12)
Leaf 1 — Round 4 :
Ch 1, turn, sc in each st making slight increase at center point: sc, sc, (hdc, dc, ch 3, dc, hdc), sc, sc (12)
Info :
These instructions create a center mesh by forming ch-3 arches in the middle. Keep edges neat; a stitch in the outer edge every row secures the profile and prevents flaring.
Leaf 1 — Round 5 :
Repeat Round 3 shaping, elongating the central mesh by adding an extra dc on each side of the ch-3 in even rows. (12)
Leaf 1 — Round 6 :
Repeat Round 4; at the tip, work 2 sc together to create a pointed end then reverse to work back along opposite edge so the leaf is symmetrical (12)
Info :
Work leaf as a symmetrical flat piece: after reaching tip, continue working back along the opposite edge of foundation chain to complete the leaf with matching stitch count. Count rows to make both sides even.
Leaf 1 — Round 7-12 :
Continue alternating mesh row and edge sc rows until leaf length measures approx 6-8" (total rows 12-14 including turning). Fasten off leaving a long tail for sewing. (12)
Info :
Make 6 leaves of varying lengths: two large (~8"), two medium (~6"), two small (~4.5"). Block each leaf to shape and open the mesh. Make sure all leaves are consistent in edge stitch counts for even sewing.
— Small Leaves (Make 4) :
Round 1 :
Ch 10, sc in 2nd ch from hook and across (9)
Round 2 :
Ch 1, turn, sc in 3, hdc, dc, hdc, sc in last 3 (9)
Round 3 :
Ch 1, turn, sc 2, dc in center, sc 2 (9)
Round 4 :
Sc evenly around both edges across previous chain to close leaf and shape tip. Fasten off leaving long tail. (9)
Info :
These small leaves fill spaces near mid- and top-vine areas for a natural staggered look. Block flat before sewing on to preserve shape.
— Bell Flowers (Make 22 small bells) :
Info :
Each bell is a small cluster worked in white with a tighter hook if needed to get defined bell shapes. We use puff or popcorn stitches to create the rounded bell look seen in the photo.
Bell — Round 1 :
Using white and 3.5mm hook, make a magic ring, ch 1, 6 sc into ring, pull tight (6)
Bell — Round 2 :
Ch 1, (inc) x 6 (12)
Bell — Round 3 :
Ch 1, *pop stitch in next st: (yo, insert hook, yo pull loop through, repeat 4 times to gather 5 loops, yo and pull through all loops, ch 1 to close pop), sc in next st* — repeat around for 6 pop clusters (12 total cluster points)
Bell — Round 4 :
Ch 1, sc in each st around to stabilize clusters. Fasten off leaving a long tail for sewing. (12)
Info :
Make between 18–24 bells for the full runner depending on spacing preferences. Bells can also be made using 3-d small tulip stitches; experiment to match your desired fullness. Keep tension firm so bells hold their shape.
— Small Stem Sprigs (Make 6) :
Round 1 :
With green yarn and 3.5mm hook, ch 8, sl st back across to create a thin sprig cord (8)
Round 2 :
Fasten off leaving tail for sewing. Make 6 sprigs of varying lengths to connect bells to main cord.
Info :
Sew small bells to each sprig by threading bell tail through sprig tip and securing with several small stitches. This creates the arcing rows of bells attached to each main leaf cluster.
— Placement & Sewing Appliques :
Info :
Lay the blocked base on a flat surface. Using your center marker, align the long green cord (Round 2 above) along the center. Pin cord in place. Refer to photo and these placement guides for leaf and bell positions.
Placement Guide :
From the short end nearest you, place a large leaf starting between rows 6–10 angled slightly. Move upward along the cord placing alternating leaves at approximately rows 16, 28, 40, 52 and 64 for a total of six large leaves. Insert small leaves between those main leaves around rows 22, 34, 46 and 58. Place bell sprigs along the cord on the side of the leaves that faces outward (see image), spacing 6–10 stitches apart along the cord.
Info :
Use pins to hold each piece temporarily and step back to evaluate balance. Once satisfied, sew each applique with long tails and a matching color yarn using small stitches along the leaf perimeter and through the cord for secure attachment. We recommend using a thin tapestry needle and a doubled yarn tail for strength.
Sewing Steps :
1. Anchor cord first with an invisible ladder stitch at three points (both short ends and center). 2. Sew leaves along base edge to cord and directly to the panel at outer edges using small whip or mattress stitches. 3. Attach bell sprigs and individual bell flowers by stitching the long tail through the sprig then through the base panel to hide knots on the back.
Info :
Keep stitches small and close to the work to avoid visible seaming on the right side. For extra security, sew through the panel to the wrong side and back through a few times before knotting and weaving in the tail.
— Decorative Veins & Surface Embroidery :
Round 1 :
With darker green yarn, embroider a single surface chain or stem stitch along the center of each leaf to create a vein. Use a thin needle and small stitches to follow the mesh opening in leaf patterns.
Info :
Surface stitching adds realism. For openwork leaves you can stitch into FLOs of the leaf edges or use small running stitches through the mesh. Keep tension light to avoid puckering.
— Scalloped Border (Worked Around Entire Rectangle) :
Info :
Before starting border, ensure panel is blocked and all appliques are securely sewn. Work border with cream yarn to match background, using 4.0mm hook for smooth join. Because our base was worked in rows, count the number of stitches on the long edge (120 across width) and the number of rows on the sides (80 rows). You will work even sc around with corner increases and then a shell round for scallops.
Round 1 :
Attach cream yarn at one corner with sl st, ch 1, work sc evenly along the first long edge into the sides of stitches (approx 120 sts), work 3 sc into corner row end to turn, sc evenly along short side (approx 80 sts), 3 sc into next corner, sc along opposite long side (120 sts), 3 sc into corner, sc along last short side (80 sts), 3 sc into final corner. Join with sl st to first sc. (Total sts ≈ 2*(120+80)+12)
Info :
Distribute sc evenly on the sides by working sc into the turning chain rows (count each row edge as one stitch). Adjust slightly if necessary so shells fall in visually pleasing spots. Keep corner increases uniform (3 sc) to avoid puckering.
Round 2 :
Ch 1, sc in each st around, placing 3 sc in each corner sc from previous round. Join with sl st. (Same total stitches as Round 1)
Round 3 :
Ch 1, *sk 2 sc, in next sc work (5 dc, ch 1, 5 dc) — this forms a larger decorative shell; sk 2 sc, sc in next sc* — rep around for scalloped motif. When working across corners, work shell centered over corner set of 3 sc to keep scallop balanced. Join with sl st to first sc.
Info :
If the scallop spacing doesn't align at the end, adjust by replacing one shell with a smaller shell (3 dc, ch 1, 3 dc) to fit exactly. Keeping shells consistent will give a neat frame to your runner.
Round 4 :
Ch 1, sl st into each dc of shell to create a framed shell, or (optional) work a picot between each shell for a lacy finished look: *(sc in top of shell, ch 3, sl st in 3rd ch) in each shell top* rep around. Fasten off and weave ends. (Final scallop edge complete.)
Info :
Block border gently with pins following the scallop curve to set the shape. Steam-light blocking is typically sufficient for cotton yarn. Allow to dry fully before laying the runner on table to prevent distortion.
— Final Touches :
Info :
Weave in all tails carefully to the wrong side. Trim ends and check all sewn points for security. Optionally add a small layer of fabric glue on hidden seam ends for extra hold, especially if the runner will be washed often.
Care :
Hand wash or machine wash on gentle cycle with mild detergent; reshape and lay flat to dry. Avoid high heat in dryer which can shrink or distort cotton pieces.
Info :
Optionally add subtle blush or tea-dye aging to the bell clusters for a vintage look, or leave crisp white for fresh spring styling. Small embroidery or beads may be added sparingly, but avoid heavy embellishments if the runner will see frequent use.
This Lily of the Valley table runner is a lovely blend of simple stitches and decorative applique that creates a timeless spring centerpiece. Each element — the airy green leaves, tiny white bells, and scalloped border — comes together to make a charming, handmade accent. The pattern is adaptable and rewarding, perfect for gifting or brightening your own table. Enjoy the meditative rhythm of the rows and the satisfaction of attaching each delicate bell. 🌿🌼