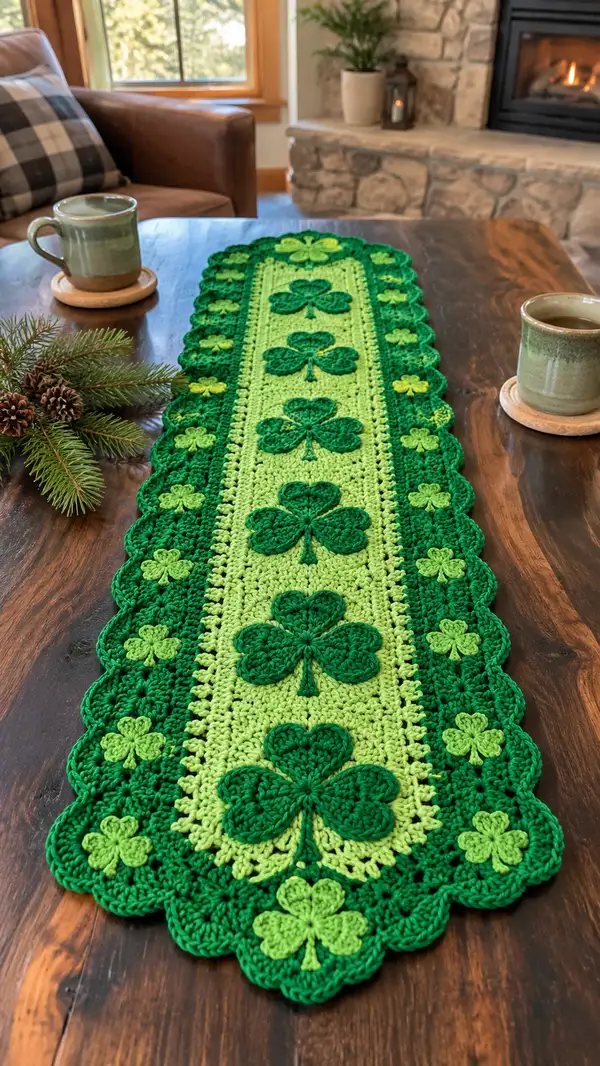
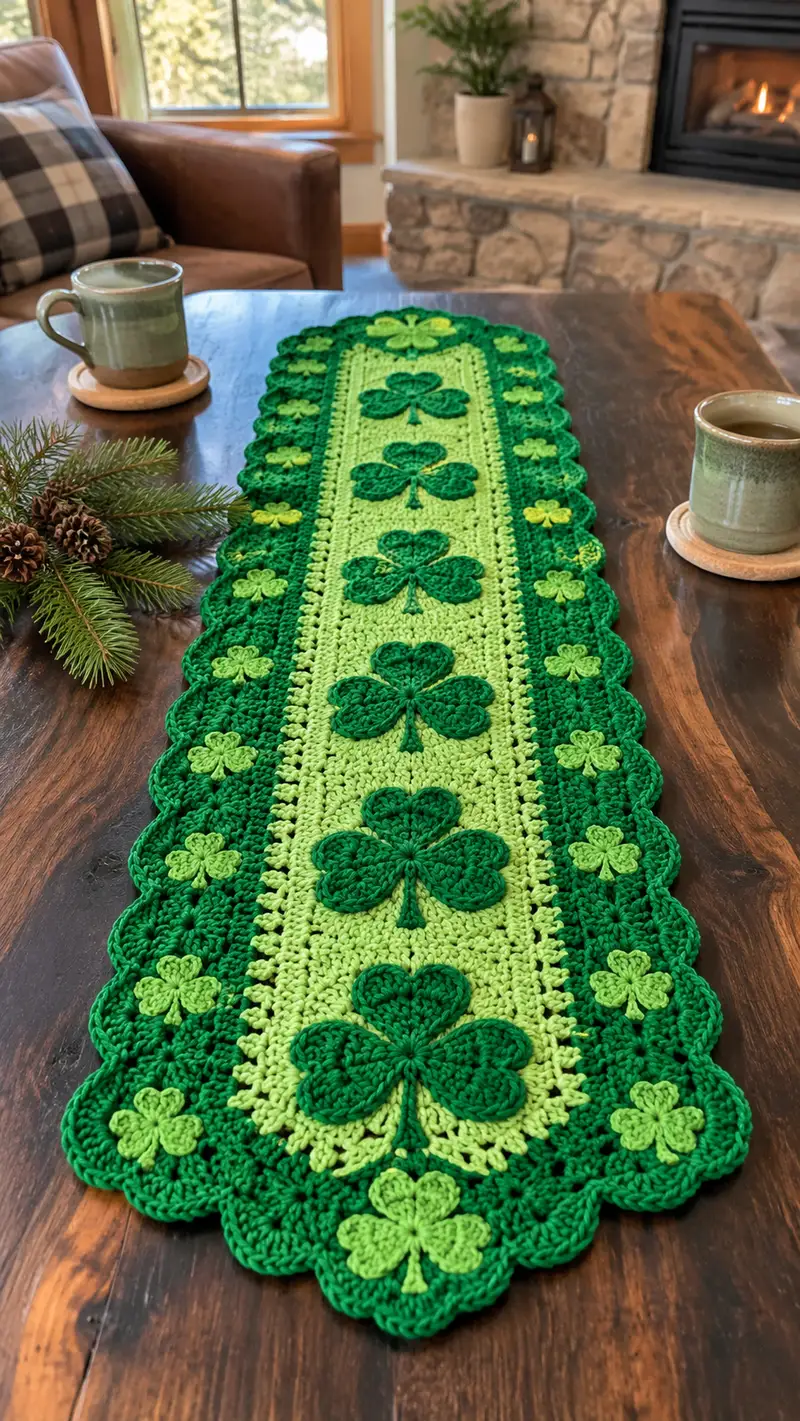
This festive table runner features bold shamrock appliques in two shades of green set against a light green center panel with an ornate scalloped border. It's a long decorative runner designed for seasonal or St. Patrick's Day decor, combining solid crochet stitches, textured shamrock motifs, and a lacy scalloped edge for a polished finish. The project is made in worsted-weight cotton yarn and works up into a sturdy, flat piece that lays nicely on dining tables, sideboards, or mantels.
Progress Tracker
0% Complete
— Notes & Construction Overview :
Info :
This table runner is worked modularly: first create the rectangular center panel in light lime green, then crochet all shamrock appliques (large and small) in medium and dark greens, create the side panels in medium green, then join panels and add the scalloped outer edging in dark green. Blocking and flat assembly ensures sharp edges and correct applique placement. Measurements provided assume worsted weight cotton and a 4.0mm hook; gauge is not strict but affects final size.
Info :
Finished approximate measurements: Width 10.5" (27 cm) center strip, overall width 13.5" (34 cm) after side panels and edging. Length approximately 36" (92 cm) with five large shamrocks spaced evenly. Adjust number of rows or repeats to lengthen or shorten the runner.
— Center Panel (Light Lime Green) :
Round 1 :
Foundation chain 61 (this creates a center panel width of roughly 10.5" using worsted cotton) - ch1, sc in 2nd ch from hook and in each ch across (60 sc)
Info :
We will refer to rows as rounds for consistency. Place a stitch marker at the first stitch of each row/round. The center panel is worked flat in rows, joined with simple edges to later join side panels.
Round 2 :
Ch1, turn, sc in each st across (60)
Round 3 :
Ch1, turn, sc in each st across (60)
Round 4 :
Ch1, turn, sc in each st across (60)
Round 5 :
Ch1, turn, sc in each st across (60)
Info :
For a smoother texture, you can work Round 2-5 in hdc instead of sc. Hdc gives a slightly taller fabric but the stitch count will remain the same. Check that edges are square by counting your first and last stitches each row.
Round 6 :
Ch1, turn, sc in each st across (60)
Round 7 :
Ch1, turn, sc in each st across (60)
Round 8 :
Ch1, turn, sc in each st across (60)
Round 9 :
Ch1, turn, sc in each st across (60)
Round 10 :
Ch1, turn, sc in each st across (60)
Info :
Begin placing markers for the centers of where the large shamrocks will sit. You will place five centers along the length. Use the following layout: center the first large shamrock at row 6 from the beginning, then every 6 rows (rows 6,12,18,24,30) depending on how long your runner is. Adjust spacing if you change length.
Round 11 :
Ch1, turn, sc in each st across (60)
Round 12 :
Ch1, turn, sc in each st across (60)
Round 13 :
Ch1, turn, sc in each st across (60)
Round 14 :
Ch1, turn, sc in each st across (60)
Round 15 :
Ch1, turn, sc in each st across (60)
Info :
If you prefer an inset textured panel, work Round 11-15 in FLO (front loops only) to create a subtle ridge down the panel for visual interest.
Round 16 :
Ch1, turn, sc in each st across (60)
Round 17 :
Ch1, turn, sc in each st across (60)
Round 18 :
Ch1, turn, sc in each st across (60)
Round 19 :
Ch1, turn, sc in each st across (60)
Round 20 :
Ch1, turn, sc in each st across (60)
Info :
At this point the center panel should be long enough to accept three central shamrocks; continue to Row 30 if planning five large shamrocks. Remember that each sh amrock center uses 6 rows of height when placed with spacing as above.
Round 21 :
Ch1, turn, sc in each st across (60)
Round 22 :
Ch1, turn, sc in each st across (60)
Round 23 :
Ch1, turn, sc in each st across (60)
Round 24 :
Ch1, turn, sc in each st across (60)
Round 25 :
Ch1, turn, sc in each st across (60)
Info :
If your runner is longer than pictured, continue repeating rows in the same stitch for every 6 rows and continue placing additional shamrock centers evenly along the length. The center panel remains the same width throughout.
Round 26 :
Ch1, turn, sc in each st across (60)
Round 27 :
Ch1, turn, sc in each st across (60)
Round 28 :
Ch1, turn, sc in each st across (60)
Round 29 :
Ch1, turn, sc in each st across (60)
Round 30 :
Ch1, turn, sc in each st across (60)
Info :
Fasten off leaving a long tail for sewing. Block the center panel flat to the desired dimensions before attaching appliques. Blocking will help even out stitches and make applique placement precise.
— Large Shamrock Applique (Make 5) (Dark Green) :
Round 1 :
Make mr, ch2 (counts as first dc), 11 dc into ring, pull ring tight and join with sl st to top of ch2 (12 dc) (12)
Round 2 :
Ch2, (2 dc in next st) x 12 around, join with sl st to top of ch2 (24) (Note: this rounds up petals base, creating a denser circle)
Round 3 :
Ch1, sc in same st, ch3, sk 1, sc in next st, *(sc, ch3, sk1, sc) repeat around* to create 12 ch-3 loops, join with sl st (24 sc loops)
Info :
These ch-3 loops form the base for three larger heart petals. We will work clusters into every 4th loop to form each heart shape. Mark the loop that will start the first petal — this becomes one of the three lobes of the shamrock.
Round 4 :
Working into the marked loop (petal 1 base): sl st into loop, ch1, *(2 tr, ch2, 2 tr) in same loop to form a heart-lobe cluster; sl st to next 3rd loop for shaping*, repeat this cluster pattern so you create three equally spaced clusters around the circle (3 heart lobes total)
Round 5 :
Ch1, around each cluster make 6 sc to define the lobe: into spaces next to the lobes work (sc, sc, hdc, sc, sc, sc) to shape each heart petal edge, working evenly around all three petals (approx 18 sc total plus shaping stitches)
Round 6 :
Ch1, turn, sc evenly around the entire applique including between petals to create a smooth circular outline (approx 30 sc). Fasten off leaving long tail for sewing
Info :
After Round 6 the three heart lobes form the top of the shamrock. We will now add a small center gathering and a stem. Block each shamrock flat and shape the heart lobes carefully with pins to exaggerate the heart points before sewing to the panel.
Round 7 :
Rejoin yarn at center between two lobes, ch1, sc in next 6 sts around to reinforce center area and add density where the lobes meet (6 sc)
Round 8 :
Ch1, sc2tog between the junction of petals twice to slightly tuck the petals inward and accentuate the heart shapes (reduces some bulk, approx 4-5 sc remain)
Info :
Stem: Using the same dark green yarn, attach at the bottom center junction and chain 9, sc back along chain to form a flat stem. Slip stitch into the base of the center to secure. You may work two rows of sc along the stem for a thicker, raised stem look.
Round 9 :
Attach yarn at bottom center, ch9, sc in 2nd ch from hook and across back to base (8 sc), fasten off leaving long tail for sewing (stem length approx 1"; adjust length if desired)
Round 10 :
Optional surface detail: Using contrasting light green thread, embroider a surface vein on each heart lobe with a single straight satin stitch from the center outwards, 2-3 stitches per lobe for subtle highlight
Info :
Blocking note: After stitching the stem and optional embroidery, pin the shamrock flat and mist with water. Let dry completely. Blocking ensures the applique lays flat and the lobes are shaped properly before sewing to the panel.
— Small Shamrock Applique (Make 18) (Medium Green) :
Round 1 :
Make mr, ch2, 6 dc into ring, pull ring tight, join with sl st to top of ch2 (6)
Round 2 :
Ch1, sc in same st, ch3, sl st to next dc; repeat around to form 6 ch-3 loops (6)
Round 3 :
Into each loop make *(2 dc, ch1, 2 dc)* to form tiny heart petals around the ring. After working into all 6 loops you will have 6 tiny petals (approx 24 dc total)
Round 4 :
Ch1, sl st between petals to tidy joins, then sc around the base to smooth edges (approx 12 sc)
Round 5 :
Attach small stem: ch5, sc back across chain to base (4 sc), fasten off leaving tail for sewing
Info :
Small shamrocks are used to fill scallops along the outer border. Make several and block flat. Because they are small, keeping them flat while sewing is essential to avoid bunching the scalloped edge.
— Side Panel (Make 2, Medium Green) :
Round 1 :
Attach medium green to the right edge of the blocked center panel. Work evenly along the long edge by sc across the side of the center panel; make 60 sc along the long edge to match the 60 stitches of the center (60)
Round 2 :
Ch1, turn, sc in each st across (60)
Round 3 :
Ch1, turn, sc2tog, sc in next 6, sc2tog, sc in next 36, sc2tog, sc in next 6, sc2tog (56) - create gentle taper to shape side panel so that it blends into scalloped edge
Round 4 :
Ch1, turn, sc in each st across (56)
Round 5 :
Ch1, turn, (sc in next 4, inc) x 10 + sc in remaining 6 to widen slightly for scallop base (66)
Info :
The shaping rounds are subtle to contour the panel into the scalloped shell border. If you prefer straight sides, skip Round 3 and 5 and simply work even rows until side panels match the length of the center panel.
Round 6 :
Ch1, turn, sc in each st across (66)
Round 7 :
Ch1, turn, (hdc, dc, hdc) in first st to begin shell base, sc across next 6 sts, *(shell in next st, sc across next 6) repeat across until end*, finish with shell in last st to create scallop anchors (approx 10 shells)
Round 8 :
Ch1, turn, sc in each st across (approx 66) - this evens the base for the scallops
Round 9 :
Ch1, turn, (sc2tog) across twice near center as needed to even counts and reach final desired edge width (final count approx 64)
Round 10 :
Ch1, turn, sc across (64)
Info :
Work Rows 6-10 until the side panels match the exact length of the center panel. Keep the last row count even so scallops will sit centered on the panel's ends. Fasten off and block the side panels flat.
Round 11 :
Reattach yarn at corner and work 3 sc into corner to build a neat seam allowance for joining (3)
Round 12 :
Ch1, sc across joining side panel to center panel. Use whip stitch to create an invisible join if you prefer sewing rather than crocheting together (stitch counts vary by join technique).
Info :
Repeat symmetrical for the opposite side. Ensure you match row counts precisely during joining so the runner stays flat with no puckering. Blocking both pieces before joining is strongly recommended.
— Scalloped Outer Edge (Dark Green) :
Round 1 :
With dark green attached at a corner, sc evenly around entire runner edge working 3 sc in each corner to maintain a flat perimeter. Aim for a consistent count around (approx 220 sc total - this will vary slightly with your gauge; count carefully)
Round 2 :
Ch1, turn, *skip 2 sts, (5 dc) in next st, skip 2 sts, sl st into next st*, repeat around to form initial scallops. You will create one scallop for approximately every 6 stitches (approx 36 scallops around total)
Info :
Adjust the repeat so that the scallops fall evenly along the long sides and exactly three scallops sit on each short end center, this will provide symmetry for shamrock placement on the ends.
Round 3 :
Ch1, sl st into center of each 5-dc scallop, ch1, *(sc, picot, sc) in center dc to create a decorative point, sl st to next scallop center*, repeat around (36 points)
Round 4 :
Ch2, *(2 dc, ch2, 2 dc) into the center of every other scallop to create a deeper shell cluster, sl st to next scallop center*, repeat to accentuate alternate scallops (approx 18 clusters)
Info :
This layered scallop approach creates a textured border that reads as lacy from a distance. The picots give a crisp definition between scallops that pairs beautifully with the small shamrocks sewn into select scallop centers.
Round 5 :
Ch1, sc around all shell clusters to tidy edges and prepare anchor points for small shamrocks; sc in spaces between shells where small shamrocks will be sewn (approx 220 sc)
Round 6 :
Ch1, sl st around to even tension and finish the edge. Fasten off leaving long tail for weaving and sewing small shamrocks into place.
Info :
Before completely fastening off, pin the runner to a blocking board and set the scallops so every scallop is evenly shaped. Mist lightly and allow to dry. This sets the scallops and ensures consistent placement for small shamrocks.
— Attaching Small Shamrocks Into Scallops :
Round 1 :
Decide which scallops will receive small shamrocks — pictured layout alternates small shamrocks in every other scallop along each long side and centers a small shamrock in each scallop at the short ends (approx 18 small shamrocks total).
Round 2 :
Using long tail from each small shamrock, position it inside the scallop center, pin if necessary, then whip stitch around the base using matching yarn, taking care not to pull the scallop inward (6 secure stitches recommended per small applique).
Info :
Sew from behind the runner when possible so stitches are less visible on the front. If necessary, use a few invisible stitches on the outer edge of the small shamrock to anchor it without visible knots.
— Placement & Attaching Large Shamrocks (Center Panel) :
Round 1 :
Five large shamrocks are placed evenly along the center panel. Suggested row centers: rows 6, 12, 18, 24, 30 counted from the top of the panel. Use a ruler and stitch markers to mark the horizontal center of the panel and the exact row positions for each heart's vertical center.
Round 2 :
Pin each large shamrock flat on the panel with the stem pointing toward the same short end. Ensure equal spacing between each shamrock and that each lobe is centered on the panel width. Adjust placement before sewing.
Round 3 :
Sew each large shamrock with a long tail using a yarn needle and mattress or whip stitch around the dense base area, catching only a few strands of the panel fabric to avoid puckering. Sew the stems flat onto the center panel using small, even stitches along both sides of the stem.
Info :
For a raised, dimensional look, add a small ring of surface slip stitches around the base of each shamrock prior to sewing; then sew through the slip stitch row instead of through the body to get a neater edge.
— Final Finishing Touches :
Round 1 :
Weave in all tails generously. Use a yarn needle to weave each end through at least 2" of fabric before trimming to prevent unraveling after washing.
Round 2 :
Lightly block the entire runner, pinning scallops and shamrocks to their final positions. Gently steam or mist with water then allow to dry completely. This final step sets everything in place and flattens minor irregularities.
Round 3 :
Optional: Add a few hand-stitched surface veins on large shamrocks with slightly lighter yarn for a subtle highlight. Use a split-stitch or satin stitch for clean lines.
Info :
Care instructions: Hand wash cold or machine wash gentle in a laundry bag, reshape while damp, lay flat to dry. Avoid bleach. Cotton will soften slightly after washing but blocking helps re-shape scallops.
This Lucky Shamrock Table Runner brings seasonal charm and handmade warmth to any table setting. Each carefully blocked piece comes together into a striking green runner with dimensional shamrocks and a lacy scalloped border — a true conversation piece. I hope making it brings you as much joy as arranging it on your own table. 🧶🌿✨