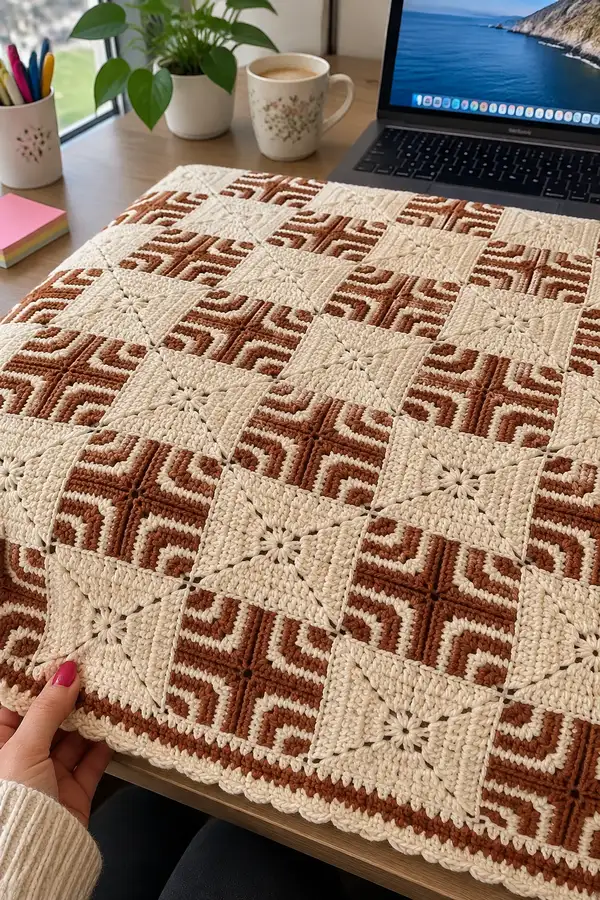
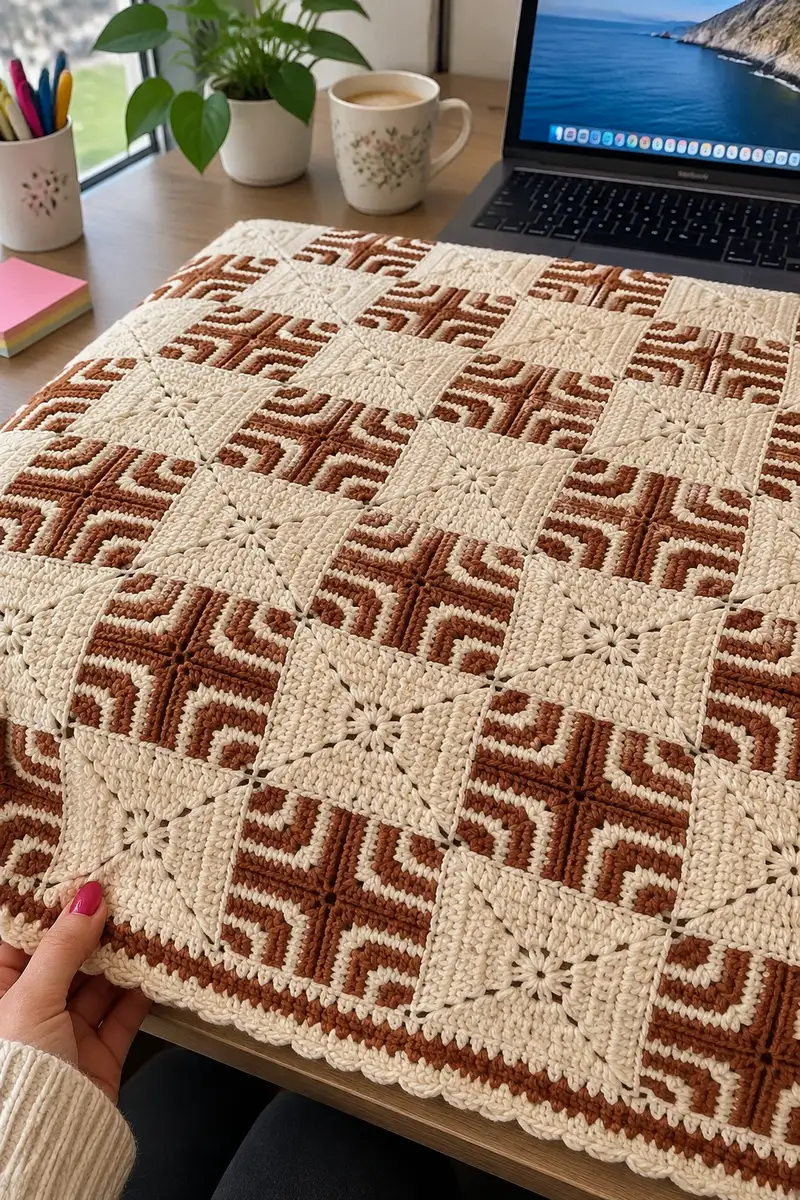
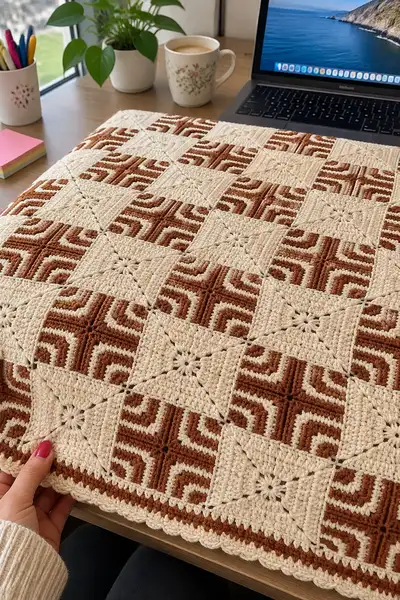
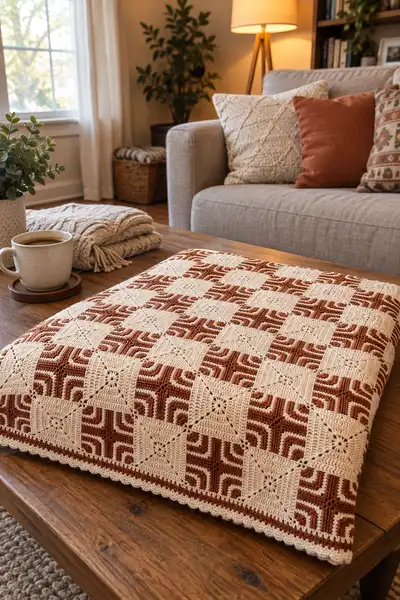
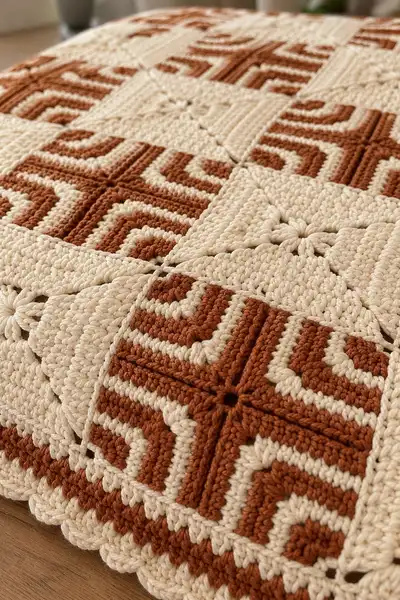
A warm, modern-aztec bedspread worked in alternating textured star squares and bold maze motif squares. This two-color throw uses cream and rusty terracotta tones with raised ridges and a delicate scalloped border for a handcrafted, vintage-modern look. The pattern is modular — make individual squares, join them in rows, and add a layered edge for a polished finish. Perfect for a bedroom centerpiece or a statement throw.
Progress Tracker
0% Complete
— Notes & Gauge :
Info :
This pattern is modular — each square is made individually and joined later. Gauge: one finished motif (square) = approx 12.5cm / 5in when worked to Round 18 with 4.5 mm hook and worsted weight yarn; adjust hook for matching gauge. Blocking lightly to square each motif improves the join and overall finished size.
Info :
Stitch abbreviations used: dc = double crochet, ch = chain, sl st = slip stitch, BLO / FLO for texture rows, puff = 3-loop puff made by yarn over/draw through 3 times and close. Use single crochet gauge when changing hook sizes to maintain consistent tension.
— Special Stitches & Techniques :
Info :
Puff Stitch: yarn over, insert hook, yarn over, pull up loop (3 loops on hook) — repeat 2 more times into same stitch (9 loops) then yarn over and pull through all 9 loops; ch1 to close puff if pattern requires. Front Post Double Crochet (FPDC): yarn over, insert hook from front to back to front around the post, yarn over and complete dc as usual. Back Post Double Crochet (BPDC) similar from back to front and back.
Info :
Working Corners: This square uses 4 corner spaces each round (ch2 corner space) worked as (dc, ch2, dc) in each corner, and even sides worked across with dc stitches. Each round increases by 8 dc total (2 additional dc at each corner expansion), so stitch count grows consistently and evenly — follow counts provided.
— Square A : Textured Star (Cream)
Round 1 :
mr, ch3 (counts as dc), (3 dc, ch2, 3 dc) into magic ring — repeat total x4, join with sl st to top ch3. (24 dc, 4 ch2 corners)
Round 2 :
ch3 (counts), work 1 dc in next 3 dc of each side, then in corner work (dc, ch2, dc) — effectively (4 dc, ch2, 4 dc) in each corner-side repeat x4; join. (32 dc)
Round 3 :
ch3, 1 dc in each of next 4 dc along side, corner (dc, ch2, dc) x4; join. (40 dc)
Round 4 :
ch3, 1 dc in next 5 dc, corner (dc, ch2, dc) x4; join. (48 dc)
Info :
Begin creating the textured star by introducing puff stitches centered on each side at Round 5. Use stitch markers to mark the center stitch of each side so puff placement remains even.
Round 5 :
ch3, work 1 dc in next 2 dc, puff in next st (see special stitch) — continue 1 dc in next 2 dc to finish side; corner (dc, ch2, dc) x4; join. (56 dc, 4 puffs)
Round 6 :
ch3, dc in each dc across until you reach the puff cluster; work dc around puff base to anchor (3 dc across puff area to create an elevated line), continue to corner (dc, ch2, dc) x4; join. (64 dc)
Round 7 :
ch2 (counts as hdc), hdc in next 7 sts across side smoothing into the raised area, corner (hdc, ch2, hdc) x4; join. (72 hdc)
Round 8 :
ch3, dc in next 8 dc across side, corner (dc, ch2, dc) x4; join. (80 dc)
Info :
Use FLO on Round 9 to create a crisp ridge that frames each quadrant of the star. This will read visually as a fine line separating the star points from the background.
Round 9 :
ch3, 1 dc in each st BLO across each side (the front loops remain for rounding) until corners; corner (dc, ch2, dc) x4; join. (88 dc)
Round 10 :
ch2, hdc in each st across to corner; (hdc, ch2, hdc) x4; join. (96 hdc)
Round 11 :
ch3, dc in next 11 sts across side maintaining stitch counts; corner (dc, ch2, dc) x4; join. (104 dc)
Info :
Round 11 is a good point to check the square measurements. If your square is growing faster or slower, adjust hook size for remaining rounds to match motif size with the aztec square counterpart.
Round 12 :
ch3, fpdc in next 2 sts, dc in next 7 sts, bpdc in next 2 sts to create a raised chevron toward the center; corner (dc, ch2, dc) x4; join. (112 total stitches)
Round 13 :
ch2, work 1 hdc in each st across each side, corner (hdc, ch2, hdc) x4; join. (120 hdc)
Round 14 :
ch3, 1 dc in next 13 sts, corner (dc, ch2, dc) x4; join. (128 dc)
Info :
Round 14 expands the side length to create the final reading area of the star. At this point the motif should measure close to the intended motif width used for this bedspread. Add blocking pins to true corners before continuing.
Round 15 :
ch3, dc in each st across but work every 4th st as a small cluster: (2 dc, ch1, 2 dc) to create a subtle texture band across each side; corner (dc, ch2, dc) x4; join. (136 dc with corner ch2s)
Round 16 :
ch2, hdc in each st across, corner (hdc, ch2, hdc) x4; join. (144 hdc)
Round 17 :
ch3, dc in each st across; join. (152 dc)
Info :
If using this motif as a bedspread square, stopping at Round 17-18 produces a nicely sized square for a multi-square layout. For a larger square continue rounds following the next two rounds and keep corner logic consistent: add 8 dc per round.
Round 18 :
ch3, dc across each st, corner (dc, ch2, dc) x4; join. (160 dc)
Round 19 :
ch2, hdc across to corner; (hdc, ch2, hdc) x4; join. (168 hdc)
Round 20 :
ch3, dc across in BLO to create framed ribs on the face across all four sides; corner (dc, ch2, dc) x4; join. (176 dc)
Info :
Fasten off if finishing motif here. We recommend making all motifs the same number of rounds for ease of joining. Leave a 25-30cm tail for joining if sewing, or finish tail and join-as-you-go at assembly.
— Square B : Modern Aztec Maze (Two-Color Terracotta & Cream)
Round 1 :
With Terracotta (TC): mr, ch3 (counts as dc), (3 dc, ch2, 3 dc) into mr — repeat x4; join. (24 dc)
Round 2 :
Change to Cream (CC) at end of round: ch3, dc in next 3 dc, corner (dc, ch2, dc) x4; join. (32 dc)
Round 3 :
CC: ch2, hdc in next 4 sts across, corner (hdc, ch2, hdc) x4; join. (40 hdc)
Info :
This motif uses short color strips on each side to create the aztec maze. We'll alternate colors in small groups of rounds (generally 1-2 rounds per color block) and use FLO/BLO to create raised ridges read as the pattern lines. Carry the unused color behind the work for short floats (max 6-8 stitches) or fasten off between color blocks if you prefer neater backs.
Round 4 :
CC: ch3, dc across until corner; corner (dc, ch2, dc) x4; join. (48 dc)
Round 5 :
Info :
Change to TC now to begin the inner maze stripes. Carry CC up the side or fasten off if floats would be too long.
Round 5 :
TC: ch3, FLO dc across first 6 stitches of each side (these will form raised stripes), then dc in remaining side sts; corner (dc, ch2, dc) x4; join. (56 dc)
Round 6 :
TC: ch3, dc across each st maintaining FLO from previous round by working normal dc; corner (dc, ch2, dc) x4; join. (64 dc)
Round 7 :
Info :
Change to CC to create contrast lines. The trick of the aztec maze is alternating narrow bands of color and using FPDC/BPDC to create dimensional ridges that read as lines from a distance.
Round 7 :
CC: ch3, dc in next 8 sts across each side but in the first 4 sts of each side work bpdc to create a recessed line; corner (dc, ch2, dc) x4; join. (72 dc)
Round 8 :
CC: ch2, hdc across to corner; (hdc, ch2, hdc) x4; join. (80 hdc)
Round 9 :
Info :
Return to TC to continue building the rounded corner maze. Work colorwork blocks in a consistent 2-round repeating rhythm: one textured round (FLO/BLO or FPDC/BPDC), then one smoothing round of dc to set the line.
Round 9 :
TC: ch3, fpdc in next 4 sts, dc in next 6 sts across each side; corner (dc, ch2, dc) x4; join. (88 dc)
Round 10 :
TC: ch3, dc in each st across; join. (96 dc)
Round 11 :
CC: ch3, dc in each st but work first 6 sts of each side in BLO to create a crisp shadow line; corner (dc, ch2, dc) x4; join. (104 dc)
Info :
By alternating where you place FPDC and BPDC and mixing FLO/BLO rounds, you can create the illusion of right-angle maze turns. Keep a small sample and test color placement to ensure the visual 'corner' shapes read correctly across the motif.
Round 12 :
CC: ch2, hdc across to corner; (hdc, ch2, hdc) x4; join. (112 hdc)
Round 13 :
TC: ch3, dc across but create short 2-st ridges in the interior: (4 dc, fpdc2tog across next 2 sts) repeat across side; corner (dc, ch2, dc) x4; join. (120 dc)
Round 14 :
TC: ch3, dc across each st smoothing out the ridges; corner (dc, ch2, dc) x4; join. (128 dc)
Round 15 :
CC: ch3, dc across each st maintaining the corner spaces; join. (136 dc)
Info :
If you want the maze squares to be slightly smaller or larger than the textured star squares, keep both motifs to the same round counts. For the bedspread shown, both motifs are worked to Round 18-20 for even size and a neat checkerboard assembly.
Round 16 :
CC: ch2, hdc across, corner (hdc, ch2, hdc) x4; join. (144 hdc)
Round 17 :
TC: ch3, FLO dc across first third of each side to form a corner band, then dc across remainder; corner (dc, ch2, dc) x4; join. (152 dc)
Round 18 :
TC: ch3, dc in each st; join. (160 dc)
Round 19 :
CC: ch3, dc in each st; join. (168 dc)
Round 20 :
Info :
Fasten off and weave in ends. Make the required number of Square A and Square B motifs — sample spread uses 8 x 8 grid = 64 motifs total alternating A/B for a queen-size bedspread. Adjust number of motifs to desired finished size.
— Assembly & Join-As-You-Go (JAYG) Method :
Info :
We recommend joining motifs as you complete final round to avoid a large pile of individual squares. The method below is a classic flat slip-stitch join with an option for mattress stitch. Join motifs in rows first then seam rows together for a flat join.
Round 1 :
Position: Place two completed motifs right sides together. With CC, align edges. Insert hook into corner ch2 space of motif A, join with sl st to corner ch2 of motif B, ch1; place 1 sc in first side stitch of A and insert hook into corresponding side stitch of B and sl st through both loops (sl st join) — continue across side placing sc/sl st pairs across each stitch until corner, finish corner by sl st through corner ch2 of both motifs. Repeat until row is joined. (This is a joining pass, no count given since per-motif vary)
Info :
Alternative: Mattress stitch with yarn needle gives an invisible join. Use long tail from final round to whipstitch from inside, pulling gently to close gap. Block row after joining for flat seams.
Round 2 :
Join rows: After making full rows of joined motifs, place two rows right sides together, align motifs and use same sl st pair method vertically down the seams to connect rows. For stronger join across bedspreads, sew additional anchoring passes at the center intersections with small whipstitches.
Round 3 :
Corner stability: at bedspread corners add an extra 2-3 small catch stitches through all layers on the diagonal to prevent corner flaring; these stitches should be hidden on the underside.
Info :
When joining, keep tension relaxed so the spread lies flat. If the spread begins to pucker, gently block and steam to relax joins, or loosen joining tension and re-sew last few seams.
— Border (worked around assembled bedspread)
Round 1 :
With CC, join in any corner ch2 space, ch1, 2 sc in corner ch2, work 1 sc in each seam and along motif sides all the way to next corner, working (2 sc, ch2, 2 sc) in each corner to keep corner square. Keep tension consistent. (Stitch count varies with number of motifs)
Round 2 :
ch3, dc in each sc around, work (dc, ch2, dc) in each corner; join. (This creates an even DC round framing the bedspread)
Round 3 :
Info :
Now we begin alternating ribbed rounds and decorative rounds. We'll work FLO/BLO rows to create striped ribs that echo the aztec motif and then add a scalloped fan edge for finishing. Use a 4.0 mm hook if you prefer a slightly tighter rim.
Round 3 :
Switch to TC: ch2, hdc in each st around in BLO to form a ribbed band. Corner (hdc, ch2, hdc). Join. (Rib round)
Round 4 :
CC: ch3, dc in each st around smoothing the rib; corner (dc, ch2, dc); join. (Smoothing round)
Round 5 :
TC: Repeat ribbed FLO round: ch2, hdc in each st in FLO around to create a raised stripe; join. (Rib count)
Round 6 :
CC: ch1, sc around entire edge for a neat frame; at corners work (sc, ch2, sc); join. (Framing sc)
Round 7 :
Info :
Scallop rounds: We'll build a 3-round scallop/fan border inspired by classic afghan edges to give a finished look similar to images. Work fans into groups of stitches with even spacing: 5 dc fan in every 3rd st, separated by sc in the next 2 sts to create crisp scallops.
Round 7 :
CC: ch3, *skip next 2 sc, (5 dc) in next st, skip next 2 sc, sc in next st* — repeat around; adjust final repeats for even scallops and work extra sc if needed to even spacing; join. (Scallop base)
Round 8 :
TC: Into center of each scallop work (ch2, 3 dc, ch2) to accentuate fans; join. (Accent round)
Round 9 :
CC: Finish edge with one more sc round around entire bedspread tipping into each fan gently with 1 sc to anchor; weave in ends. (Finishing sc)
Info :
Optional: Add a final picot edge: ch3, sl st into base to create tiny decorative points between scallops. This reads delicate at the bed edge and mirrors the handmade look in the photo.
— Optional Extra Border for Bed Skirt Look (10 Rounds)
Round 1 :
With CC join under edge, ch3, dc in each st across front side, working around corners as usual; join. (Start extra border)
Round 2 :
TC: ch2, hdc in each st in BLO around to create a ribbed vertical band that will give skirt-like drape; join.
Round 3 :
CC: ch3, dc in each st around; join.
Round 4 :
TC: ch1, sc around to firm edge; join.
Round 5 :
CC: ch3, *3 dc in same st, skip 3, sc in next* repeat around to create a spaced frill; join.
Round 6 :
TC: ch2, hdc in each st to even out frills; join.
Round 7 :
CC: ch3, dc around smoothing; join.
Round 8 :
TC: ch1, sc around including sc into top of each frill to anchor; join.
Round 9 :
CC: ch3, 1 dc in each st; join.
Round 10 :
Info :
Fasten off and weave ends for a skirted, slightly flared border. This extra border will add weight and visual depth along the bed sides and can be omitted for a flatter throw.
— Finishing :
Info :
Weave in all ends on the reverse side; lightly block the finished bedspread flat to square corners and even the border. If any joins are loose, go back with a yarn needle and add small reinforcing stitches behind the motif joins. Steam gently from the right side using a cloth if needed to relax fibers.
Info :
Label your work and note any color substitutions for future reproductions. Photograph sections as you go to document placement of color blocks if you plan to reproduce the same layout later.
Completing the Modern Aztec Bedspread is such a rewarding finish — the checkerboard of textured cream stars and terracotta maze squares creates a warm, tactile centerpiece for any bedroom. Each square builds satisfying texture and the scalloped edge adds a final elegant touch. Enjoy the meditative repetition and proud moment of draping this cozy heirloom over your bed. 🧶✨