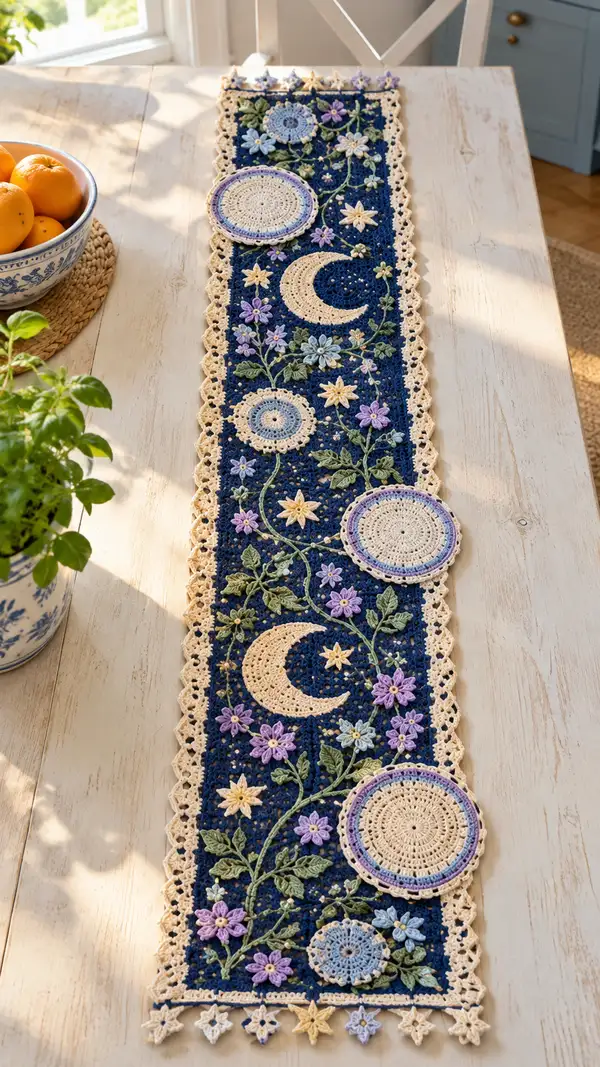
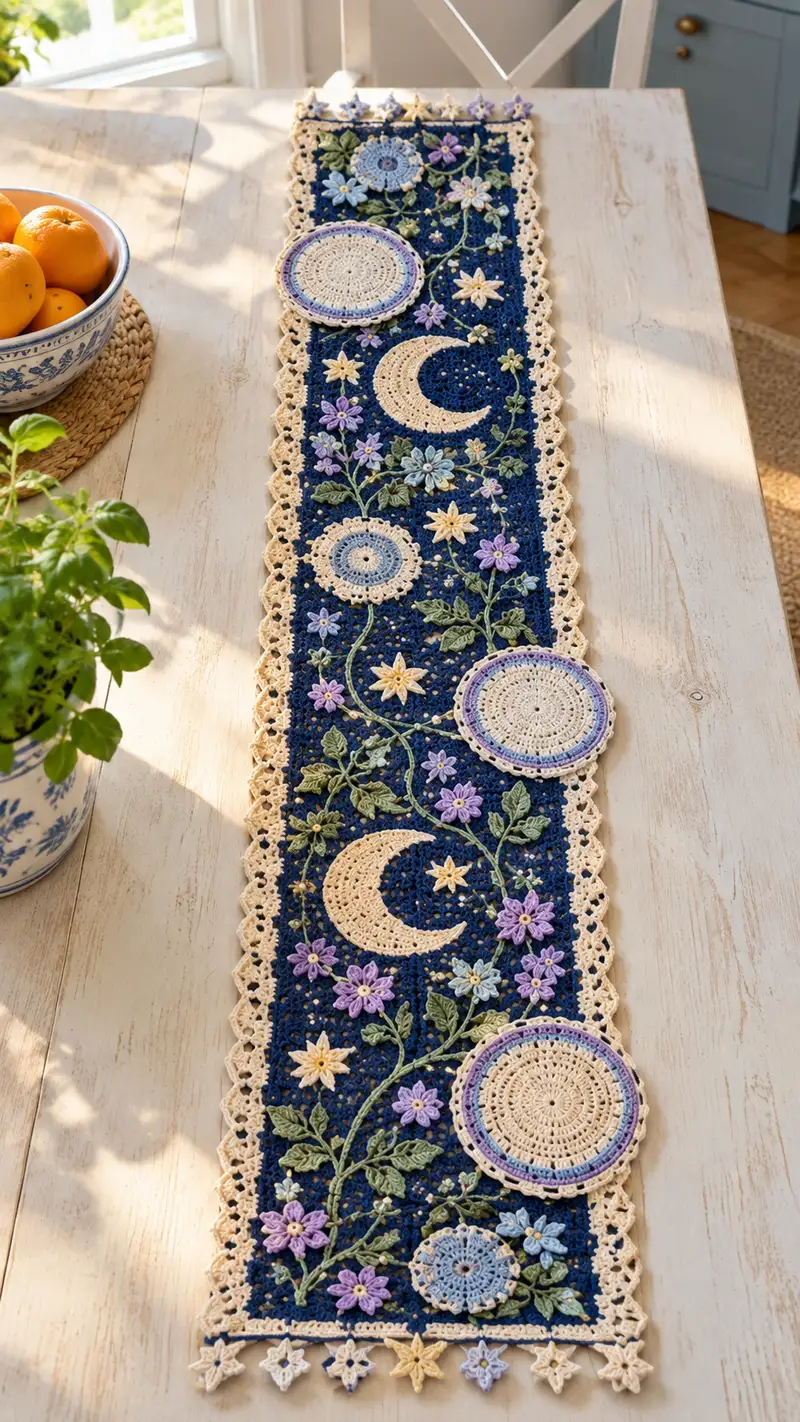
Bring a moonlit floral vignette to your table with this detailed Moonlit Garden Table Runner pattern. A deep navy lace panel is embroidered with crescent moons, layered medallions and delicate vines dotted with lilac and cream blossoms. Finished with a scalloped cream border and star fringe, this runner makes a dramatic centerpiece for dining and console tables. Step-by-step rounds, join-as-you-go instructions and decorative motif patterns are included for a beautiful heirloom result.
Progress Tracker
0% Complete
— Background Panel (Deep Navy Lace Ground) :
Round 1 :
Foundation: With deep navy, ch 101 (this forms the length foundation; alter in multiples of 10+1 for wider/narrower runner). Turn; row counts are described as 'rounds' for continuity with motifs.
Round 2 :
Row 1: Starting in 4th ch from hook, (counting the loop on the hook as ch) 1 dc in 4th ch, *ch2, sk 2 ch, 1 dc in next ch*; rep from * to * across to last 3 ch, ch1, 1 dc in last ch. Turn. (Approx. 50 dc spaces across)
Info :
Work this foundation tightly but not so tight that motifs will sit unevenly. Place a marker at the beginning corner for orientation.
Round 3 :
Row 2: Ch3 (counts as dc), 1 dc in same st, *ch2, sk next ch2 sp, 2 dc in next dc*; rep across to end, finishing with 2 dc in last st. Turn. (Maintain approx. 50 shell pairs)
Round 4 :
Row 3: Ch1, sc in first dc, *ch3, sk 2 dc, sc in center of next shell (between the two dc)*; rep across finishing with sc in final top of turning ch. Turn.
Round 5-8 :
Rows 4–7: Repeat Rows 2–4 twice more to establish a firm mesh base. Keep count so the panel stays rectangular and edges even. (Panel will be 4 shell rows deep at this point.)
Info :
These early mesh rows create the holes that will allow vine stems to weave across the panel. Keep the tension stable and block the panel after completing the mesh before applying motifs.
Round 9 :
Row 8: Ch3 (counts as dc), 1 dc in same st, *ch2, sk ch3 sp, 2 dc in next sc*; rep across. This tightens the mesh slightly and readies the surface for applique. Turn.
Round 10-16 :
Rows 9–15: Continue alternating the shell row and sc with ch3 spaces pattern as in Rounds 3–4 to reach a total of 15 shell-row heights along the length of the panel (adjust to desired runner length; aim for about 35–45 rows total for a long runner). At this point your panel should measure approximately the intended width with even mesh across.
Info :
Mark positions for medallions and moon motifs by counting rows from one end: place marks at approximately 1/6, 3/6, and 5/6 of the panel length for the three large medallions; crescent moons fall between medallion pairs. Use pins or contrasting thread to mark these centers.
Round 17 :
Row 16: Work an even row in pattern but begin to narrow the panel edges slightly for a delicate border join: ch1, sc in each st for 10 st, proceed mesh pattern across body, sc final 10 sts. This creates a stable band for joining the scalloped edge later.
Round 18-28 :
Rows 17–27: Continue even pattern across the entire panel maintaining the 10-stable edge on both sides. Work until your panel reaches the desired length between the pinned motif centers (approx. 28–32 rows of mesh after initial setup for a table runner similar to the image). Keep row counts consistent for symmetric placement.
Info :
Block this panel flat, pinning to exact final dimensions before moving to motifs. Proper blocking ensures accurate motif placement and ease of sewing/joining.
Round 29 :
Row 28: Repeat Round 17 to form the final stabilization band before edging; ch1, sc in each st across the first 10 sts, follow mesh pattern, sc last 10 sts.
Round 30 :
Row 29: Ch1, sc in each st across entire row (approx. equal stitch count to foundation width). Turn and fasten off if you prefer to edge later in cream; otherwise continue to edging section with cream yarn.
Info :
Keep the navy ground unadorned until motifs are blocked and ready. If you prefer join-as-you-go, leave loops available where motifs will be attached by leaving longer tails at marked centers.
— Large Circular Medallion (Make 3 — Layered Medallion with Contrast Rounds) :
Round 1 :
With cream yarn, mr, 8 dc in ring (8). Join with sl st to first dc. (This forms the small central ring)
Round 2 :
Ch3 (counts as dc), dc in same st, 2 dc in each dc around (16). Join. (16)
Round 3 :
Ch3, dc in same st, *1 dc in next st, 2 dc in next st* around (24). Join. (24)
Round 4 :
Ch2, hdc in same st, *1 hdc in each of next 2 sts, 2 hdc in next st* around (30). Join. (30)
Info :
Change to pale blue for round 5 if making the layered color ring as seen in image. Carry the cream end to weave in later or cut and fasten off as you prefer.
Round 5 :
With pale blue, ch3, dc in same st, *dc in each of next 3 sts, 2 dc in next st* around (36). Join. (36)
Round 6 :
With cream again, ch1, sc in same st, *ch3, sk 1 st, sc in next st* around to create decorative open-work (36 sc, 36 ch3 sps). Join. (36)
Round 7 :
Ch3, 2 dc in first ch3 sp, *ch1, 3 dc in next ch3 sp* around to form slight ruffled outer band. Join. (Approx. 12–18 shell groups depending on spacing)
Round 8 :
Switch to lilac or soft purple: Ch1, sc in same st, *ch5, sl st in next outer shell center*; rep around to create decorative picot-loop outer edge. Fasten off leaving tail for sewing. Block flat. (Decorative loop count equal to outer shells)
Info :
Make three of these medallions: two slightly smaller (omit Round 5 or use fewer increases) and one full-size as above. Block each medallion on a flat surface to open the lace and keep round shape before sewing them onto the panel.
— Small Round Doily (Small Circular Motif, Make 2–3) :
Round 1 :
With cream, mr, 6 sc in ring (6). Join. (6)
Round 2 :
Ch3, 2 dc in each sc around (12). Join. (12)
Round 3 :
Ch3, *dc in next st, 2 dc in next st* around (18). Join. (18)
Round 4 :
Ch1, sc in same st, *ch4, sc in next group* around to make airy loops. Join and fasten off; weave ends. Block slightly domed or flat depending on style.
Info :
These small doilies sit layered with medallions to echo the big circles in the image. Make 2–3 of different sizes by varying increase rounds to add depth.
— Crescent Moon Motif (Make 2) :
Round 1 :
With cream, mr, ch2, 8 hdc into ring (8). Do not join; work in continuous spiral for smooth shaping. (8)
Round 2 :
(1 hdc, inc) x 8 (12). (12)
Round 3 :
(2 hdc, inc) x 8 (16). (16)
Round 4 :
(3 hdc, inc) x 8 (20). (20)
Round 5 :
(4 hdc, inc) x 4, then hdc in next 8 sts, then (4 hdc, dec) x 2 to create a tapered edge (24). Shape is now a full circle; we will remove a wedge to make a crescent.
Round 6 :
Work 8 hdc across the wedge area, then fasten off leaving long tail. With tapestry needle, pull the wedge closed slightly to create an inner crescent curve; stitch to secure creating the crescent hollow. Adjust curvature to match photo—moon inner edge should be concave.
Info :
Blocking these moons slightly domed and pinching the inner edge while damp will help hold the crescent shape. Make two and sew them into the panel where marked.
— Vine & Stem (Long Chain with Surface Slip Stitching) :
Round 1 :
With leaf green, at first marked medallion lower edge, ch (length to reach next motif approx. 60–80 ch depending on spacing). Work a long chain as the main vine path. Fasten off if too long to hold comfortably.
Info :
We will couch this chain to the navy ground using surface slip stitches to make a raised vine. Pin chain in gentle S-shape across panel following photo layout before stitching.
Round 3 :
Re-attach green yarn at one end by inserting needle under mesh, sl st around chain every 4–6 ch to hold it. Use small, nearly invisible stitches on the reverse side to catch the chain without pulling it flat. Continue to pin and couch chain along the planned path.
Round 4-10 :
Work additional small branches: ch 6–12 then sl st back along chain to create offshoots; attach tiny leaves and flowers along these offshoots as you go. Make 6–10 vine lengths depending on desired lushness. Fasten off and weave in tails under the mesh.
Info :
Use a tapestry needle and an invisible couching stitch (tiny sl st anchored beneath the chain) to secure vines. Leave slight loops between couching points for softness and natural curve.
— Leaves (Make 20–30) :
Round 1 :
With leaf green, ch6. Row 1: sc in 2nd ch from hook, hdc in next, dc in next, 3 dc in last ch; rotate to work on opposite side of foundation chain: dc in next, hdc in next, sc in last. Sl st to first sc. (Leaf tip fan with symmetrical stitches) (Approx. 10–12 sts)
Round 2 :
Ch1, sc in each st around leaf working tightly to shape point. Sl st to join. Fasten off leaving tail for sewing.
Info :
Make leaves in two sizes by varying the foundation chain length: ch4 for small leaves (approx. 6–8 sts total) and ch8–10 for larger leaves (approx. 14–18 sts). Block leaves over a light shaping curve to mimic natural leaf veining.
Round 4 :
Sew leaves onto vine offshoots using the long tail and invisible whip or ladder stitch, spacing clusters of 2–4 leaves at intervals. Some leaves are worked directly into vine offshoot chains before couching for secure attachment.
— Small Layered Flower (Make 30–40) :
Round 1 :
With lilac, mr, ch2, work 8 hdc into ring (8). Join and fasten off. (8)
Round 2 :
Rejoin lilac to front of round, ch1, sc in same st, *ch4, sl st in next st* around to form 8 loops. Fasten off. (8 loops)
Round 3 :
Make the petal layer: With lilac or a lighter purple, attach to each loop: (sc, hdc, 2 dc, hdc, sc) into the ch4 loop. Rep around to make 8 petals. Fasten off leaving tail for sewing.
Round 4 :
Center: Sew a tiny cream disk (6 sc in mr, close) into center of each flower and add a picot or tiny bead for a center pop. Optionally add a small amount of fiberfill under centers to make flowers three-dimensional.
Info :
Vary petal counts and layering by changing foundation ring counts (9 or 10 hdc) for fuller flowers. Block each flower petal slightly to set the shape and then attach to panel following photo placement.
— Star Flower (Make 10–14) :
Round 1 :
With pale yellow, mr, ch3, 10 dc into ring; join. (10)
Round 2 :
Ch1, sc in same st, *ch5, sc in next st* around to create 10 loop points. Fasten off. (10 loops)
Round 3 :
Petals: Into each ch5 loop work (sl st, sc, hdc, dc, hdc, sc, sl st) to make pointed star rays. Fasten off and sew onto panel with small cream seed bead centers.
Info :
These star motifs are used both as surface decoration and as fringe elements at the runner ends. Make a few in alternate colors for variety.
— Attachment & Layering — Sewing Motifs to Panel :
Info :
Before attaching, fully block both the background panel and all motifs. Arrange medallions, moons, flowers, leaves and vines on the pinned panel following your marked centers. Check balance and negative space. Use safety pins or sewing pins to temporarily hold placement.
Round 2 :
Sew medallions: Using the long tail or matching thread, whipstitch the medallion back to the navy ground by stitching into the stabilization band and the mesh holes around the medallion perimeter. Use evenly spaced invisible stitches; do not over-tighten to avoid puckering. Place outermost large medallion above the lower end, the mid medallion centered, and the third toward the opposite end as in the image.
Round 3 :
Sew moons: Position crescent moons in the navy mesh where indicated. Sew the inner crescent curve so it tucks into the mesh holes; secure the outer curve with evenly spaced stitches so that the moon appears lightly appliqued, not glued flat.
Round 4 :
Attach vines by couching: With tapestry needle and thin green yarn, make small couching stitches every 4–6 chains to anchor vine. Add leaves and small flowers to vine offshoots by sewing through petal bases and vine foundation chain. Ensure leaves face outward for dimensional effect.
Info :
Sew small flowers on top of medallions and in vine clusters to create layered appearances. Use tiny beads or yarn picots for centers to mirror image details.
— Scalloped Side Border (Cream) :
Round 1 :
Join cream yarn to the stabilization band on one long side; ch1, sc evenly into the 10-st band across the length to create a firm edge (approx. same stitch count as foundation width). Turn and work along edge rows to form scallops.
Round 2 :
Ch4 (counts as tr), *sk 2 sts, 5 tr in next st, sk 2 sts, sl st in next st* repeat along edge to create a shell scallop every 6 sts. End with sl st to final sc. Fasten off and repeat on opposite long side and along both short ends (work to match spacing).
Info :
Work scallops with consistent stitch counts; if a shell does not line up at the end, adjust by spreading slightly across two sc or decreasing a shell group by one tr to maintain symmetry. Block scallops flat once complete.
— Star Fringe End Edging (Make 10–12 per end) :
Round 1 :
At each short end, count off points across the last stabilization row. For each point: attach cream yarn, ch4, sl st in 2nd ch from hook to create a small loop, ch6, picot (ch3 sl st in 3rd ch), ch6, join to base with sl st, then make star petal points by working into the loop: (sc, hdc, 2 dc, hdc, sc). Fasten off. Repeat across the end.
Round 2 :
Intersperse alternate color small stars: Make some stars in lilac, pale blue and pale yellow placed between cream stars so the fringe alternates colors as in the photo. Block the fringe carefully to maintain shape.
Info :
Attach fringe firmly to the final stabilization row. Use the long tail and weave through several mesh stitches on the reverse for stability. If using beads at star centers, sew beads on after assembly.
— Decorative Raised Stems and French Knot Centers :
Round 1 :
Using contrasting green, embroider additional raised stems with surface chain stitch (couching) to thicken any vine lines that look too flat after couching. Use a long tapestry needle and small sl st anchors to shape the raised line.
Round 2 :
For tiny flower centers, use yellow embroidery thread and make French knots or sew small beads into centers. Secure knots with a drop of fabric glue on the reverse for extra security if giving as a gift.
Info :
Take care not to pull embroidery too tight—raised stems should sit softly atop the lace ground for the natural garden look.
— Final Finishing Rounds & Blocking :
Round 1 :
Once all motifs are sewn, pin the entire runner to blocking mats to exact final dimensions and gently mist with water or blocking spray. Pin scallops and fringe points to uniform shape. Allow to dry completely.
Round 2 :
Weave in all tails on reverse side. If desired, add light spray starch to the motifs only to give a firmer hand while leaving the main ground flexible for table use.
Info :
Inspect all seams and attach additional reinforcement stitches if any motifs feel loose. Trim excess threads and secure loose ends with needle and matching yarn inside the mesh to hide them.
Completing this Moonlit Garden Table Runner is a truly rewarding experience—watching each medallion, moon and flower come together to create a lush, dimensional scene is pure joy. The contrast of deep navy with soft creams and lilacs gives the runner a timeless elegance that's perfect for special dinners or everyday charm. Block, finish and display it proudly—this piece will become a treasured centerpiece in any home. 🧶🌙✨