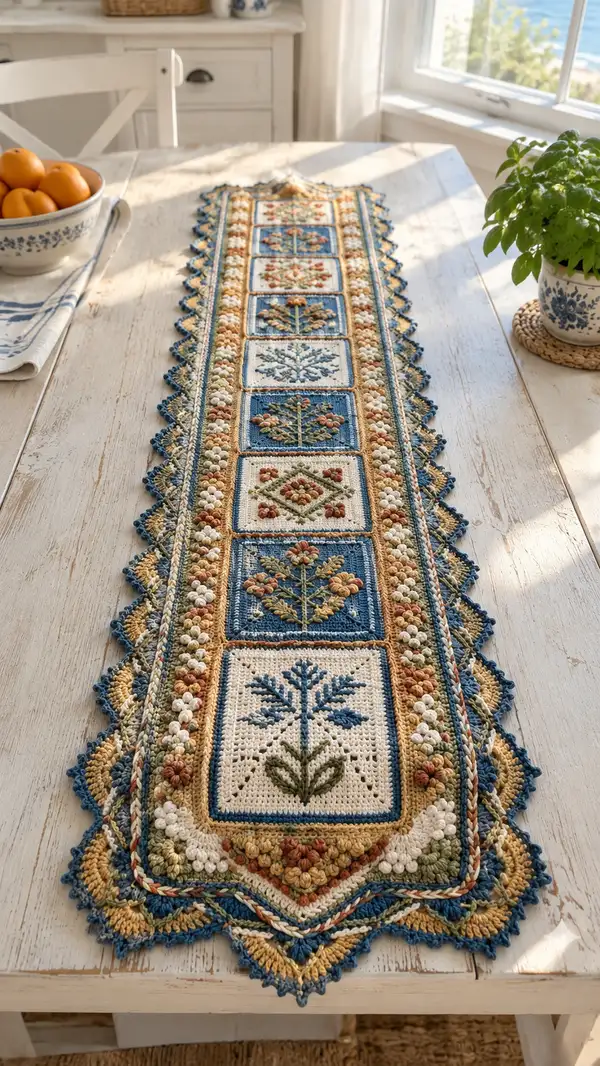
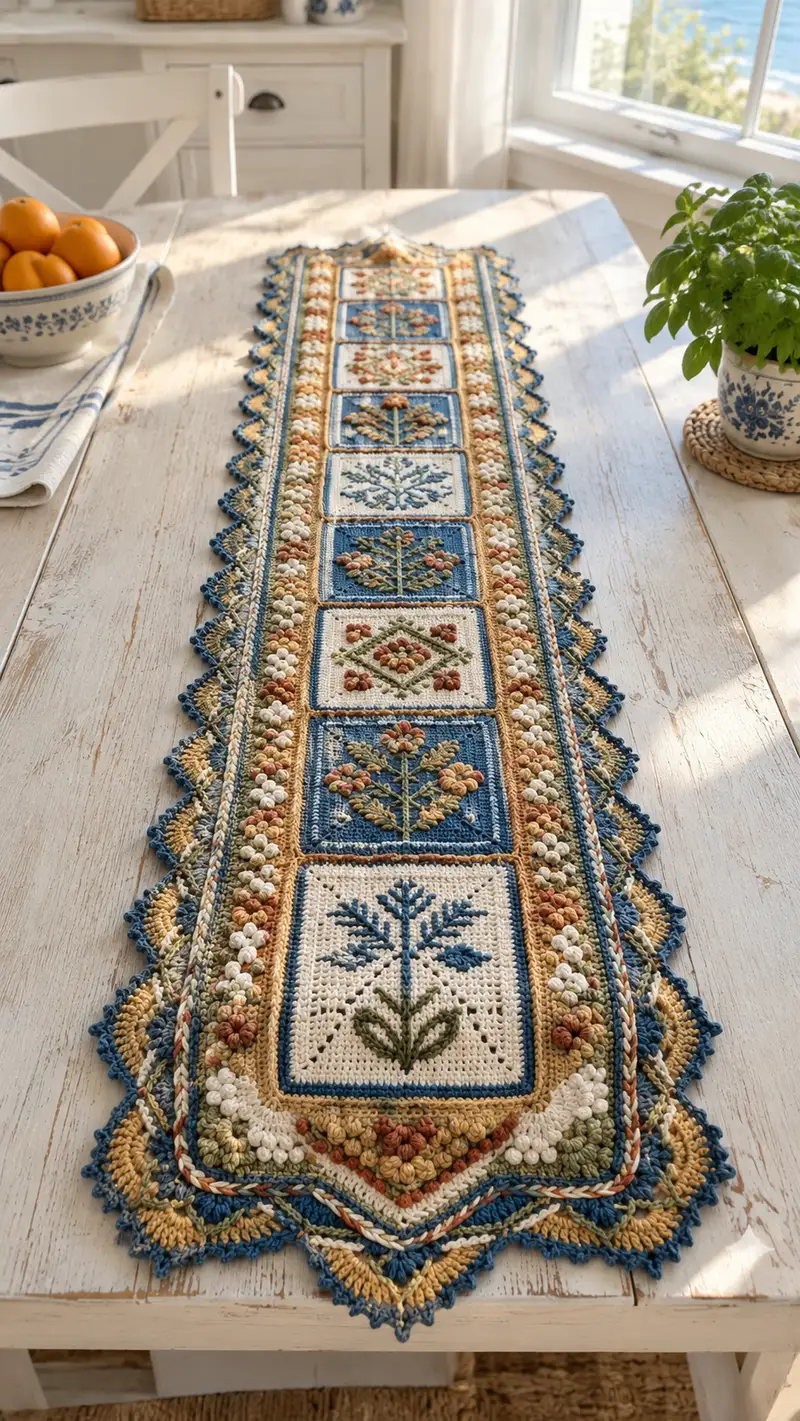
Create a charming vintage-style table runner built from embroidered-looking crochet squares, raised bobble bands, and a scalloped pointed border. This runner features alternating blue and cream floral motifs, soft gold and olive accents, and textured puff/popcorn stitches for a heirloom look. The pattern uses tapestry-style colorwork, bobble clusters, and a decorative braided edge to frame each square for a refined farmhouse aesthetic. Ideal for an elegant dining table or entry console.
Progress Tracker
0% Complete
— Notes & Gauge :
Info :
Gauge: 32 sts x 20 rows = 10cm (4in) in sc worked tightly with 3.5mm hook. Adjust hook if needed. Work tapestry color changes by carrying unused yarn along the top of the previous row, catching it with the working color every 6-8 sts to avoid long floats. All squares are worked in rows (counted as rounds for this pattern) and finished with a 1-round perimeter that creates a crisp framed edge for joining.
Info :
Terminology: In this pattern 'round' refers to a worked row across the square when turning at ends. Each square is a grid of 32 stitches across unless specified otherwise. All stitch counts provided reflect completed rows including turning ch counts where used.
— Motif Square (Blue Background - Flower) :
Round 1 :
Foundation chain 33 (counts as ch1 + 32 sc). Row 1: sc in 2nd ch from hook and in each ch across (32)
Round 2 :
Ch1, turn. Sc in each st across (32)
Round 3 :
Ch1, turn. Sc in each st across (32)
Round 4 :
Ch1, turn. Change to denim blue on final yarn over of last sc of previous row. Sc in each st across with denim blue (32)
Round 5 :
Ch1, turn. Sc in each st across in denim blue (32)
Round 6 :
Ch1, turn. Begin motif placement: sc in first 12 sts in denim blue, change to mustard gold and sc 8 sts, change back to denim blue sc last 12 sts (32)
Info :
Color changes: When changing color, finish the previous stitch to the last yo, then draw new color through. Carry unused colors along the row and catch them every 6-8 sts to secure floats.
Round 7 :
Ch1, turn. Sc across following charted motif: small flower center in rust terracotta centered on row (stitches 15-18) with olive green stem stitches beneath (32)
Round 8 :
Ch1, turn. Sc in denim blue across; work puff cluster at center: where chart indicates, make a 3-loop puff in rust (see special stitches) counting as 1 sc. Maintain total 32 by substituting 1 sc = 1 puff stitch placement
Round 9 :
Ch1, turn. Sc across in denim blue (32)
Round 10 :
Ch1, turn. Sc across; add two small single-stitch color changes for petals (mustard and rust) placed symmetrically around center (32)
Info :
Embroidery note: The raised stems and leaf veins are worked after the square is complete using surface slip-stitch or a simple embroidery using a yarn needle and stranded yarn. We'll include step-by-step surface instructions later.
Round 11 :
Ch1, turn. Sc across in denim blue (32)
Round 12 :
Ch1, turn. Sc across; create two small bobble clusters on either side of the motif using 3dc pop stitches (each counted as 1 st) — place as charted (32)
Round 13 :
Ch1, turn. Sc across in denim blue (32)
Round 14 :
Ch1, turn. Sc across in denim blue (32)
Round 15 :
Ch1, turn. Change to mustard for inner frame on final yo. Sc across in mustard for this row to begin framed border (32)
Round 16 :
Ch1, turn. Sc across mustard (32)
Info :
Begin finishing frame: This mustard row forms a thin frame around the motif. Keep tension even to maintain square edges. If you prefer a wider frame, add one more round of mustard here before the final perimeter.
Round 17 :
Ch1, turn. Change to cream on final yo. Sc across in cream (32)
Round 18 :
Ch1, turn. Sc across in cream (32)
Round 19 :
Ch1, turn. Sc across in cream (32)
Round 20 :
Ch1, turn. Work 1 sc in each st in cream (32). Finish with sl st to first sc. Fasten off leaving 20-25cm tail for joining. Square measures approximately 10cm (4in) blocked.
— Motif Square (Cream Background - Diamond Flower) :
Round 1 :
Foundation chain 33. Row 1: sc in 2nd ch from hook and in each ch across (32)
Round 2 :
Ch1, turn. Sc across (32)
Round 3 :
Ch1, turn. Change to cream if not already. Sc across in cream (32)
Round 4 :
Ch1, turn. Sc across cream (32)
Round 5 :
Ch1, turn. Begin diamond center: work sc to stitch 9, change to olive and sc 8 sts across (center diamond), change back to cream remaining sts (32)
Round 6 :
Ch1, turn. Sc across; on the olive diamond area work small rust bobbles as charted (use 3-loop puff in rust), count these bobbles as 1 stitch each to keep 32 stitches total
Round 7 :
Ch1, turn. Sc across in cream (32)
Round 8 :
Ch1, turn. Sc across; add two mustard single stitches above and below the diamond in the center row (32)
Info :
Puff/popcorn placement: For consistent texture, work all puff/popcorn stitches in the yarn color specified and keep loop height even. After completing a puff cluster, pull center loop through and secure with final yarn over to complete one st recorded as 1 sc for count consistency.
Round 9 :
Ch1, turn. Sc across cream (32)
Round 10 :
Ch1, turn. Sc across cream (32)
Round 11 :
Ch1, turn. Change to mustard on last stitch. Sc across mustard for inner frame (32)
Round 12 :
Ch1, turn. Sc across mustard (32)
Round 13 :
Ch1, turn. Change to denim for outer inner frame. Sc across denim (32)
Round 14 :
Ch1, turn. Sc across denim (32)
Round 15 :
Ch1, turn. Change to cream and sc across (32)
Round 16 :
Ch1, turn. Sc across cream (32)
Info :
Edge finishing: Leave a 20-25cm tail at the end for joining. If you plan to block the squares, fasten off with a long tail to allow for trimming after joining and blocking.
Round 17 :
Ch1, turn. Sc across cream (32)
Round 18 :
Ch1, turn. Sc across cream (32)
Round 19 :
Ch1, turn. Sc across cream (32)
Round 20 :
Ch1, turn. Sc across cream (32). Fasten off leaving tail for joining.
— Make Motifs :
Info :
Make 4 x Motif Blue and 4 x Motif Cream to create the runner shown (total 8 squares). You can increase or decrease the number of squares to achieve your desired length. Block each square to exact measurements before joining; a light steam and pinning to a square template helps achieve consistent edges.
— Joining Motifs (Join-As-You-Go Row Join) :
Round 1 :
With RS facing and with long tail from final round, align two squares RS together (or RS facing you depending on preferred seam visibility) and begin join at first stitch. Insert hook through corner stitch of Square A, then through corresponding corner stitch of Square B, pull up a loop and ch1; sc through both loops across matching stitches to join (32)
Round 2 :
Continue joining subsequent squares: match stitch-for-stitch and sc through corresponding stitches of both squares. Keep tension slightly loose to prevent puckering (32)
Info :
When joining multiple squares in a row, join them sequentially: join first and second, then third to the assembled strip, aligning centers and corners. Use pins to keep edges flush and count every 8th stitch while pinning.
Round 3 :
After joining the full row, work a single crochet round along the top and bottom edges of the entire assembled strip in cream to create a continuous base for side bands: join yarn at an outer corner, ch1,sc in each st around the outside perimeter, placing 3 sc in each corner to maintain flatness (approx stitch count varies with number of squares; for 8 squares across perimeter across top expect 8 x 32 = 256 sts across top row; distribute corner increases evenly)
Round 4 :
Sl st to join and fasten off. We will now add textured bobble bands to the long sides. Place assembled row RS up and measure central alignment for side bands (they run the full length of the runner parallel to the squares).
— Side Bobble Bands (both sides) :
Round 1 :
With RS facing, attach mustard yarn at first stitch along long side just outside the cream sc border. Ch1, sc in same st, *ch2, skip 1, work pop (see special stitches) in next st, ch2, sc in next st* repeat along length. The bobble/pop clustered spacings create a dotted ridge. Keep total count such that pop placements align with square seams approximately every 8th stitch.
Round 2 :
Ch1, turn. Sc across in mustard in remaining loops to create a solid row; place sc over pops to anchor them (st count remains the same across band as you are working into a foundation edge row; aim for consistent spacing)
Round 3 :
Change to cream and work 1 round sc across to define inner edge (this rounds forms the inner ridge next to the squares) (st count unchanged)
Round 4 :
Repeat pop placement in the outer row above the mustard base using alternating colors: work small rust pops clustered in groups of 3 every 16 sts to echo motifs (counts vary by length; maintain symmetry)
Info :
If you prefer a less textured look, substitute the pop/puff stitches for simple sc or hdc. Popped bobbles are decorative and create depth when blocking, so pin the bobble shape when steaming to keep them distinct.
Round 5 :
Fasten off and repeat along opposite side. Ensure both bands are identical and mirror each other; measure distances from ends and corners as you go to create symmetry.
— Inner Framed Ridges :
Round 1 :
With cream, join at a corner and sc across the thin perimeter between squares and bobble band to create a consistent ridge (use 1 sc in each st around the entire length, place 3 sc in each corner point). This creates a visual inner frame (st count depends on length; maintain 1 sc per available st).
Round 2 :
Change to olive green on final yo and work 1 round of sc to create a thin contrasting ridge (keeps runner visually anchored) (st count unchanged)
Info :
When changing colors on perimeter rounds, always change on the final yarn over of the previous sc so the new color appears as the working color for all stitches of the round.
Round 3 :
Work 1 round in mustard using BLO for a ribbed raised effect: ch1, sc in each st BLO around (this creates a small ridge that reads like a cord) (st count unchanged)
— Raised Braided Cord (two-layer decorative braid) :
Round 1 :
Attach 3 strands (blue, cream, mustard) held together at one end and work a narrow chain along the inside edge: with 3.0mm hook, chain length slightly shorter than full inner perimeter length, then work 1 sl st back along the chain to create a tubular braid. Slip-stitch this braid in place along the mustard BLO ridge, sewing or sl st at intervals to anchor.
Round 2 :
For a raised effect, work 1 round sc around the braid on both sides: attach yarn at the base and sc around the braid to secure it to the runner. This secures the braid and forms a flush decorative cord (st count varies by braid circumference).
Info :
If you prefer a single-strand twisted cord, you can simply twist two colors tightly and tack them down with evenly spaced sl sts instead of crocheting a chain-braid. The crochet braid gives a neater finished appearance and is easier to wash.
— Scalloped Pointed Edge (Outer Border) :
Round 1 :
Working from one end along a long side, attach denim blue at the outermost stitch; ch3 (counts as dc), *skip 2 sts, 5 dc in next st (shell), skip 2, dc in next st* repeat to create scallops. For the pointed effect align shells so their peaks fall at the seam between squares; ensure shells at ends form a pointed corner cluster.
Round 2 :
Join mustard on final yo and work 1 round of hdc in each st across to create a layered look; place hdc in top of each dc and shell peak for definition (st count will be slightly higher due to shells; distribute evenly)
Round 3 :
Work a picot-edging round in cream: *sc in next 3 sts, picot (ch3, sl st into 3rd ch from hook), sc in next 3 sts, sl st into top of next shell peak* repeat along the length. Picots create sharp points accenting each shell peak.
Info :
To create the pointed triangular tips visible at the ends in the photo, place a series of three shells that converge to a central taller shell at the end. For example at the short end work: dc, shell, 7dc peak shell, shell, dc with color transitions to create a layered point.
Round 4 :
Reverse the scallop pattern on the opposite long side to mirror the first side. After both long sides are complete, work the same layers on the short ends, paying special attention to pointed peak arrangement: create a central tall peak using 7 dc (counts as 1 peak), then flank it with shells for symmetry.
Round 5 :
Work final edging in denim using small reversed loops: attach denim and sc around outermost loops of scallops placing 2 sc in each picot to create crisp edges. Fasten off and weave in ends.
— Decorative Raised Stitch Rows (final texture layer) :
Round 1 :
Along the length of the runner between the squares and the scalloped edge, work a raised row by making Front Post Half Double Crochets (FPHDC) around the mustard BLO ridge: attach yarn, ch2, hdc in next st, *FPHDC around next st, hdc in next 2 sts* repeat to maintain rhythm (st count adjusted to match ridge spacing)
Round 2 :
Return with a sc round in cream to anchor the raised posts: sc in each st around, working over the feet of the FPHDC to hide tails (st count unchanged)
Info :
These raised post rows echo the stitched texture shown in the photo and help the braided cord sit neatly. Use a slightly smaller hook if your FPHDCs look loose compared to surrounding texture.
— Surface Crochet & Embroidery (Stems, Veins, and Final Flowers) :
Round 1 :
Using a small crochet hook or yarn needle and stranded yarn in olive green, surface slip-stitch the central stems: insert hook from RS at base of motif, pull up loop, then working along the surface, sl st in each center point along the motif to form a raised stem. Secure ends on WS with waste yarn or by stitching back into fabric.
Round 2 :
With rust terracotta, embroider small French knot-like puffs for flower centers: bring yarn up at marked point, wrap 3 times around needle and insert near the exit point, pull through snugly. For a more crochet approach, make a tiny 3-loop picot using a small hook and tack into place.
Info :
Surface slip-stitch technique: Hold the carried yarn on the RS and slip-stitch into the top of stitches to create smooth raised lines that resemble embroidery. This method keeps the back tidy and maintains the crocheted aesthetic.
Round 3 :
Work leaf veins with moss green by using twin needle embroidery or a second strand and a tapestry needle: create short straight stitches radiating from the center stem. Keep lengths even and knot securely on WS.
Round 4 :
Optional: add a few tiny rust puff clusters at base of each flower for dimension. Secure these with a small stitch into the fabric and hide tail on the WS.
— End Points & Final Finishing Rounds :
Round 1 :
At both short ends of the runner, create a reinforced triangular point: with cream attach yarn to the base of the pointed shell arrangement and work 1 round sc across the underside to tidy and stabilize the point. Place 3 sc in each peak to maintain shape.
Round 2 :
Work 1 round of slip stitch in denim around the entire outer edge to create a neat finishing line; if using a different color palette, choose the darkest color for contrast and crispness (st count matches outermost edge loops).
Info :
Blocking: Wet-block or lightly steam the runner, pinning shells and bobbles into place to shape them properly. Allow to dry overnight. Blocking will open the motif centers and set the scalloped edge for a crisp, heirloom finish.
Round 3 :
Weave in all ends to the WS using a yarn needle. Trim tails flush after weaving them through at least 6-8 stitches to prevent slippage.
Round 4 :
Optional finish: Use a fabric-safe spray sizing to help maintain edge crispness for tables that will be used frequently. Avoid direct heat on puff stitches to preserve their texture.
Info :
Care instructions: Hand wash or machine wash on gentle cycle inside a laundry bag. Reshape while damp and lay flat to dry. Avoid heavy tumble drying which can flatten bobbles and shells.
Finishing this runner is so satisfying — each square comes alive with texture and color as you join and frame them. The layered bobbles and scalloped points give a vintage, cottage feel that elevates any table. Block carefully, add the surface stems, and stand back to admire the heirloom-style detail you created. 🧶✨ This project makes a special gift or a centerpiece you’ll be proud to display. Happy stitching and enjoy every textured row! 🌿