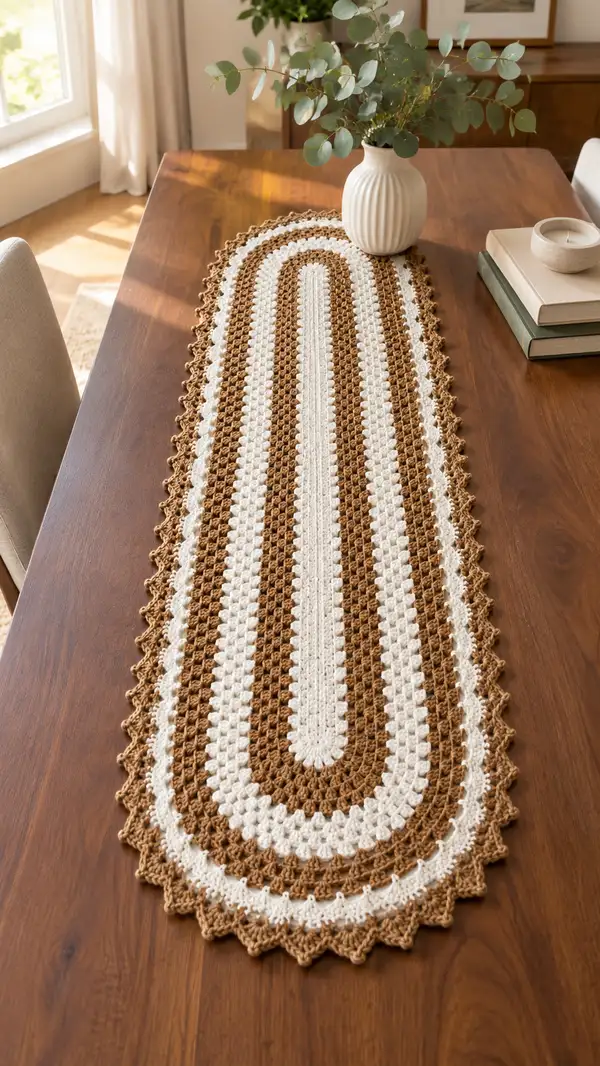
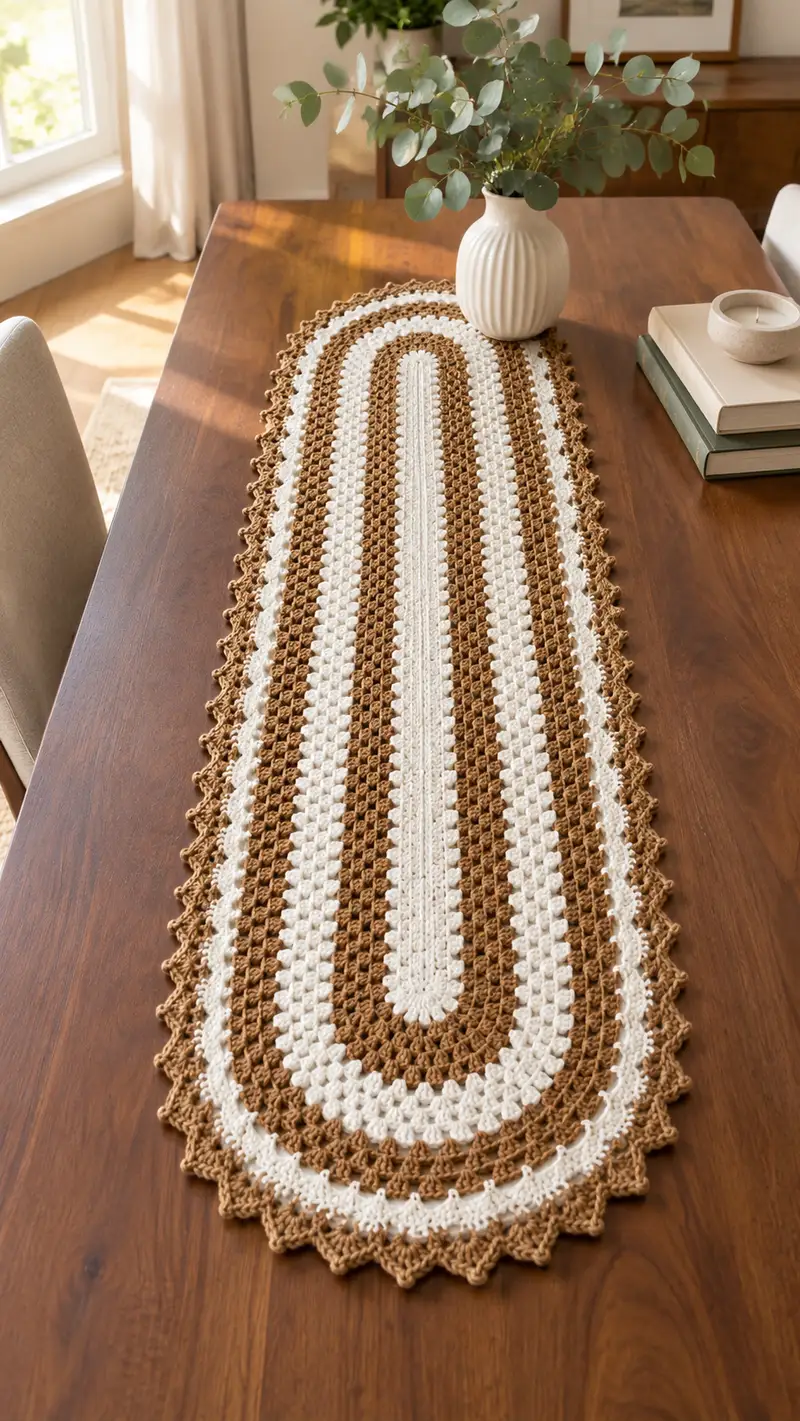
Create a long, elegant oval table runner featuring warm tan and creamy white stripes and a delicate picot-style scalloped border. This runner combines a central ribbed panel with classic granny-style cluster rows for texture and visual interest. Finished in breathable cotton blend yarn, it lays flat and adds a cozy, handmade accent to your dining table. The pattern is modular—work the center panel first, then build concentric rounds and finish with a decorative scallop edge.
Progress Tracker
0% Complete
— Notes & Gauge :
Info :
The runner is worked in the round starting from a long central ribbed panel and expanding outward into concentric cluster rounds. Gauge is not critical for width/length but affects final size and yarn amounts. With worsted cotton and a 4.0mm hook, expect approximately 10 clusters (3-dc cluster groups) across the narrowest width per side at early rounds; adjust hook size if you prefer denser or looser fabric. The pattern lists stitch counts at the end of each round to help you verify progress.
— Center Ribbed Panel (Foundation)
Info :
We begin by creating a narrow ribbed center panel worked in rows, then join into rounds to form an oval. This rib gives the runner its long, neat center column seen in the photo.
Round 1 :
Chain 12. Turn, skip first chain from hook, 1 sc in second chain from hook, 1 sc in next chain across to end (11 sc). (11)
Round 2 :
Ch 1, turn, 1 sc in BLO in each st across (11). This BLO ridge creates a rib effect. (11)
Round 3 :
Repeat Round 2 for 18 rows total (11). Continue working in BLO for a total of 18 rows to create a tall ribbed strip approximately 14-18 cm long depending on tension. (11)
Info :
If you want a longer runner center, add extra BLO rows here in multiples of 2 to keep the proportions balanced. When the rib is the length you want (this photo shows about 18-22 cm center before the first cluster round), fasten off and prepare to join into the first round around the oval ends.
Round 4 :
With right side facing, join Warm Tan with a sl st to the short end of the rib (corner). Ch 3 (counts as dc), 2 dc in same short end stitch to form a rounded tip. Working down the long side of the rib: 1 dc in each of next 11 BLO stitches. At opposite short end (other tip), work 3 dc in the end stitch to round the end. Work 1 dc in each of the 11 stitches along the opposite side back towards the start. Join with sl st to top of initial ch-3. Total dc count = 3 + 11 + 3 + 11 = 28 dc. (28)
Info :
Placing 3 dc in each short end creates the first rounded end and begins to build the oval shape. Keep tension even; use stitch markers in the first stitch after each 3-dc cluster to mark quarter points for later rounds.
— Round Expansion with Cluster Units (Build the First Ovals)
Round 5 :
Ch 3 (counts as dc), *ch 1, sk 1, 3 dc in next st* across the long side until you reach the short end; at the short end (where 3 dc exist) work (ch 1, 3 dc) twice into the same end stitch to widen the corner, continue 3-dc clusters down the opposite long edge mirroring the first side; join with sl st to top of initial ch-3. You should now have a pattern of 3-dc clusters separated by ch-1 sps around the entire oval. Estimated cluster count across the round: 12 clusters with ch-1 spaces; stitch look similar to (3 dc cluster, ch1) repetition. (12 clusters, counts vary by side)
Round 6 :
Change to Soft Cream (Info: fasten on new color at the sl st join). Ch 3, 1 dc in the ch-1 sp of each cluster from previous round, placing 3 dc in each ch-1 sp at the ends to maintain rounded corners. Join with sl st to top of ch-3. This round creates the alternating color band; count will be equal to number of ch-1 spaces turned into clusters. (approx 12 clusters)
Round 7 :
Change to Warm Tan. Ch 3, *ch 1, 3 dc into the next ch-1 sp* across, with extra (ch1, 3 dc) at each end to keep corners rounded. Join with sl st. (clusters increase slightly depending on added corner clusters)
Info :
Rounds 5–7 establish a 3-row stripe (tan, cream, tan). The runner in the photo uses narrow repeating stripes. If you prefer wider stripes, repeat the same color for 2–4 rows before switching.
Round 8 :
Repeat Round 6 in Soft Cream: ch 3, work 1 dc in top of each 3-dc cluster below across, placing 3 dc in corner ch-1 spaces. Join with sl st. (cluster count mirrors previous)
Round 9 :
Repeat Round 7 in Warm Tan: ch 3, *ch 1, 3 dc in next ch-1 sp* around, with corner increases as before. Join with sl st. This completes 5 full cluster rounds around the oval after the rib foundation. (clusters continue to expand slowly each round due to corner increases)
Info :
At this early stage, total cluster counts are relatively small and will grow gradually. Keep note of the count of ch-1 spaces and clusters each round; maintain symmetry and make sure increases are mirrored at both short ends.
— Expanding Stripes: Repeating Cluster Bands
Round 10 :
Change to Soft Cream. Ch 3, in each ch-1 sp from previous round work 1 dc; in the corner ch-1 sps work 3 dc to keep the rounded contour. Join with sl st. (count increases slightly from corners)
Round 11 :
Change to Warm Tan. Ch 3, *ch 1, 3 dc in next ch-1 sp* around, placing additional (ch 1, 3 dc) pairs in corner spaces for smooth curve. Join. (count grows gradually)
Info :
From Rounds 9–20 you will repeat the color band scheme (tan then cream) alternating cluster rounds and rounds worked into ch-1 sps to convert them into full clusters. This creates the distinct ribbed cluster look on each stripe band. The sample uses ~12–14 bands total; continue alternating until the runner reaches desired width.
Round 12 :
Repeat Round 10 in Soft Cream. Join and check that the curvature at each short end stays consistent by counting corner clusters—there should be two corner increases at each rounded tip every other round. (clusters continue to expand)
Round 13 :
Repeat Round 11 in Warm Tan: ch 3, *ch 1, 3 dc in next ch-1 sp* around. Join. The oval will feel slightly wider—this is expected. (clusters continue)
Round 14 :
Repeat Round 12 (Soft Cream). After joining, use stitch markers to mark the first cluster after each corner to maintain symmetry in following rounds. (clusters)
Info :
If you prefer fewer stripes, carry the unused color behind the working row (inside the fabric) for 4-6 stitches only; otherwise fasten off each color and weave ends. Carrying is fine for cotton blends but can create bulk at the joins; choose method by your preference for tidiness versus fewer ends.
Round 15 :
Warm Tan: ch 3, work (3 dc, ch 1) into every ch-1 sp around, plus the extra corner increases. Join with sl st. (cluster count grows gradually; estimate 20–28 clusters around depending on chain counts at each side)
Round 16 :
Soft Cream: ch 3, 1 dc in top of each 3-dc cluster from previous round (this converts the staggered clusters into a more solid band). At corner ch-1 sps place 3 dc to broaden the curve. Join. (counts will match number of clusters)
Round 17 :
Warm Tan: Repeat cluster round (ch 3, *ch 1, 3 dc in next sp*). Join. Maintain stitch counts symmetrical on both ends by placing identical increases in corner spaces. (clusters)
Info :
Continue alternating two-round stripe sets (cluster round in tan followed by solid round in cream or vice versa depending on your chosen sequence). The sample runner shows three narrow tan bands alternating with three narrow cream bands, then repeated to reach full runner width. Count your bands to match the look or repeat until you reach your desired runner width from edge to edge.
— Middle Run (Growing the Oval to Runner Width)
Round 18 :
Warm Tan: ch 3, *ch 1, 3 dc in next ch-1 sp* around with corner increases. Join. (clusters increase by 4–6 across the round due to corner growth)
Round 19 :
Soft Cream: ch 3, 1 dc in each cluster top across, 3 dc in corner sps where indicated. Join. (counts correspond to cluster tops)
Info :
By Round 20 you should be seeing a clear oval banding—if you measured the runner length you can now choose whether to continue working more stripe repeats to elongate the runner. Each two-round band (cluster + fill round) adds about 4–6 mm to the half-width on each side; plan accordingly.
Round 20 :
Warm Tan: Repeat cluster round (ch 3, *ch 1, 3 dc in next sp*). Join. Check for evenness by folding the runner lengthwise; the two sides should match in curvature at both ends. (clusters)
Round 21 :
Soft Cream: ch 3, 1 dc in each cluster top across (this will create the white stripe seen in the photo). Join. (counts match cluster tops)
Round 22 :
Warm Tan: ch 3, *ch 1, 3 dc in next sp* around with extra corner clusters as before. Join. The fabric is now wide and forming the long stripes. (clusters)
Info :
At this stage, you may switch to working with a 3.5mm hook for the next contrasting border rounds if you want a slightly tighter edge. The sample uses the same 4.0mm hook for the whole piece for a consistent look.
Round 23 :
Warm Tan (repeat for continuing tan band if repeating pattern): ch 3, 1 dc in each cluster top around to flatten the band. Join. Continue alternating bands until runner reaches desired overall width from edge to edge (the example shows ~10–12 stripes per side). (dc count matches cluster tops)
Round 24 :
Soft Cream: ch 3, *ch 1, 3 dc in next sp* around; maintain corner increases at ends. Join. This is a contrast stripe. (clusters)
Info :
If you want to lengthen the runner (end-to-end) instead of width, this base can be extended by making the center rib panel longer before the first round joins. For the pictured long runner, the center rib was intentionally longer (~20–24 cm) prior to the expansion rounds.
— Continuing Stripe Repeats (Rounds 25–60)
Round 25 :
Warm Tan: ch 3, *ch 1, 3 dc in each ch-1 sp from previous round* around; place 3-dc group in each corner ch-1 sp to maintain oval shape. Join. (clusters)
Round 26 :
Soft Cream: ch 3, 1 dc in each cluster top across the round (this converts the cluster spaces into a filled band). Join. (dc count equals number of clusters)
Info :
Repeat the two-round band structure: (cluster round in one color) then (solid dc round in the contrasting color). The photo shows 14–18 two-row bands total across the width depending on desired runner proportions; continue alternating until you reach the full width (end-to-end dimension across table). Keep careful count and mark your first cluster at each quarter point to ensure symmetry as rounds increase.
Round 27 :
Warm Tan: ch 3, *ch 1, 3 dc in next sp* around. Join. (clusters)
Round 28 :
Soft Cream: ch 3, 1 dc in each cluster top across; join. (dc count matches previous cluster number)
Round 29 :
Warm Tan: ch 3, cluster round identical to Round 27. Join. (clusters)
Round 30 :
Soft Cream: ch 3, 1 dc in each cluster top across. Join. (dc count)
Info :
At Rounds 25–40 continue the established band pattern; you will likely reach your desired width by around Round 40 depending on initial rib length. The runner in the photo appears to have about 9 alternating full-width stripes in total per side (warm tan and cream alternating), so adjust repeats to match the photo or your preference.
Round 31 :
Repeat cluster round (Warm Tan) as Round 27. Join. (clusters)
Round 32 :
Repeat fill round (Soft Cream). Join. (dc count)
Round 33 :
Warm Tan: repeat cluster (ch 3, *ch1, 3 dc*). Join. (clusters)
Round 34 :
Soft Cream: repeat fill round (1 dc in each cluster top). Join. (dc count)
Round 35 :
Warm Tan: repeat cluster round. Join. (clusters)
Info :
Periodically fold the runner lengthwise to check that the sides remain even and the oval ends are matching in curvature. Place more frequent corner increases if you notice flattening at the ends: add an extra (ch1, 3 dc) in corner spaces every 3–4 rounds to keep the curve smooth.
Round 36 :
Soft Cream: fill round—1 dc in each cluster top around; join. (dc count)
Round 37 :
Warm Tan: cluster round (ch 3, *ch 1, 3 dc in next sp*); join. (clusters)
Round 38 :
Soft Cream: fill round—1 dc in each cluster top; join. (dc count)
Round 39 :
Warm Tan: cluster round. Join. (clusters)
Round 40 :
Soft Cream: fill round. Join. (dc count)
Info :
By Round 40 you will be approaching the final width. Decide whether to repeat the stripe sequence to get the exact width and look; match the photo by alternating until you have approximately five warm tan bands and five cream bands across the runner, or choose your own rhythm.
— Transition to Final Rounds and Edge Preparation (Rounds 41–60)
Round 41 :
Warm Tan: ch 3, cluster round as before. Join. (clusters)
Round 42 :
Soft Cream: fill round—1 dc in each cluster top; join. (dc count)
Round 43 :
Warm Tan: cluster round. Join. (clusters)
Round 44 :
Soft Cream: fill round. Join. (dc)
Info :
The sample runner uses a final two-row sequence of tan then cream, then a tan predisposition for the edging. At Round 45 plan to work a shallow single crochet round to even out the top and prepare for the scalloped edging.
Round 45 :
Warm Tan: ch 1, 1 sc in each stitch around (this evens the outer edge and smooths the transition to the scallop border). Join with sl st. (st count will equal number of dc across outermost round)
Round 46 :
Soft Cream: ch 1, 1 sc in each st around for one round if you want a soft white ridge before the scallop (optional). Join. (st count)
Info :
If you carried colors inside, weave in tails now before scalloping so they are hidden under the border. Weave each tail at least 5 cm into the nearby stitches to secure. Blocking after weaving gives a neater edge.
Round 47 :
Warm Tan: ch 3, *skip 2 sc, (5 dc in next sc), skip 2 sc, sl st in next sc* around the straight long sides and at the rounded ends place (7 dc) in the top of the corner sc to create fuller scallops. Join with sl st. This forms deep scallops around most of the runner. (scallop count approximate based on outer st count)
Round 48 :
Soft Cream: For a layered scallop effect, ch 1, sl st to the center dc of each 5-dc scallop, ch 3, (3 dc) in same dc, sl st to next scallop center—this creates a picot-like raised point in each scallop. Join. (scallops match previous round)
Info :
Work the scalloped edge evenly. On each long side you will repeat identical scallops; on the short rounded ends you may need slightly larger scallops (7-dc) so that the rounded tips remain smooth. If in doubt, measure diametrically opposite scallops to ensure symmetry.
— Detailed Scallop / Picot Edge (Final Decorative Border)
Round 49 :
Warm Tan: ch 1, sl st in next sc and into the next scallop center, *ch 1, sc in center of scallop, ch 3, sl st in 2nd ch from hook to form a small picot, sl st back into center, sl st to next scallop center* around. Join. This adds tiny picot points for the crisp edge we see in the photo. (picots = scallop count)
Round 50 :
Soft Cream (optional highlight): ch 1, slip stitch across the tops of scallops and single crochet into every sl st space to tidy up. Join. At this point, the runner edge should be uniform with a delicate, open scallop look. (st count equals scallop count x few sts)
Info :
If you prefer a more open, lacy look, work ch-3 loops between scallops instead of picots. If you prefer a denser border, replace picots with small shells (3 dc, ch 1, 3 dc) spaced evenly in place of each center picot.
Round 51 :
Finish Round: Fasten off in Warm Tan and weave in all ends securely using a yarn needle. Weave tails through at least 5–7 stitches worth of fabric and trim. Block the runner to shape flat as described in the blocking info section below. (final)
Info :
Blocking: Soak runner in lukewarm water with a gentle detergent if desired; gently squeeze out excess water, lay flat on blocking mat, pin to desired oval shape and allow to dry completely. Use light spray starch if a crisper table protector is desired. Blocking evens the scallops and flattens any minor unevenness caused by tension variations.
— Alternate Narrow Band Variant (If you want extra texture)
Round 52 :
Optional: Before adding scallops, you can add a narrow bobble band: with Soft Cream, ch 1, *sc in next 3 sts, bobble in next st (work 5 dc bobble: [yo, insert, pull up, yo pull through 2] x5 closing on last pull-through), sc in next 3 sts, skip 1* around. This adds raised bobble texture similar to vintage tapestries seen in some runners. Join. (bobble count)
Info :
The photo shows a clean, small scallop edge; this bobble band is optional for a more textured, farmhouse look. If used, add one sc round after bobbles to even the edge before scalloping.
— Custom Length and Repeats Guidance
Info :
To create a longer runner, increase the number of initial BLO rows in the center rib before joining into rounds and then continue more alternating bands of clusters and fills until you reach the desired overall length. To change width, adjust the number of cluster repeats in early rounds by altering the starting chain length of the rib. Each extra chain makes the runner proportionally wider as it is mirrored on the opposite side during the first join.
Info :
Always work in pairs of rounds (cluster + fill) for a consistent stripe look; odd numbers of rounds will shift the color balance on one edge. For the pictured runner, we stopped after an even number of bands to keep symmetry.
— Finishing & Blocking Details
Info :
Weave in ends with a yarn needle and trim. Pin the runner to a flat blocking board and gently stretch so that scallops are evenly spaced. Allow to dry fully before removing pins—this sets the shape. For a crisper finish, use light spray starch while pinned and allow to dry fully. Store flat or rolled to avoid permanent creases.
This long oval runner brings warm, handmade charm to any dining table—perfect for everyday or seasonal styling. The alternating warm tan and creamy stripes balance rustic and modern sensibilities, and the delicate scalloped edge gives the piece a polished finish. Each stitch builds toward a beautifully textured fabric you’ll be proud to display. 🧶✨ Add a vase and your favorite blooms for a cozy table setting! 🌿