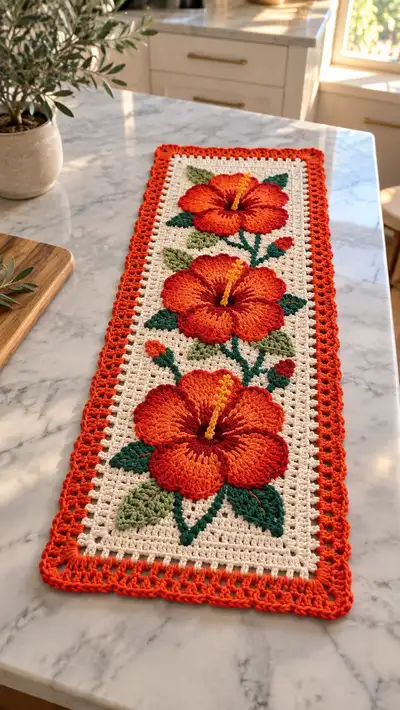
🧶 Beautiful ✨ Detailed 💝 Adorable

Vibrant Hibiscus Table Runner Pattern

Vibrant Hibiscus Table Runner Pattern
4.4★ Rating
8-10 Hours Time Needed
2.5K Made This
✂️

Intermediate Level

Ideal for those with basic crochet experience, featuring slightly more advanced stitches and techniques to expand your skills.

⏱️

All-Day Adventure

Requires 8-10 hours, ideal for a full day of immersive crocheting.

🏡

Cozy Accent

A warm touch for your space that transforms ordinary corners into inviting nooks filled with handmade charm.

🧶 Jump to Pattern ↓

About This Vibrant Hibiscus Table Runner Pattern

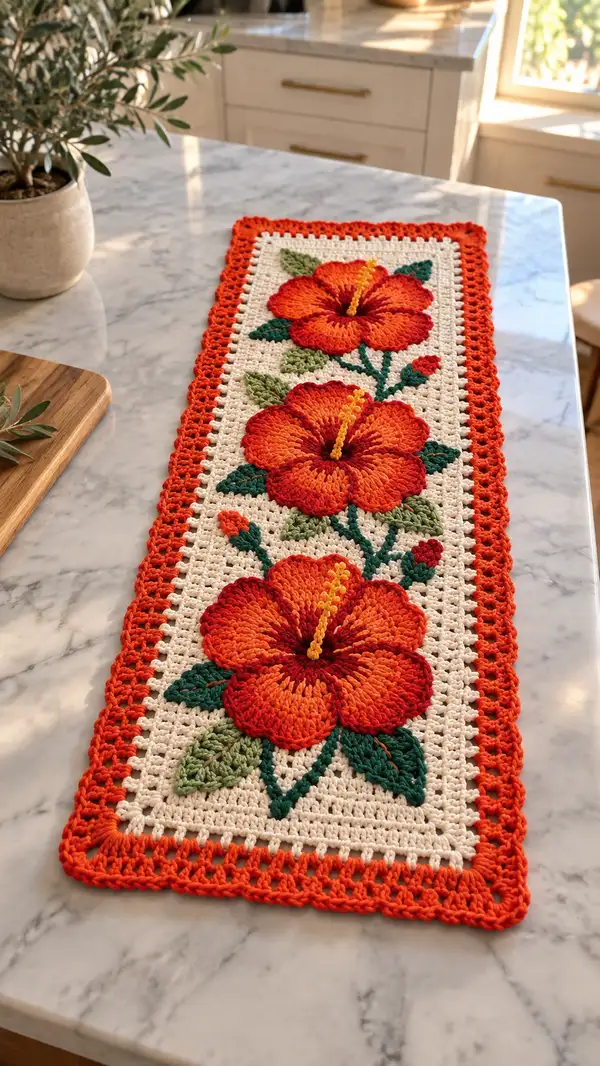
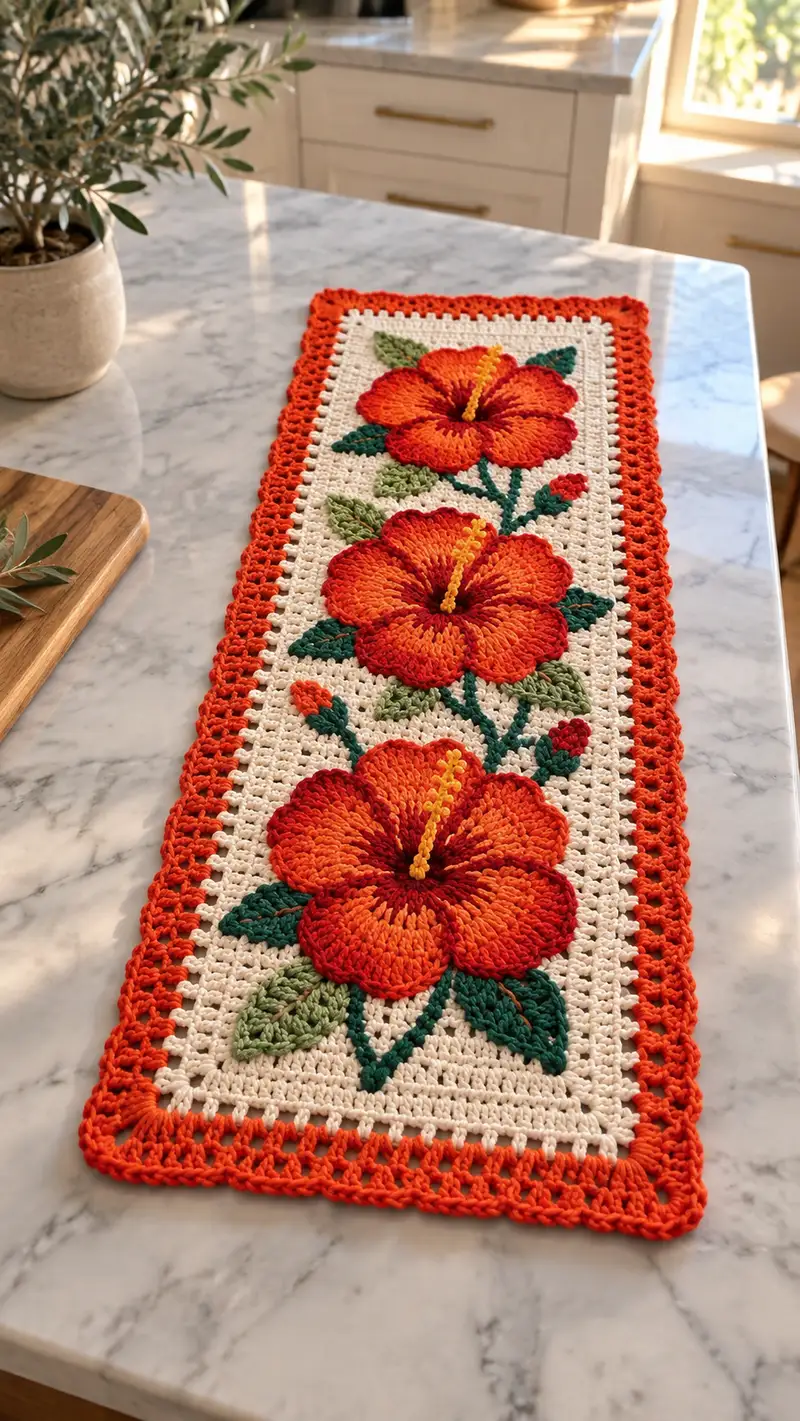
This pattern creates a long rectangular table runner decorated with three oversized hibiscus flowers in warm orange and red tones, leafy green accents, and a creamy crocheted field. Each flower is made with layered, textured petals to give a bold, dimensional look that sits on top of a flat background worked in double crochet. The border is a scalloped cluster in matching orange to frame the runner and tie the design together.

Vibrant Hibiscus Table Runner Pattern crochet pattern - detailed view of completed project

The design uses simple motif construction (flower centers, petals, leaves) and surface crochet for stems, so pieces are crocheted flat, assembled, then edged for a neat finish. The pattern is written for worsted-weight cotton yarn and a 4.5 mm hook for a firm, table-friendly fabric.

Why You'll Love This Vibrant Hibiscus Table Runner Pattern

I love this pattern because the large, textured hibiscus blooms instantly elevate a simple table runner into a centerpiece. The layered petals and subtle color shifts in the flowers give this piece a handcrafted, almost painterly quality. I also appreciate that the runner combines flat panel crochet with separate sculpted motifs, so you can enjoy both straightforward rows and more creative motif work.

Vibrant Hibiscus Table Runner Pattern step 1 - construction progress Vibrant Hibiscus Table Runner Pattern step 2 - assembly progress Vibrant Hibiscus Table Runner Pattern step 3 - details and accessories Vibrant Hibiscus Table Runner Pattern step 4 - final assembly and finishing

Switch Things Up

I absolutely loved designing this runner because it balances flat panel crochet with sculptural motifs; the hibiscus petals make a dramatic focal point without being overly complicated to construct.

I like to customize this pattern by switching yarn colors — try coral and peach petals with a navy background for a modern twist, or soft pastels for a spring table runner. You can also change the number of flowers: make a shorter runner with just one centered bloom, or create a longer table piece with five flowers.

For a different texture try using a lighter sport-weight yarn with a smaller hook for a delicate runner, or a heavier cotton for a more durable kitchen centerpiece. Add beads or embroidery to the flower centers for extra sparkle or make the stems crocheted cords for a raised effect — I encourage you to make the design your own!

Common Mistakes & How to Fix Them

✗ Skipping stitch markers at the beginning of each row or round leads to miscounted stitches and uneven borders; mark your starting stitch consistently. ✗ Not blocking the finished rectangular panel can make assembly and border shaping difficult; block the panel flat before attaching motifs. ✗ Carrying yarn across long surfaces can create lumpiness; instead, weave in tails or use surface crochet for stems and details. ✗ Overstuffing petal motifs or curled leaf elements will prevent them from lying flat; keep flat motifs lightly supported by blocking, not stuffing. ✗ Switching hook size mid-project without accounting for gauge creates uneven motifs and mismatched joins; maintain consistent hook and tension. ✗ Positioning safety pins or stitches incorrectly while sewing petals down will skew flower symmetry; pin and check placement from multiple angles. ✗ Using yarn that is too fuzzy or stretchy reduces the crispness of the 3D petal texture; choose a firm cotton or cotton blend for definition.

Vibrant Hibiscus Table Runner Pattern

A sunlit table runner featuring three bold orange hibiscus blooms on a warm cream field with leafy green stems and a scalloped orange border. This elegant rectangular runner combines textured 3D petals, layered leaves, and surface embroidery for a garden-fresh centerpiece. The finished piece lies flat and is written for medium-weight cotton yarn to achieve crisp stitch definition and a polished table-ready look.

Intermediate 8-10 Hours

Materials Needed for Vibrant Hibiscus Table Runner Pattern

— Main Fabric

  • 01
    Worsted weight cotton yarn (#4), approximately 300-350g in cream (main background)
  • 02
    150-180g in bright orange (flower primary petals)
  • 03
    50-70g in deep red or rust (petal shading and outline)
  • 04
    80-100g in deep teal/forest green (leaf and stem main color)
  • 05
    40-50g in light olive green (leaf highlights)
  • 06
    Small amount (10-15g) in golden yellow for stamens and flower center detail

— Tools Required

  • 01
    4.5 mm (7) crochet hook for main work
  • 02
    4.0 mm (G) crochet hook for tighter motif edges (optional)
  • 03
    Worsted-weight cotton yarn in specified colors
  • 04
    Tapestry needle for sewing and weaving ends
  • 05
    Scissors
  • 06
    Stitch markers (at least 6) to mark repeats and beginning of rounds
  • 07
    Pins or blocking pins and a blocking mat
  • 08
    Measuring tape or ruler
  • 09
    Optional: small blunt yarn needle for surface embroidery
  • 10
    Optional: blocking wires to square corners

Progress Tracker

0% Complete

— Materials & Gauge :

Info :

Gauge: 14 dc x 10 rows = 10 cm (4 in) in worsted cotton with 4.5 mm hook. Gauge is not critical for length but important for motif scale so petals sit proportionally on the background. Use the same hook throughout unless noted.

Info :

Finished size (approx): 14 cm x 90 cm (5.5 in x 35 in). Adjust length by adding or subtracting background rows; adjust width by changing foundation chain multiple as directed in 'Background Panel' section.

— Background Panel (Main Rectangular Field) :

Round 1 :

Foundation: Using cream yarn, ch 141 (this gives a runner width of approximately 14 cm with 14 dc per 10 cm gauge; ch count chosen to center three large motifs in the field). Turn to work first row.

Round 2 :

Row 1: Dc in 4th ch from hook (counts as dc + ch2 corner if turning work each row), *dc in next ch across to last 3 ch, dc in last ch; total dc across ~138 depending on exact tension. Turn. (approx 138 dc)

Info :

If you prefer a true rectangular worked-in-round approach, you can work rows back and forth instead of joining rounds. This pattern uses rows to keep the fabric flat and easy to applique onto.

Round 3-6 :

Repeat Row 1 for a total of 6 rows of solid dc to create a firm edge for the motifs to sit on. (approx 138 dc each row)

Info :

Mark rows 3 and 6 as reference points for the top and bottom margins of the motif band. These even rows help align the three flower motifs later.

Round 7-26 :

Main Field: Continue working even rows of dc across the foundation chain for a total of 26 rows in cream (including the first 6 rows). This creates a rectangular field that is about 18 cm long from top to bottom before motifs are added; you will centre three motifs vertically spaced along these rows. (approx 138 dc each row)

Info :

To keep edges straight, after each row ch2 and turn, work the last dc into the very top of the turning chain from the previous row. Use stitch markers at both ends every 10 rows while working to maintain alignment.

Round 27 :

At the row where the first (top-most) flower will be placed, stop after completing the dc row and prepare to anchor the flower by leaving the top row unworked from this point; the motifs will be sewn onto these central rows later. Mark the exact central stitch of the row with a removable marker to guide motif placement.

Info :

Space between motifs: mark the vertical positions for the three flowers so there is equal distance between each bloom. A spacing of 22 rows between centers produces a balanced look for the sample size.

— Large Hibiscus Flower (Make 3) :

Info :

Each hibiscus is constructed from a layered center, five sculpted petals, a stitched stamen, and a backing disk for sewing. Work petals in orange (main) and add deep red as an outline/edge color to create the shaded look. Make three identical flowers.

Flower Center - Center Disk Round 1 :

Make MR with golden yellow. 6 sc in MR (6)

Round 2 :

Inc x6 (12)

Round 3 :

(1 sc, inc) x6 (18)

Round 4 :

1 sc in each st (18)

Info :

Leave a long tail for sewing and set center disk aside. This small disk will anchor the petals and hide the joins. Do not stuff; it should remain flat.

— Petal (Make 5 per flower; repeat ×15 total) :

Round 1 :

Using bright orange yarn, MR, ch1, 6 sc in MR (6)

Round 2 :

6 inc (12)

Round 3 :

(1 sc, inc) x6 (18)

Round 4 :

(2 sc, inc) x6 (24)

Info :

These early rounds form the petal base. Work tightly so the petal holds shape; use mr for a smooth center. Count carefully.

Round 5 :

(3 sc, inc) x6 (30)

Round 6 :

(4 sc, inc) x6 (36)

Round 7 :

(5 sc, inc) x6 (42)

Round 8 :

1 sc in each st (42)

Info :

At this stage you have a shallow disk. To elongate into a petal, we will add elongated surface texture and shaping in the next rounds using front-post/back-post and cluster stitches to give a raised petal rib.

Round 9 :

'Switch to deep red yarn for shading', join with sl st at any stitch on round 8. *Ch2, dc3tog cluster over next 6 sts, sk 1* rep 7 times to form 7 radial cluster ribs around the disk. Finish with sl st. (7 clusters across circumference approximating 42 base stitches)

Info :

The dc3tog clusters act as ribs that will be pulled outward to form the petal lobes. Place them evenly; if your counts differ slightly, space clusters to form 5 or 7 ribs as needed but keep them even for a symmetrical petal.

Round 10 :

Switch back to bright orange. Work behind the cluster ribs by inserting hook behind the clusters and working BLO sc around the previous round to anchor ribs and create height: 1 sc in each st BLO around (42)

Round 11 :

Ch2 (counts as hdc), *[hdc in next 3 sts, 5 dc shell in next cluster top (work shells into the tops of the dc3tog cluster), hdc in next 3 sts]* rep across to create 5 distinct wide lobes. Total counts will vary depending on number of clusters; aim for 5 large lobes across the frontal edge.

Info :

Sculpting tip: As you work the shells, gently pull the shell outward so it cups slightly. Use a larger hook (4.5 mm to 5.0 mm) for the shell round if you want more pronounced petals; if you prefer flatter petals remain with 4.5 mm.

Round 12 :

Round of sc around the edge to tidy: 1 sc in each st across and 3 sc in each shell apex to round the edge (approx 54 sc). Fasten off leaving a long tail for sewing. Block flat and pin into a slightly cupped shape to hold petal curve.

Info :

Make five petals for each flower (×5). After making the petals, make a small backing disk in cream to sew petals to for stability (see 'Petal Backing Disk').

— Petal Backing Disk (Make 1 per flower) :

Round 1 :

Using cream, MR, 6 sc in MR (6)

Round 2 :

6 inc (12)

Round 3 :

(1 sc, inc) x6 (18)

Round 4 :

1 sc in each st (18)

Info :

This small disk will be used as a stable base to sew all five petals and the golden center together. Leave a long tail for sewing and set aside.

— Leaf (Make 8) :

Round 1 :

Using deep teal/forest green, MR, ch1, 6 sc in MR (6)

Round 2 :

6 inc (12)

Round 3 :

(1 sc, inc) x6 (18)

Round 4 :

(2 sc, inc) x6 (24)

Round 5 :

1 sc in each st (24)

Info :

To shape the leaf, we will work elongated stitches along one side and then mirror on the other side to create a pointed leaf tip.

Round 6 :

Ch3 (counts as dc), dc in next 6 sts along one side, 3 dc in tip st (top of leaf), dc in next 6 sts down other side, finish with sl st to base. (approx 17 dc plus 3 at tip)

Round 7 :

Switch to light olive green for highlights. Surface slip-stitch along the central vein: join yarn at tip, working surface sl sts from tip down the center toward base, catching top loops to create a highlighted vein. Fasten off and leave long tail for sewing.

Info :

Make 8 leaves total (mix deep and light green for variety). Block leaves lightly flat to smooth the shaping before attachment.

— Bud (Make 3 small buds per flower, total 9) :

Round 1 :

Using bright orange, MR, 6 sc in MR (6)

Round 2 :

6 inc (12)

Round 3 :

1 sc in each st (12)

Round 4 :

Switch to deep teal for bud cap: 1 sc in each st BLO to create an indentation (12). Fasten off leaving a tail to sew closed and attach to stems.

Info :

Buds are tiny and add interest around the flowers. Make three bud units for each flower cluster and sew them near leaves and stems for a natural arrangement.

— Stamen (Make 3 per flower) :

Round 1 :

Using golden yellow, ch 16, sl st back along chain to create a cord-like stamen. Fasten off leaving long tail for sewing.

Round 2 :

Using yarn needle, fold cord in half and sew the center of cord to flower center disk, then curve forward and stitch a few small yellow French-knot-style loops using short lengths of yarn folded and secured to mimic hibiscus stamen texture. Trim ends to desired length and secure.

Info :

Alternatively use a knotted yarn tassel or a small length of broomstick-stitch chain to create a textured stamen effect. Sew securely so it won't shift when the runner is handled.

— Flower Assembly (Per Flower) :

Info :

Arrange five petals evenly around the cream backing disk. Overlap petals slightly so their inner edges sit flush against the center disk. Use pins or stitch markers on the backing disk to hold petals in place before sewing.

Round 1 :

Place first petal with its inner edge centered on the backing disk. Using the long tail from the petal edge, whip-stitch through the petal base, through the backing disk, and repeat for the remaining petals so they form a five-petal rosette. Secure ends neatly on the underside of the backing disk. (no stitch count)

Round 2 :

Sew the golden center disk over the petal join by aligning the center disk over the meeting point of the petals and sewing around the disk with long tail, pulling slightly to cup the petals and secure overlapping edges. Fasten off and weave in ends on the back.

Info :

Block the assembled flower lightly: pin petals into a slightly cupped shape so they sit above the field when sewn. The center should remain slightly raised.

— Surface Stems & Placement :

Round 1 :

With deep teal yarn and tapestry needle or yarn hooked surface slip stitch: starting at the bottom of the runner where the lowest flower will be placed, mark the exact center of the flower backing disk on the panel and use surface slip stitches to stitch an upward curve for the stem to the flower center position. Make stems approximately 6-8 cm long on the sample to visually connect flowers.

Info :

Alternative: Work thin crocheted cords (i-cord or chained & single-crocheted) and sew them onto the background as stems for a raised look. Sew small forks for branches and attach buds and leaves accordingly.

Round 2 :

Pin each completed flower in its marked location centered on the cream field rows. Ensure equal spacing between flowers; typical spacing on sample 22 rows center-to-center. Pin leaves and buds in a natural arrangement along the stems before sewing.

Round 3 :

Sew each flower backing disk to the background panel using mattress stitch or whip stitch through the backing disk and through the dc rows beneath. Use the long tails and work several passes to ensure the flower sits flat and secure. Stitch leaves and buds in place on or near stems, sewing through background and motifs to anchor them firmly. Hide knots on underside and weave tails neatly.

Info :

Start sewing from the underside of the panel when possible so top stitches remain invisible. Use small, even stitches to provide a secure hold without puckering the fabric.

— Corner and Edge Finishing of the Background Panel :

Round 1 :

After all motifs are sewn in place and tails woven, work one round of crab stitch (reverse sc) in cream around entire rectangle to neaten the edges: join yarn at a corner, sc in each dc along edges and ch2 corners, working in reverse direction for a twisted rope edge. (counts vary by side)

Info :

Crab stitch adds a sturdy, slightly textured edge that helps the scalloped border sit neatly. Work loosely to avoid puckering the border.

Round 2 :

Switch to bright orange. Join yarn with sl st in any crab stitch, ch3 (counts as dc), *skip next st, (5 dc in next st) shell, sk next st, dc in next 3 dc* repeat along side ends. For corners work 7 dc shell to create a rounded corner. This forms the decorative scalloped border. Continue around entire runner and finish with sl st to join. Fasten off and weave ends. (counts vary by side; shells placed evenly)

Info :

Spacing note: If your panel has slightly different stitch counts on each side, space shells evenly by dividing total available edge stitches by number of shells desired so shells appear evenly distributed.

Round 3 :

Optional decorative round: Work 1 round of picot edging: *dc in shell apex, ch3, sl st in 3rd ch of ch3 to form picot* around scallops for an extra lacy finish. Fasten off and weave ends. Block the entire runner flat and let dry.

Info :

Blocking: Spray steam lightly and pin edges square. Allow to dry fully to set the petals and border. For table use, consider light starch for added body but test on scrap yarn first.

— Final Finishing Details :

Info :

Weave in all tails securely on the wrong side. Trim any stray fibers. If you want extra durability, you may use a few small hidden stitches of matching sewing thread through the backing disk into the panel to reduce stress on crochet stitches when the runner is handled.

Round 1 :

Optional appliqué reinforcement: On the underside, apply a narrow strip of lightweight interfacing or fusible tape under the flower areas to prevent stretch if runner will be washed frequently. Test heat settings on scrap yarn first.

Info :

Care: Hand wash gently in cool water with mild detergent, reshape and air dry flat. Avoid wringing. Cotton yarn may shrink slightly; block after washing to reshape.

Assembly Instructions

  • Attach each assembled flower by positioning its backing disk centered on the marked row/stitch on the cream panel. Pin in place with several pins to ensure petals are evenly spaced, then sew around the disk with the long tail using whip stitch through the disk and background, making sure to catch petal bases to secure them.
  • Sew leaves to the background by aligning leaf tips along stems or beside petals. Use small invisible stitches along the leaf midline and outer edges to flatten the leaf onto the panel. Weave in tails on underside securely.
  • Add buds near stems by sewing the base tightly to the background panel; arrange 3 buds per flower cluster for natural accents. Make sure any bud base stitches go through the panel for a durable hold.
  • Create stems by surface slip-stitching or by sewing thin crocheted cords to the background. If using cords, sew both ends and occasional midpoints to anchor the stem so it won't shift when the runner is moved.
  • Work the final border after all motifs are attached. Join the bright orange border yarn at a corner and work evenly spaced shell scallops along each side; adjust spacing if necessary to keep shells balanced at corners.
  • Weave and conceal all tails on the underside of the runner, then lightly block the entire piece, pinning edges and petals to the desired shape. Allow to dry completely before use.

Important Notes

  • 💡Use stitch markers consistently at the beginning of each row to avoid counting errors and maintain proper shaping.
  • 💡Block motifs flat before assembly; blocking helps petals lie properly and makes sewing easier with less stretching.
  • 💡Stuffing is not required for motifs; petals are shaped with post stitches and shell placement—avoid adding filler which will distort flatness.
  • 💡For a crisp finished look, use cotton or cotton-blend yarn rather than very fuzzy fibers which hide stitch definition.
  • 💡When sewing motifs, use short, even stitches that pass through both motif backing and panel for long-lasting attachment.
  • 💡Keep long tails and knot on the wrong side; weave them through 3-4 stitches to secure rather than tying bulky knots visible on top.
  • 💡If your stitch count differs, space motifs visually by measuring and marking centers with removable pins before sewing.
  • 💡Test washing instructions on a small scrap of your chosen yarn to check for colorfastness and shrinkage before completing the runner.

This hibiscus table runner brings bold floral color and handcrafted charm straight to your table. Each layered petal and leaf is designed to sit slightly raised for a 3D garden effect that looks spectacular in natural light. The scalloped orange border completes the look and ties the design together. I hope you enjoy making this beautiful statement piece for your home or as a thoughtful handmade gift! 🧶🌺
You ask,

we answer.

FAQs

What is the finished size of this runner?

Based on the specified materials and hook size (4.5 mm and worsted cotton), the sample runner measures approximately 14 cm x 90 cm (5.5 in x 35 in). You can lengthen or shorten by adding or removing background rows and adjust width by changing the foundation chain multiple.

Can I use a different yarn weight?

Yes — you can use a different weight, but adjust your hook size accordingly (usually 1-2 hook sizes up or down). Different yarn weights will change the final size and the scale of the motifs, so make a small gauge swatch and consider reducing or increasing the number of foundation chains to compensate.

Do I need to block the motifs?

Blocking is highly recommended. Blocking helps flatten petals, open shells, and align edges for neat stitching and a professional finished look. Pin petals gently into the desired cupped shape while damp and allow to fully dry.

Should the petals be stuffed?

No — petals are shaped with post stitches and shell clusters rather than stuffing. Stuffing would make them bulky and cause the runner to sit unevenly. Light blocking achieves the cupped, sculpted look instead.

How do I attach the flowers securely?

Use the backing disk and long tails from the petals and center disk to sew the motif to the background with tight, even stitches. Sew through both panel and backing disk in multiple passes for strength. Optionally reinforce on the underside with small sewn crosses of matching thread.

Can I make the runner washable?

Yes — use colorfast cotton and hand wash in cool water. Avoid agitation and reshape while damp. Some crafters apply a light fabric starch after blocking for extra body, but test on scrap yarn first.

How many motifs do I need?

This pattern uses three large hibiscus motifs spaced evenly. You will make three flower assemblies, 15 petals total (5 per flower), 3 center disks, about 9 small buds (3 per flower), and 8 leaves (2-3 leaves per flower cluster depending on placement).

Can this design be resized?

Absolutely. To make a wider runner, increase the foundation chain in multiples that keep shell spacing even. To lengthen, simply increase background rows between flower centers. Changing yarn weight or hook size will also resize the final piece proportionally.