🧢 Beautiful ✨ Detailed πŸ’ Adorable

Orange Spiral Halloween Garland with Cute Ghosts and Pumpkins Pattern

Orange Spiral Halloween Garland with Cute Ghosts and Pumpkins Pattern
3.9β˜… Rating
5-7 Hours Time Needed
2.5K Made This
βœ‚οΈ

Intermediate Level

Ideal for those with basic crochet experience, featuring slightly more advanced stitches and techniques to expand your skills.

⏱️

Weekend Treat

Takes 5-7 hours, making it an enjoyable project to finish over a couple of days.

πŸŽƒ

Autumn Vibes πŸ‚

Earthy tones with cozy textures inspired by falling leaves and the rich, warm colors of harvest season.

🧢 Jump to Pattern ↓

About This Orange Spiral Halloween Garland with Cute Ghosts and Pumpkins Pattern

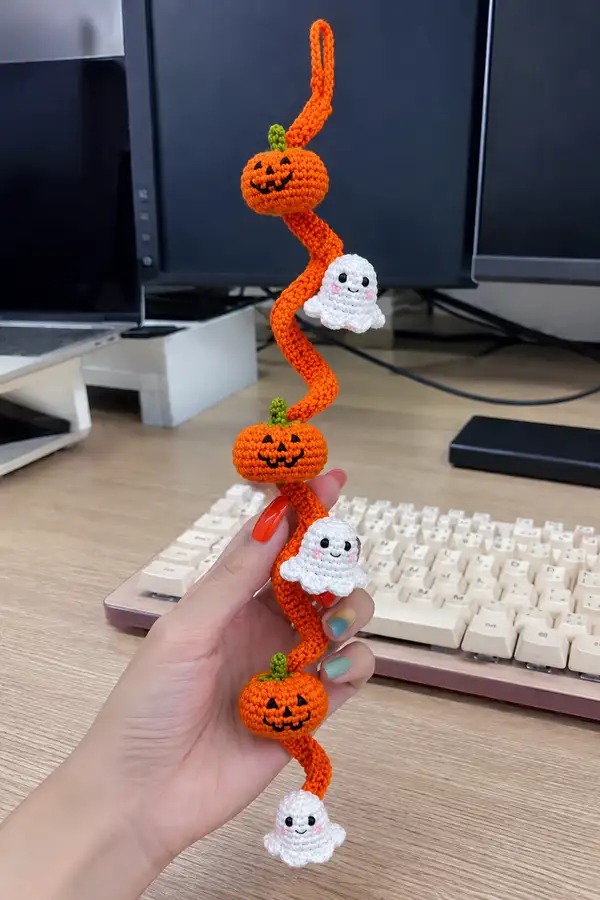
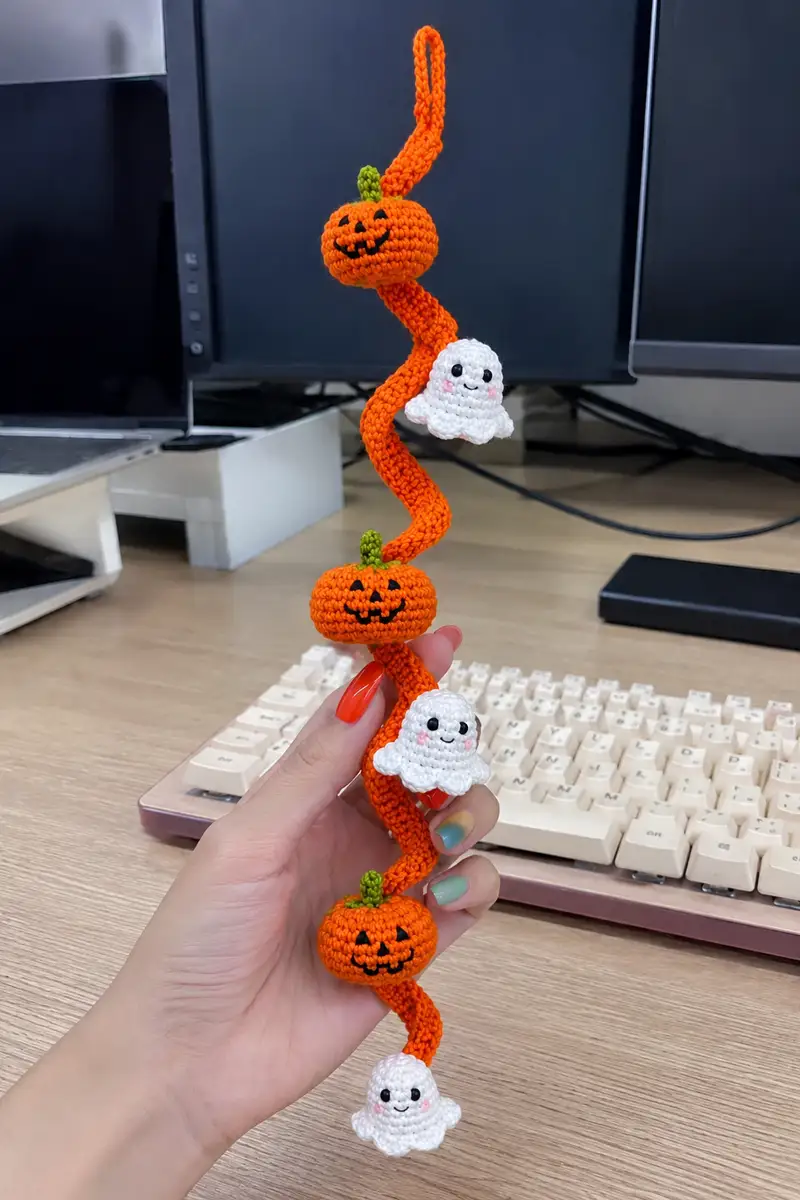
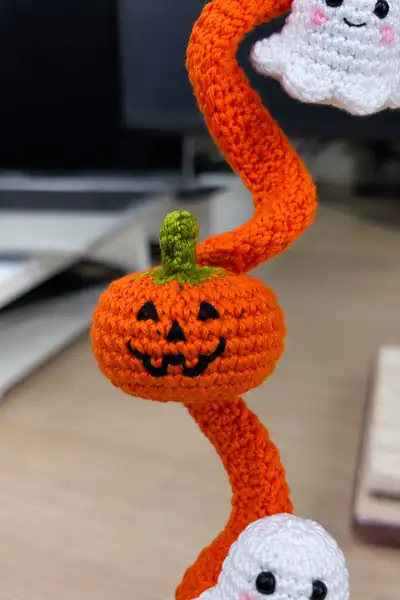
This pattern recreates a spiral Halloween garland with alternating small pumpkins and ghosts along a twisty orange cord. The pumpkins are tiny round jack-o-lanterns embroidered with black facial details and topped with a small green stem. The ghosts are bell-shaped with a scalloped hem, safety eyes, tiny stitched smiles and blush. The central spiral cord is a slim crocheted tube you stuff lightly and optionally insert wire to make a stable curly shape. The finished garland is compact, lightweight and perfect for hanging from a hook or as a decoration on shelves and workspaces.

Orange Spiral Halloween Garland with Cute Ghosts and Pumpkins Pattern crochet pattern - detailed view of completed project

This design balances simple amigurumi elements with a playful construction: make three pumpkins and three ghosts and space them evenly on the spiral cord. The instructions include stitching methods for neat joins, stuffing tips, and embroidery guidance so even intermediate crocheters can reproduce the exact look.

Why You'll Love This Orange Spiral Halloween Garland with Cute Ghosts and Pumpkins Pattern

I love this pattern because it turns a handful of basic amigurumi techniques into a charming, space-saving Halloween decoration. The smiling pumpkins and sweet ghosts have so much character despite their tiny size, and the spiral cord makes the whole piece feel dynamic and playful. I also appreciate how customizable it is β€” change the faces, add beads or use different colorways to match your decor.

Orange Spiral Halloween Garland with Cute Ghosts and Pumpkins Pattern step 1 - construction progress Orange Spiral Halloween Garland with Cute Ghosts and Pumpkins Pattern step 2 - assembly progress Orange Spiral Halloween Garland with Cute Ghosts and Pumpkins Pattern step 3 - details and accessories Orange Spiral Halloween Garland with Cute Ghosts and Pumpkins Pattern step 4 - final assembly and finishing

Switch Things Up

I absolutely loved creating this garland idea because it offers so many ways to customize while keeping the core construction simple. You can play with color β€” try pale peach for pumpkins or mint for stems for a fresh look. I often switch face expressions by varying the embroidery for each pumpkin to give them personality.

I like to change the size by swapping yarn weights: a sport weight yarn with a smaller hook will give a dainty garland, while chunky yarn with a larger hook makes a bold statement piece. You can also add beads between ornaments or replace some pumpkins with little felt leaves to change the theme.

Finally, experiment with the spiral: add a thinner or thicker internal wire to alter how tightly it curls, or make a double-spiral by crocheting two tubes and twisting them together for an extra dramatic effect. Don’t be afraid to make the pattern your own β€” tiny changes go a long way.

Common Mistakes & How to Fix Them

βœ— Skipping stitch markers at round starts can cause misaligned features and uneven shaping; always mark your first stitch of each round. βœ— Inconsistent tension between rounds creates lumpy or uneven surfaces; practice maintaining steady, even tension throughout the entire project. βœ— Not stuffing gradually as you work causes difficulty reaching inside later; stuff pumpkins and ghosts in small increments to achieve smooth shapes. βœ— Attaching pieces without pinning first can result in crooked placement; pin and view from multiple angles before sewing. βœ— Using a hook too large for amigurumi yarn results in stuffing showing through; use a slightly smaller hook than the yarn label suggests. βœ— Embroidering facial details before securing eyes or stuffing fully can distort placement; secure eyes and stuff to final firmness before embroidery. βœ— Failing to secure ends when carrying color can cause unraveling later; weave tails inside and stitch back through several rounds.

Orange Spiral Halloween Garland with Cute Ghosts and Pumpkins Pattern

A delightful spiral Halloween garland featuring three smiling jack-o-lanterns and three sweet scalloped ghosts strung along a twisty orange spiral cord. This compact hanging decoration uses bright orange, crisp white and a touch of green, perfect for desks, doorknobs, or tree branches. The pattern includes step-by-step amigurumi-style pumpkins, tiny ghosts with scalloped hems, stems and a flexible spiral core for shaping. Make multiple garlands to add playful autumn vibes to any space.

Intermediate 5-7 Hours

Materials Needed for Orange Spiral Halloween Garland with Cute Ghosts and Pumpkins Pattern

β€” Main Fabric

  • 01
    Worsted weight yarn (#4) approximately 120g in bright pumpkin orange (main cord and pumpkins)
  • 02
    50-60g in white (for three small ghosts)
  • 03
    15-20g in bright green (for three small pumpkin stems and leaf accents)
  • 04
    Small amounts (10-15g total) in black (for facial embroidery) and pink (for cheeks)

β€” Tools Required

  • 01
    3.25mm (D) crochet hook for main work (recommended)
  • 02
    2.75mm (C) hook for tighter ghosts and stem details (optional)
  • 03
    Safety eyes 6mm or 8mm (use 6mm for smaller ghosts as shown) β€” 6 pairs total
  • 04
    Polyester fiberfill stuffing (approx 50-80g total)
  • 05
    Thin floral wire or pipe cleaners (optional, for shaping spiral)
  • 06
    Yarn needle for sewing and embroidery
  • 07
    Stitch markers (at least 3-4)
  • 08
    Scissors
  • 09
    Pins for assembly
  • 10
    Optional: Fabric glue for securing embroidered eyes, and small bead weights if you want a heavier bottom

Progress Tracker

0% Complete

β€” Materials & Gauge :

Info :

Gauge is not critical for this decorative garland, but for scale, using worsted weight yarn with a 3.25mm hook yields pumpkins approximately 3.5-4cm (1.5in) wide and ghosts about 3cm tall. Adjust hook or yarn weight to change final size.

β€” Notes :

Info :

Work in continuous rounds unless specified to join. Use a stitch marker at the first stitch of each round and move marker after completing the round. Embellish faces after stuffing, and always position safety eyes before final stuffing. Carry yarn inside body for color changes or fasten off and weave tails. Optional internal wire in spiral cord must be padded with stuffing to avoid poking out.

β€” Spiral Cord (main structure) :

Info :

This central orange spiral is a slim stuffed tube crocheted in the round then shaped into a spiral. The tube is worked with a small circumference (12 sts) and many rounds to achieve length. Insert a flexible wire or pipe cleaner through the center after stuffing if you want the spiral to hold its curve permanently.

Round 1 :

6 sc in magic ring (6)

Round 2 :

6 inc (12)

Round 3 :

1 sc in each st (12)

Round 4 :

1 sc in each st (12)

Round 5 :

1 sc in each st (12)

Info :

From round 3 onward the tube is 12 sts in circumference. If you prefer a slimmer or wider cord, adjust Round 2 to 10 or 14 sts total using increases accordingly (i.e., 5 inc -> 10, 7 inc -> 14).

Round 6-15 :

1 sc in each st (12)

Info :

These early rounds form the hanging loop/top. At round 12-14 you can create a small loop by chaining 10-12 and slip stitching back into the next stitch instead of continuing a round; this is optional. If you make a separate loop, continue the tube after completing the loop join.

Round 16-95 :

1 sc in each st (12) (continue working even rounds to reach desired cord length; this pattern continues to round 95 for a long garland)

Info :

Work rounds 16-95 straight for a long tube. The example project used 95 rounds total for the cord to create a long spiral with three pumpkins and three ghosts spaced evenly. If you want a shorter garland, stop earlier. Insert wire later to form spirals.

Round 96 :

1 sc in each st (12)

Round 97 :

1 sc in each st (12)

Info :

If you plan to add pumpkins and ghosts by sewing them on, allow extra rounds between attachments for spacing. Example spacing in this pattern: pumpkin at rounds 20, 40, 60 and ghosts at rounds 30, 50, 80 (approximateβ€”adjust to taste).

β€” Pumpkin (Make 3) :

Info :

Each pumpkin is worked in orange with a small green stem. The pumpkin is slightly flattened with ribs created by working a few rounds in BLO. Safety eyes are not used on the pumpkins; instead the face is embroidered with black yarn after stuffing. Follow stitch counts carefully for a neat pumpkin shape. This pumpkin uses 26 rounds total.

Round 1 :

6 sc in magic ring (6)

Round 2 :

6 inc (12)

Round 3 :

(1 sc, 1 inc) x 6 (18)

Round 4 :

(2 sc, 1 inc) x 6 (24)

Round 5 :

(3 sc, 1 inc) x 6 (30)

Round 6 :

(4 sc, 1 inc) x 6 (36)

Round 7 :

(5 sc, 1 inc) x 6 (42)

Round 8 :

(6 sc, 1 inc) x 6 (48)

Info :

Rounds 1-8 expand the base to 48 stitches, giving a slightly larger pumpkin with visible ribs later. If you prefer a smaller pumpkin, stop increases at round 6 to reach 36 sts and shorten the following even rounds proportionally.

Round 9-20 :

1 sc in each st (48)

Info :

Rounds 9-20 build the height of the pumpkin. For added ribbing texture, work Round 10 in BLO and Round 14 in BLO as well to create subtle vertical ridges. Keep rounds even and place safety marker if you plan to stitch the faces centrally later.

Round 21 :

(6 sc, 1 dec) x 6 (42)

Round 22 :

(5 sc, 1 dec) x 6 (36)

Info :

Begin stuffing the pumpkin firmly here. Use small amounts of stuffing and press into corners to maintain a rounded shape. Do not overstuff; the embroidered face looks best on slightly soft pumpkins.

Round 23 :

(4 sc, 1 dec) x 6 (30)

Round 24 :

(3 sc, 1 dec) x 6 (24)

Round 25 :

(2 sc, 1 dec) x 6 (18)

Round 26 :

(1 sc, 1 dec) x 6 (12)

Round 27 :

6 dec (6)

Info :

Fasten off leaving a long tail for sewing. Finish stuffing to the desired firmness and use the tail to close the remaining hole with a yarn needle. Weave the tail through remaining stitches and pull tight to close, then weave tail into the body to secure. Repeat for all three pumpkins.

β€” Pumpkin Stem (Make 3) :

Info :

Small green stem made with foundation or magic ring. Stitch the stem to the top center of pumpkin and use embroidery to add tiny radial leaves if desired.

Round 1 :

mr, 4 sc in mr, pull tight (4)

Round 2 :

1 sc in each st (4)

Round 3 :

1 sc in each st (4)

Round 4 :

ch 6, sl st back along chain towards base to create a short stalk, fasten off leaving tail for sewing

Info :

Sew stem to top of pumpkin at the very center. Add a few small green embroidered radial stitches around the base of the stem to simulate pumpkin ridges using surface slip stitch or embroidery stitches in bright green.

β€” Ghost (Make 3) :

Info :

Each ghost is worked in white and features a little scalloped hem for a cute flared base. Safety eyes (6mm) and a small embroidered smile complete the face. Each ghost uses 20 rounds of construction including the scalloped edge.

Round 1 :

6 sc in magic ring (6)

Round 2 :

6 inc (12)

Round 3 :

(1 sc, 1 inc) x 6 (18)

Round 4 :

(2 sc, 1 inc) x 6 (24)

Round 5 :

(3 sc, 1 inc) x 6 (30)

Info :

Rounds 1-5 form the rounded crown of the ghost head. Mark the front center so you place safety eyes evenly. For a smaller ghost, stop increases at round 4 (24 sts) and adjust the following rounds accordingly.

Round 6-10 :

1 sc in each st (30)

Info :

At the end of Round 7 or 8 place two 6mm safety eyes spaced about 6 stitches apart (approximately 6-8 stitches depending on face size). Secure eyes firmly before stuffing. Alternatively embroider eyes later using black yarn.

Round 11 :

(4 sc, 1 dec) x 5 (25)

Round 12 :

(3 sc, 1 dec) x 5 (20)

Info :

Begin stuffing the ghost lightly. Ghosts should be soft but not floppy β€” enough stuffing to hold shape while still allowing the scalloped hem to flare.

Round 13 :

(2 sc, 1 dec) x 5 (15)

Round 14 :

(1 sc, 1 dec) x 5 (10)

Round 15 :

5 dec (5)

Info :

Fasten off and leave a long tail for closing and sewing the base if needed. Flatten slightly to form a bell shape for the ghost body before adding the scalloped hem by working extra rounds from the base with the ghost reopened, or make a separate scalloped trim and stitch to the bottom.

Scalloped Hem (attached) :

Join white at base edge evenly; (sc in next st, skip 1, 5 dc in next st, skip 1) around to form scallops. Adjust spacing to get 6 evenly spaced scallops. Fasten off and weave ends.

Info :

Alternative scallop: (sc, hdc, 3 dc, hdc, sc) in alternate stitches to create a softer scallop. Keep counts even so the ghost base sits flat when laid on a surface.

Face Embroidery :

Use black yarn to stitch a small smile between the eyes. Add two small pink blush dots with embroidery thread or a tiny dab of fabric paint. Secure all ends behind the face and weave tails into the stuffing.

β€” Assembly & Attachment :

Info :

Decide on the spacing of pumpkins and ghosts along the spiral cord before sewing. Use pins to temporarily position each element and view the spiral from several angles. Typical spacing: pumpkin at cord round 20, ghost at round 30, pumpkin at 40, ghost at 50, pumpkin at 60, ghost at 80 (approximateβ€”this pattern uses 95 cord rounds total).

Attach Pumpkins :

Use the long tail from the pumpkin closure or a new strand of orange to sew the pumpkin to the cord. Position the pumpkin so its top aligns with the cord stitch row; sew through the bottom of the pumpkin and around the cord a couple times to secure. Weave tail inside pumpkin and hide.

Attach Ghosts :

Sew ghosts in the same manner, positioning the ghost's top center against the cord and stitching through a few rounds of the ghost base into multiple rounds of the cord to create a firm joint. Ensure the stitched point is hidden inside the ghost.

Info :

For a neater join, use ladder stitch around 8-10 stitches and then secure with several whip stitches to the cord. Reinforce joints with small backstitches so the tiny ornaments don't rotate or tilt when the garland hangs.

Optional Wiring :

Insert a flexible floral wire through the center of the stuffed cord before closing the top of the cord if you want a poseable spiral. Wrap wire ends with a small bit of felt or more stuffing to avoid sharp points. Bend the cord gently into a spiral shape and twist the wire ends to lock shape inside.

Final Finishing :

Weave in all tails, trim stray fibers, and double-check all embroidered features are secure. If desired, lightly steam block the pumpkins (do not soak) to smooth stitches. Add a small bead weight to the bottom pumpkin by stitching a flat button or hidden weight inside the closure for better hanging balance.

β€” Optional Variations & Tips :

Info :

Change face expressions by varying embroidery; make ghosts with open mouths for surprised looks. Use variegated orange yarn for the cord for a rustic look. Add tiny felt leaves or hang beads between ornaments for added sparkle.

Care Instructions :

Spot clean with a damp cloth. Avoid machine washing if you inserted wired supports. Store flat or coiled to protect shape and faces.

Assembly Instructions

  • Position head-like pumpkins at your pre-planned cord rounds (example used rounds 20, 40, 60). Pin each pumpkin in place and sew through the pumpkin base and several cord rounds using the long tail to secure. Use an invisible ladder stitch to minimize visible seams.
  • Position ghosts between pumpkins at rounds 30, 50 and 80. Sew each ghost to the cord by stitching through the top rounds of the ghost body and the cord tube, reinforcing with 6–8 backstitches to stabilize the join.
  • Insert flexible wire along the center of the spiral cord before fully closing the top. Pad the wire with stuffing and wrap the ends before finishing the cord to protect yarn from penetration.
  • Sew pumpkin stems to the top center of each pumpkin. Add small embroidered green stitches radiating from the stem attachment to create a realistic pumpkin top.
  • Embroider all pumpkin faces with black yarn centered on the front of the pumpkin. Use a yarn needle to create clean triangles for eyes and a curved mouth; anchor stitches inside the stuffing.
  • Weave and hide all tails inside each ornament and inside the cord. Trim close to the weave and ensure no loose tails are left where the garland will be handled.
  • If desired, secure small surface features like felt leaves with a dab of fabric glue after sewing for extra stability.
  • Hang the garland by the top loop, then adjust the spiral shape by bending the internal wire slightly to achieve a pleasing curl and even spacing between ornaments.

Important Notes

  • πŸ’‘Use stitch markers consistently at the beginning of each round to avoid counting errors and maintain proper shaping.
  • πŸ’‘Stuff body parts gradually as you work rather than waiting until the end, especially for narrow openings like the pumpkin necks and the tube core.
  • πŸ’‘For safety eyes, position and secure before stuffing head fully - they cannot be repositioned once locked in place.
  • πŸ’‘Maintain consistent tension throughout the project; too tight creates stiff, small pieces, too loose creates floppy, holey fabric.
  • πŸ’‘When sewing pieces together, use yarn slightly thinner than working yarn for neater, less visible seams.
  • πŸ’‘Pin all pieces in position before final sewing to ensure proper placement and symmetry.
  • πŸ’‘For amigurumi, work tightly enough that stuffing doesn't show through stitches; a 3.25mm hook on worsted weight helps with this.
  • πŸ’‘If adding internal wire, pad the wire with stuffing and wrap wire ends before closing to avoid poking through.

This playful spiral garland brings tiny Halloween characters to life with bright orange spirals and sweet scalloped ghosts. Each pumpkin and ghost is crafted with love and simple amigurumi techniques that come together beautifully. The pattern is satisfying to stitch and makes a delightful accent for desks, doors, or shelves. Have fun personalizing faces and spacing β€” your finished garland will be a charming seasonal treasure! πŸŽƒπŸ‘»πŸ§Ά

You ask,

we answer.

FAQs

What is the finished size of this amigurumi?

Using worsted weight yarn and a 3.25mm hook, the finished garland shown is approximately 28-30cm (11-12in) long. Adjust yarn weight or number of cord rounds to change the final length.

Can I use different yarn weights for this pattern?

Yes! You can use any yarn weight, but use a hook 0.5-1.5 sizes smaller than recommended for tight amigurumi fabric. Thicker yarn yields a larger garland and vice versa.

Do I need to use safety eyes or can I embroider them?

Both work. Safety eyes give a glossy professional look, while embroidered eyes are safer for kids and allow more expression. Attach eyes before final stuffing for best positioning.

How much stuffing will I need?

Approximately 50-80 grams of polyester fiberfill should be sufficient for three pumpkins, three ghosts and the cord tube. Stuff pumpkins firmly and cord lightly to allow shaping.

Can I make the arms and legs poseable?

This pattern does not include arms/legs, but you can make the spiral poseable by inserting floral wire in the cord tube. Pad the wire and secure ends before closing.

What if my stitch count is off?

If you notice a counting error, it's generally best to unravel back to where the count was correct and rework. Using stitch markers and keeping a row counter prevents many counting mistakes.

How do I prevent holes when stuffing?

Work with tight, even tension and a slightly smaller hook than yarn recommendation. Add stuffing in small pieces and distribute evenly rather than jamming large clumps inside.

Can I customize colors and details?

Definitely! Swap orange for pastel colors for a cute twist, or add tiny beads and felt leaves. Faces, spacing, and embellishments are all easy to personalize.