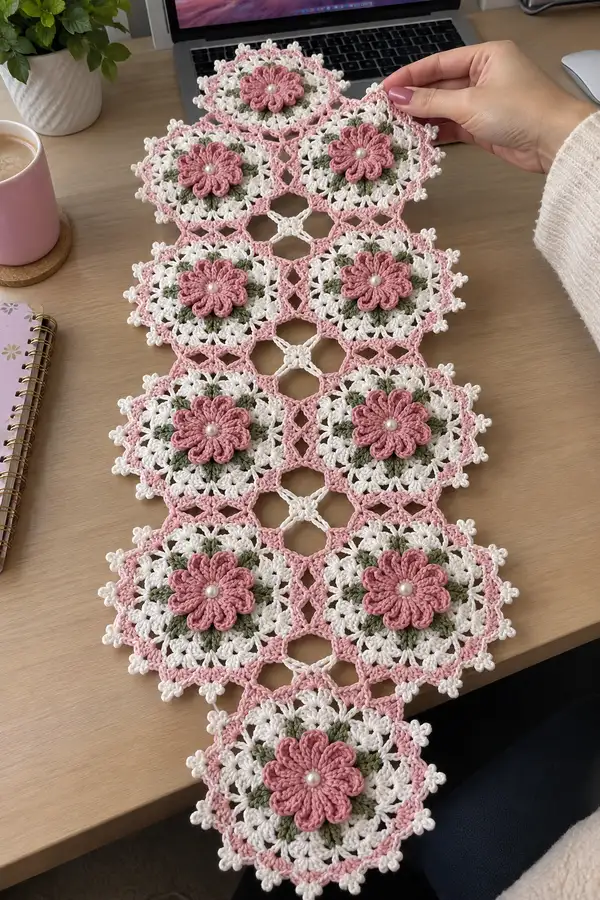
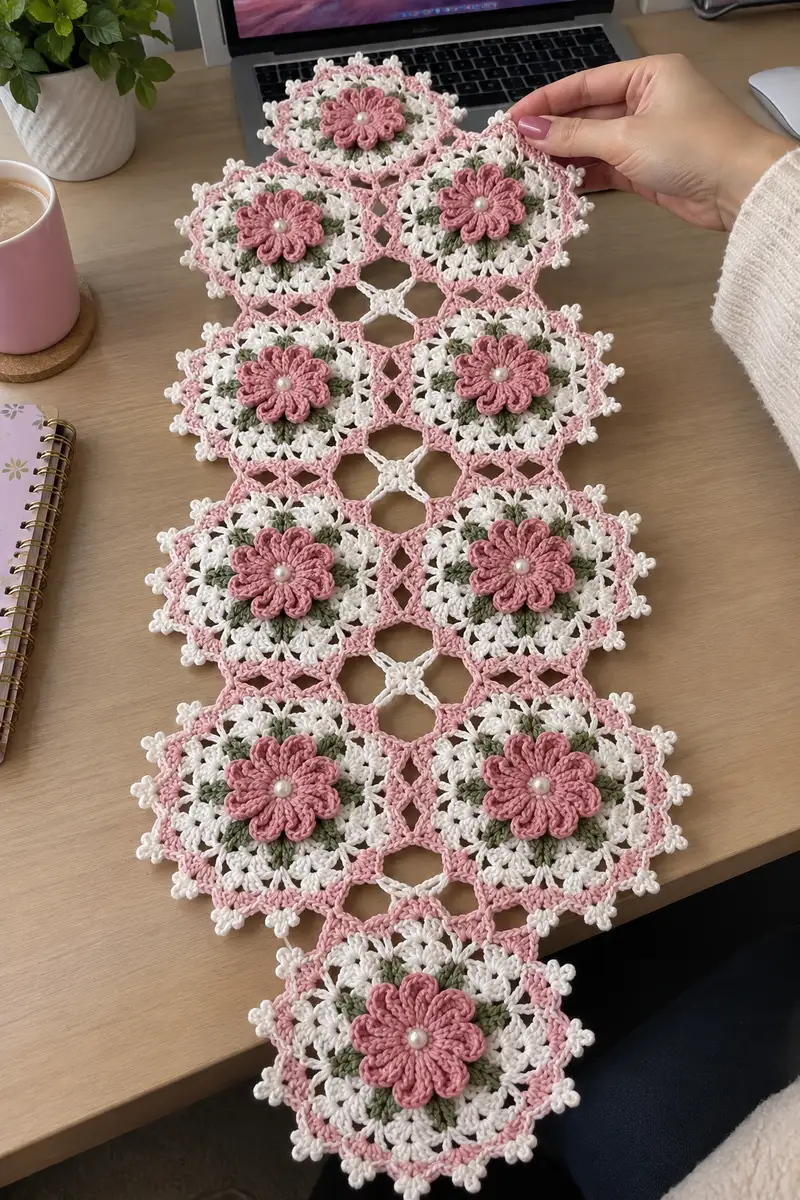
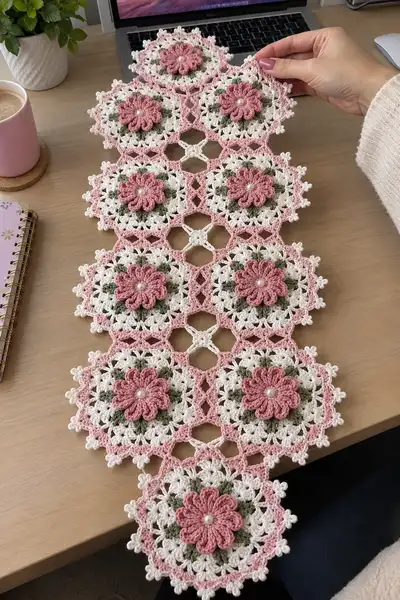
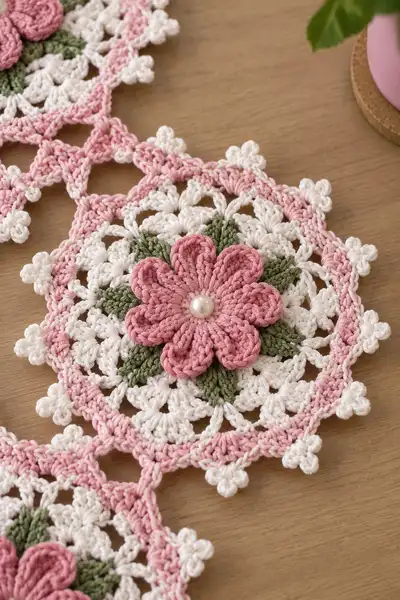
Create a charming hexagon table runner made of joined floral medallions with 3D petals and delicate picot edging. This pattern features soft pink flowers, cream lace rounds and olive leaf accents for a vintage-inspired look. The finished runner shown is constructed from hexagonal motifs joined in rows and finished with a scalloped pink border and pearl centers.
Progress Tracker
0% Complete
— Pattern Overview :
Info :
This runner is made from hexagonal floral motifs joined in a staggered column layout. Each motif is worked in rounds from the center out, building a circular medallion then converting to a hexagon shape with a joining round. A raised 3D flower is created on top of the medallion and a small pearl is sewn at the center of each flower. Blocks and seams are joined with a lacy connecting round in pink for the lattice and finished with a pink scalloped picot edge. The pattern below details each motif (base rounds, petals, leaves), the joining rounds and the finishing border.
Info :
Each motif can be made as one unit and blocked; however, the pattern also provides instructions to join on the 6th outer point so motifs form a tight honeycomb layout. The pattern uses common cluster and shell stitches: (dc cluster), shell (2 dc, ch2, 2 dc), and picot buds for the outer points.
— Motif Base (Make one motif; motif rounds 1-16) :
Round 1 :
Start with cream yarn. 6 sc in magic ring. (6)
Round 2 :
Inc in each st around (2 sc in each st) (12)
Round 3 :
(1 sc, inc) x6 (18)
Round 4 :
(2 sc, inc) x6 (24)
Round 5 :
(3 sc, inc) x6 (30)
Info :
From this point we will begin to introduce small chain-spaces and clusters to create the lacy texture. Keep tension even so later rounds lie flat. If you prefer a slightly larger motif, use a 3.25 mm hook; for crisper stitches, use 2.75-3.0 mm.
Round 6 :
(4 sc, inc) x6 (36)
Round 7 :
Change to cream made into small shell pattern: *dc in next 3 sts, ch2, sk 2 sts* rep around to create 12 ch2 spaces. (36 dc worked in clusters around; stitch count remains 36 shells)
Info :
Place a stitch marker at the first dc of this round so you know the shell centers for later symmetry. This round establishes the base points used to anchor the petals and leaves.
Round 8 :
Working into shell centers: *(sc, ch3, sc) into ch2 space of previous shell*, repeat around to create 12 small loop spaces. (24 sc total plus 12 ch3 loops)
Round 9 :
Switch to olive green yarn. Into each ch3 loop: join with sl st, ch1, (hdc, dc, hdc) forming a small leaf base; sl st into next shell top to secure. Repeat around creating 12 small leaf bases. (12 leaf bases)
Info :
These green stitches are the first layer of leaves visible beneath the raised pink petals. Keep the green stitches slightly loose so the pink petals will sit neatly above them.
Round 10 :
Fasten off olive green. Return to cream yarn. Working into same shell structure: *ch1, sc in next 3 dc (working evenly across previous dc cluster), ch2, skip ch-space and join to next cluster* Repeat for 12 repeats. This builds a lacy cream round with chain arches. (36 sc and 12 ch2 spaces overall)
Round 11 :
Switch to dusty pink for petal foundation. Into each of the 12 ch2 spaces: join with sl st, ch3 (counts as dc), 2 dc, ch1, 3 dc (cluster shell) - making a petal foundation that fans out. Sl st to next sc to secure. (12 petal foundations)
Info :
Round 11 creates the base where the 3D petals will be formed. Use a slightly shorter stitch length if needed so petals sit proud but not floppy. If your yarn is springy, consider using the smaller 2.5 mm hook for the subsequent petal rounds.
Round 12 :
— Begin conversion to hexagon points: (in cream) Ch5, sl st to next group top to form a small picot bridge; *ch5, sl st into top of next petal foundation* repeat around to make 12 strap loops. (12 ch5 bridges)
Round 13 :
Working back into the petal foundations in dusty pink: for each foundation work: join with sl st, ch2, (tr in next st, tr in next st, ch1, tr in next st, tr in next st) fold slightly and sl st at base to create a raised petal. Repeat for each of the 12 petals. (12 raised petals)
Info :
For the raised petals, work the treble stitches loosely and fold the petal over the center ring, then secure at the base to get a defined curved petal. Keep each petal uniform: count trebles to ensure each petal has identical height and width.
Round 14 :
Switch to dusty pink and work sc evenly around the entire motif across the petal bases and chain bridges: *sc in each top and loop* making an even round to unify the flower and begin shaping into a hexagon; you should have approximately 48 sc around (count and adjust by adding/subtracting sc evenly to maintain symmetry) (approx 48)
Round 15 :
Switch to cream. Work a decorative shell round: *(2 dc, ch2, 2 dc) into every 4th sc around* to create 12 shell points. This begins to visually carry the round towards a hexagon (12 shells remain, stitch count per repeat 4 = 48)
Info :
Check that your motif lies flat. If it cups or ruffles, adjust tension (a slightly looser or tighter hook) or add/subtract a few sc evenly in Round 14 to flatten. Blocking will help set the shape before joining.
Round 16 :
In cream, create the hexagon points: *ch3, sl st to the apex of the next shell, ch3, sc into the picot space to form a small point* repeat around creating 12 outer points; fasten off and weave ends. Motif base complete. (12 outer points)
Info :
Blocking tip: lightly wet block motifs pinned to a hexagon template to ensure consistent shape and size among motifs before joining. Pin outer points symmetrically and let dry fully.
— Raised Petals Detail (worked on top of each motif; petals rounds P1-P6) :
Round P1 :
Using dusty pink and 2.5-3.0 mm hook: join at the base of any petal foundation with sl st, ch1, sc (to anchor). (Anchor sc)
Round P2 :
Petal build: ch2 (counts 1 hdc), 3 hdc in same space, *ch1, 4 hdc across next petal stitch cluster, ch1, sl st at base* Fold the work to shape the petal. Repeat for each petal to create 12 petals. (Each petal comprised of 4-6 hdc depending on your fold)
Info :
Work petals loosely to allow them to curve. You will fold and secure the petal at the base with a slip stitch or a small stitch with the tapestry needle if you prefer a neater look.
Round P3 :
Edge on each petal: working around the outer curve of each petal, sc 10 (adjust count to petal size) evenly across to neaten edges; sl st into base to secure. Repeat for 12 petals. (approx 120 sc across all petals)
Round P4 :
Picot bump: *(ch3, sl st into last sc) at petal outer tip* for slight definition on each petal edge. Repeat for each petal tip. (12 picots)
Round P5 :
Sew pearl: Using yarn needle and beading needle, sew one 6-8mm pearl to the center of the motif through the base of petals. Secure with thread and knot hidden in stitches. Add a tiny dab of glue inside bead if desired. Repeat for each motif after petals are secured.
Info :
Sew the pearl so it sits flush but not pulling the petals together; it should accentuate the petals. Avoid sewing through the yarn in a way that distorts the ring center.
Round P6 :
Fasten off dusty pink and weave ends under petals carefully to hide yarn tails. Motif flower is now fully formed and centered on the base medallion.
— Leaf Detail (Make 3 leaves under each flower; rounds L1-L6) :
Round L1 :
Using olive green: join at designated leaf anchor point (previous small leaf base from Round 9). Ch1, 6 sc into the base area to form a rounded leaf nub. (6)
Round L2 :
(sc, inc) x3 around (9)
Round L3 :
Working on one side of leaf to shape a point: sc in next 4 sts, hdc, dc, tr into tip, then reverse on other side: dc, hdc, sc in remaining sts; sl st to base. Leaf shaped. (st count varies slightly; keep symmetrical)
Info :
Make 3 leaves in alternating positions under the petal cluster so petals appear to sit atop a small spray of leaves. Slightly block leaf shapes using steam or spritzing and pinning if desired.
Round L4 :
Edge leaf: sc evenly around leaf edges to neaten, about 12 sc per leaf. Fasten off and weave ends. Repeat for all leaf bases (3 leaves per motif).
Round L5 :
Optional: add a central vein with surface slip stitches using darker green yarn across each leaf for subtle definition. Make a single running line from base to tip for each leaf.
Round L6 :
Final positioning: tack leaves to the cream base with small whip stitches under petals so the leaves remain slightly visible; secure ends. Motif complete and ready for blocking and joining.
Info :
When you make multiple motifs, aim for consistent placement of leaves relative to a marked petal so that joined motifs align consistently.
— Joining Round (Make for each motif when joining into runner; JR1-JR16) :
Info :
Motifs are joined via a dedicated joining round worked in dusty pink to form the lattice. Join motifs into rows by working JR1 on a fresh motif and slip-stitching into the adjacent pinned motif points at the outer shells. The instructions here assume joining each motif on its 6 equidistant outer points to neighboring motifs. Work as you go or join after blocking; both give a neat result.
Round JR1 :
With dusty pink, join at any outer point of a completed motif with sl st. Ch3 (counts as dc), dc, ch2, dc, dc into same point to make a small shell. (Shell created at point)
Round JR2 :
*Ch4, sl st into outer shell tip to create a bridge* Repeat to first join location where you will slip-stitch into the neighboring motif's shell tip (pin motifs together before joining). At join points: replace sl st into air with sl st into the corresponding stitch on the neighbor motif. Repeat around making 6 join bridges. (6 join bridges when attached to neighbors)
Info :
When joining, work slowly and pin motifs in place to ensure that each bridge lies flat. For motifs forming edges of the runner (no neighbor on that point), make a complete ch4 bridge but do not slip-stitch to another motif — this leaves the outer point free for final edge decoration.
Round JR3 :
After joining each of the 6 points to neighboring motifs where applicable, work 1 sc around each ch4 bridge to tidy: *sc 4 (across bridge), sc into neighbor join* Repeat making the lattice lines sturdy. (Approximately 48 sc total including joins)
Round JR4 :
Make small bobble connectors in the hexagon spaces: ch3, (3 dc cluster) into the small ch-space formed by four motifs, secure with sl st; repeat for each exposed gap when the runner is assembled to hold the lattice bag. This creates a small open diamond between three or four motifs depending on layout. (Count depends on runner layout)
Info :
Joining is modular: work into two motifs simultaneously at each joining point to create a flat, invisible seam. Use a removable pin to test placement before sewing or slip stitching permanently.
Round JR5 :
Fasten off pink and weave ends. Repeat joining rounds for every motif as you build the runner row by row. Note: When joining a new motif to two neighbors, slip-stitch across both neighbors at each designated point to lock the motif in place.
— Runner Layout and Connections (Assembly rounds A1-A24) :
Info :
The photo shows 9 hexagonal motifs joined in a staggered column (three columns of three motifs each, joined with small diamonds in between). The instructions below show how to assemble motifs into a column of 3 and then join columns to form the runner. Adjust number of motifs to desired runner length and width.
Round A1 :
Make 9 motifs following Motif Base + Petal + Leaf sections. Block all motifs flat on a template to consistent hexagon shape and allow to dry completely before joining.
Round A2 :
Lay out motifs: three columns each of three hexagons. Place center of runner with one column, then offset adjacent columns so points interlock. Pin motifs lightly together at each contact point.
Round A3 :
Choose a motif to be a hub. Join dusty pink using JR1 and JR2 to adjacent motifs at exactly the six outer points that touch neighbors. Work joins so that each pair of motifs is connected by a ch4 bridge and secured with sc round as in JR3. Continue to add motifs one at a time, joining each new motif to the previously placed motif as you go.
Info :
If you prefer a seam-stitched join rather than slip-stitch join, align motifs and use a matching pink yarn on a tapestry needle to whipstitch through both motif edges for an invisible join. Slip-stitch joins are faster and give a neat lacy look.
Round A4 :
Once the core motif chain is joined into a column of three, add the next column: align the second column offset by half a hexagon so each motif contacts up to 3 neighbors. Use the same JR join technique to secure all contact points. Repeat for third column.
Round A5 :
After all motifs are joined, inspect all ch4 lattice bridges and reinforce any loose ones by working an extra round of sc across each bridge from one motif into the other. This strengthens the runner structure. (sc across each bridge)
Round A6 :
Optional small diamond filler: In the small diamond-shaped gaps formed between the 4 points of neighboring motifs, use cream yarn to make tiny decorative clusters: join with sl st into center of gap, ch1, (sc, ch2, sc) to make a tiny star. Repeat for every internal gap. This softens the open holes and gives visual continuity.
Info :
Work across the runner in one direction to keep tension consistent. If the runner begins to skew, unpick the last few joins and re-pin more carefully, keeping outer edges straight by referencing a ruler or piece of cardboard.
Round A7 :
Weave all loose yarn tails neatly on the back of the runner and trim flush. Use a small dab of glue on particularly stubborn knots under beads to avoid shifting. Check symmetry of motif placement by measuring across the runner at several points.
— Outer Edge and Scalloped Border (Edge rounds E1-E18) :
Info :
Edge rounds produce the picot buds and scalloped pink border visible in photos. Work along the outermost free points and join edges consistently to create a finished, decorative rim.
Round E1 :
With dusty pink, join at any outer shell that forms an outermost point. Ch1, sc in same st, *ch3, skip next 2 sts, sc in next st* Repeat along the entire outer edge of the runner to create regular ch3 loops spaced evenly. Fasten off and rejoin as needed to continue along edges. (loop count depends on runner perimeter)
Round E2 :
Work back into each ch3 loop: join with sl st, (sc, hdc, dc, picot, dc, hdc, sc) into each loop to make a scallop with a central picot bump. This creates the pronounced outer buds. Repeat around all outer loops. (one scallop per ch3 loop)
Info :
Be consistent with the picot height: use ch3 for the picot for small buds or ch4 for larger buds. Pin scallops as you go to set spacing before final tightening of the picot stitch.
Round E3 :
Where two scallops meet at corners or tight angles, ease with short sl sts or adjust by adding 1 sc to prevent puckering. When you encounter outer motif points that are isolated (no neighbor), work a star of sc5 around the outer point then add a scallop on top for symmetry in corners.
Round E4 :
Final tidy: sc evenly across the join lines at the outermost edges to make a clean continuous border; weave ends and snip. Block the finished runner lightly to set the border and embellishments.
Info :
For a firmer edge, work an additional round of slip stitches in cream around the very outer perimeter before adding the pink scallop. This will visually frame the motifs with a thin cream rim.
— Optional Extra Rows for Larger Runner (EX1-EX12) :
Round EX1 :
To extend the runner, make additional motifs and attach them to either end following the same joining pattern. Add motifs in pairs to keep columns balanced during assembly. Extend until desired length is reached.
Round EX2 :
If expanding widthwise, add complete columns and join using the same JR pattern. Balance motifs so outer scallops align neatly and the final border remains even on all sides.
Info :
As the runner grows, check for twisting or biasing and correct early by adjusting a few joins; long runs are prone to slight curving if tension is inconsistent.
Round EX3 :
For a placemat or smaller piece, cut motif count to 1-3 motifs and finish with border rounds only — the border instruction will scale down exactly the same way.
— Finishing and Blocking (Finish rounds F1-F6) :
Round F1 :
Block the assembled runner: dampen slightly with spray bottle, pin to a flat board following a hexagon template or measured grid, and stretch gently until even. Pin scallops and picots taut to emphasize definition. Leave to dry fully.
Round F2 :
Trim any visible ends and weave remaining tails deep into the structure. Use a matching thread to hide ends along motif backs for a tidy appearance.
Round F3 :
Secure pearls: check all pearls for firm stitching; if any wobble, reinforce by taking the needle through to the back and tightening then knotting securely on the reverse side. Hide knots under nearest leaf stitches.
Round F4 :
Optional stiffening: if you want a more formal doily look, mix fabric stiffener per manufacturer's instructions and lightly brush on the reverse side only. Allow to dry flat.
Info :
Care instructions: Hand wash or gentle cycle in a mesh bag with cool water. Reshape while damp and dry flat. Avoid tumble drying to preserve pearls and petal 3D shape.
Round F5 :
Final inspection: make sure all motif joins are secure, beads are attached tightly and no loose loops remain. Touch up any open stitches by taking a small matching yarn and stitching into place from the back to hide seams.
Round F6 :
Display and enjoy: place runner on table and arrange small items atop — avoid heavy vases placed directly on petals to preserve three-dimensional detail.
This floral hexagon runner brings a touch of vintage charm to any table with its layered petals, green leaf accents and pearl centers. The modular motif approach makes it easy to customize length and color, and the delicate picot edge gives a romantic finishing touch. Whether you make one motif as a coaster or a whole runner for your table, each stitch contributes to a beautiful handmade keepsake. 🧶🌸 Happy crocheting — enjoy seeing the motifs come together into something truly special! ✨