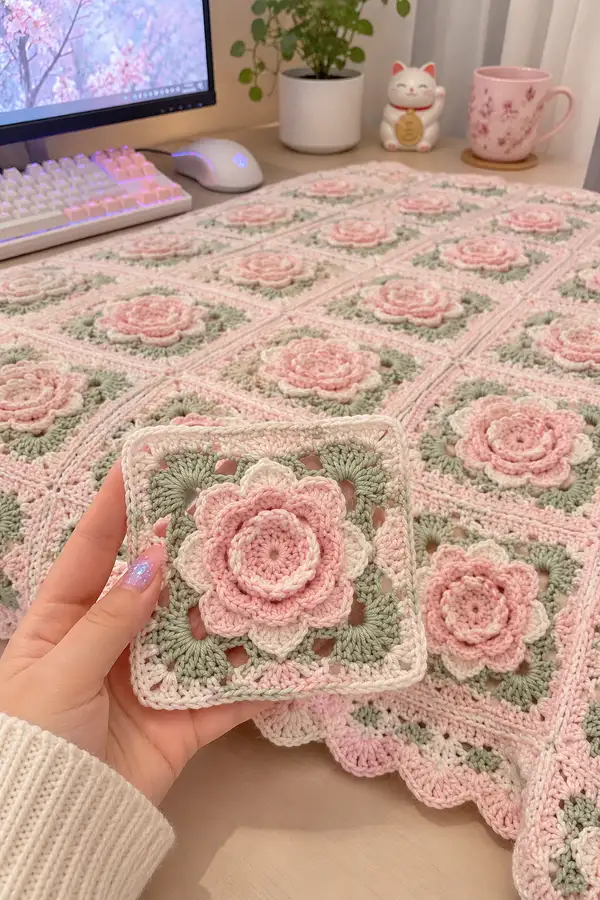
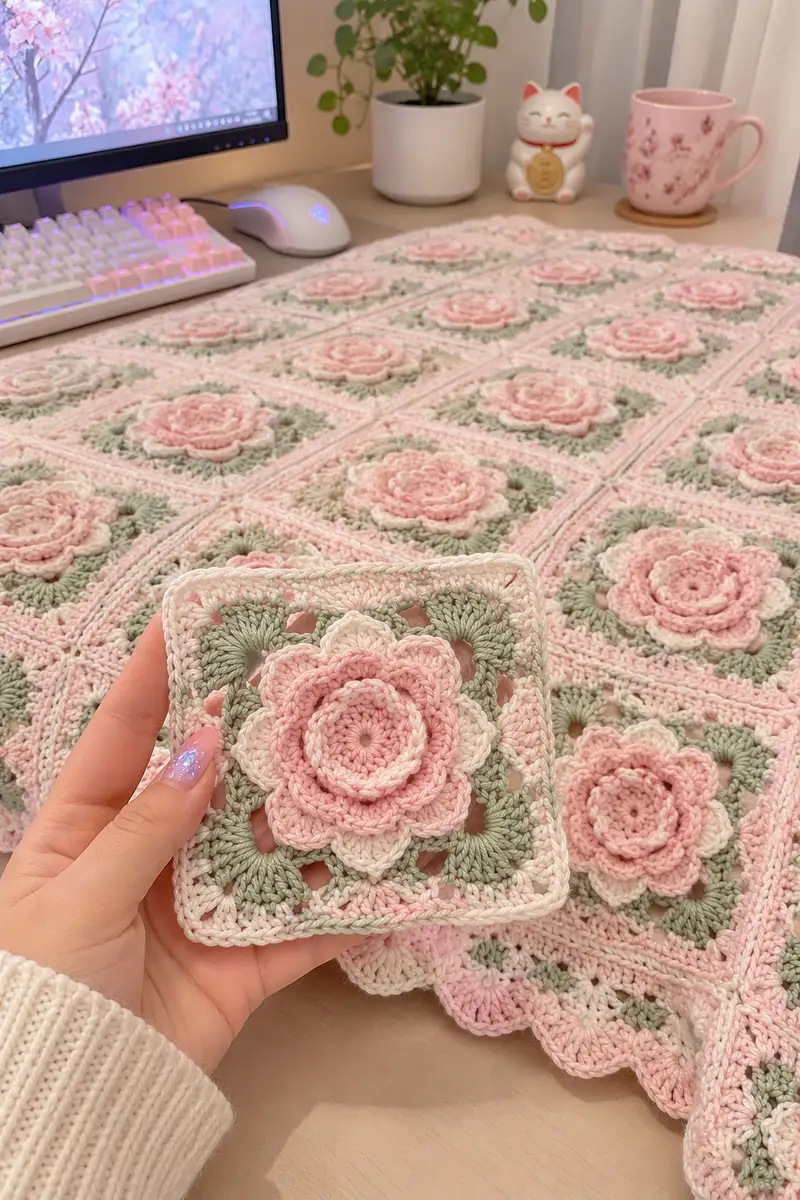
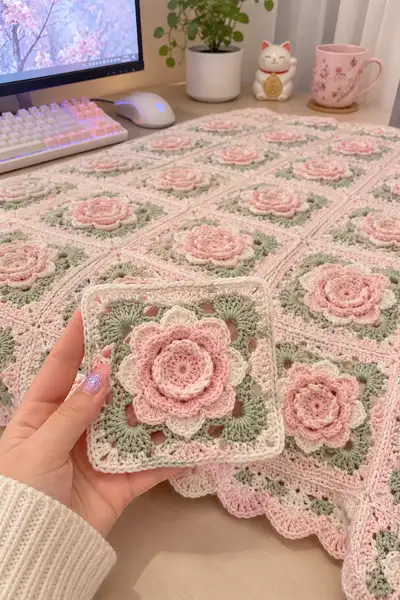
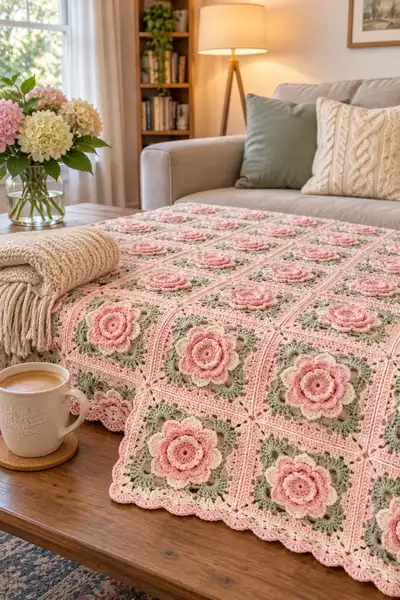
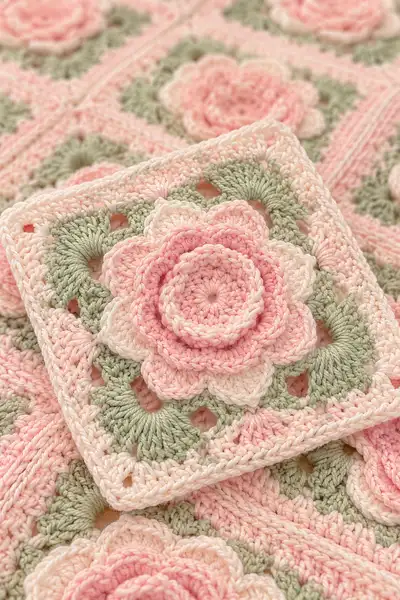
A romantic bedspread made of layered 3D rose granny squares in soft blush pinks, cream and sage. Each square features a raised three-tiered rose, leafy corner fans and a delicate scalloped border. The pattern includes step-by-step instructions for the floral motif, square formation, join-as-you-go assembly and finishing border. Perfect for an heirloom throw or bedspread with a vintage cottage aesthetic.
Progress Tracker
0% Complete
— Notes & Gauge :
Info :
This pattern is written in US terms. Gauge is not critical for motif look, but for square size aim for approximately 4.5" (11.5cm) per finished square when using worsted/light-worsted cotton and 3.5mm hook. If your squares are larger or smaller, adjust hook size accordingly. Count your finished rounds to match assembly instructions.
Info :
Each square is constructed in rounds. Use stitch markers to mark round starts and corners. Change color on last yarn-over of the previous stitch to keep joins tidy. Blocks of Info sections are included throughout for tips and technique reminders.
— Center Ring (Rose Base) :
Round 1 :
6 sc in magic ring (6)
Round 2 :
Inc in each st around (12)
Round 3 :
(1 sc, inc) x 6 (18)
Info :
This small 18-stitch disc forms the base for the first petal layer. Keep tension even so subsequent petals sit flat.
Round 4 :
(2 sc, inc) x 6 (24)
Round 5 :
1 sc in each st (24)
Info :
You may use a slightly smaller hook for rounds 1-5 to tighten the center if you prefer a more compact rose center. Fasten off or leave attached for continuous work depending on your comfort.
— Inner Petal Layer (Petal Row A) :
Round 6 :
Join petal color with sl st to next st, ch1, *sc in next st, ch3, skip 1 st, sc in next st; rep from * around to create 12 ch3 loops (24 sc, 12 ch3 loops total). Join with sl st to first sc
Info :
These ch3 loops form the foundation for the petal clusters. Keep loops even; count loops before proceeding.
Round 7 :
*In next ch3 loop work (sc, hdc, 3 dc, hdc, sc) to form a petal, sl st into next sc; rep from * around (12 petals)
Round 8 :
Sl st in center of each petal to round it slightly, then sl st to base and fasten off if changing color (petal layer A completed)
Info :
Use gentle shaping of petals: after creating the fan, pull the fan into a shallow cup by slipping into the petal center. Do not pull too tight; petals should remain slightly raised.
— Middle Petal Layer (Petal Row B) :
Round 9 :
Join middle petal color with sl st behind the spaces between petals to stagger placement, ch1, sc in same place, *ch4, sc between next two petals; rep from * to form 12 ch4 loops. Join with sl st to first sc
Round 10 :
*In next ch4 loop work (sc, hdc, 4 dc, hdc, sc) to form a larger petal, sl st into next sc; rep from * around (12 larger petals)
Round 11 :
Sl st in the center of each larger petal to shape, then sl st to base and fasten off if desired (middle petal layer complete)
Info :
Petal Row B sits slightly overlapping Row A; offset placement by working into spaces between Row A petals. This creates a 3D layered appearance.
— Outer Petal Layer (Petal Row C) :
Round 12 :
Join outer petal color (use same as Round 10 or slightly darker for depth) on back loops behind Row B, ch1, sc, *ch5, sc into next space between petals; rep around (12 ch5 loops). Join with sl st
Round 13 :
*In ch5 loop work (sc, hdc, 5 dc, hdc, sc) to make bold outer petal, sl st to next sc; rep from * around (12 outer petals)
Round 14 :
Carefully fold outer petals slightly outward and sl st in petal centers to keep them raised. Fasten off remaining tails and weave in ends on wrong side.
Info :
If using variegated yarn for petals, consider alternating rows of slightly different shades for a gentle ombre effect. Always fasten off between major color changes to avoid visible loops.
— Decorative Raised Center Ring (Optional accent) :
Round 15 :
Re-join smallest center color (or contrast) to the very center with sl st behind round 5, ch1, work 12 sc evenly around the small inner circle (12)
Round 16 :
*Work 3 sc in the next st, skip 1; rep around to form tiny raised bobbles (12 clusters). Join and fasten off leaving long tail for securing if needed
Info :
This raised ring adds a delicate focal point to each rose. It can be omitted for simpler motifs or exaggerated for extra dimension.
— Secure Petals & Trim (Stitching Petals Together) :
Round 17 :
Using a matching yarn tail and yarn needle, take small whip stitches through the base of the three petal layers to tether them together where they overlap to prevent shifting. Make 12 small stitches evenly around the base.
Info :
Do not pull tight when stitching layers; aim for secure but invisible tacking. This stabilizes petals during blocking and joining with square rounds.
— Leaf and Fan Foundation (Green Round Start) :
Round 18 :
Join sage green in any stitch behind a petal base, ch1, sc in same st, *ch3, skip 2 sts, sc in next st; rep until you have 12 ch3 loops between petals. Join with sl st (24 sc, 12 ch3 loops)
Round 19 :
*In each ch3 loop work (sc, hdc, 5 dc, hdc, sc) to form a leaf/fan; rep around (12 leaf fans). Fasten off and weave ends.
Info :
Leaf fans will occupy the corners later when you square-off. Work tides evenly so fans sit like little scallops around the rose; keep their outer edges uniform for clean square edges.
— Begin Square Formation (Round 1 of Square) :
Round 20 :
With cream/ivory join in the top of any leaf fan outermost stitch, ch1, sc evenly across to next corner area (work 1 sc in each st and 3 sc in each space between fans to create base). Work until the full round is complete and join with sl st. Aim for 48 sts total (approx). Adjust to maintain symmetry
Info :
Round 20 is flexible: you may count to a set number (example 48 sc) or work evenly until you reach the natural square outline created by leaf fans. Use stitch markers at four equidistant points for the future corners.
Round 21 :
Ch3 (counts as dc), dc in same st, dc across next 10 sts, corner: (2 dc, ch2, 2 dc) in corner sp, dc across next 11 sts, corner: (2 dc,ch2,2 dc); repeat around to make 4 corners, join with sl st to top of ch3. Count will be approx 64 dc with 4 ch2 corner spaces.
Info :
This establishes the classic square shape with defined corners. If you have more/fewer stitches across sides, distribute dc evenly, maintaining 4 corner clusters of (2 dc,ch2,2 dc).
— Square Round 3-6 (Build out square) :
Round 22 :
Ch3, dc in each dc around, in corner spaces work (2 dc,ch2,2 dc). Join. (Same stitch count as previous round)
Round 23 :
Repeat Round 22 to expand square further. (Even dc round)
Info :
Work 2-4 rounds of dc to square up to a neat frame around your floral center; this determines final square size. Count rounds to match companion squares for consistent assembly.
Round 24 :
Change to lighter pink if desired. Ch1, sc in each dc around, working (sc, ch2, sc) in each corner space to maintain square corners. This creates a tidy frame ready for decorative edging. Join with sl st.
Info :
Switch to sc rounds or use BLO to create texture at the square edge. For the pictured effect, a sc round in pale pink/cream gives a clean border before final decorative rows.
— Decorative Box Stitch Round (texture) :
Round 25 :
Ch3 (counts as dc), *skip next st, 3 dc in next st (cluster), skip next st, dc in next st; rep around to create a textured box stitch look; in corner spaces work (2 dc,ch2,2 dc). Join. Count will vary depending on your earlier dc count; ensure clusters are evenly placed.
Info :
Adjust counts so that clusters line up symmetrically on each side. If necessary, add or remove a dc before a corner to evenly space clusters. This round gives a slightly raised texture complementing the rose.
— Corner Detail & Picot Row :
Round 26 :
Ch1, sc in each st until corner, in corner space work (sc, ch3, sc) to create a small decorative ch3 corner, continue across the side. Join with sl st.
Round 27 :
Picot round: ch1, sc in next 2 sts, (ch3, sl st into top of last sc) for picot, sc in next 4 sts; repeat along each side and into corner chain spaces work (sc, ch3, sl st into same sc) for a delicate decorative corner. Join and fasten off.
Info :
Picots add a lacy vintage feel. If you prefer a simpler look, substitute a sc round instead. Keep tension loose on picots to avoid curling edges.
— Join-As-You-Go Preparation :
Round 28 :
If you plan to join-as-you-go (JAYG), stop after Round 25 and use Round 26 and onward to join squares. Lay out your squares in final order and keep them blocked to the same dimensions.
Info :
JAYG is ideal for making a large bedspread as it avoids lots of finishing sewing. Work the joining round on the last round of each new square: you will join a side by slip-stitching into the corresponding stitches of an already-placed square.
— Join-As-You-Go (Joining One Side) :
Round 29 :
With right sides facing, place completed square A (existing) and square B (new) so you are working on square B last round. When you reach the side to join, ch1, sc in next st, *insert hook under next available loop of square A (corresponding stitch), sl st through both pieces (or sl st into A then sc into B as preferred), sc into next st of B; rep along side until corner.
Round 30 :
At corner, work (sc in corner of B, sl st into corner of A, sc in corner of B) then continue joining next side when you reach it. Repeat until two or more sides are joined. When joining finished, fasten off and weave ends.
Info :
Maintain consistent tension while joining. If sl st looks loose, use sc-through-both method for a neater, flatter seam. Pin squares before joining to align petals and corners perfectly.
— Alternative: Whipstitch Joining :
Round 31 :
Lay two squares wrong sides together. Using yarn tail and yarn needle, whipstitch along matching sc posts through both loops, taking even small stitches. Fasten off and weave ends. Repeat to assemble large panels.
Info :
Whipstitch gives a nearly invisible seam when using matching yarn and small stitches. Use a ladder stitch for a completely flat join. JAYG gives a continuous crochet look; choose the finish you prefer.
— Border Round 1 (Edge Stabilizer) :
Round 32 :
Once all squares are joined into panels, with right side facing join cream yarn at any corner, ch1, sc evenly around entire blanket edge working (sc, ch2, sc) in each corner. Work 1 sc in each stitch and 3 sc in each corner chain for reinforcement. Join with sl st and fasten off.
Info :
This stabilizer round evens out joins and prepares the edge for decorative rounds. Count corners and place markers to ensure neat symmetry.
— Border Round 2 (Texture Ridge) :
Round 33 :
Join pale pink, ch2 (counts as hdc), hdc in each sc around, in corners work (hdc,ch2,hdc). Join. This creates a raised ridge and softens the square join lines.
Info :
Use BLO or FLO here if you'd like a subtle rib effect that frames the blanket; for the pictured texture keep standard hdc across.
— Border Round 3 (Shell Foundation) :
Round 34 :
Join rose color, ch1, sc in same st, *skip next 2 sts, 5 dc in next st (shell), skip next 2 sts, sc in next st; rep around placing shells evenly; in corners keep sc into corner spaces. Join with sl st.
Info :
Space shells evenly; if you hit a corner, work scs into corner space to keep shells centered on sides. This round begins the scalloped finishing you see along the edge.
— Border Round 4 (Double Shell) :
Round 35 :
Ch1, sc in same st, *in shell work (sc, ch3, sc) to make deeper scallop, sc in next sc between shells; rep around. In corners work sc into corner spaces with ch3 loop for corner lace. Join and fasten off.
Info :
This round deepens the scallop and creates the pretty scalloped edge seen in the photographs. Adjust ch3 to ch4 for larger scallops if desired.
— Final Picot/Scallop Round (Finish) :
Round 36 :
Join cream, ch1, sc into first st, *ch3, sl st into top of last sc for small picot, sc into next 4 sts; rep around to create a delicate picot accent between scallops. Work two extra picots at each corner for definition. Fasten off and weave in ends thoroughly.
Info :
Blocking after finishing is crucial: pin the blanket to final dimensions and steam/block each square so roses sit proud and edges lay flat. Use iron on steam setting without touching yarn directly (or use dry blocking) if using cotton-blend yarn.
— Optional Deep Frill Border (Extra Rows) :
Round 37 :
To make a deeper frill, join rose color, ch3 (counts as dc), dc in next 2 sts, *skip 1, 7 dc in next st, skip 1, dc in next 3 sts; rep around placing larger shells on each side. Work (2 dc,ch2,2 dc) in corners. Join.
Round 38 :
Ch1, sc in each dc around to tidy edge, work (sc,ch2,sc) in corners. Join and fasten off.
Info :
Deep frill adds more vintage drama and is recommended for bedspread use. It increases perimeter by several inches depending on how many rows you add. Add as many frill rounds as desired for a dramatic drape.
— Alternative Center Variation (Simpler Flat Rose) :
Round 39 :
If you prefer a flatter center for lap blankets, omit Round 16 raised ring and work a continuous round of sc across Rounds 6-12 to flatten petal layers slightly.
Info :
Flattening the center reduces bulk when making a large bedspread and yields a neat, low-profile motif suitable for frequent use.
— Blocking & Finishing :
Round 40 :
Block each square to the same dimension: pin to measured size on blocking board, lightly steam or wet block according to yarn instructions. Allow to dry completely before joining and finishing border rounds.
Info :
Blocking harmonizes rose petals and square edges—do not skip. If you used acrylic yarn, use steam blocking carefully; for cotton, wet blocking yields the best flatness and crisp edges.
— Stitch Counts Summary (Reference) :
Info :
Typical motif counts after rounds will approximate: Center rounds ~24 sc disc, Petal rounds create 12 petals, Leaf round yields 12 fans, Square framing rounds will produce between 48-64 dc depending on how many expand rounds you choose. Adjust for desired finished square size.
Info :
For a bedspread similar to pictured using 30 squares (5x6) estimate yarn usage in Materials. If making larger, scale yarn accordingly.
— Pattern Troubleshooting Rounds (Extra Guidance) :
Round 41 :
If petals flare outward too much, add a securing round of slip stitches around petal bases pulling just enough to curl edges inward slightly. Work gently in small sections.
Round 42 :
If corners pucker, add additional dc in corner clusters to widen the corner - e.g., (3 dc,ch2,3 dc) in corner spaces for greater square spread.
Info :
Always check several squares together before committing to final join to ensure uniformity across the entire bedspread.
— Labelling and Organization Advice :
Round 43 :
Label each square as you finish with a small slip of paper to track its position in the overall layout. Organize squares into rows and count them before joining.
Info :
Organizing early prevents scrambling when assembling a large number of squares. Group by color batches if dye lot differences exist.
This Pink Roses Garden granny square bedspread is a labor of love and a beautiful heirloom to pass on. Each layered rose square is a little floral bouquet you crochet yourself, and watching the blanket grow row by row is endlessly satisfying. The final scalloped border frames the blooms perfectly and adds a polished vintage finish. 🧶🌸 Snuggle under it, gift it to someone special, or display it as a centerpiece — every stitch tells a story. Happy crocheting! 🎀