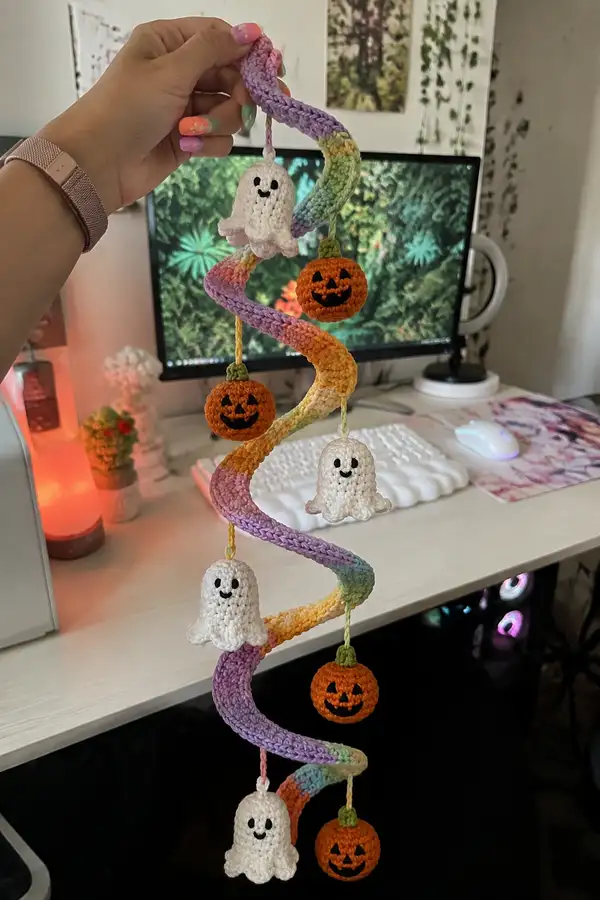
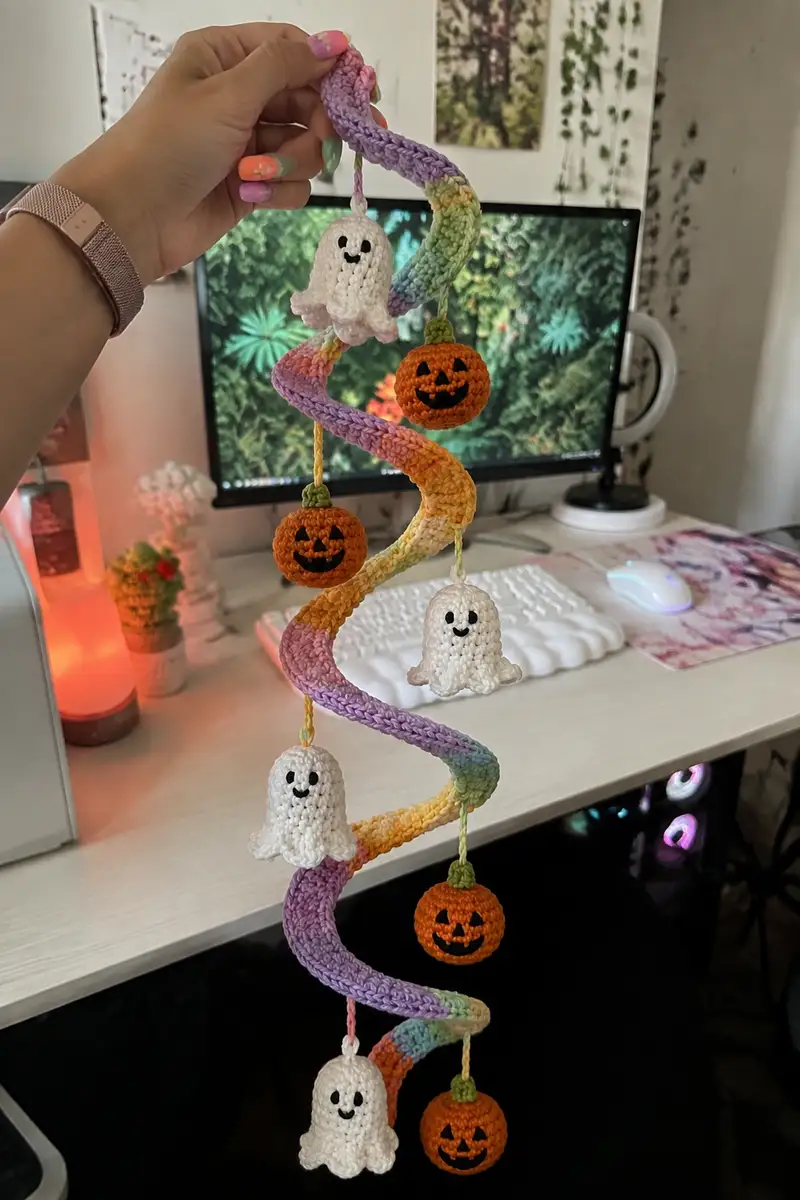
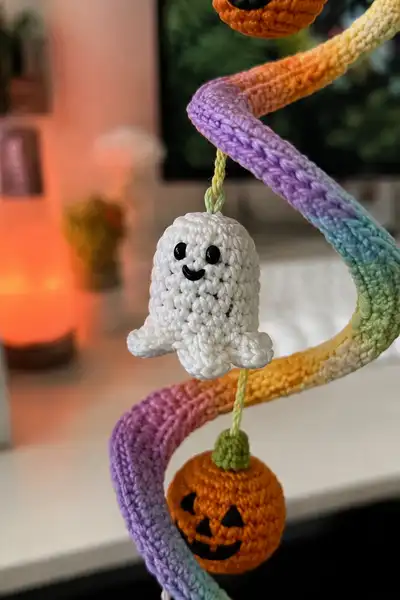
Create a whimsical Rainbow Pastel Spiral Halloween Garland featuring tiny smiling ghosts and jack-o-lantern pumpkins suspended along a soft crocheted spiral. This bright, pastel variegated spiral pairs playful Halloween charms with a dreamy color palette. Perfect for a doorway, window, or as a seasonal room accent—lightweight, decorative, and easy to customize.
Progress Tracker
0% Complete
— Materials & Gauge :
Info :
Gauge is not critical for this decorative garland but stitches should be fairly tight to prevent stuffing showing. With DK light-worsted yarn and 3.5mm hook, 10 sc x 10 rounds = approximately 4cm x 4cm in flat swatch. Adjust hook if your fabric is loose.
— Spiral Tube (make 1 - core structure) :
Round 1 :
6 sc in magic ring (6)
Round 3 :
(1 sc, inc) x 6 (18)
Round 4 :
(2 sc, inc) x 6 (24)
Round 5 :
(3 sc, inc) x 6 (30)
Info :
We will keep tube at 30 sts circumference to create a medium-thickness spiral. If you want a thinner or chunkier spiral adjust the increases in rounds 3-5 accordingly and keep the same number for even rounds.
Rounds 6-15 :
1 sc in each st (30)
Info :
Change to your variegated yarn (if using separate variegated skein) now. If working with self-striping variegated yarn, no additional change required — the color progression will create the pastel rainbow effect shown.
Rounds 16-25 :
1 sc in each st (30)
Info :
If you want the spiral to be more structural, feed an 18-20 gauge floral wire into the tube later (see Info at round 26). For a softer hanging garland you can omit the wire and stuff lightly only.
Rounds 26-35 :
1 sc in each st (30)
Info :
Begin stuffing the tube lightly at round 30. Use small amounts of fiberfill, distributing evenly. The tube should be gently padded, not solid; overstuffing makes the spiral rigid and less attractive.
Rounds 36-45 :
1 sc in each st (30)
Info :
Every 10 rounds check length to compare to reference if you want the same number of twists (6 charms spaced along the spiral). You can make the spiral longer or shorter by adding or removing sets of 10 rounds.
Rounds 46-55 :
1 sc in each st (30)
Info :
At round 55 route an optional long piece of floral wire into the center of the tube: pull up a loop about 10cm long out of one side, insert wire and continue crocheting to encase the wire. Leave 2–3cm of wire poking out at each end to anchor or twist into a loop.
Rounds 56-65 :
1 sc in each st (30)
Info :
If carrying yarn when color changes occur, carry the unused yarn along the inside of the tube so floats are hidden (only works if tube is not fully stuffed until later).
Rounds 66-75 :
1 sc in each st (30)
Info :
To create a spiral that naturally twists when hung, you can strategically block the tube after finishing by wrapping it around a cylindrical object (neck of bottle) and steaming lightly if fiber allows. If using acrylic yarn avoid steam; instead manually coil and set with wire.
Rounds 76-85 :
1 sc in each st (30)
Info :
Measure the finished tube length now — for the sample garland the tube after 85 even rounds produced approximately 65-75cm of length. Add more rounds if you want a longer garland for additional charms.
Rounds 86-95 :
1 sc in each st (30)
Info :
Finish stuffing the tube evenly, then work finishing rounds to close the top and create the hanging loop. Stuff ends more firmly to help maintain spiral shape.
Round 96 :
(3 sc, dec) x 6 (24)
Round 97 :
(2 sc, dec) x 6 (18)
Round 98 :
(1 sc, dec) x 6 (12)
Info :
When you reach 12 sts, leave a long tail to pull through and close the tube; this will form the top base where the hanging loop is attached. If you have inserted wire, ensure wire end is tucked and secured before final closure.
Info :
Fasten off leaving a 25–30cm tail for the hanging loop. Thread tail onto yarn needle, weave around remaining 6 sts, pull tight to close. Use remaining tail to form a small loop, sew securely and weave in ends.
— Hanging Cords (make 6) :
Info :
These cords connect the spiral to the charms. Make 6 cords of approximately 8–12 cm (finished hanging length from twist to charm top). You can make simple twisted cords, i-cords, or short chains ended with a sl st loop to attach to spiral at desired rounds.
Cord Option A :
Ch 30, sl st in second ch from hook and each ch across to create a tightly crocheted chain cord (approx 12 cm). Fasten off and weave in tail. Make 6.
Cord Option B :
Create a 4-strand twisted cord: cut three 40 cm lengths of yarn, fold in half, knot at fold, twist tightly and fold to form a stable hanging cord. Secure end with a few wraps of scrap yarn and knot. Make 6.
Info :
Attach cords at the inside of spiral by slipping the working yarn tail under the top loops on the chosen round then sewing securely. Space charms evenly; sample spacing: attach cords at rounds 16, 28, 40, 52, 64, 76 (counting from top of finished spiral).
— Ghost (make 4) :
Round 1 :
6 sc in magic ring (6)
Round 3 :
(1 sc, inc) x 6 (18)
Round 4 :
(2 sc, inc) x 6 (24)
Round 5 :
(3 sc, inc) x 6 (30)
Info :
At this stage the ghost body is forming. Place safety eyes between rounds 7-9, approximately 6-8 sts apart depending on expression. If embroidering eyes, do this later after closing top but before final stuffing.
Rounds 6-10 :
1 sc in each st (30)
Info :
Work even rounds to create height. For a slightly taller ghost add extra even rounds (11-12) to suit your desired scale. The sample ghosts used 12 even rounds giving a slightly elongated bell shape.
Round 11 :
(3 sc, dec) x 6 (24)
Round 12 :
(2 sc, dec) x 6 (18)
Info :
Begin stuffing lightly here, fill until body feels plump but still soft. Stuff intermittently so the opening stays manageable for the ruffle step below.
Round 13 :
(1 sc, dec) x 6 (12)
Info :
We will now create the scalloped skirt by working shells around the bottom edge. With the ghost held upside-down, attach yarn at any stitch of Round 6 (the bottom edge before decreases) and work skirt rounds around the outer rim.
Skirt Round 1 :
Working into the edge stitches around base (counts will vary depending on where you join), *ch 2, skip 1 st, sl st in next st* repeat around to form small loops. Join with sl st to first loop.
Skirt Round 2 :
Into each ch-2 loop work (sc, hdc, dc, hdc, sc) to create a small shell. Repeat around for 6 scallops (approx) depending on spacing. Join with sl st to first shell.
Info :
If you prefer a simpler frill, instead ch 3 loops and sc into loops next round. For the sample ghost the scalloped hem used 6 shells spaced evenly to create the wavy bottom shown.
Skirt Finish :
Fasten off leaving a 25 cm tail for sewing to hanging cord. Weave tail through the top center of the ghost (through the top 1–2 rounds), form a small loop and knot securely so you can sew the cord into place. Hide the tail by weaving into body.
Face Option A :
Attach 6–8mm safety eyes between rounds 7-8 and embroider a smiling mouth with black yarn using small satin stitch. Secure eyes before final stuffing.
Face Option B :
Embroider eyes and smile with black embroidery thread after completing ghost for a child-safe finish. Use small French knots for eye sparkle if desired.
Info :
For the top hanging point, run the cord or twisted yarn through the topmost center of the ghost and knot inside so the ghost faces outward when hanging. Make sure the knot is secure and the hanging cord is sewn through a couple of stitches to prevent rotation.
— Pumpkin (make 4) :
Round 1 :
6 sc in magic ring (6)
Round 3 :
(1 sc, inc) x 6 (18)
Round 4 :
(2 sc, inc) x 6 (24)
Round 5 :
(3 sc, inc) x 6 (30)
Round 6-9 :
1 sc in each st (30)
Info :
For pumpkins we keep a round sphere. These rounds form the widest part of the pumpkin. If you prefer a flatter pumpkin, stop increasing earlier and work more even rounds.
Round 10 :
(3 sc, dec) x 6 (24)
Round 11 :
(2 sc, dec) x 6 (18)
Info :
Begin stuffing the pumpkin firmly but not overpacked, leaving room to cinch the top. If you want prominent vertical ribs, thread a length of contrasting yarn through the pumpkin later to cinch grooves (instructions follow).
Round 12 :
(1 sc, dec) x 6 (12)
Info :
Close top by pulling tail through and cinching, but leave a tail for attaching a short stem and the hanging cord. For pumpkin face, either embroider eyes and mouth with black yarn or sew on pre-cut felt shapes.
Stem :
With green yarn: ch 2, 6 sc in second ch from hook (6). Round 2: inc x6 (12). Round 3: 1 sc in each st (12). Fasten off leaving tail to sew. Cup the stem slightly when sewing to create a bulbous top.
Info :
To create vertical pumpkin ribs: use a long length of black or darker orange yarn and a yarn needle. Insert needle through center top, out bottom at one point, then back to top at next rib location; repeat for 6–8 evenly spaced vertical lines and pull gently to create shallow grooves. Secure ends inside and weave in.
Face Option :
Embroider triangle eyes and jagged mouth using black yarn and satin stitch. Alternatively, cut small felt shapes and glue/sew in place. For durability, sewing is preferable.
Attachment :
Sew the stem to the top center of the pumpkin using tail. Weave hanging cord through the stem base or stitch cord directly to uppermost rounds so the pumpkin hangs centered.
— Small Details & Alternate Techniques :
Info :
To make charms lighter, use smaller yarn and a finer hook (e.g. 3.0mm) and adjust rounds: reduce even rounds to shorten charms. To make charms more robust, use a slightly thicker yarn and add a tiny amount of fabric glue to secure embroidered faces.
Info :
To create cheek blush on ghosts use a tiny bit of dry pastel chalk or fabric blush applied with a cotton swab and sealed lightly with a textile medium. Test on scrap yarn first.
— Finishing & Assembly :
Info :
Before assembly, pin all charms to the spiral to visualize spacing. The sample garland had 6 charms spaced evenly for a balanced look. Hang the spiral and adjust positions before final sewing.
Step 1 :
Lay spiral flat and decide placement order (top to bottom in sample: ghost, pumpkin, ghost, pumpkin, ghost, pumpkin). Pin each cord to an inner stitch of the spiral at the recommended rounds. For a more secure hold, sew through several spiral rounds when attaching the cord end.
Step 2 :
Sew each charm to the end of its hanging cord: weave cord tail through the topmost stitches of the charm (for ghosts, through top center and knot; for pumpkins, through stem base). Double-knot and weave ends back into body to hide.
Step 3 :
Check charm orientation. If a charm tilts, sew a short second stitch through the spiral and into the charm body to stabilize. Keep stitches small and tidy to avoid visible hanging threads.
Step 4 :
If you inserted wire in the spiral core, twist the top wire ends to a small loop to hang and tuck bottom end inside the lower end and secure with a couple of stitches. If no wire was used, secure the hanging loop formed at spiral top by sewing a small reinforcement piece of yarn over the loop base.
Info :
Weave all loose ends into neighboring stitches and trim flush. Steam-block carefully if yarn allows to relax stitches and encourage the spiral to settle into a smooth curve. Acrylic yarns should not be steamed — instead shape manually.
Step 5 :
Hang your garland and make final adjustments. Slightly shift charms so they alternate on opposite sides of the spiral for visual interest. Tighten any loose knots and add small dabs of fabric glue where needed for extra security on embroidered faces.
Info :
Store this garland flat or on a hanger; avoid compressing the spiral for long-term shape retention. Remove dust gently with a lint roller or careful spot clean with a damp cloth if needed.
This pastel Halloween garland is a joyful blend of spooky and sweet — tiny ghosts and smiling pumpkins suspended on a dreamy rainbow spiral. Each piece is stitch-by-stitch satisfying, and the finished hanging decoration brings instant whimsy to any room. 🎃👻 I hope it becomes a favorite seasonal accent in your home — enjoy creating and customizing every little charm! 🧶✨