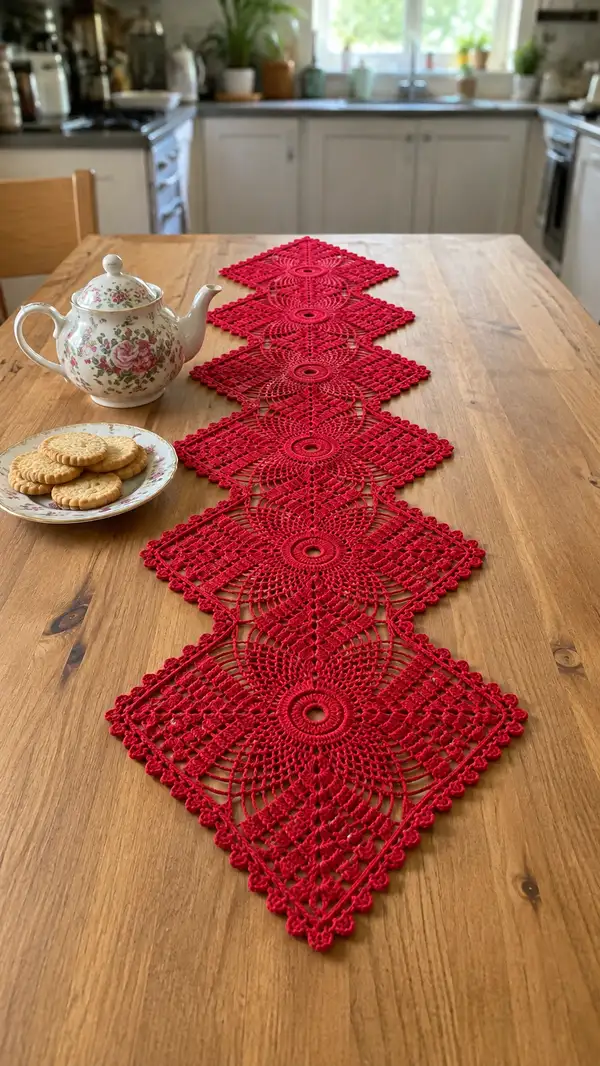
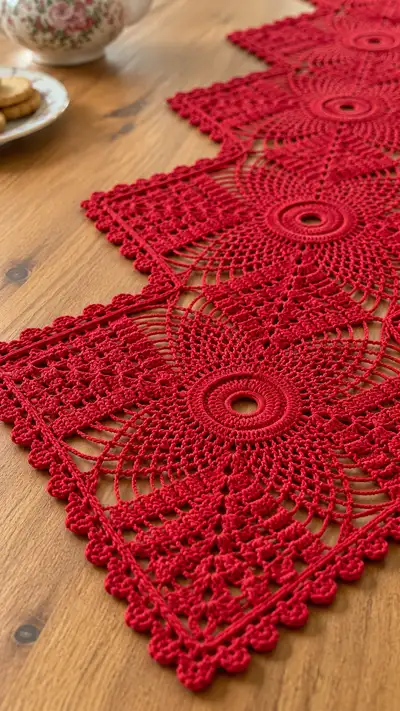
Bring vintage elegance to your dining table with this long red lace diamond runner. The design features six joined square motifs with a circular, sunburst center, delicate fan petals and a scalloped picot edging. Worked in fine cotton for a crisp finish, this runner lies flat and drapes beautifully along the table. Perfect for seasonal decor, tea settings, or a romantic centerpiece.
Progress Tracker
0% Complete
— Notes and Gauge :
Info :
This pattern is written in US terms. Gauge is not critical for yardage but will affect finished motif size. Using a 1.75mm hook with mercerized cotton size 10, each finished square motif measures approximately 18cm (7") corner to corner. If you use DK cotton and a 3.25mm hook, expect each motif to finish around 22–24cm (8.5–9.5"). Measurements in parentheses below are stitch counts for the round. Work loosely when creating long arches and more firmly when creating central rounds to prevent the center from gaping.
— Motif (make 6 total) :
Round 1 :
Make a magic ring (MR). Ch1, 8 sc into MR. Join with sl st to first sc. (8)
Round 2 :
Ch3 (counts as dc), dc in same st, 2 dc in each st around. Join with sl st to top of ch3. (16)
Round 3 :
Ch3, dc in same st, *dc in next st, 2 dc in next st; rep from * around. Join. (24)
Round 4 :
Ch3, dc in same st, *(2 dc),(dc in next 2 sts); rep from * around. Join. (32)
Info :
Keep the stitches of the central rounds slightly tighter than later rounds to create a firm sunburst centre. Use a marker to note the first dc of each round to keep track of repeats.
Round 5 :
Ch4 (counts as dc+ch1), dc in same st, *dc in next 3 sts, dc + ch1 in next st; rep from * around. Join to top of initial ch4. (40 with ch-1 spaces)
Round 6 :
Ch1 (does not count), sc in same st, *ch6, sk 3 dc, sc in next dc; rep from * around to create 10 chain-spokes. Join with sl st to first sc. (10 ch-6 spaces)
Round 7 :
Into each ch-6 sp: *(sc, hdc, 5 dc, hdc, sc) — this creates a petal shell; rep around into each ch-6. Join with sl st to first sc. (10 petals)
Round 8 :
Ch3, dc in same st, *ch3, sk to center of next petal, dc cluster: (dc, ch2, dc) into petal center; ch3, sk to next petal; rep around. Join. (10 dc clusters with ch-3 arches)
Info :
Petal shaping creates an initial circular floral motif. Keep petals evenly tensioned and block each motif flat after completion to square up petals before continuing to square shaping rounds.
Round 9 :
Ch1, sc in same st, *ch7, sc in top of next petal (directly opposite), rep around. Join. (10 ch-7 arches)
Round 10 :
Work into each ch-7 arch: sl st, ch3, 11 dc (work long dc fan across arch), ch3, sl st into same arch; rep around to form extended fan spokes across each arch. Join. (10 fans)
Round 11 :
Ch1, sc in same st, *ch4, sk 5 dc across fan, sc at base between fans; rep around. Join. (10 ch-4 spaces)
Round 12 :
Into each ch-4 sp: *(sc, ch3, tr, ch3, sc) to create small arches that will become corner shaping. Join. (10 short arches)
Info :
At this stage the motif is transitioning from round to square. Use a blocking pin at each of the 4 cardinal-axis petals to visualize the diamond orientation (four major points will be created in the next rounds).
Round 13 :
Ch1, sc in same st, *ch9, sc into center of second next fan (to form longer bridge), rep around. Join. (10 ch-9 arches)
Round 14 :
Work wide loop fills across the new arches: Into each ch-9: sl st, ch3, 15 dc, ch3, sl st in same arch. Join. (10 large fans)
Round 15 :
Ch1, sc in same st, *ch5, sc between large fans; rep around. Join. (10 ch-5 spaces)
Round 16 :
Into each ch-5: *(sc, ch2, 5 dc shell, ch2, sc) — this begins to form the straight edges for the eventual square. Join. (10 small shells)
Info :
From rounds 13–16 we pull the circular motif into an eight-pointed rosette that will be squared. Keep tension consistent so that the outer shells align into four corner groups on the next rounds.
Round 17 :
Ch2 (counts as hdc), hdc in same st, *hdc across next 8 sts/shells, then in next position work (hdc, ch3, hdc) to create a corner space; rep this sequence to form 4 corner ch-3 spaces. Join. (Approx 40 hdc total including corners)
Round 18 :
Work into each straight-edge hdc run: *(2 dc in next 2 sts, ch2) across the edge sections; when you reach a corner ch-3 space work (2 dc, ch3, 2 dc) into corner; continue around to create a squared outline. Join. (Edge segments formed, 4 corners with ch-3)
Round 19 :
Ch1, sc in same st, *ch4, sc into the third dc of the next edge block to create evenly spaced ch-4 mesh across edges and ch-4 in corners as well. Join. (Even ch-4 mesh around edges)
Round 20 :
Into each ch-4 space across the edge work: sc, ch3, 3 dc, ch3, sc — repeat across all edge ch-4s. This fills the mesh with decorative clusters and creates a more solid lace panel. Join. (Clusters across edge)
Info :
At rounds 17–20 the motif has become a loose square. Count corner sections and verify you have 4 corner groups; pin the motif into a diamond shape with a corner upward to check square symmetry before proceeding.
Round 21 :
Ch1, sc in same st, *(ch3, sk 3, sc) across edge clusters; at corners work (sc, ch5, sc) into corner ch-3 to create larger corner arches; rep around. Join. (Larger corner arches created)
Round 22 :
Into each corner ch-5 arch: work (sl st, ch3, 9 dc, ch3, sl st) to create large rounded corner fans. Into each edge ch-3: (sc, ch2, 3 dc, ch2, sc) to strengthen edges. Join. (4 corner fans and reinforced edges)
Round 23 :
Ch1, sc in same st, *ch6, sc in next edge spot; rep around to create long mesh for the center of each side. Join. (Mesh of ch-6 spaces across sides)
Round 24 :
Work an open filet across each ch-6: Into each ch-6: (sc, ch5, sc) to create prominent vertical bars which will help define the diamond. Join. (Visible vertical bars around motif)
Info :
If you prefer a denser motif, substitute hdc for sc in the side fills. For exact replication of the photo use sc and long ch spaces to maintain crisp open lace.
Round 25 :
Ch1, sc in same st, *(ch2, sc in next arch) across sides; at corners work (sc, ch3, picot, ch3, sc) to start the scalloped picot edge. Join. (Picot seeds placed at corners)
Round 26 :
Work a bobble-row across the side mesh: Into each side ch-chain work (ch3, 3 dc cluster, ch3) anchored with sc at each end; at corners work (5 dc cluster, ch5, 5 dc cluster) to create raised corner bobbles. Join. (Raised bobble texture across sides and corners)
Round 27 :
Ch1, sc in same st, *sc in each dc cluster top and sk to next cluster; work 3 sc into each corner large cluster to compact the corner. Join. (Edge smoothed and corners compact)
Info :
Check motif size now. If motifs are too small or large compared to pattern, adjust by altering hook size. Make 6 identical motifs, blocking each to a diamond orientation before joining.
Round 28 :
Final stabilization round: Ch1, sc in same st, *sc evenly across edges (about 40–48 sc depending on tension), place a small picot every 4 sc: (sc, ch3, sl st into same sc) to create delicate raised dots along edge. Join and fasten off leaving long tail for joining. (Final round count variable — approx 44 sc)
Info :
Weave in tails partially now (leave at least 15cm/6" for joining). Block each motif precisely: pin points to a template diamond shape, spray or wet block, and allow to dry fully. Proper blocking is crucial for neat joins and a flat runner.
— Center Reinforcement (optional) :
Round 29 :
If you prefer a reinforced centre, insert small 12–18mm plastic ring into the motif centre before Round 6 finishes. Rework Round 1–5 tension so the central rounds sit snugly around the ring. Alternately crochet a small tight round to encase a ring: MR, 8 sc (8), ch1, join, then continue with round 2 over the outside of the ring.
Info :
The optional ring prevents the center from collapsing and gives a more rigid look. If not using a ring, ensure Round 1-5 are worked tightly and slip stitches are snug to avoid a hole appearing in the centre.
— Join-As-You-Go Method for Runner Assembly :
Info :
This runner is pictured with 6 motifs joined corner-to-corner to form a long diamond chain. You will join motifs along two opposite sides using a join-as-you-go (JAYG) technique on the last round. Join the motifs in the order you prefer: typically start with the centre motif and add outward to keep symmetry.
Round 30 :
With the right side of Motif A facing you and Motif B placed on top (right sides together), begin the last round on Motif B. When you reach the point on Motif B where it should join to Motif A, instead of finishing that sc, sl st into the corresponding st on Motif A, ch1, and continue motif B. Repeat three or four joining sl sts evenly across the side. Continue the round on Motif B to finish its last round. Fasten off and weave in join tail. (Join using 4–6 sl sts per adjoining side depending on spacing)
Round 31 :
For a flat join, when joining side-midpoints align the ch-arches: use sl st joins through the mid-chains and anchor through cluster tops. Aim for 6 evenly spaced joins per side for stable seams. Repeat for each side connection until all motifs are linked in a chain of six diamonds. (Use consistent spacing for smooth runner).
Info :
Pin both motifs together on a flat surface before joining to ensure edges align and motif points are oriented as a diamond. Double-check symmetry by measuring distance across opposite joins before working sl sts.
Round 32 :
To reinforce joins from the top side, work a decorative connecting round over the joins: With right side facing, join yarn at a corner of Motif A near a join site, ch1, sc evenly around the exposed join seam (through both motifs' edge scs), placing a sc in each exposed join sl st and sc between joins to create an even seam. Continue around the entire runner length across all motifs. Fasten off. (Approximately 8–12 sc per motif side depending on gauge)
Round 33 :
Work a 'bridge' round to tidy open mesh areas between motifs: Join at an inner side, ch3, *sk 2 sts on motif edge, dc in next st, ch1; rep along seam inserting dc into both motifs where possible to create consistent ladder bars across joins. This reduces drift and stabilizes the runner. Fasten off. (Bridge stitches vary by join width)
Info :
When joining three or more motifs, work one side at a time and check flatness frequently. If a seam pulls in, unpick the last 2–3 joins and re-space sl sts to spread joins more evenly.
— Runner Main Border Rounds :
Round 34 :
With runner assembled, pick a long side. Join yarn at a corner point with sl st, ch1, sc in same st, then sc evenly along exposed edges of all motifs on that side including seam scs, placing 3 sc into each corner peak. Work the entire outside perimeter of the runner in this manner to create a uniform border base. Join to first sc and fasten off. (Count approx 180–220 sc depending on motifs)
Info :
This round evens out differences between motifs and creates a base for the decorative scalloped edging. Keep sc spacing consistent — use pins to mark where each motif corner meets the next to avoid bunched joins.
Round 35 :
Join yarn at any side sc; ch1, *skip 1 sc, (5 dc cluster in next sc, skip 1 sc, sc in next sc) — this alternates raised clusters with flat scs to create texture. Continue around the entire perimeter, working extra clusters at motif corners (work (7 dc cluster) at corners). Join and fasten off. (Clusters spaced approx every 3–5 sc)
Round 36 :
With right side facing, join at a cluster: ch1, sc in same st, *ch3, sc into the middle of the next dc cluster, ch3, sc into next sc; rep around. This creates small arches between clusters. Join. (Arch spaces created)
Info :
Adjust cluster sizes slightly to ensure corner clusters lie flat. If corners flare, reduce cluster count by 1–2 dc per corner cluster and add an extra sc or picot to secure shape.
Round 37 :
Work decorative picot edging: Join at any sc, *sc in next ch-3 space, picot (ch3, sl st to first ch), sc in same space, skip next sc, sc in next; rep around to place picot scallops evenly. At corners, work (sc, picot, sc) into corner sc cluster to emphasize corner points. Join and fasten off. (Picot scallops around perimeter)
Round 38 :
Optional raised bead row: Using same color and a slightly smaller hook, work into each picot loop: (sl st, ch3, 3 sc, sl st) to create a small bead. Work around entire perimeter for a pronounced beaded scallop. Fasten off and weave in ends. (Bead units around edge)
Info :
If you prefer the look in the photos (raised bobble scallop), work the bead row to add depth. For a subtler look, omit Round 38 and simply block to flatten the picots.
— Detailed Decorative Scallop (extra texture) :
Round 39 :
To recreate the larger bobble scallops seen in the photo, join at an edge sc and work: *(sc, ch3, 5 dc cluster, ch3, sc) in every second arch between clusters; rep and overlap slightly at corners. Join. (Scallop clusters placed evenly)
Round 40 :
Secure scallops with a locking round: ch1, sc in each top of scallop and between scallops, placing 3 sc around each 5-dc cluster to anchor it down. Join. (Locking round stabilizes scallops)
Info :
Work this extra decorative scallop only if you want the runner to have prominent raised edges like the photograph. It increases the runner's profile and adds extra texture when light hits the surface.
— Final Stabilization and Weaving :
Round 41 :
Weave in ends from motif joins using a blunt tapestry needle, taking yarn through several adjacent stitches: go from the right side into the wrong side and back through a different route to camouflage the tail. Tie a small knot if needed where two tails meet and weave the knot into the seam.
Round 42 :
For extra stability, whipstitch across joins on the wrong side using a matching yarn tail: work through the centre of the seam a few times and knot securely. This is especially useful if the runner will receive heavy objects or frequent handling. Clip remaining tails close to the fabric.
Info :
Weaving and hiding ends neatly prevents them from catching on tableware. If using the optional ring, weave an extra round around the ring to prevent it shifting inside the motif.
— Blocking and Final Finishing :
Round 43 :
Wet-block the entire runner: lay flat on blocking mat, pin each motif corner out to a diamond template, and stretch gently to open meshes evenly. Pin scallops so they are uniform and symmetrical. Spray with clean water or immerse then press out excess water before pinning. Allow to dry completely (12–24 hours). Remove pins and check edges; add a few extra pins and respray if necessary to perfect shape.
Round 44 :
Optional: Lightly starch the runner for a crisp table-linens finish. Use diluted spray starch and re-pin quickly, then allow to dry. Test starch on a small corner first to ensure desired stiffness. Iron only if your yarn label allows at low heat with a pressing cloth.
Info :
Proper blocking is essential. The motifs will look significantly better after blocking when all meshes open and scallops become defined. If storing, fold gently with acid-free tissue to maintain shape.
— Variations and Alternate Motif Sizes :
Round 45 :
To make a shorter runner, reduce the number of motifs assembled (3–4 motifs will make a small runner). To make a longer runner, add more motifs and maintain pattern symmetry by always adding motifs evenly from the center outward. Larger motifs: switch to DK cotton and a 3.25mm hook and scale rounds uniformly — counts for fan and corner clusters remain visually similar but stitch counts will increase slightly — reblock to required dimensions.
Info :
Substituting yarn weight affects both finished size and drape. Use a slightly smaller hook than the yarn label suggests for crisp amigurumi-like lace; for more open lace use the recommended hook size.
Round 46 :
Optional colorwork: For multi-colored runners you can change color on Round 17 when the motif begins to form corners. Carry the unused yarn inside the motif if you prefer no joining ends, or fasten off and join new color neatly to avoid color bleed into delicate meshes.
Info :
When changing color, carry yarn inside only across short distances to avoid bulk. Alternatively, crochet a discrete color-change join round that uses a thin contrast yarn for a framed look.
Round 47 :
Pattern complete. Admire your runner and style with a teapot, candles or a vase—this runner’s bold color and intricate lace will be a centerpiece. If desired, make matching coasters: work single motif and omit outermost bobble rounds to form small square coasters.
This gorgeous red lace runner will transform any table into an elegant display — perfect for holidays, tea time, or everyday charm. Every motif is a small rewarding project, and joining them creates a joyful stitch-by-stitch reveal. Enjoy the therapeutic repetition of lacework and the dramatic payoff of a beautiful finished piece. 🧶 Pin it, make it, and share your finished runner with friends and family — it’s a labor of love worth showing off! ✨