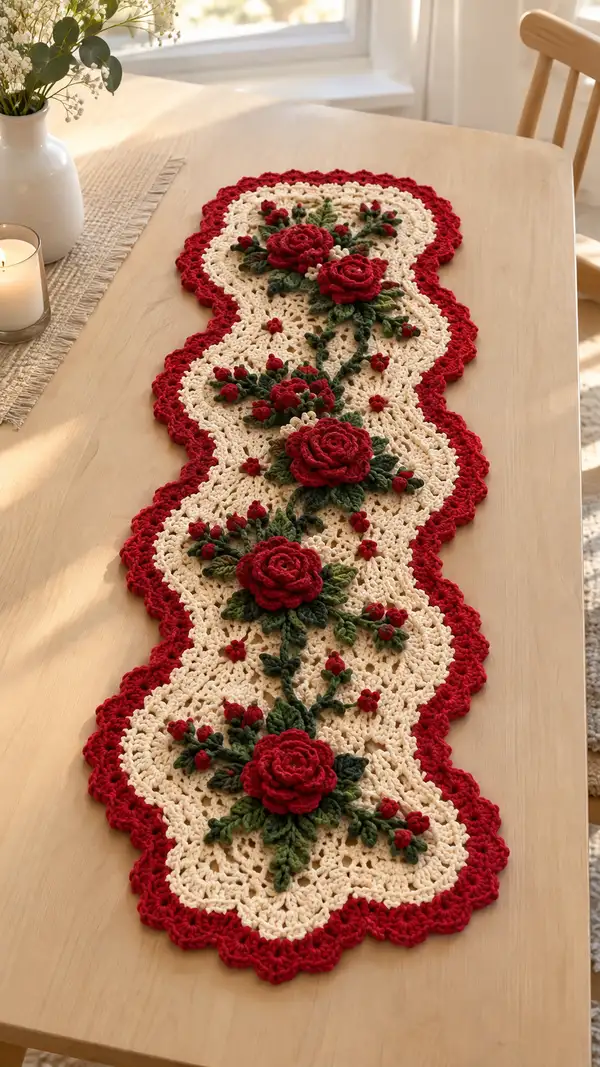
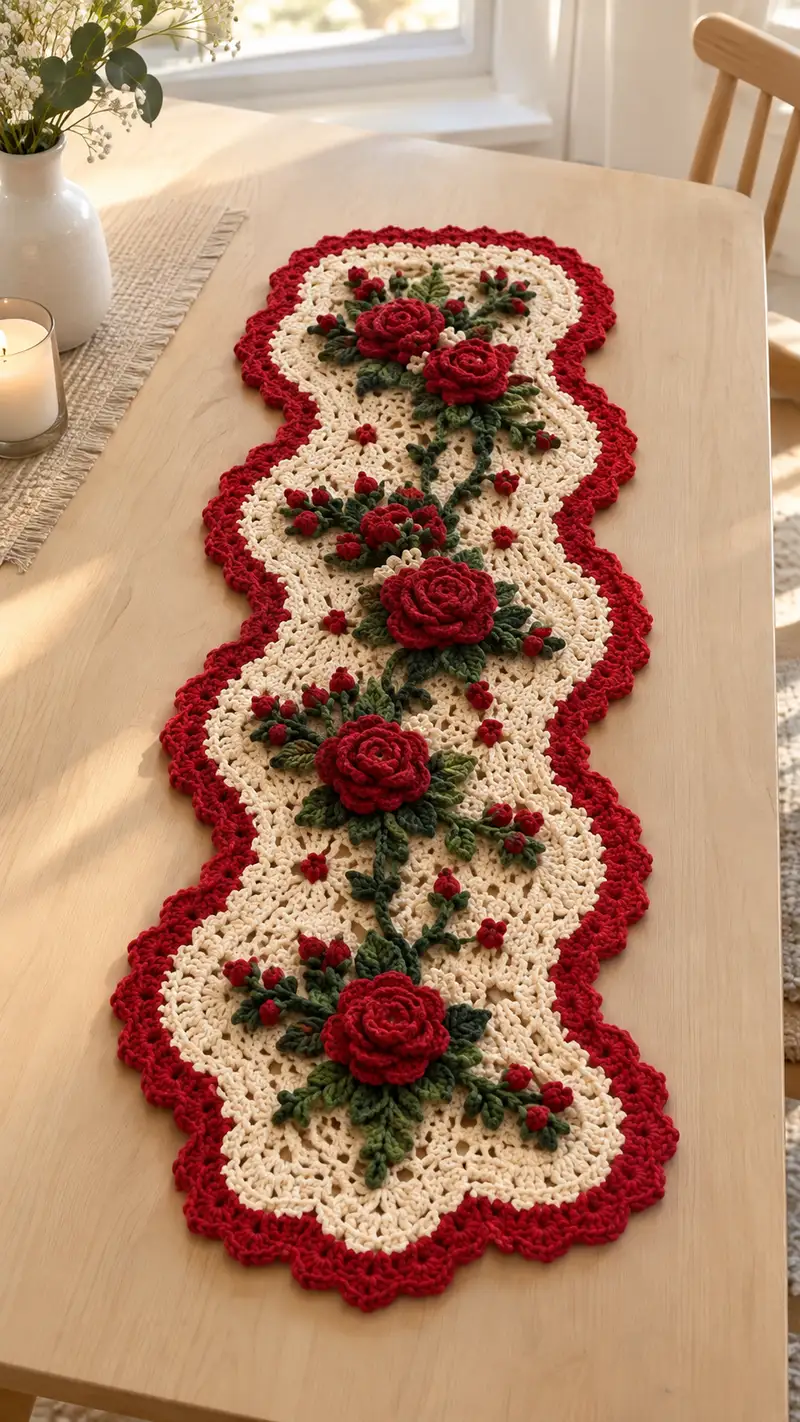
A beautifully detailed table runner featuring layered red roses, delicate green leaves and an intricate cream lace background with a rich red scalloped border. This elegant runner is perfect for dining tables, buffets or as a centerpiece for special occasions. The pattern uses applique roses and vines sewn onto a repeating lace motif to create an elongated, scalloped runner shape. Clear round-by-round instructions and assembly tips help you recreate the romantic vintage look.
Progress Tracker
0% Complete
— Overview & Structure :
Info :
This runner is built from a repeating lace motif that forms the cream base; six motifs are worked in identical fashion and joined to form the elongated runner. Each motif is heavily embellished with 3D roses, leaves, buds and vines in red and green yarn. Work motifs flat in the round, block flat, then join motifs edge-to-edge using whip stitch or join-as-you-go. Finish with a red scalloped edging worked around the full runner perimeter. Read through all sections before beginning and work a gauge swatch if desired.
— Lace Motif (Make 6 identical motifs) :
Round 1 :
Start with cream yarn. mr, 6 sc in magic ring (6)
Round 2 :
Inc in each st around (12)
Round 3 :
(1 sc, inc) x 6 (18)
Round 4 :
(2 sc, inc) x 6 (24)
Round 5 :
(3 sc, inc) x 6 (30)
Round 6 :
(4 sc, inc) x 6 (36)
Round 7 :
(5 sc, inc) x 6 (42)
Round 8 :
(6 sc, inc) x 6 (48)
Info :
At this point the motif has a stable circular base of 48 stitches. Place a stitch marker in the first stitch to mark the start. Maintain markers to help identify the six cardinal points where scallops and lobes will form (one marker per 8-stitch segment is useful).
Round 9 :
1 sc in each st (48)
Round 10 :
1 sc in each st (48)
Round 11 :
*ch 3 (counts as dc), sk 1 st, dc in next st, ch 1, sk 1 st, dc in next st* around working 24 dc groups and 24 ch-1 spaces (48 stitch-worked spaces total but 24 shell anchors) (24 dc groups)
Info :
Round 11 creates a basic open mesh. The count shows 24 worked groups; you will have 24 chain-1 spaces which will be used in later rounds to create lobes and delicate picot decorations.
Round 12 :
Into each ch-1 space: (sc, ch2, 3 dc, ch2, sc) ; between groups sl st to next dc as needed (This keeps the motif circumference approximately 48 anchors)
Round 13 :
1 sc in each dc and sc around working into established stitches, maintaining 48 anchor points (48)
Round 14 :
Into every 8th anchor (marked cardinal points): work a lobe increase to begin the scalloped outline. *At cardinal anchor: (sc, hdc, 3 dc, hdc, sc) into same anchor*; between cardinal anchors work 1 sc in each anchor. You will add 5 extra stitches at each cardinal (5 x 6 = 30 extra stitches) so new overall count becomes 78 (48+30=78)
Info :
This round purposefully increases at six equally spaced anchors to form the beginning of lobes. Place temporary markers at the six points so you can match lobes when joining motifs later.
Round 15 :
1 sc in each st around (78)
Round 16 :
To create lace mesh between lobes: *(ch 4, sk 3 sc, sl st into next) repeat around* making 26 chain-4 picot arches evenly between scalloped lobes (maintain 78 working anchors by distributing chains evenly). (78 anchors)
Round 17 :
Work into chain-4 arches: (sc, ch3, 3 dc, ch3, sc) into each arch to make delicate petal-shaped scallops; there will be 26 of these units (78 stitch anchors after work)
Info :
At this stage you have a motif with defined scalloped lobes and multiple small arches—these provide secure places to attach rose appliques and leaves. Block the motif now: pin flat and steam/block per fiber instructions. Once blocked, the lobes will open and maintain shape when joined to other motifs.
Round 18 :
1 sc in each st (78)
Round 19 :
Work a shallow scallop around all lobes: *(sc in next 4 sts, 5 dc in next st (shell), sc in next 4 sts, sl st in next st)* repeat for 6 large scallops around the outline. Each shell uses 1 anchor; this pattern yields 6 shells and maintains total anchors around 78 by distributing sl sts and scs accordingly (78)
Info :
If your stitch count differs slightly because of yarn/gauge, adjust the number of plain sc between shells to keep shells evenly spaced around the motif outline. The key is 6 large scallops for the motif outline (one at each cardinal point) and smaller scallops between.
Round 20 :
1 sc in each st (78)
Round 21 :
Work decorative clusters in small spaces to create a flat surface for applique: Into every small chain space, work (hdc, ch1, hdc). Repeat around to fill small gaps (78)
Round 22 :
Finish motif top: 1 sc in each st (78). Fasten off leaving 20-25 cm tail for joining later. Make 6 motifs identical. Block all motifs before joining.
Info :
Blocking tip: use a damp cloth and a steam iron at safe distance or spray with water then pin on blocking board to the exact scallop shape. Allow to dry thoroughly to set the shape. Proper blocking makes joining easier and neater.
— Joining Motifs Into Long Runner :
Info :
Line up 6 motifs so their long lobed sides form an S-shaped elongated runner pictured. Join motifs using whip stitch from corner to corner along two adjacent scalloped edges, or use a join-as-you-go method by slip stitching through edge loops of the next motif as you work the last round of the previous motif. Leave slight gaps to insert vines and buds later (do not over-tighten joins).
Round 1 (Join Step) :
Place motif A and motif B right sides together aligning lobes; using cream yarn and a yarn needle, work whip stitch through corresponding SC anchors along the joining side to join motifs. Make even stitches approximately every 6-8 mm. When finished join, knot and weave in tails. Repeat to join all six motifs in a linear sequence (no numeric stitch count as lengths vary by motif joining side).
Info :
Positioning tip: before stitching, pin the motifs together on the table and check the overall runner curve. If you prefer a flatter runner, arrange motifs in a straight line, otherwise follow an S shape for a more organic look. When joining, ensure scallops align and not tucked behind to avoid bulked seams.
— Rose Appliques (Make 6 large layered roses + 12 small roses/buds) :
Rose Strip Round 1 :
With red and smaller hook if desired: ch 60 (or any multiple of 6; this length yields approximately a 10-12 cm rolled rose depending on yarn). Do not join; starting in 2nd ch from hook, sc across (59 sc)
Rose Strip Round 2 :
Turn. To create petal clusters: *sc in next 2 sts, hdc in next 2 sts, 5 dc in next 2 sts, hdc in next 2 sts, sc in next 2 sts* ; repeat across. You will make approximately 59/10 = 5-6 full petal units depending on chain length; if your chain yields partial petal unit at end, adjust by finishing with sc to anchor strip. (Approx 59 anchors)
Rose Strip Round 3 :
Fasten off leaving a long tail. Roll the strip tightly from one end to the other to create the center; secure carefully by sewing the base with the long tail. For a more layered look, fold the strip slightly as you roll to make fuller outer petals. Make 6 large roses. Small buds: ch 6, work 5 sc back across (5 sc), roll and sew (make 12 small buds).
Info :
Rose shaping tip: roll loosely for a soft rose, or tighter for a compact rosette. Use a small dab of glue if you need temporary hold while sewing. Stitch the base of the rolled rose to secure it so it does not unroll when attached to the motif. If you prefer layered circles instead of strip method, you can make circular layered petals (see alternative below).
Alternative Large Rose (Layered Petal Rounds) :
mr, 6 sc in MR (6); Round 2: (1 sc, inc) x3 (9); Round 3: (2 sc, inc) x3 (12); Round 4: Fasten off leaving long tail, work 3 petals rounds by working shell clusters around the small circle: into each st make (ch2, 7 dc, ch2) then shape and sew petals outward. This produces a smaller, flatter rose—recommended for a variety of sizes.
Info :
Make 6 large roses and a dozen small buds. Adjust size by changing chain length for the strip or using a smaller/larger hook. Lightly stuff rose centers with polyester fill (very small amount) if you want a puffed center, but most roses look best unstuffed and flat.
— Leaves (Make 24 leaves of mixed sizes) :
Leaf Round 1 :
With leaf green, ch 10, sc in 2nd ch from hook and across to end (9 sc). Turn (9)
Leaf Round 2 :
Ch1, work along one long side: hdc in first st, dc in next, tr in next 2, dc in next, hdc in next, sc in next - then work along opposite long side in matching decreases: sc, hdc, dc, tr, dc, hdc to shape tip back to foundation. Fasten off (length unchanged, finishing picot optional)
Info :
You will form leaves in two sizes: full leaf as above and small leaf by starting ch 7 and following same shaping principle (makes a smaller leaf). Add BLO ribbing by working 1 sc in BLO across the next row for a veined look if desired.
Leaf Round 3 :
For veins and dimension: With darker green, whip stitch 3-4 lines from base to tip. Optional: embroider a central vein with surface slip stitches (ch1, sl st along center) to make veins pop.
Info :
Make a mixture of 16 medium leaves and 8 small leaves to place around the large roses as pictured. Slightly block leaves by pinning them flat so they curve gently—this helps when sewing them under rose bases.
— Vines and Buds (Vines are surface-crocheted) :
Vine Round 1 :
With leaf green, using surface crochet technique (or make a chain and sew): Starting at the top of a motif, ch 80-120 depending on desired vine length. For surface crochet: work slip stitches along the lace surface where vine will run, anchoring the vine to the lace. For a sewn chain vine: ch length, then sew chain down with yarn needle to form a slightly raised vine.
Vine Round 2 :
Where buds and leaves attach, leave short chain stubs of ch 4-6 and secure in place; these will serve as branch anchors for buds. For a natural look create a few gentle S-curves and loops. There is no single count—vine lengths vary by motif placement, but plan one main central vine per motif roughly 80-120 ch long.
Bud Round 3 :
Make small buds as: mr, 6 sc in MR (6) Fasten off leaving tail for sewing, or ch 4, work 6 sc across and roll into a tiny bud (6). Make 12-16 small buds across the runner.
Info :
Vine and bud placement is aesthetic—pin everything on the blocked base motifs before sewing. Vary bud sizes to keep a natural look. Use short stitches to attach buds so they do not flop away from the runner surface.
— Small Decorative Flowers (Tiny 5-petal clusters) :
Round 1 :
With red, ch5, sl st to form ring. Repeat 5 times around center to form tiny 5-petal flower: in ring work *(ch2, sl st in ring)* x5, pull tight and secure (5 mini petals). Stitch these sparsely on motifs to echo the main roses. (No global count)
Info :
Make 8-12 tiny flowers to scatter across motifs as pictured. They are purely decorative and are best sewn on with a few small stitches under the petal base.
— Assembly & Placement of Appliques :
Info :
Before sewing, lay out the joined runner and pin each large rose to the center of each motif. The pictured runner has one large rose centered on each motif with smaller leaves and buds fanning out along the vine. Place a few leaves under each rose and stitch leaves first, then center the rose and sew through the base stitches to attach to the motif. Attach buds at vine forks.
Assembly Step 1 :
Pin 6 large roses to motif centers: one rose on each motif centered over the largest scallop. When satisfied with placement, sew each rose base to the motif with long tail and needle using tight mattress or ladder-like stitches to secure the base invisibly. Double back and weave in tails for security.
Assembly Step 2 :
Sew leaves around each rose: place medium leaves (3-4) under the rose base pointing outward, and 1-2 small leaves tucked in between. Sew leaves by stitching through the base only so edges remain free and slightly raised.
Assembly Step 3 :
Sew vines next: anchor the long vine chains by stitching at their start and finish and a couple of places along their length. Sew small bud bases to the vine at branch points, making sure each bud is tight and secure (no long loose tails).
Info :
Tip: Use a blunt tapestry needle to pass through lace holes without splitting yarn. Work from the wrong side when possible to hide knots and weavings. Sew each applique securely with at least 6-8 stitches around the base for the large roses to avoid future loosening.
— Border Edging (Red scalloped edge around full runner) :
Info :
Edge is worked with red yarn in rounds; because the runner is formed from 6 motifs joined, count the number of large scallop points along the outer perimeter (each motif has 6 large scallops and multiple small scallops). For neatness, work edging in two rounds: a foundation round of even sc anchors and then a scalloped shell round.
Round 1 (Foundation) :
Attach red yarn at any outermost scallop base. Work 1 sc in every visible top-loop and sl st in corners to create a continuous edge anchor. For the entire runner you should arrive at an even total of anchors; for planning, if each motif outer perimeter yields 78 anchors then 6 motifs joined would give 468 anchors (78 x 6 = 468) minus anchors used in joins; final anchor count approx 440-468 depending on join method. Work 1 sc in each anchor around the entire runner (approx 440-468 sc).
Info :
If your anchor count is slightly different because of tension or joining, simply work 1 sc in each available stitch/space; avoid skipping or doubling anchors or shells will misalign.
Round 2 (Scallop Shells) :
*sc in next 3 anchors, 7 dc in next anchor (shell), sc in next 3 anchors, sl st in next anchor* repeat around creating pronounced scallops. The count of shells will equal the number of major scallop anchors around the runner (expected around 36 shells total if each motif contributes 6 large scallops x 6 motifs = 36 shells). After completing the round, join with sl st, fasten off and weave in ends.
Round 3 (Picot Trim Optional) :
For more decorative edge: attach red at any sc, *ch3, sl st into same anchor to form picot, sk 2 anchors, sc into next* repeat around adding picots between shells. Fasten off and weave ends.
Info :
The outer scallop count is important to ensure symmetry. If you placed 6 motifs, expect 36 pronounced scallops. Adjust spacing of sc between shells in Round 2 if needed to create precisely 36 shells.
— Finishing Touches :
Info :
Once all appliques and border are sewn, give the runner a final block. Lay the runner flat on a blocking board, shape scallops to match, and pin. Lightly steam (following yarn care instructions) or spray with water and allow to dry. This sets the lace and roses pleasingly. Weave in all ends on the wrong side and trim close to fabric.
Detailing :
If you want added realism, use a tapestry needle and darker green to add a few embroidered veins on leaves, or a tiny yellow thread center to tiny red flowers. Small touches elevate the handmade look.
Final Care :
Hand-wash gently in cool water and dry flat. Avoid wringing or machine agitation which can distort applique. Store flat or rolled to avoid creasing of the 3D roses.
Completing this runner is an immensely satisfying journey—each lace motif joins into an elegant, continuous path accentuated by rich red roses and leafy vines. The layered appliques give luxurious depth, while the cream lace lets the flowers truly stand out. Lay it on your table for instant seasonal charm or keep it as a treasured heirloom centerpiece. 🧶🌹✨