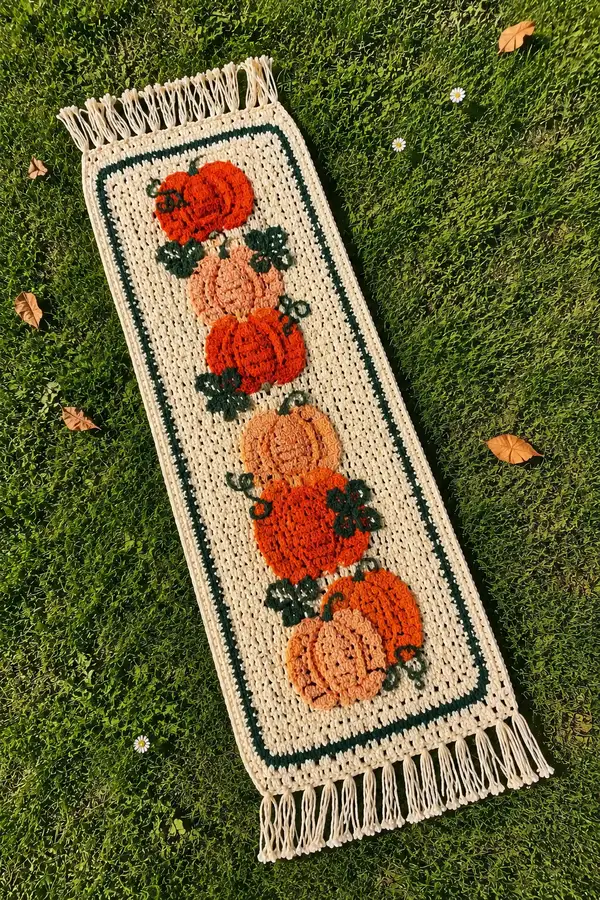
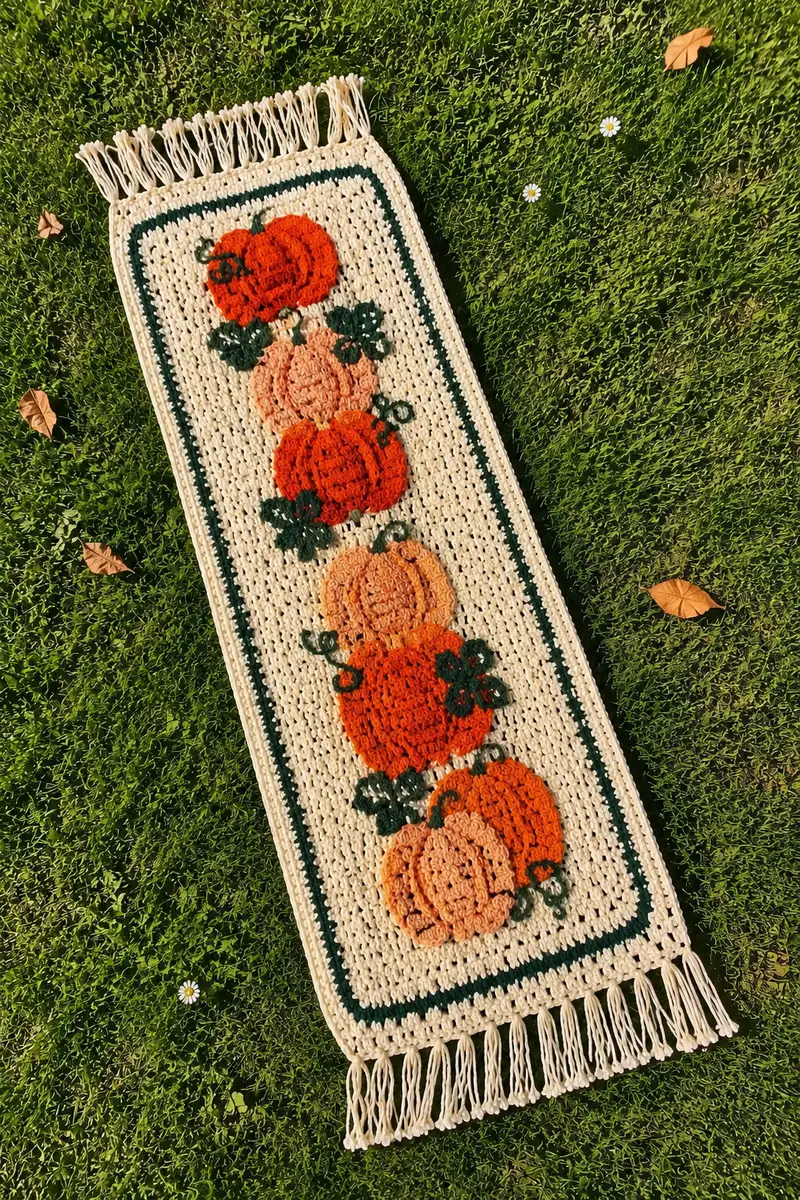
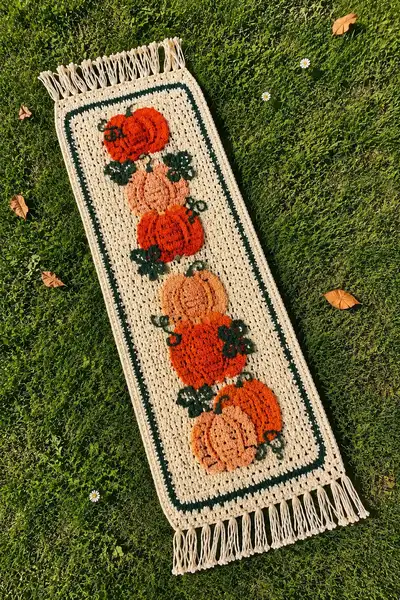
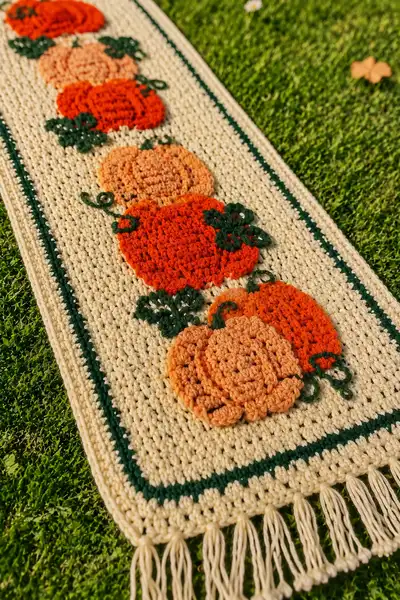
A warm, rustic table runner featuring stacked textured pumpkin appliques on a creamy openwork background with deep green trim and long fringe. This autumn-ready runner has cozy farmhouse charm — raised pumpkin ribs, leafy vines and a stitched border provide depth and handmade character. Great for a kitchen table, entry console, or layered on a buffet to welcome fall.
Progress Tracker
0% Complete
— Pattern Overview & Gauge :
Info :
This runner is worked in three main components: the openwork base panel, six pumpkin appliques (worked in the round), and small leaf/vine motifs. The base panel is a rectangular mesh worked back and forth in rows. Appliques are sewn on after the panel is completed. The entire piece is edged with a narrow green inner stripe and cream outer border, finishing with long cream fringe.
Info :
Gauge (approximate): 12 dc x 8 rows = 4" / 10 cm using worsted weight cotton-blend and 5.0mm hook. Gauge affects final size; use hook that gives a similar drape as photographed.
Info :
Finished size (photographed): approximately 12" wide x 50-55" long including fringe. Measurements will vary with yarn, hook, and number of mesh rows; you can lengthen or shorten by adding or removing mesh rows.
— Materials Recap :
Info :
Yarn choices in the photos: warm cream main background, deep pumpkin orange, muted peach/coral, dark forest green for vines and inner border. Use cotton-blend or sturdy acrylic for good table-lay and durability.
— Base Panel (Main Cream Mesh) :
Round 1 :
Foundation chain 122 (this gives 120 dc across after turning). Ch 3 (counts as first dc), dc in 4th ch from hook and in each ch across — 120 dc total. Turn.
Round 2 :
Ch 3, dc in each st across (120). Turn.
Round 3 :
Ch 3, *sk next dc, dc in next dc, ch 1; rep from * across ending with dc in last st — creates a subtle mesh (approximately 60 dc + 60 ch-1 spaces). Turn.
Info :
The photographed mesh is an airy, uniform texture. The ch-1 spaces keep the panel lightweight. Use a stitch marker at the first dc of every row to keep edges even.
Round 4 :
Ch 3, dc in each dc and dc into each ch-1 space across (120). Turn.
Round 5 :
Ch 3, *sk next dc, dc in next dc, ch 1; rep from * across. Turn. (mesh repeat)
Round 6 :
Ch 3, dc in each st and in each ch-1 across (120). Turn.
Round 7-12 :
Repeat Rounds 3-6 twice (mesh structure). Keep stitch pattern even and consistent. (6 rows total of mesh beyond foundation)
Info :
Work tightly enough that the panel is firm but still flexible. The photographed runner has a fairly dense mesh, so if your mesh is too open change to a slightly smaller hook.
Round 13-30 :
Repeat the 4-row mesh pattern (ch-3 turning foundation row + mesh row + solid dc row + mesh row) until you have worked a total of 48 rows of mesh (including initial rows), measuring roughly 40" lengthwise before appliques. For the photographed length work 48 mesh rows total (this will be adjusted later depending on pumpkin placement).
Info :
Place markers at each end of Row 1 and Row 48 to identify top and bottom placement for pumpkins. You will add appliques after establishing their vertical center points on the panel.
Round 31 :
Work 1 row of solid dc (ch 3, dc across 120). This creates a firm area to anchor the inner green border later. Turn.
Round 32 :
Ch 1, sc evenly in each st across working into the back loop only (BLO) for a subtle ridge along the inner border area (120 sc). Turn.
Info :
If you want the inner green stripe to be inset off the mesh slightly, work this BLO sc row — it helps the green row sit neatly adjacent to the mesh.
— Inner Green Stripe (worked on panel) :
Round 1 :
Change to dark green yarn with RS facing. Ch 3, dc across 120 in each st and each ch-1 space where applicable — 120 dc. Turn.
Round 2 :
Ch 3, dc across 120. Turn. (This produces the single green stripe visible to frame the pumpkins.)
Info :
When changing to green, carry the cream yarn up the side or cut and weave later. In the photo the green inner stripe is narrow (two rows), so 2 dc rows in green will match the look.
Round 3 :
Change back to cream yarn. Ch 3, dc across 120. Turn.
Round 4-6 :
Work 3 rows of mesh pattern (repeat ch-1 openings) in cream to return to the openwork look and create space for pumpkin stitching. After these rows, place a row marker to indicate the centerline where your first pumpkin will be positioned.
Info :
Decide pumpkin placement now. The photographed runner shows six pumpkins stacked vertically with small gaps of mesh between them. Mark centers on the RS with pins or safety pins: starting 3-4 rows below top border, then place centers approximately 6-7 rows apart vertically, adjusting to fit your panel length.
— Pumpkin Applique (Make 6) :
Info :
Each pumpkin is worked in the round to form a circle and then sculpted into a pumpkin with surface ribs and 5-7 scalloped 'segments'. Use deep orange or muted peach as desired. Work two versions: large pumpkin (use deeper orange) and smaller pumpkin (muted peach). The photographed runner alternates tones for depth.
Round 1 :
With chosen pumpkin color, make a magic ring. 6 sc into ring (6). Tighten ring. (Pumpkin center)
Round 2 :
6 inc (12). (Place a marker at the first st of round if desired.)
Round 3 :
(1 sc, inc) x 6 (18)
Round 4 :
(2 sc, inc) x 6 (24)
Round 5 :
(3 sc, inc) x 6 (30)
Info :
These increase rounds create a flat circular disc to form the body of the pumpkin. Keep tension firm and even so the disc doesn't ruffle too much. For a flatter applique, block lightly after assembly.
Round 6 :
(4 sc, inc) x 6 (36)
Round 7 :
(5 sc, inc) x 6 (42)
Round 8 :
(6 sc, inc) x 6 (48)
Round 9-10 :
1 sc in each st around (48). (Two rounds to build height of pumpkin base)
Round 11 :
For ribbing and segment definition: ch 1, 1 sc in same st, *ch 3, skip 2 sts, sc in next st; rep from * around to create looped spaces that will be used for surface slip-stitch ribs — counts will vary but maintain spacing over 48 sts.
Info :
These ch-3 loops give a guideline for where the visible ribs will sit. Alternatively, you can work surface slip stitch ribs directly over the sc rows later if you prefer a flatter look.
Round 12 :
Switch to FLO technique to make raised ribs: ch 1, sc in each st FLO around (48). Turn.
Round 13 :
Use surface slip stitch method: working on RS, join yarn at top of pumpkin and work 6 evenly spaced surface slip-stitch lines from outer edge toward center to carve segments. Each rib: insert hook under a row of stitches, yarn over and pull up a loop, repeat along a curved line and finish with a sl st. Do 6 ribs total spaced evenly. This sculpts the pumpkin segments.
Info :
When making ribs, follow natural curve: start at outer edge, travel in toward the center 5-8 sts, and back out if you want deeper lines. Surface work is forgiving — you can remove and redo ribs until spacing is even.
Round 14 :
For scalloped bottom segments (optional): join yarn at edge and work a round of small petals: *skip 1, (sc, hdc, dc, hdc, sc) in next st, skip 1, sl st in next st; rep around to create soft scallops that mimic pumpkin lobes. Weave in tail but leave enough for sewing to panel. (Approximate final circumference remains ~48 scallop points.)
Round 15 :
Fasten off leaving a 12-14" tail for sewing onto panel. Lightly block applique to flatten and shape scallops if desired.
Info :
If you'd like slightly puffed pumpkins, add a very small felt circle or a light dab of batting centered behind applique before sewing to the panel. Do not overstuff; the runner should remain flat on the table.
Round 16 :
Create the stem: with dark green, ch 6, join to form a short cord by drawing yarn through loops and working twisted single crochet or i-cord method for 5-6 sts, fasten off leaving tail for sewing. Couch the stem on top of pumpkin with a few invisible stitches.
Round 17 :
Make leaf clusters: with dark green, ch 6, in 2nd ch from hook work (sc, hdc, dc, hdc, sc) to form a small leaf; fasten off leaving tail. Make three small leaves per pumpkin as in photo cluster patterns. Make 6 clusters total (3 per pumpkin grouping as needed).
Info :
Use the tail to baste leaf clusters and stems in place temporarily so you can adjust before final sewing. Leaves should sit overlapping the pumpkin edge slightly and sometimes between stacked pumpkins.
— Pumpkin Placement & Repetition :
Info :
Make 6 pumpkins in total: alternate deep orange and muted peach to achieve the photographed variation. Suggested order from top: deep orange, muted peach, deep orange, muted peach, deep orange, muted peach (or arrange as you prefer).
Info :
Layout the completed pumpkins on the RS of the base panel using pins to mark centers. Spacing in the sample: approx 6-7 mesh rows between centers vertically. Adjust if your panel length differs. Leave equal margins top and bottom (about 4-6 mesh rows) for the border.
Info :
Make sure pumpkins are centered horizontally on the panel. The photographed runner is about 12" wide with pumpkins centered along the midline; pin the center of each pumpkin at the same column of mesh spaces for a straight vertical line.
— Leaves, Vines & Tendrils (Make multiples) :
Round 1 :
With dark green yarn, ch 12. In 2nd ch from hook work (sc, hdc, dc, tr, dc, hdc, sc) to form a long leaf; fasten off leaving tail for sewing. Make 8-12 leaves total sized to tuck under pumpkins. (Leaf counts per pumpkin will vary.)
Round 2 :
For tendrils: with dark green, ch 20, work slip-stitch back along chain to create a twisted curled cord; or use a simple chain and then wind it around a pencil and steam slightly to set curls if using cotton. Make 6-12 tendrils for natural curling accents.
Info :
Tendrils may be sewn in loops and tucked under the pumpkin edges so they stay secure. Position them before sewing so the orientation looks natural — curls pointing outward and upward in the photo.
— Assembly: Sew Appliques to Panel :
Round 1 :
Place pumpkins and leaf clusters on the RS of the mesh panel and pin into position. Start sewing with the long tail, using small whip stitches or ladder stitch through the outer edge scallops and into the mesh spaces so the join is invisible from the RS. Use matching pumpkin-colored yarn for a neat finish.
Round 2 :
Secure leaf clusters and stems with hidden small stitches and secure tendrils by sewing one or two points where they meet the pumpkin body. Weave ends into the fabric and trim.
Info :
Be mindful not to pull the panel fabric too tight while sewing — maintain the flatness of the mesh so the runner remains even. Use small, even stitches and stitch through a couple of layers of mesh if necessary for strength.
— Outer Border & Finishing (Worked around entire panel) :
Round 1 :
With cream yarn and RS facing, rotate to work across short edge. Work sc evenly into the edge of the panel across the short side and up the long side to create a neat single crochet border. Adjust the number so the border is even; aim for sc count that keeps edges flat (approx 120 sc along long sides, adjust per your exact stitch count). Join with sl st at corner.
Round 2 :
Ch 3 (counts as dc), work 2 dc in same corner stitch, *skip next 2 sc along edge, in next sc work (2 dc, ch 1, 2 dc) to create corner clusters every 3 sc for a decorative edge; rep along all edges and work corners as (2 dc, ch 1, 2 dc). Join with sl st. This produces the outer decorative row seen in photos.
Info :
If your outer edge is curling, add an extra row of sc in BLO before this decorative row to stabilize. Use stitch markers at corners to keep shape square and flat.
Round 3 :
Work a final finishing round: ch 1, sc around in each st and ch-1 space, placing 3 sc in each corner to keep it square. Fasten off and weave ends. This completes the crocheted border before fringe is added.
— Fringe :
Round 1 :
Measure and cut 72 strands of cream yarn to 12" each (will fold to 6" when attached) for each short edge; adjust number of strands to fill width evenly. For cleaner look cut extra to match and trim after attaching.
Round 2 :
Attach fringe using lark's head knots along the short edge: fold each strand in half, insert hook under edge stitch, pull loop through and pass tails through loop, tighten. Space evenly (approx 1.5 strands per sc if 120 sc across — adjust spacing). Repeat on other short edge for symmetrical fringe.
Info :
Photographed fringe is long and full. For added security apply a tiny dot of fabric glue inside the knot on the back side or stitch through the knot with a few running stitches of matching yarn.
Round 3 :
Trim fringe ends to the same length and steam-block the entire runner flat, shaping the fringe to hang straight. After blocking allow to dry fully on a flat surface.
— Alternate Pumpkin Construction (Ribbed Segments Method) :
Round 1 :
Work pumpkin center through Round 10 as earlier, then instead of surface slip-stitch ribs do post stitches for dimension: With RS facing, insert hook from front to back around a column of stitches and work fpdc (front post double crochet) down the length to create a raised rib. Repeat to make 6 ribs evenly spaced around circumference. Fasten off and weave in ends.
Info :
Post stitch ribs give stronger, sculpted ribs that cast shadows similar to the photo's dimensional pumpkins. Choose the surface slip-stitch method for softer ribs if you prefer flatter appliques.
— Small Leaf Detail (Optional Embellishment) :
Round 1 :
To add a 3-leaf cluster: with dark green crochet 3 small leaves using ch 6 method per leaf and join them at the base with a sl st. Sew cluster to one side of pumpkin using matching yarn and small stitches.
Info :
Arrange leaf clusters strategically between pumpkins to break up the vertical stack and create a natural garden feeling similar to the sample photograph.
— Final Touches & Blocking :
Info :
Weave in all ends using a yarn needle. Pin the runner to a blocking mat making sure edges are square and pumpkins are centered. Use a steam iron held above (not touching) to set the applique surface and gentle shaping. Do not press directly if using synthetic yarn; use appropriate method for yarn fiber.
Info :
Once dry, re-check applique attachment; if any areas seem loose, tack them down from the WS with a few stitches through the applique outer scallops into the mesh to secure them permanently.
Info :
For a more rustic look, consider distressing fringe ends gently with scissors to stagger lengths slightly or adding small wooden beads to fringe ends before trimming for weighted hang.
You did it — your Rustic Farmhouse Pumpkin Patch Table Runner is ready to grace your fall table with handcrafted charm! The dimensional pumpkins, leafy clusters and long fringe create cozy, seasonal texture perfect for gatherings. Each stitch contributes to a warm, farmhouse-ready centerpiece. Enjoy styling it on your table or gifting it to someone who loves autumn decor! 🧶🍁