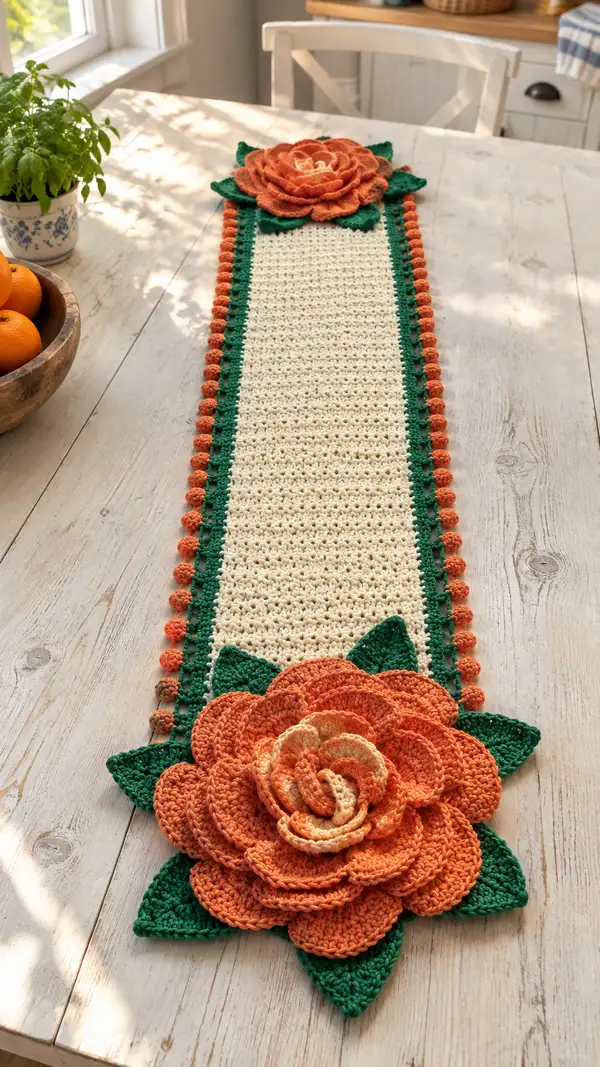
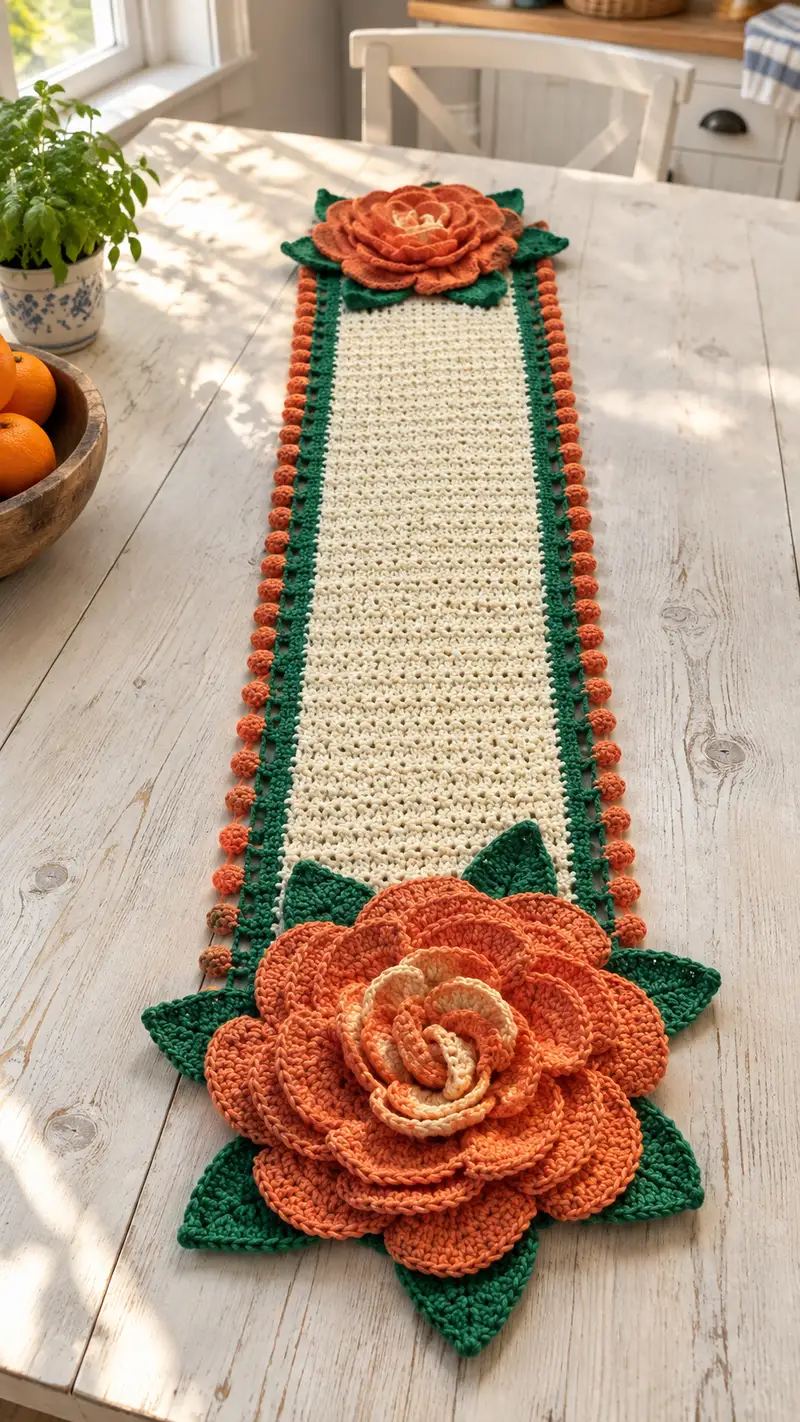
A long, elegant table runner featuring a textured cream centre, deep green scalloped borders, and two oversized layered orange roses at each end. The runner is finished with a playful bobble trim in rusty orange and warm cream accents. Perfect for autumn tables or seasonal decor, this project combines basic stitches with decorative motifs for a striking handmade centerpiece.
Progress Tracker
0% Complete
— Notes & Gauge :
Info :
Runner photographed measures approximately 11.5" (29 cm) wide and 48" (122 cm) long excluding flowers; finished length including the flowers at each end is approximately 60" (152 cm). Gauge is not critical for width if you maintain consistent tension, but for reference 14 sc x 16 rows = 4" in single crochet using 4.0mm hook in cotton yarn. Adjust hook size if necessary.
— Center Panel (work in rows) :
Round 1 :
Foundation: Ch 85. (This gives 84 sc across; adjust multiples of 2 if you want a wider or narrower runner.)
Round 2 :
Row 1 (RS): Sc in 2nd ch from hook and in each ch across, turn (84)
Round 3 :
Row 2 (WS): Ch 1, sc in each st across, turn (84)
Round 4 :
Row 3: Repeat Row 2 (84)
Round 5 :
Row 4: Repeat Row 2 (84)
Info :
Work the center panel using single crochet rows for a dense, stable body. Place stitch marker at the first stitch of every 10th row to keep track of progress and to ensure straight edges.
Round 6-15 :
Rows 5-14: Ch 1, sc in each st across; turn (84) — repeat for 10 rows total
Info :
If you prefer a slightly lacy open texture like the photo, replace every 4th row with: (ch1, *skip next st, dc in next st, ch1, dc in same st*, repeat) to create a subtle ladder effect. Keep symmetry by doing this on both WS and RS rows.
Round 16-25 :
Rows 15-24: Continue sc rows (84). Keep even tension and check width periodically; adjust hook if you notice the fabric getting narrower or wider than expected.
Info :
For a subtle ridge effect along the long sides (as in the photo), work the first and last 2 stitches of every 6th RS row in BLO (back loops only). This creates a shallow ridge to anchor the border later.
Round 26-35 :
Rows 25-34: Continue sc in each st across (84). You should now be roughly half the desired length; measure as you go. Keep center flat by not pulling tight at turn chains.
Round 36-45 :
Rows 35-44: Continue sc in each st across (84)
Info :
When approaching the full length, count total rows so that you will have an even number for symmetrical placement of the flowers at both ends. For this pattern complete a total of 60 rows for the center panel (including first sc row).
Round 46-60 :
Rows 45-59: Continue sc in each st across (84). Fasten off at the end of Row 60 and weave in the tail or leave for joining to the border later (we recommend leaving a 12" tail to secure while picking up stitches for the border).
— Side Border (deep green) :
Info :
We work a round of single crochet around the entire rectangle to build a foundation for the decorative edging. Start anywhere along a long side. Ensure the same stitch count on both long sides by matching turning chain counts.
Round 1 :
Join green yarn to any RS st on a long side with a sl st, ch 1, sc in same st and in each st across long side (84). When you reach the corner, work 3 sc in the corner stitch; continue along short edge (sc in each end-row), 3 sc in next corner, continue along opposite long side 84 sc; repeat corner increases to end round. Join with sl st to first sc.
Round 2 :
Ch 1, sc in each st around, working 3 sc in the corner sts; join with sl st (total stitch count around will be roughly 84 + short ends + corner increases; equal on both long sides)
Round 3 :
Ch 2 (counts as hdc), hdc in each st around, add 3 hdc in corner sts for a rounded corner, join with sl st.
Info :
These foundation rounds create a firm frame for the decorative bobble row. Keep tension firm to give a crisp edge for the bobbles to be evenly spaced.
Round 4 :
Ch 1, sc in each st around (this evens out after the hdc round). Join with sl st.
Round 5-6 :
Repeat Round 4 for two more rounds for a total of 3 sc rounds after the hdc round (this builds height so the bobble row sits nicely).
Info :
Count the long-side stitches now (should equal 84 sc before corners). Mark the start stitch for bobble spacing. You will place a bobble every 4th stitch along each long side to get the photo's regular spacing.
— Bobble Trim (rusty orange) :
Info :
Make the bobble trim separately and join in the next round, or work bobbles directly into a round; both methods are given. Each bobble is made with 5 partial double crochet loops (US dc) worked in same stitch and finished together to make a small raised ball. If you prefer a cream/orange alternating bobble look as in the photo, make every 6th bobble in a lighter orange/cream.
Round 1 :
With orange, join at the long-side start stitch, ch 1, *sc in next 3 sts, bobble in next st; rep from * across long side; when you reach corner make bobble in first corner st and continue along short end with scs and bobbles spaced to mirror opposite side. Join with sl st.
Round 2 :
Ch 1, sc in each st across, working 3 sc in corner sts. If you made bobbles separately, slip-stitch them on now: place a bobble every 4th sc and sew them on from WS with matching yarn.
Round 3 :
Ch 1, sc in each st around to secure bobble placement and tidy the edge, join with sl st. Fasten off and weave ends.
Info :
For a more pronounced bobble, make larger bobbles: 6 partial dc loops before closing, or slightly larger yarn for the bobble row only. Keep bobbles evenly spaced for a consistent look down the runner's length.
— Flower Motif (Make 2, identical) :
Info :
Each flower is built in concentric layers: inner spiral (center) and then several petal tiers worked either as shells on a foundation chain or as worked-in rounds attached to a circular base. The photographed flowers use layered shells to get a full, sculptural look. We'll build the center in a small spiral, then make three distinct petal tiers: small inner petals, medium middle petals, and large outer petals. Use lighter orange for inner petals and deeper orange for outer petals to create natural grading.
Round 1 :
Center spiral: With lighter orange, ch 21. Row 1: sc in 2nd ch from hook and in next 18 ch, turn — leave a tail for sewing (19 sc). This small strip will be worked as a loose spiral to form very tight inner coils.
Round 2 :
Row 2: Ch 1, sc across 19, do not fasten off. Roll the strip into a tight spiral, stitching with yarn needle through the base edge every 4-5 sts to secure into a round center. This creates a coiled rose center about 1.5" across depending on tension.
Info :
Alternatively you can form a classic small circular base with magic ring: MR, ch1, 6 sc in ring (6), 6 inc (12), 6 inc (18), pull ring and close; then work next rounds of petals directly into this circle.
Round 3 :
Inner petal tier foundation: With lighter orange, make a round base: if using spiral method continue by crocheting along the outer edge of the spiral: join yarn at outermost edge and sc evenly around the spiral edge for roughly 24-28 sc to create a small circular base for petals. Adjust so there are 6-8 base loops for petal placement.
Round 4-8 :
Inner Petals (Tier 1) - 6 to 8 petals: For each petal: *ch 6, (sc in 2nd ch from hook, hdc in next, 2 dc in next, hdc in next, sc in last), sl st into next base st to anchor*. Repeat around to make 6-8 small petals. After rowing the petals, fasten off and shape petals by pinning and lightly blocking for a soft curve.
Info :
Pin each petal so the curve shows outward; steam-block lightly or spritz and let dry on pins. This gives a natural cupped petal shape. Keep inner petals fairly upright to build volume for the next tiers.
Round 9-18 :
Middle Petal Tier (Tier 2): Switch to deeper orange. Create a circular foundation around the inner petal base by sc’ing evenly around the base edge to produce approximately 30-36 anchor points (count to keep symmetry). For each petal: *ch 8, sc in 2nd ch, hdc in next, 3 dc in next 2 ch, hdc in next, sc in last; sl st into next anchor st*. Repeat 10-12 times to make medium-sized petals that slightly overlap the inner tier. Fasten off and block these petals to a larger curve. (This tier uses larger shells and more stitches per petal.)
Info :
When attaching petal tiers, stagger placement so each petal covers the seam of two petals below it. This mimics a real rose layering and avoids gaps showing at the base.
Round 19-34 :
Outer Petal Tiers (Tier 3 & optional Tier 4): Continue with the deepest orange. Make a new circular foundation by working sc around the outer edge of Tier 2 to create 36-44 anchor sts. Outer Petals - Round A (Tier 3): For each petal: *ch 10, sc in 2nd ch, hdc in next, 5 dc in next 3 ch, hdc in next, sc in last; sl st into next anchor st*. Repeat 12-14 times. Create an optional larger outer-most tier (Tier 4) using ch 12 petals with 7 dc clusters for very large outer petals if you want the ultra-full look found in the photo. Fasten off and block each tier to shape the outward curve of petals.
Info :
Petal counts and stitch groupings above produce large layered petals. If you want more but smaller petals, reduce chain length and dc clusters accordingly. Keep all petals unstuffed; they get shape from blocking and strategic stitching into the base.
Round 35 :
Assembly of petals to flower base: Stack tiers from inner to outer and pin into final arrangement. Using matching yarn and tapestry needle, sew the tiers together at several points around the base — a running stitch through the base of each petal layer will secure them. Make sure to sew through several loops of the runner base so attachment is stable later.
Info :
When pinning, view from both RS and WS to ensure petals radiate evenly and the flower sits flat on the table when attached. If petals twist, flatten by adding a few strategic stitches under the petal base to anchor in the right direction.
— Leaf (Make 6 per runner, 3 per flower) :
Round 1 :
With green yarn, ch 12. Row 1: Sc in 2nd ch from hook, sc in next 9 ch, 3 sc in last ch (turn to work down opposite side), sc in next 9 ch, sc in last ch (this creates a pointed oval base). Do not join; leave a tail for sewing. (Approximately 24 sc total including last scs)
Round 2 :
Work around edge: sc in each st across, but in the center tip (the 3 sc cluster) work 3 sc, ch 1, 3 sc to accentuate the point. Fasten off and weave in ends. Repeat to make 6 leaves (3 per flower).
Info :
For more definition, on the top surface work a raised centre vein: attach yarn at base of leaf, ch 1, sc up center of leaf using front post scs or hdc to form a subtle ridge. This mimics the leaves in the photo which show a defined central vein.
— Finishing Petal Edges (optional decorative edging) :
Round 1 :
With slightly lighter yarn than petal color, work a delicate picot border around each petal: Join yarn at petal base, sc evenly across petal edge; for every 4th sc make a picot (ch 3, sl st into first ch). This adds a tiny highlight visible at close range like the photo's delicate edge tones.
Info :
Use this sparingly on inner petals only if you want subtle highlights. Picots on very large outer petals can look too busy; instead consider just a single row of hdc for definition.
— Flower Assembly & Attachment :
Round 1 :
Arrange one completed flower at the end of the runner so the center of the flower sits about 2 rows beyond the end of the cream panel (photo shows the flower overlapping the runner slightly). Pin in place through the base of the lowest petal layer and through the border rounds beneath.
Round 2 :
Sew the flower to the runner by stitching from the underside into the foundation rounds at points where large petals overlap the border. Use a whip stitch or mattress stitch to anchor the base securely. Make sure the flower is centered left-to-right on the runner edge.
Info :
Sew slowly and check every few stitches by lifting the runner to examine how the flower sits. Add stitches through the green border rounds (not just the cream center) so that the flower is supported at the edge and will not detach under use.
Round 3 :
Pin and arrange 3 leaves under the flower: two slightly to the sides and one tucked under the lower petals. Sew leaves at the base with small invisible stitches through the border rounds for stability. Repeat the entire flower and leaf process at the opposite end so both ends match.
Info :
When attaching the second flower, align it so it mirrors the first; measure from each end of the center panel to the flower center to ensure a symmetrical placement for the runner overall.
— Optional Extra Flower Center Detail :
Round 1 :
To mimic a lightly variegated center seen in the photo, take a small length of pale cream and embroider short straight stitches into the innermost coil to simulate staminelike highlights. Use a few loose knots of cream for a textured core if desired.
Info :
Keep these details minimal so they read as delicate highlights rather than a separate decorative element. A few stitches of light cream are enough to add depth and realism.
— Final Blocking & Care :
Round 1 :
Once flowers and leaves are attached, lightly block the entire runner flat. Pin the runner down and gently spritz with water or use a steam iron at a distance on a low setting to set the petals into their curved positions. Allow to dry fully before removing pins.
Info :
Blocking is critical to make petals lie naturally and borders sit flat. Cotton responds well to steam or wet blocking. Do not overstretch; preserve original shape while smoothing edges and forming petal curvature.
— Care Instructions :
Info :
Hand wash in cool water with mild detergent, reshape while damp, and dry flat. If you need to machine wash, use a gentle cycle inside a mesh bag, then reshape and dry flat. Avoid tumble drying to protect petal shapes and bobbles.
Finishing this runner is so rewarding — the dramatic roses and bobble-trimmed edges make a simple rectangular panel into a show-stopping centerpiece. Each petal layer adds depth and warmth while the green border frames the piece beautifully. Gather friends and family around a table that feels instantly special thanks to your handmade touch. 🧶🌼✨