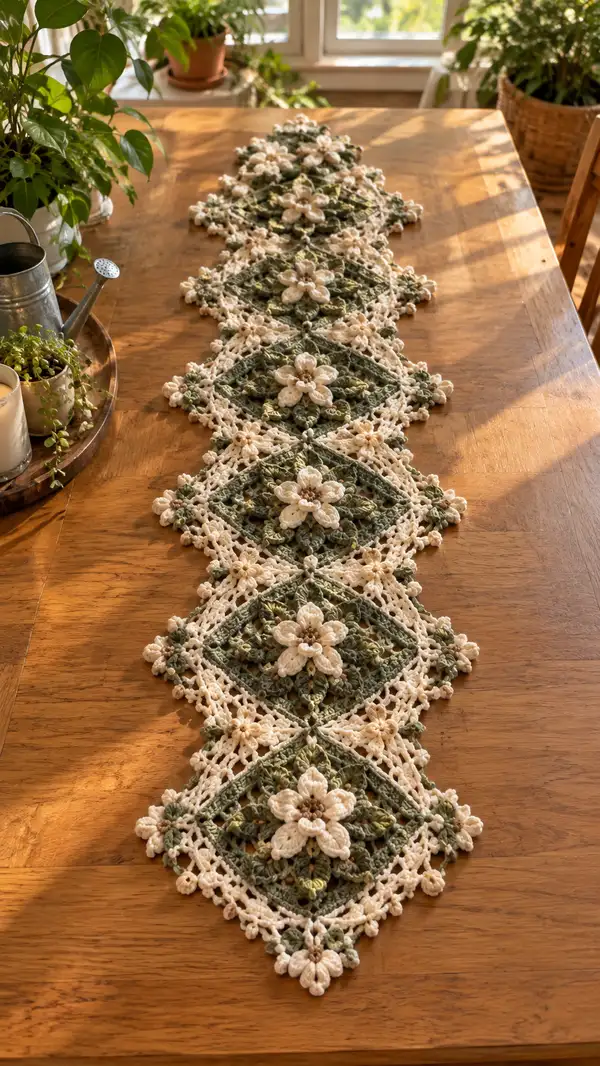
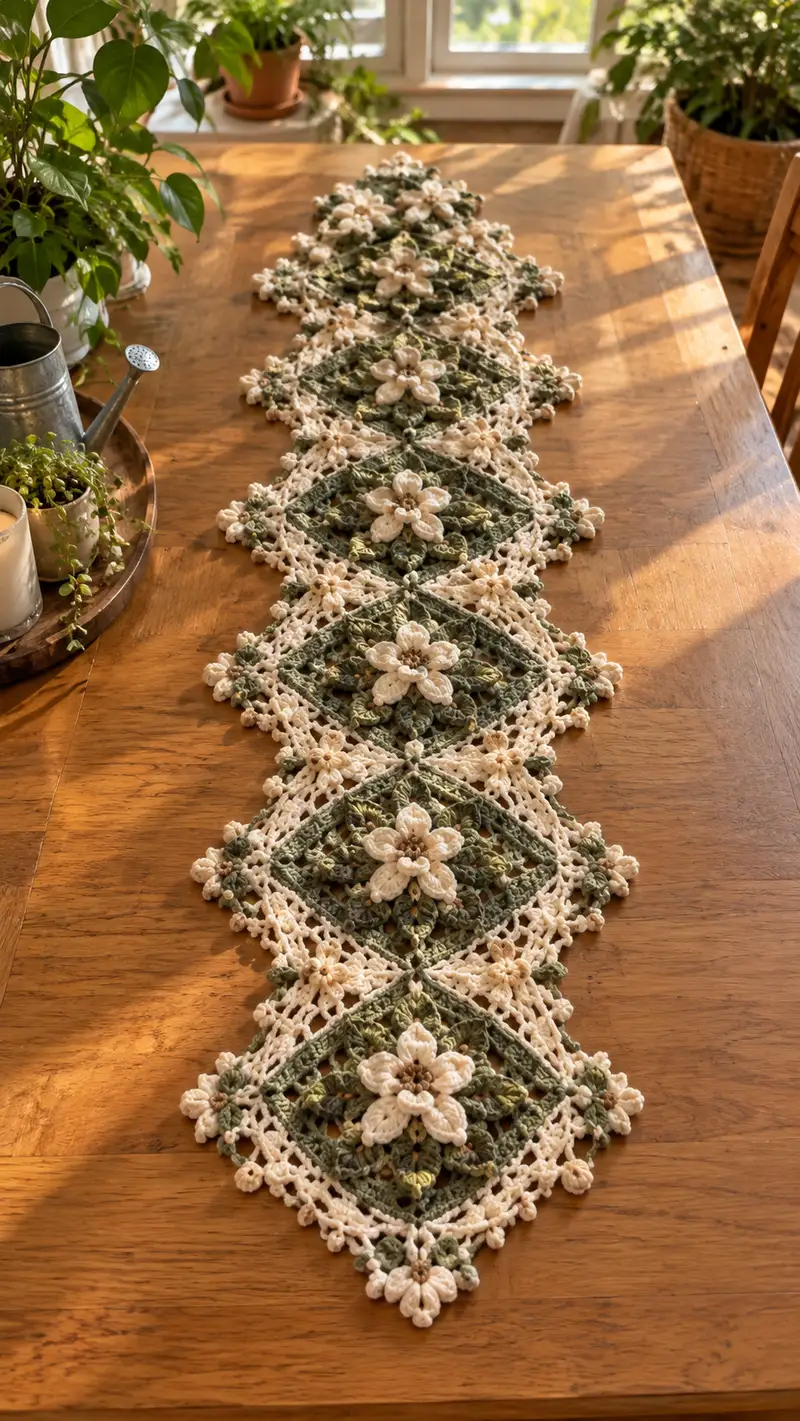
A delicate sage green and cream floral diamond table runner worked from connected square motifs with layered 3D flowers and lacy scalloped joins. This pattern recreates the soft botanical feel of the photo, featuring raised petal applique9s, leafy clusters, and a gentle scalloped border. Worked in cotton DK or light worsted, it's a beautiful accent for dining tables or sideboards. Detailed rounds, join-as-you-go instructions and finishing notes included for confident intermediate crocheters.
Progress Tracker
0% Complete
— Materials & Gauge :
Info :
Use a cotton DK or light worsted yarn for good drape and crisp stitch definition. Gauge is not critical for motif shape but aim for approximately 22 sts and 28 rows = 10 cm in sc with 3.5 mm hook for reference. Swatch and block a motif to check size and tension.
— Notes & Techniques :
Info :
This pattern uses join-as-you-go for the main diamonds, puff and cluster stitches for the 3D petals, and picot edging for the scalloped border. When a round says '12 petals' it refers to repeated petal clusters worked into evenly spaced loop spaces created in the previous round. Use stitch markers on the first stitch of each round; this pattern is worked in continuous rounds unless otherwise stated.
— Center Flower Applique9 (Make 1 per motif) :
Round 1 :
mr, ch 1, 12 sc in ring, sl st to first sc to join (12)
Round 2 :
*ch 4, sk 1 sc, sc in next sc* repeat around to create 12 ch-4 loops, sl st to base of first loop (12 ch-4 loops)
Info :
These loops become the petal foundations. Keep the loops even; adjust loop length to match petal size you want. Use the smaller 3.0 mm hook for tighter, more defined petals if desired.
Round 3 :
In each ch-4 loop work: (sc, hdc, 5 dc, hdc, sc), sl st to base to secure. Repeat for all 12 loops to form 12 petals (12 petals)
Round 4 :
Ch 1, sc in same st, *ch 3, sc between next two petals* around, sl st to first sc (12 ch-3 spaces)
Round 5 :
Work 12 small puff clusters into each ch-3 space: (yarn over, insert hook in ch-3 space, yarn over and pull through, repeat 3 more times until 5 loops on hook, yarn over and pull through all loops, ch 1 to secure) sl st to first puff (12 puff clusters)
Info :
Puff clusters may create thickness. Keep consistent loops for even petals. If using beads for centers, tack a bead now with a few stitches through the center of the flower.
Round 6 :
Ch 1, sc around the base of the petals into available stitches and spaces to create a tidy round: work 36 sc evenly distributed around base (36)
Info :
Fasten off cream yarn leaving a long tail (approx 20-25 cm) for sewing the flower to the green square later. Weave a small amount of stuffing or fiberfill into the flower center if you want slightly raised centers; not required.
— Inner Leaf Layer (worked into motif center) :
Round 1 :
With sage green, mr, ch 1, 12 sc in ring, sl st to join (12)
Round 2 :
*ch 5, sc in next st* around to create 12 ch-5 loops (12 ch-5 loops)
Round 3 :
In each ch-5 loop work: sc, hdc, 3 dc, hdc, sc to form 12 small leaf-shaped clusters (12 leaf clusters)
Round 4 :
Ch 2, 1 hdc in same st, *ch 3, 1 hdc between leaf clusters* repeat around, sl st to first hdc (12 ch-3 spaces)
Info :
This inner leaf layer sits beneath the cream petals and provides a textured green base. Keep the leaf clusters slightly flattened so they don't compete with the top petals.
— Central Motif Base (Diamond Square) :
Round 1 :
With olive/sage green, make a mr, ch 2 (counts as first hdc), work 10 hdc into ring, sl st to top of ch 2 to join (11 hdc)
Round 2 :
Ch 3 (counts as dc), dc in same st, *dc in next 2 sts, 2 dc in next st* repeat to end, sl st to top of ch 3. Increase pattern creates 14 dc total (14)
Round 3 :
Ch 1, sc around next 14 dc evenly distributing 14 sc (14)
Round 4 :
*Ch 4, sk next sc, sc in next sc* around to create 14 ch-4 loops for the next decorative round (14 ch-4 loops)
Round 5 :
Work 14 raised cluster leaves into each ch-4 loop: (sc, hdc, 5 dc, hdc, sc) - this echoes the inner leaf & coordinates with applique9 petals (14 leaf petals)
Info :
These early rounds are building the dense center that will be squared out into a diamond. Keep tension even. If your center looks too small, omit some increases in Round 2 but be consistent across motifs.
Round 6 :
Ch 2, hdc across all cluster bases working 28 hdc (2 hdc in each cluster base) to create a fuller round (28)
Round 7 :
Ch 1, sc in each st around (28)
Round 8 :
Change to sage green lighter shade if using two greens. Ch 4, skip 1 sc, sc in next, *ch 4, sc in next* repeat around creating 14 ch-4 loops (14 loops)
Info :
Color change here will create the layered look with a darker olive base and softer sage decorative loops. Carry the unused yarn along the wrong side inside the clusters if preferred for fewer ends.
Round 9 :
Work 14 petal clusters into the ch-4 loops to create a second ring of petals: (sc, 3 dc, sc) in each loop - 14 clusters (14)
Round 10 :
Ch 1, sc in each st around (42) — distribute stitches evenly across cluster bases and previous sc to make 42 sc total
Round 11 :
Start shaping into a diamond: *ch 6, sk 5 sc, sl st into next sc to form corner loop* repeat 4 times to make 4 corner loops for diamond orientation (4 corner loops plus side arches)
Round 12 :
Into each side arch (between corner loops) work: sc, hdc, 5 dc, hdc, sc to build side leaf clusters; repeat on all 4 sides (4 side clusters)
Info :
At this stage the motif begins to look squareish; orient your motif rotating 45 degrees to visualize the diamond shape. Use stitch markers at 4 corner loops to maintain symmetry when shaping later rounds.
Round 13 :
Ch 2, hdc across side clusters and corner loops: work 6 hdc along each side and 3 hdc across each corner loop to total 36 hdc (36)
Round 14 :
Ch 1, sc across (36)
Round 15 :
*In corner loop: (sc, ch 4, sc) to form pronounced corner picot; along side work (ch 3, sc in next st) repeat creating 4 side arches and 4 corner picots* (4 corner picots, 16 side ch-3 spaces)
Round 16 :
Work 16 small 3-d bobble or popcorn clusters in the side ch-3 spaces: (5 dc popcorn) secured with sl st—distribute evenly (16 popcorns)
Info :
Popcorn clusters add texture and a vintage feel. Use the same yarn color or a slightly darker green to highlight texture. Be sure to slip stitch firmly after each popcorn to anchor it securely.
Round 17 :
Ch 1, sc around entire motif, working 72 sc total (work 2 sc around each popcorn base and appropriate counts across sides) (72)
Round 18 :
Ch 5, sk 3 sc, sc in next sc across sides to form openwork chains around motif: create 18 ch-5 spaces (18 ch-5 spaces)
Round 19 :
Into each ch-5 space work: sc, 3 dc, sc to create rounded arches (18 arches)
Round 20 :
Ch 1, sc around to tidy and even counts: 96 sc total across entire round (96)
Info :
Fasten off green yarn leaving a 30-40 cm tail if you plan to sew the cream flower on top. Block this motif flat and square (diamond) before joining. Carefully pin corners to accentuate diamond corner points.
— Motif Decorative Edge & Corner Flowers :
Round 1 :
With cream, attach at a corner picot or corner loop: ch 1, sc around the corner edge and along sides for a decorative lace foundation (approx 40 sc across corner and adjacent side) (40)
Round 2 :
*ch 3, sk 2 sc, sc in next sc* continue to form airy mesh around motif perimeter creating 20 ch-3 spaces (20)
Round 3 :
In each ch-3 space work: (sc, picot, sc) making small decorative picot points; repeat around (20 picot points)
Round 4 :
Make 4 small corner mini-flowers directly into corner picot loops: for each mini-flower mr, ch 1, 6 sc in ring, sl st, then into each sc work (ch 3, sl st) to make 6 tiny petals. Fasten off leaving tail for securing (4 mini-flowers)
Info :
These little corner flowers will become the connecting points when joining motifs with the join-as-you-go method. Keep tails long for sewing or weave through neighboring motif loops to link.
— Join-As-You-Go Instructions (Connect motifs lengthwise) :
Info :
Make motifs as many as desired in number of diamonds. This runner pictured uses 7 large diamonds; you can make more or fewer. Join motifs as you make the final decorative edge rounds so corners and side points link seamlessly. Align motifs so their corner mini-flowers meet where diamonds touch.
Round 1 :
Work cream decorative Edge Round 1 on the new motif until you reach the corner where it will join an existing motif. Instead of finishing the corner mini-flower off, use sl st to join into the corresponding corner picot of the adjacent motif, then continue to complete the mini-flower by crocheting into both motif loops to lock them together (join 1 corner)
Round 2 :
When joining along a side, work the ch-3 mesh and where a ch-3 space lines up with the ch-3 space of an existing motif, work the (sc, picot, sc) into both spaces simultaneously (use sl st through existing motif to pick up the connection) to create a stable seam. Repeat for all side alignments for each motif.
Info :
Take time aligning motifs on a blocking board and pinning before permanent joining. This reduces mismatch and ensures consistent spacing. For corners where three motifs meet (center intersections), tuck a small bead or extra picot to hide complex joins.
— Joining Sequence for a Row of Diamonds :
Step 1 :
Make first motif fully and block flat. Attach second motif's decorative cream round up to the first corner; join corner mini-flower to the first motif's corner, complete second motif edge, then reach first side ch-3 space and join to the corresponding ch-3 space on the first motif. Continue around until two motifs are connected along the meeting side.
Step 2 :
Place third motif below the second aligning corners; join-as-you-go using the same corner and side technique. Work left to right or right to left consistently to keep joins neat and avoid twisting.
Info :
When three motifs meet at a small intersection (two corners touching and one side), work a double join: sl st through both adjacent motif loops, then sc through the new motif loop to make a small triangular connector. Reinforce with a second round of sc behind the first join if needed.
— Scalloped Border & Final Edge (Worked after all motifs joined) :
Round 1 :
With cream, join at any outer edge point: ch 1, sc evenly around entire assembled runner outer perimeter, placing 2 sc in outer corners to keep edges flat. Count should be approximately 240-300 sc depending on runner length (approx 240-300)
Round 2 :
*Ch 5, sl st into 3rd ch from hook to create small loop, sc in next sc* repeat around to create airy loops for scallops (approx 80 ch-5 loops)
Round 3 :
In each ch-5 loop work: (sc, 3 dc, sc) to form scallops. This will create roughly 80 scallops around the outer edge depending on initial count (approx 80 scallops)
Round 4 :
Ch 1, sc around scallops placing 3 sc in each scallop center to emphasize roundness (approx 240 sc)
Round 5 :
Optional decorative finish: into every third scallop, work a small 5-dc popcorn or 5-dc bobble anchored with sl st to add occasional raised points for vintage look (approx 26 popcorns)
Info :
Blocking the entire runner after joining and before the final border will ensure scallops are even. Use rust-proof pins and a low heat steam or light spray to set the shape. If you prefer a firmer edge, use slightly starched water during blocking.
— Alternate Lace Border (If you prefer very openwork) :
Round 1 :
With cream, ch 1, sc evenly around runner perimeter (approx 240)
Round 2 :
*Ch 7, sc into 4th ch of previous loop to create large picot loops across the runner edge* repeat approx 80 times to make a wide lace border (approx 80 ch-7 loops)
Round 3 :
In each ch-7 loop work: sc, hdc, 5 dc, hdc, sc to create openwork floral arches (approx 80 arches)
Info :
This alternate border creates a lighter, more ethereal look but uses more yarn. Choose border style based on how much stability you want for table use.
— Final Finishing Touches :
Info :
Sew the cream central flower applique9 onto the green motif centers using the long tail left from the flower assembly. Position the flower centered over the motif’s raised center. Whip stitch through the flower base and motif base in several places to keep the flower secure and flat.
Step :
Sew or tack the corner mini-flowers so they lie flat and hide the joins. Weave in all ends on the reverse side of the runner. Trim tails close to the weave. If using beads for centers, sew them on with small stitches and secure with a knot and a dab of fabric glue.
Info :
Give the entire runner a final block to set the shape and scallops. Lay flat on blocking board, pin points and scallops evenly, and spray lightly with water; allow to dry completely. If cotton yarn relaxes and grows slightly, blocking will even edges and secure motif junctions.
— Sizing & Adjustments :
Info :
Each finished diamond motif (blocked) measures approximately 18 cm corner-to-corner with the yarn and hooks recommended. The pictured runner uses 7 diamonds for a standard dining table runner ~125 cm long. For a shorter runner, make 5 diamonds; for a longer table, make 9 or more. Changing yarn weight or hook size will change motif size proportionally; adjust motif count accordingly.
Info :
If you want a denser runner with less drape, use mercerized cotton or a slightly smaller hook to tighten fabric. For a softer, more flowing runner, use a slightly larger hook or a cotton-blend yarn with more drape.
Completing this floral diamond table runner is a slow, rewarding journey that yields a truly special handmade accent piece. Each motif brings its own little flower and texture, and when joined together the runner becomes a conversation piece that livens a table. Block the motifs, sew the petals on, and watch the runner transform with its scalloped edges and vintage charm. I hope you enjoy every stitch of this project—happy crocheting! 🌿🧶