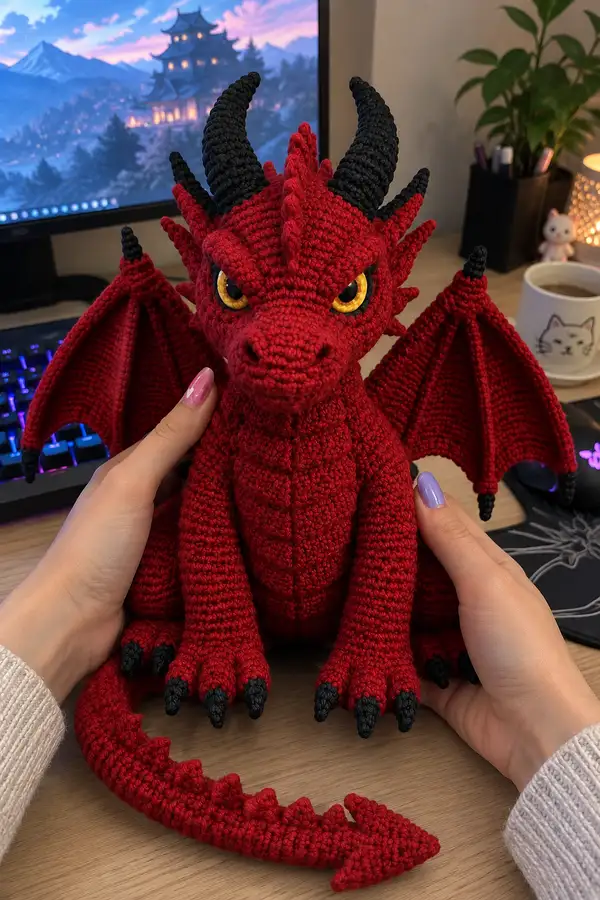
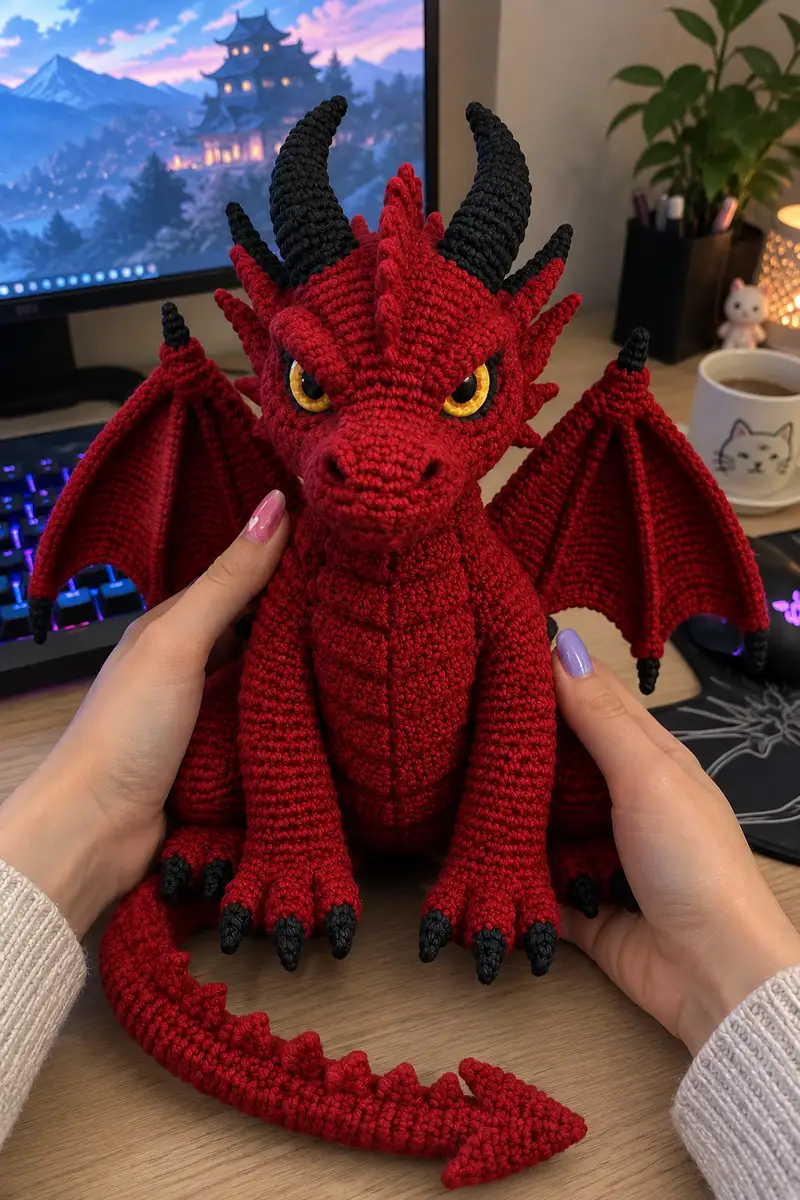
Bring this fierce yet cuddly scarlet dragon to life with detailed, step-by-step instructions. This design features sculpted snout and jaw, expressive golden safety eyes, textured black horns and claws, articulated wing bones with membrane, a spiked ridge down the back, and a pointed arrow tail tip. The finished plush sits upright with sturdy legs and dramatic wings — perfect for display or as a special handmade gift.
Progress Tracker
0% Complete
— Head (Sculpted Sphere + Face Details) :
Round 1 :
6 sc in magic ring (6)
Round 3 :
(1 sc, inc) x 6 (18)
Round 4 :
(2 sc, inc) x 6 (24)
Round 5 :
(3 sc, inc) x 6 (30)
Round 6 :
(4 sc, inc) x 6 (36)
Round 7 :
(5 sc, inc) x 6 (42)
Round 8 :
(6 sc, inc) x 6 (48)
Round 9-11 :
1 sc in each st (48)
Info :
Start working in continuous rounds (no joining). Place a stitch marker at the first stitch of each round and move it up. We will sculpt the head as a slightly elongated sphere; eye placement will be noted below.
Round 12 :
(7 sc, inc) x 6 (54) — small crown increase to give room for forehead and brow
Round 13-16 :
1 sc in each st (54) — build forehead and upper head height
Info :
Place safety eyes between rounds 14 and 15. Count across the round: mark the center front stitch, then count 9-11 stitches to the left and right for each eye to achieve the fierce, slightly wide-set stare seen in the photo. Use 18-22mm safety eyes for comparable scale. Insert and secure washers before continuing to stuff.
Round 17 :
(8 sc, inc) x 6 (60) — add a gentle flare for upper skull and brow ridges
Round 18-20 :
1 sc in each st (60) — maintain circumference to allow room for eye sockets
Round 21 :
(8 sc, dec) x 6 (54)
Round 22 :
(7 sc, dec) x 6 (48)
Info :
Begin stuffing head firmly now, especially around the eye sockets and brow. Use small amounts of fiberfill and push into the corners with a stuffing tool or blunt pencil to create a smooth, round surface.
Round 23 :
(6 sc, dec) x 6 (42)
Round 24 :
(5 sc, dec) x 6 (36)
Round 25 :
(4 sc, dec) x 6 (30)
Info :
We will now create a lower front opening to attach the muzzle. Do not close the head completely; leave an opening large enough to seam the muzzle piece in and to later attach the neck. Keep stuffing firm but not overly rigid to allow sewing ease.
Round 26 :
1 sc in each st around (30)
Round 27 :
1 sc in each st around (30)
Round 28 :
(4 sc, dec) x 5 + 2 sc (25) — begin to form lower jaw transition (math: (4+dec)*5=25)
Round 29 :
1 sc in each st (25)
Round 30-31 :
1 sc in each st (25) — hold this round to create a short neck seam later
Info :
Fasten off head leaving a long tail for sewing the muzzle and neck. Keep the opening oriented forward; you will attach the muzzle piece so the snout projects. Use removable pins to mark center front and jaw corners to ease alignment when sewing.
— Muzzle (Make 1 — Sculpted Snout + Nostrils) :
Round 1 :
6 sc in magic ring (6)
Round 3 :
(1 sc, inc) x 6 (18)
Round 4 :
(2 sc, inc) x 6 (24)
Round 5 :
(3 sc, inc) x 6 (30)
Round 6-8 :
1 sc in each st (30) — elongate the muzzle
Info :
To sculpt a defined snout shape, use slight tensioning and press the top of the muzzle as you stuff. Insert a small amount of stuffing only at the tip initially; add more after attaching to the head and fine-tuning shape.
Round 9 :
(3 sc, dec) x 6 (24)
Round 10 :
(2 sc, dec) x 6 (18)
Round 11 :
(1 sc, dec) x 6 (12)
Round 12 :
1 sc in each st (12)
Info :
Use embroidery or small slip stitches to form nostrils: with a tapestry needle and short length of black (or darker red) yarn, stitch two small ovals on the top-front of the muzzle. Alternatively, leave small openings and use French knot technique for texture.
Round 13-15 :
1 sc in each st (12) — extend for jaw seam as needed (add or remove rounds to match head opening depth)
Info :
Position muzzle against the head opening, aligning the center front and jaw line. Stuff the muzzle to a firm but slightly compressible feel. Sew the muzzle to the head opening using a mattress or whip stitch, spacing stitches evenly and hiding them inside the head. Fasten off and weave in tail.
— Neck (Short Cylinder) :
Round 1 :
With right side facing, pick up stitches around head opening or work separate neck tube: 12 sc in magic ring (12)
Round 3 :
(1 sc, inc) x 6 (24)
Round 4-6 :
1 sc in each st (24)
Info :
Sew the neck tube into the head opening and sew the lower edge to the body opening later. The neck should be stuffed lightly to keep flexibility for a natural pose.
Round 7 :
(3 sc, dec) x 6 (18)
Round 8 :
1 sc in each st (18)
Round 9 :
(2 sc, dec) x 6 (12)
Round 10 :
1 sc in each st (12) — leave an opening for attaching to body
Info :
Fasten off leaving a long tail for sewing. Stuff lightly; the neck should be firm enough to hold the head upright but flexible for slight tilts.
— Body (Main Torso) :
Round 1 :
6 sc in magic ring (6)
Round 3 :
(1 sc, inc) x 6 (18)
Round 4 :
(2 sc, inc) x 6 (24)
Round 5 :
(3 sc, inc) x 6 (30)
Round 6 :
(4 sc, inc) x 6 (36)
Round 7 :
(5 sc, inc) x 6 (42)
Round 8-12 :
1 sc in each st (42) — build torso height; continue in continuous rounds
Info :
If you want a flatter belly panel later, change to working in BLO around round 11 to create a ridge where the belly meets body sides. Stuff body only after sewing legs in place for a neat seam.
Round 13 :
(5 sc, inc) x 6 (48) — slight flare for chest
Round 14-18 :
1 sc in each st (48)
Round 19 :
(5 sc, dec) x 6 (42) — begin shaping toward waist
Round 20 :
(4 sc, dec) x 6 (36)
Round 21 :
(3 sc, dec) x 6 (30)
Info :
Stuff the body moderately at this point, firm enough to support a seated pose but not so firm that seams become visible. Keep the opening at bottom for sewing legs and tail later.
Round 22 :
1 sc in each st (30)
Round 23 :
(2 sc, dec) x 6 (24)
Round 24 :
(1 sc, dec) x 6 (18)
Round 25 :
1 sc in each st (18) — leave these stitches as the top of the inner base for leg attachment
Round 26-30 :
1 sc in each st (18) — keep this opening for secure sewing of legs; fasten off leaving long tail
Info :
For a stable seated position, add a few grams of poly pellets or dried beans into the lower body before final closing, enclosed in a small cloth pouch sewn into the base. This helps the plush sit upright without tipping fine.
— Belly Panel (Optional — Decorative Ribbed Front) :
Round 1 :
Start with a chain 20, join to form a ring with sl st, then work 1 sc in each ch around to form a narrow panel (20)
Round 2-10 :
Work rows back and forth in continuous spiral: ch1, turn, 1 sc across 20 (20) — create the ribbed vertical panels by working 2-3 extra rows with FLO to create raised ridges
Info :
Sew this panel centered on the front of the body aligning top and bottom edges with the chest and belly. Add vertical surface slip stitches down the panel to simulate segmented belly scales.
— Arm (Make 2) :
Round 1 :
6 sc in magic ring (6)
Round 3 :
(1 sc, inc) x 6 (18)
Round 4-6 :
1 sc in each st (18) — shape wrist and lower arm
Info :
Stuff the hand portion firmly to ensure the digits keep their shape. These limbs are slightly tapered and will be sewn to the sides of the body around rounds 12-14 of the body for natural arm placement.
Round 7 :
(2 sc, dec) x 6 (12)
Round 8-12 :
1 sc in each st (12) — build upper arm length; add or remove rounds to match body proportion
Round 13 :
(2 sc, inc) x 4 + 4 sc (20) — fan out for shoulder cap to make sewing easier (math: (2+inc)*4 = 16 +4 =20)
Round 14-16 :
1 sc in each st (20) — leave an opening at top for sewing to body; fasten off leaving long tail
Info :
Make 3-4 small black claw cones (see Claw section below) and sew them to the hand tip in a semi-circle. Sew arms to body at side seams, aligning shoulder round at body rounds 12–14 for symmetry.
— Leg (Make 2 — Seated Hind Leg) :
Round 1 :
8 sc in magic ring (8)
Round 3 :
(1 sc, inc) x 8 (24)
Round 4 :
(2 sc, inc) x 8 (32)
Round 5-8 :
1 sc in each st (32) — build foot base and instep
Info :
Feet are broad and flat for a stable seated pose. Stuff the foot very firmly and shape toes by sewing claw cones to the front edge. The leg will taper into the thigh area which is sewn to the lower body opening.
Round 9 :
(3 sc, dec) x 8 (28)
Round 10-14 :
1 sc in each st (28) — form calf and thigh
Round 15 :
(2 sc, dec) x 7 + 2 sc (21)
Round 16 :
(1 sc, dec) x 7 + 0 sc (14)
Round 17-18 :
1 sc in each st (14) — create seam allowance for attaching to body
Round 19-22 :
Increase or decrease 1–2 rounds as needed to match body opening circumference; fasten off leaving long tail
Info :
Sew legs to body bottom evenly spaced. Use pins and a temporary baste to check pose and balance before sewing permanently. Add extra stuffing into the top of the leg if the body seam appears loose.
— Wing Membrane (Make 2 — Flat Membrane) :
Round 1 :
With red yarn ch 2, work 6 sc into 2nd ch from hook, then continue by working in rows to create a fan-shaped membrane: (6 sc) base
Round 2 :
Work in rows: ch1, turn, work 6 sc across (6)
Round 3 :
Now increase at ends to expand the semi-oval: at each edge add (1 sc, inc) repeats. Row becomes ~10 sts depending on increases
Round 4-10 :
Continue increasing at edges each row to create a broad semicircle: approximately reach 40-50 sts width across at widest row. Work all rows in continuous SC, counting each row for symmetry.
Info :
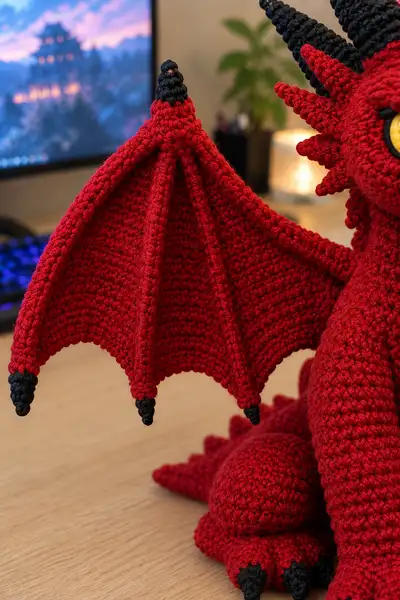
Work wing as a flat semicircular membrane with scalloped outer edge to match photos. Keep tension slightly looser than body so the wing will drape. We'll add wing bones on top as separately crocheted tubes sewn in place to create the structured ridges.
Round 11-14 :
Decrease slowly along inner edge to form wrist base for joining to shoulder; shape into slight curve that mirrors photo. Fasten off leaving a long tail for sewing.
Round 15-20 :
Work a decorative edge round: 1 sc in each st along curving edge, then sl st to secure (counts vary depending on your wing width)
Info :
Make two wing membranes. Create wing-bone tubes (see Wing Bone section) and pin them along the inside of the membrane dividing it into panels. Sew tubes securely, keeping slight tension so the membrane shows the folded panel effect.
— Wing Bones / Ridges (Make 6 per wing — Tubular Ribs) :
Round 1 :
Make a magic loop and 6 sc in ring (6)
Round 3-12 :
1 sc in each st (12) — work tubular length to match the membrane panel length (~10–12 cm). Adjust rounds to scale with your wing size. For longer ribs, work up to 18 rounds (12 sc).
Info :
Sew these tubes along the inner wing membrane at evenly spaced intervals to create the radiating ribs seen in the photo (typically 5 ribs from base to tip). For a firm ridge, insert a wire into each tube before closing and sewing the end shut.
Round 13 :
Optionally decrease by (1 sc, dec) x 4 to taper toward the tip if desired (math depends on original length)
Round 14 :
Fasten off leaving long tail for sewing; if using wire insert it now and then sew end closed.
— Tail (Tapered Tube + Arrow Tip) :
Round 1 :
6 sc in magic ring (6)
Round 3 :
(1 sc, inc) x 6 (18)
Round 4-10 :
1 sc in each st (18) — extend to desired tail length (approx 20–28 rows total for the full tapered effect)
Info :
For a thick, curving tail like the photo, optionally insert a length of flexible wire or pipe cleaner into the tail before final stuffing so you can pose the tail curve. Stuff firmly near the base and more lightly toward the tip to create a natural taper.
Round 11 :
(1 sc, dec) x 6 (12)
Round 12-15 :
1 sc in each st (12)
Round 16 :
(1 sc, dec) x 4 (8)
Round 17 :
1 sc in each st (8)
Round 18 :
Fasten off leaving long tail to sew arrow tip.
Arrow Tip (Make 1) :
Make a small triangle cone: mr, 6 sc (6); inc x6 (12); 1 sc around (12); (2 sc, dec) x 3 (9); (1 sc, dec) x 3 (6); dec x3 (3); fasten off leaving tail to sew to tail end and position arrowhead facing outward. Use black yarn for tip if following the photo.
Info :
Sew the arrow tip to the tail end, then seam the open tail base to the body lower back at the designated body round. Before fully closing tail seam, add stuffing and any weight for balance.
— Horn (Make 2 — Ribbed Spiral Horn) :
Round 1 :
6 sc in magic ring (6) with black yarn (use smaller hook if desired)
Round 3-10 :
1 sc in each st (12) — to form a tall cone
Round 11 :
(2 sc, dec) x 3 (9)
Round 12 :
(1 sc, dec) x 3 (6)
Round 13 :
dec x3 (3); fasten off leaving long tail to sew. Insert a small amount of stuffing for structure. For the textured spiral effect, after finishing the horn, work surface slip stitches in a spiral from base to tip or work alternating post stitches while crocheting the tube.
Info :
Sew horns to the top of the head behind the brow ridge. Angle them slightly inward as seen in the image. For extra rigidity, insert a short length of wire or plastic straw into the horn before closing.
— Spike / Crest Cones (Make ~12 small cones for head + back) :
Round 1 :
5 sc in magic ring (5)
Round 3 :
1 sc in each st (10)
Round 4 :
(2 sc, dec) x 2 + 2 sc (8)
Round 5 :
(1 sc, dec) x 2 + 2 sc (6)
Round 6 :
dec x3 (3); fasten off leaving a tail for sewing
Info :
Sew these cones along the centerline from the forehead down to the tail base. Position them densely on the head and more spaced along the back. For larger mid-back cones, scale up by working the first increase row to 12 stitches.
— Claw / Talon (Make 10 for feet and hands) :
Round 1 :
6 sc in magic ring with black yarn (6)
Round 2 :
(1 sc, inc) x 3 (9)
Round 4 :
(1 sc, dec) x 3 (6)
Round 5 :
dec x3 (3) — finish tip and fasten off leaving a tail to sew onto digits
Info :
Sew clusters of 3-5 claws to each foot and 3 to each hand. Use small, even stitches and hide tails inside the foot. Position claws so they slightly overlap the front edge of the foot to mimic the model.
— Eye Details and Brow Spikes :
Round 1 :
After installing safety eyes and securing washers, embroider eyelids using 2 strands of red yarn. Using a tapestry needle, work surface slip stitches above and below the eye to create a hooded brow look.
Round 2 :
Stitch small triangular spikes along the brow by working 3–5 chain triangles attached with single crochet surface stitches. Reinforce each spike with a stitch at the base.
Info :
Position the eyebrows slightly over the upper edge of the safety eye to create an intense, focused gaze. Use darker red or burgundy to add an outline for improved contrast.
— Assembly & Finishing Details :
Info :
Block and lightly steam parts to remove curl from wings if yarn allows. Use pins to arrange parts on body and map out final placement before sewing. Always check symmetry by comparing left and right sides.
Step :
Sew the legs to the body: position each leg evenly on the bottom opening, pin in place, then stitch through both body and leg rounds using a yarn needle and matching yarn. Use ladder stitch or whip stitch for an invisible seam.
Step :
Sew the arms to the sides of the body at chest-level rounds (body rounds 12–14). Ensure the claws point slightly forward. Reinforce with several passes of stitching to support the limb weight.
Step :
Attach the neck tube to the body top opening and to the head opening. Adjust the head angle before final closing to achieve the desired expression. Secure with small neat stitches around the entire top of the body.
Step :
Sew wing membranes to the back at shoulder lines using hidden slips and long tails. Add the wing bone tubes on top and stitch them in place along the inner curved ribs, leaving a small portion of tip free if you want folded wings.
Step :
Sew the tail to the center back bottom opening. Reinforce with extra stitches and add a small loop of chain inside for added stability if the tail will be posed frequently.
Info :
Weave in all ends inside the plush to hide tails and prevent unraveling. For extra durability, knot tails then pass them through several internal stitches before trimming close. Use a few drops of fabric glue on safety-eye washers if you need additional security for display items.
This scarlet dragon is a joy to create — each stitch sculpts expression, from the fierce brows to the curled tail and articulated wings. Sewing the small cones and ribs is an especially satisfying part of the build, and watching the plush take shape is rewarding. 🧶 Share your dragon proudly or gift it to someone who loves fantasy — the layered horns, striking golden eyes, and textured belly will make it a keepsake. Happy crocheting and may your stitches be even and joyful! 🐉✨