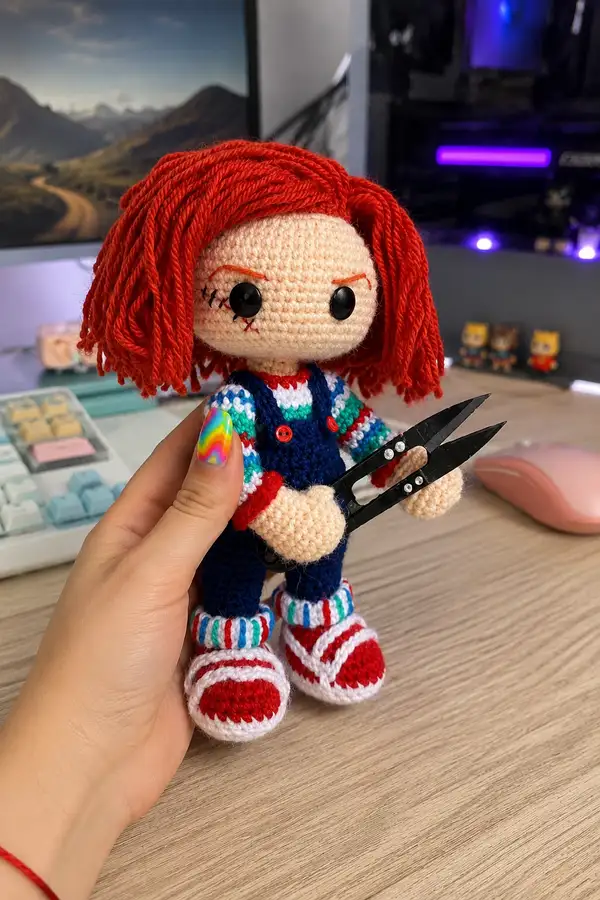
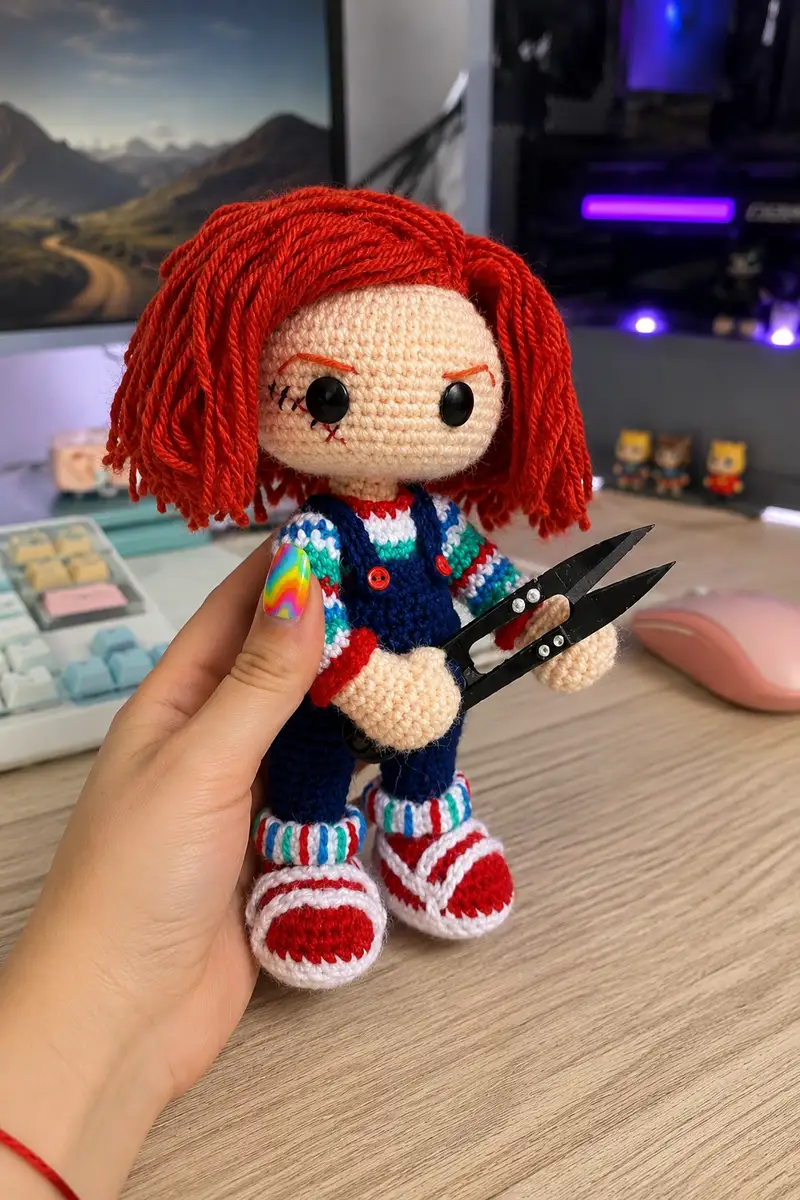
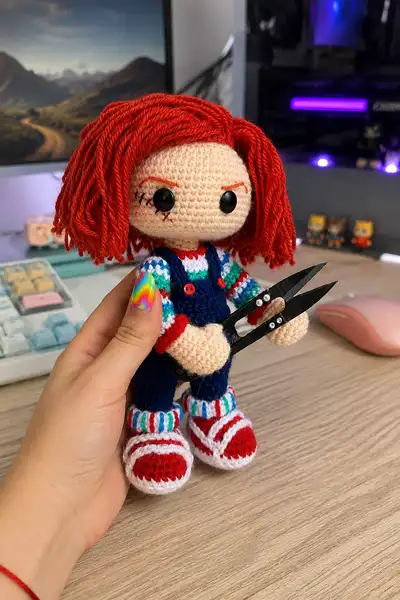
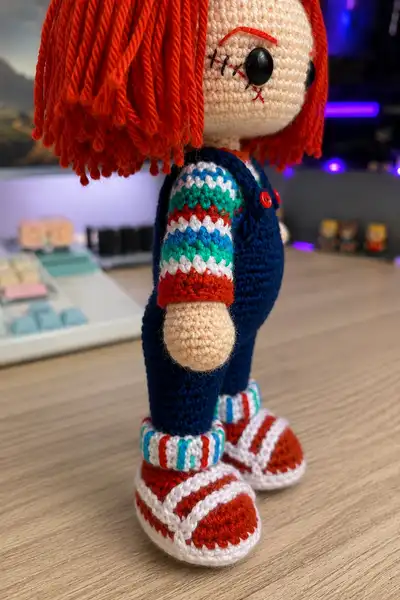
Create a spooky yet adorable Chucky-inspired amigurumi with bright red yarn hair, striped sweater sleeves, navy overalls, and red sneakers. This detailed pattern reconstructs the doll in the photos: round head with embroidered scars, big black safety eyes, short bob hair made from yarn strands, and layered clothing including cuffed shoes and buttoned straps. Designed to be realistic in proportions and sturdy for display, the doll stands around 8-9 inches tall when made with worsted weight yarn and a 3.5mm hook.
Progress Tracker
0% Complete
— Head :
Round 1 :
6 sc in magic ring (6)
Round 3 :
(1 sc, inc) x 6 (18)
Round 4 :
(2 sc, inc) x 6 (24)
Round 5 :
(3 sc, inc) x 6 (30)
Round 6 :
(4 sc, inc) x 6 (36)
Round 7 :
(5 sc, inc) x 6 (42)
Round 8 :
(6 sc, inc) x 6 (48)
Round 9 :
(7 sc, inc) x 6 (54)
Round 10-13 :
1 sc in each st (54)
Info :
Place safety eyes between rounds 13-14 approximately 10-12 stitches apart (count across to find center). Eyes pictured are large black 10mm for a doll-like look. Embroider scars and lashes after securing eyes but before final stuffing. Keep a stitch marker at the beginning of each round.
Round 14-16 :
1 sc in each st (54)
Info :
If you prefer a slightly taller head, add rounds 14-16 as even rounds; the sample head keeps even rounds 10-16 to reach the pictured height. Mark the round where you want the top of the ear/eye placement for symmetry.
Round 17 :
(7 sc, dec) x 6 (48)
Round 18 :
(6 sc, dec) x 6 (42)
Round 19 :
(5 sc, dec) x 6 (36)
Info :
Begin stuffing head firmly but not rock-hard. Use small bits of fiberfill, pushing into the top and around the eye sockets with a stuffing tool or blunt pencil. Check placement of eyes and embroidery guides as you go.
Round 20 :
(4 sc, dec) x 6 (30)
Round 21 :
(3 sc, dec) x 6 (24)
Round 22 :
(2 sc, dec) x 6 (18)
Round 23 :
(1 sc, dec) x 6 (12)
Info :
Fasten off leaving a long tail for sewing to the neck section or body later. Finish stuffing through the neck opening while the round count is still small so the shape remains smooth. Weave the tail through the 6 sts and pull closed, secure and hide the tail inside the head.
Round 25 (Neck Join) :
Rejoin flesh yarn to the base opening, ch1 and work 6 sc around the opening evenly to reform the base (6)
Round 26-30 (Neck Tube) :
1 sc in each st (6) - repeat for 5 rounds to create a neck tube (6)
Info :
The neck tube is extra rounds of 6 sc to give height for attaching to the body. Keep tension slightly snug so the neck holds shape. You can add a thin wire inside the neck if you need poseability but the sample is rigid enough without it.
— Face Embroidery & Eyes :
Info :
Before adding hair, embroider scars and eyebrow shapes. Using stranded embroidery thread or thin yarn, stitch short scar lines diagonally across the cheek next to the right eye. Use black for stitched lines and red for crossing X marks as pictured. For eyebrows, use orange yarn and couch or chain stitch across the brow line several stitches above the eyes.
Step :
Insert 10mm safety eyes between rounds 13-14 leaving 10-12 sts between centers, secure washers tightly. Embroider lashes with black yarn by stitching small short straight stitches downward from the eye edge (3-4 lashes). Add small red "X" crosses below the eye to mimic stitched scar detail.
— Body (Torso) :
Round 1 :
6 sc in magic ring (6)
Round 3 :
(1 sc, inc) x 6 (18)
Round 4 :
(2 sc, inc) x 6 (24)
Round 5 :
(3 sc, inc) x 6 (30)
Round 6-10 :
1 sc in each st (30)
Info :
At the end of round 10, change to navy yarn for the overalls body shape if you want the overalls worked directly onto the torso. In this pattern the overalls are worked around the torso but left open at back for straps; change color now if you want a continuous garment look. Work in continuous rounds; use stitch marker.
Round 11-14 :
1 sc in each st (30)
Info :
Build the torso height across rounds 6-14 to match head-to-body proportion in the photos. The sample measures approximately 3.5-4 inches torso height before leg joins. If you plan to sew arms on later, leave surface stitch space where arm joints will sit (roughly at round 12 on both sides).
Round 15 :
(3 sc, dec) x 6 (24)
Round 16 :
(2 sc, dec) x 6 (18)
Round 17 :
(1 sc, dec) x 6 (12)
Info :
Stop stuffing until after legs are attached if you plan to create integrated leg tubes; otherwise stuff the torso lightly now to allow sewing the head on more easily. For a stable standing doll, keep the body moderately stuffed but allow some give for overlap with overalls.
Round 18-24 (Leg Tubes Preparation) :
1 sc in each st (12) - work 7 rounds to lengthen the lower torso and prepare leg openings (12)
Info :
At the end of round 24, fasten off leaving long tails for sewing legs into the openings if you are not crocheting legs directly into the body. If you prefer integrated legs, move to leg rounds below and pick up 6 sts for each leg from the base; sample uses separate legs sewn to the body for tidy joins.
— Arm (Make 2) :
Round 1 :
6 sc in magic ring (6)
Round 3 :
(1 sc, inc) x 6 (18)
Round 4-6 :
1 sc in each st (18) — palm shaping
Info :
These first rounds create the hand/palm. Stuff the palm firmly but leave the wrist opening slightly flexible for attaching to the sleeve. If you want finger definition, you can use surface slip stitches to mark digits, but the sample keeps a mitten shape.
Round 7 :
(2 sc, dec) x 6 (12)
Round 8 :
Change to shirt stripe colors: red yarn. 1 sc in each st (12)
Round 9 :
Change to white yarn. 1 sc in each st (12)
Round 10 :
Change to teal yarn. 1 sc in each st (12)
Round 11 :
Change to light blue yarn. 1 sc in each st (12)
Round 12 :
Change to white yarn. 1 sc in each st (12)
Round 13 :
Change to red yarn (shirt cuff) 1 sc in each st (12)
Round 14 :
Switch to flesh yarn to create upper arm transition, 1 sc in each st (12)
Round 15-18 :
1 sc in each st (12) — continue arm length to shoulder (12)
Info :
Stuff the arm lightly after round 14 so the sleeve remains slightly flexible. Keep stuffing minimal in the upper arm to allow sewing to the torso. Fasten off leaving a long tail for sewing. Repeat for second arm.
— Leg (Make 2) :
Foot & Shoe Base - Round 1 :
Make shoe sole using red yarn. Ch 9, working along chain and opposite side to make oval: 2 sc in 2nd ch from hook, 6 sc across (6), 3 sc in last ch, continue working on opposite side 6 sc, 2 sc in last ch (18) - join to form oval (18)
Round 2 :
Work 1 sc around in each st (18)
Round 3 :
(1 sc, inc) x 6 (24)
Round 4 :
1 sc in each st (24)
Round 5 :
Switch to white yarn. 1 sc in each st (24) — shoe edging
Round 6 :
Change back to red yarn. Work 1 sc in each st (24)
Info :
The shoe oval forms a stable base. The sample shoes are worked mostly in red with white trims; create the stripes by surface slip stitch later or work narrow white rounds now. Keep tension firm so the shoe maintains shape.
Round 7 :
Switch to navy for leg tube join: pick up 12 sts at heel front center (see assembly notes) and work 1 sc in each st around to begin leg (12)
Round 8-12 :
1 sc in each st (12) — build lower leg length (12)
Round 13 :
Change to navy (continue) (12)
Round 14-18 :
1 sc in each st (12) — lengthen to hip (12)
Info :
Stuff the foot firmly to keep shoe round. Stuff the leg lightly as you go, with more stuffing near the top for a firm hip join. Fasten off leaving a long tail if sewing into body openings; if sewing shoes on after assembly, leave shorter tail to avoid bulk.
Round 19-24 (Leg Cuff & Final) :
Switch to white, then stripe sequence white/teal/light blue/red for the cuff: work 1 round each in alternating colors to create visible ankle cuff (use single rounds for crisp stripes). Fasten off leaving long tail for weaving.
— Overalls (Front & Back as One Piece) :
Front Panel - Round 1 :
With navy yarn, ch 11, sc in 2nd ch from hook and across (10), ch1 turn and sc back across to create rectangle foundation — or start from a circle to join around torso; sample worked as rounds joined to body. For amigurumi, pick up 30 sts around torso and work in rnds for the bib/overall front (30)
Round 2-6 :
1 sc in each st (30) — build front bib height
Info :
After round 6, fold bib and mark strap positions about 5-6 stitches from outer edges. Add two small red buttons sewn to the bib front for decoration, matching the sample where buttons sit on the chest.
Round 7-12 (Body of Overalls) :
Continue 1 sc in each st (30) for rounds 7-12 to create the full overalls torso layer that covers the navy body. Add a slight decrease at round 12 if you want the overalls to taper to the hips: (3 sc, dec) x 6 (24)
Round 13-18 :
1 sc in each st (24) — work down towards leg openings. On rounds 16-18 leave space at back for strap attachments using a small slit of 4-6 sts or work straps as separate pieces sewn on later.
Straps (Make 2) :
Ch 18, sc in 2nd ch from hook across (17) for strap length. Fold strap ends and sew to bib and to back of overalls at marked positions. Attach a small red button on front bib at strap endpoints for a finished look.
Info :
Work straps tightly and sew securely. If you prefer a one-piece overall, work long straps and secure them to the back with whip stitch. Buttons are decorative; you can also use stitched dots if matching buttons are not available.
— Shoes Decorative Straps & Surface Detail (Both Shoes) :
Round 1 :
Using white yarn, surface slip stitch two horizontal straps across the top of the red shoe: one near the toe and one near the midfoot. Alternatively, sc 1 round in white across the top rows of the shoe before attaching leg tube.
Round 2 :
Create white sole edge by working a round of sc around the shoe base in white for a crisp trim (work even; number of sts will match base circumference).
Info :
Surface slip stitches create raised straps; stitch firmly and fasten off ends inside the shoe to hide. Use a tapestry needle and tuck ends under sole stitches to avoid snagging on display surfaces.
— Hair (Red Bob) :
Info :
Hair is made from cut lengths of bright red worsted yarn attached by looping and knotting strands through head stitches. Use 2-3 ply strand thickness (full worsted strand) for a chunky bob. Each strand folded in half and pulled through a stitch then knot tightened to form a loop — this is the classic latch/loop attachment.
Step 1 :
Cut yarn into 7 inch (18 cm) pieces. For a full bob like the sample you will need approximately 140-180 strands depending on density preference.
Step 2 :
Attach strands densely around the crown starting at the forehead line and working towards the nape: insert hook into a stitch, fold strand in half, pull loop through, pull tails through the loop and tighten. Continue placing rows close together to avoid visible scalp.
Step 3 :
Once attached, trim the ends to even length for a chin-length bob and fluff with fingers. For the side parting, attach slightly more strands on one side and leave a small sweep to fall over the eye as pictured.
Info :
To secure hair for display, you can add a bit of fabric glue at the base of a few inner rows to prevent slipping. To get the slightly ragged Chucky look, leave a few strands uneven and trim after attaching while the doll is upright to check fall and length.
— Assembly & Finishing Details :
Info :
Sew head to torso by aligning neck tube rounds with top of torso opening. Use mattress stitch or whip stitch with a long tail for invisibility. Stuff torso to desired firmness before closing to ensure the head sits naturally on the neck.
Step 1 :
Position arms at the sides of the torso around round 12 (measured from top of torso) and sew in place through several passes of yarn to secure. Use mattress stitch for a smooth seam and leave a small gap between arm and body to preserve a curved shoulder shape.
Step 2 :
Sew legs into leg openings or if legs are separate, pin and sew them to the base of the torso at even spacing so the doll stands square. Reinforce with extra passes of yarn to make the legs stable for standing display.
Step 3 :
Attach overalls by sewing the back edges to the torso or slipping them on if worked as a separate garment. Sew straps on top of the shoulders and secure with small buttons pinned to the bib front for the authentic look.
Info :
Add embroidered scars by threading a needle with red yarn and making short X stitches across the cheek, then overlay black 'stitches' to mimic holding stitches. For eyebrows, use orange yarn and couch a short curved stitch above the eyes. Secure all ends inside the head and weave in thoroughly.
Step 4 :
Sew shoe trims and surface stripes in white using whip stitch or surface slip stitch. Add red buttons to front bib. Weave in all ends, trim excess, and do a final shaping of hair and stuffing adjustments.
Info :
Final blocking: lightly steam (not touch) if using acrylic yarn to even stitches and relax joins. Brush hair lightly with a soft comb to separate strands if needed, and trim to final shape. For long-term durability, secure buttons with a dab of fabric glue after sewing if the doll will be handled by children.
— Optional Details & Variations :
Info :
To make the doll poseable, insert thin floral wire into limbs before stuffing and fold and wrap wire ends toward the center so they don't poke through. You can also make the overalls removable by increasing the back slit and sewing detachable buttons or snaps on the straps. Vary hair length by trimming strands shorter or longer for different looks.
Final Check :
Check symmetry before final sewing: eyes even, arms level, legs equal distance from center. Reinforce high-stress joins like legs with several passes of yarn and a small dab of fabric glue on the inside if desired. Enjoy your creepy-cute Chucky-inspired doll!
This creepy-cute Chucky-inspired amigurumi is a rewarding project that combines sculpted shaping, playful color stripes, and dramatic yarn hair to create a characterful finished piece. Follow the rounds carefully and enjoy watching each element — head, clothing, and hair — come together into a spooky little companion! 🧶🔪 Whether displayed as a seasonal accent or a collectible, this doll makes a memorable handmade gift. Happy stitching and have fun with the details!