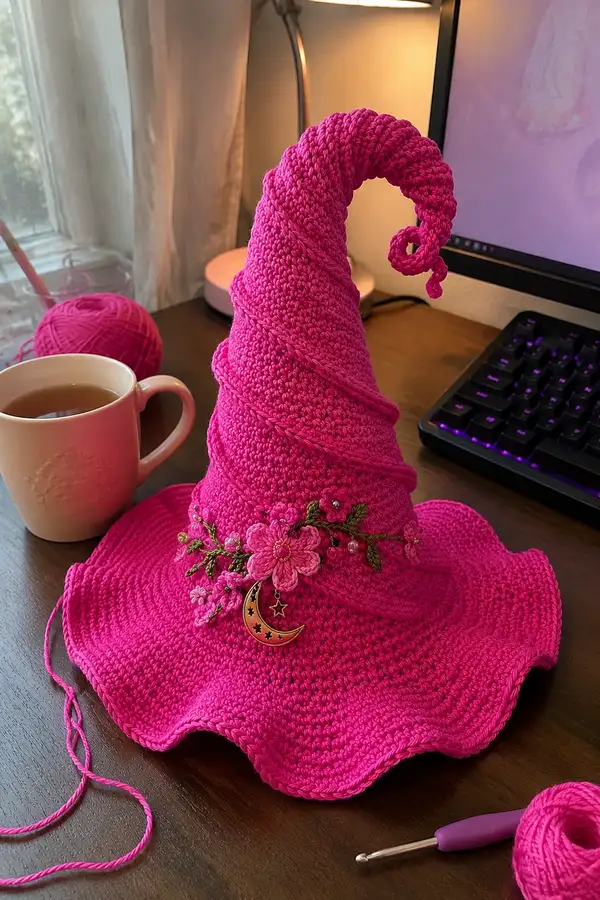
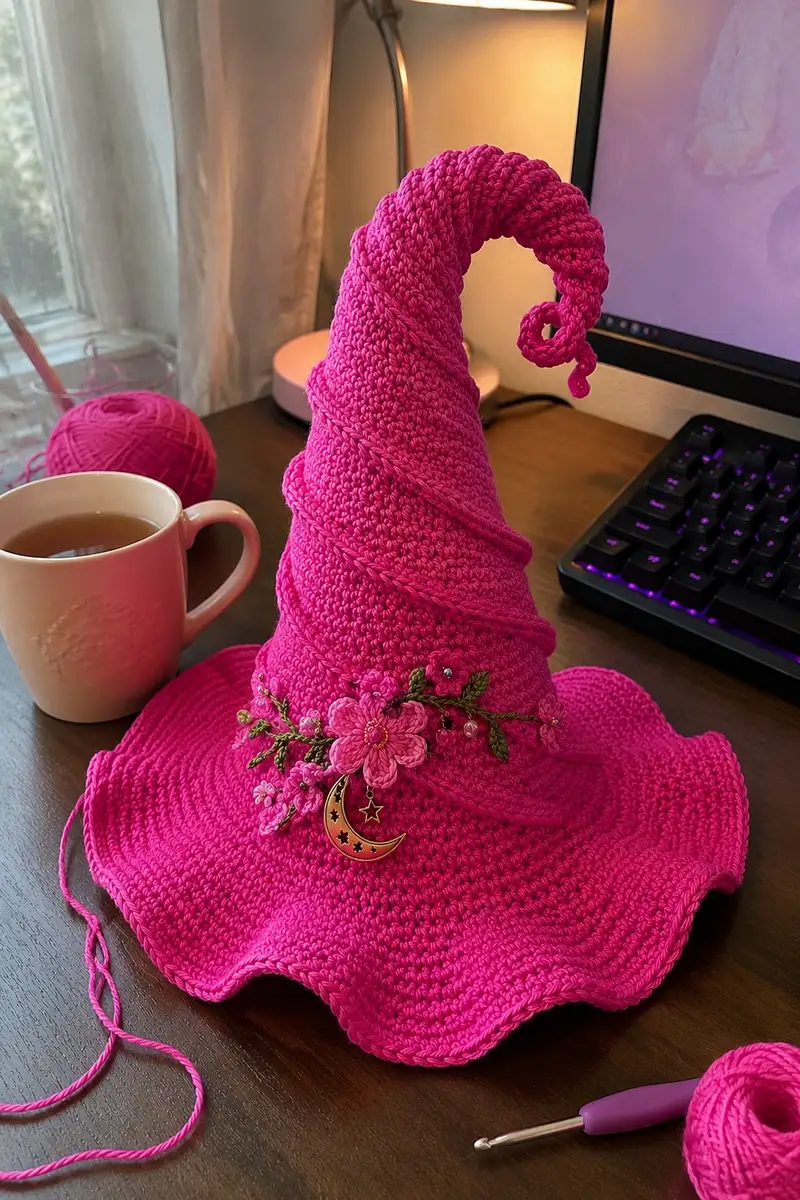
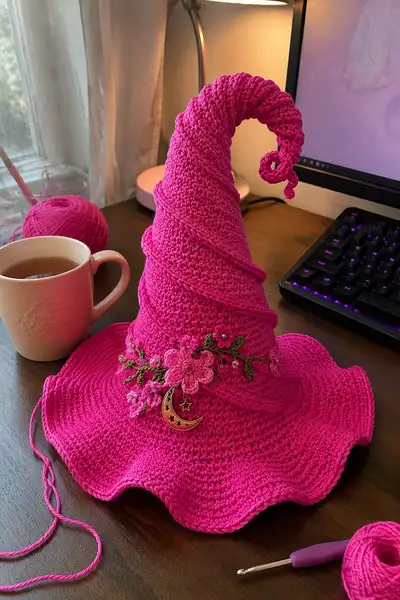
A whimsical, bright pink spiral witch hat full of feminine charm — tall curled cone, wide wavy brim, and a braided spiral trim. The hat is richly decorated with crocheted flowers, embroidered leaves, bead accents and a dangling moon charm for a girly Halloween or cosplay accessory. Structured to hold its curled tip with optional wire or internal stuffing and finished with a neat twisted brim edging. Detailed rounds and tips make shaping and assembly straightforward for an experienced crocheter.
Progress Tracker
0% Complete
— Cone (Top-Down) :
Round 1 :
6 sc in magic ring (6)
Round 3 :
(1 sc, 1 inc) x 6 (18)
Round 4 :
(2 sc, 1 inc) x 6 (24)
Round 5 :
(3 sc, 1 inc) x 6 (30)
Round 6 :
(4 sc, 1 inc) x 6 (36)
Round 7 :
(5 sc, 1 inc) x 6 (42)
Round 8 :
(6 sc, 1 inc) x 6 (48)
Round 9 :
(7 sc, 1 inc) x 6 (54)
Round 10 :
(8 sc, 1 inc) x 6 (60)
Info :
We are working top-down from the very tip of the cone. The magic ring start allows a clean narrow tip that can be stuffed lightly or fitted with a short wire. Keep a stitch marker at the start of each round; increases are evenly spaced to keep the cone symmetrical.
Round 11-18 :
1 sc in each st (60)
Info :
Work even in 60 sts until the cone reaches approximately 6.5-8.5 inches from tip (adjust for desired hat height). These rounds create the middle of the cone — check height often against a measuring tape or a wearer for proportion.
Round 19-22 :
1 sc in each st (60)
Round 23 :
(8 sc, 1 dec) x 6 (54)
Round 24 :
(7 sc, 1 dec) x 6 (48)
Round 25 :
(6 sc, 1 dec) x 6 (42)
Info :
Begin gentle tapering here if you prefer a slightly more dramatic curl at the top. If you want a perfectly straight cone that only curls at the very tip, skip this taper and continue even rounds until you are ready to form the curl piece separately.
Round 26 :
(5 sc, 1 dec) x 6 (36)
Round 27 :
(4 sc, 1 dec) x 6 (30)
Round 28 :
(3 sc, 1 dec) x 6 (24)
Info :
If you plan to insert craft wire to help hold the curl, leave the very last 6-12 rounds open (do not close off). Thread in and position a length of wire that has been bent and looped at the end for safety, then continue to shape. For a fabric curl, lightly stuff the tip with fiberfill before forming the spiral.
Round 29 :
(2 sc, 1 dec) x 6 (18)
Round 30 :
(1 sc, 1 dec) x 6 (12)
Info :
Fasten off the very tip if you plan to attach a separate curled spike later — otherwise, leave a long tail to sew the top shut and pull into the first smaller spiral to form the curled tip. If inserting wire, leave a 6-12 inch length protruding inside the cone to anchor the curl and protect the wire end by folding it back on itself.
— Curl/Tip Construction (Make 1) :
Info :
The tip curl is created by working a narrow spiral strip that is then shaped around wire or lightly stuffed. You can crochet the curl directly onto the cone or make it separately and sew in. For a separate curl, use the main color and 3.25mm hook for a firm cord.
Round 1 :
Ch 20, sc in 2nd ch from hook and each across (19)
Round 2 :
Ch 1, turn, sc in BLO across (19)
Round 3-10 :
Ch 1, turn, sc in each st (19)
Info :
This creates a flat firm strip of 19 sts. Adjust length by adding more chains if you want a longer or tighter curl. Fold the strip into a spiral and either whip stitch closed along the long edge to form an i-cord, or roll and sew through the center to create a tubular curl around a wire.
Round 11 :
Fold strip and sc through both layers at the end to form a secure spiral tip; sc around to shape curl until comfortable with curl size. Fasten off leaving a long tail for sewing (19 or less depending on assembly)
Info :
If using wire, insert the prepared wire and wind the crocheted strip around it, stitching through both strip and cone fabric to anchor. If you prefer no internal wire, stuff the strip firmly with fiberfill and over-sew the seam to hold the spiral shape.
— Cone Spiral Rope (Decorative Wrap) :
Info :
The diagonal twisted rope seen spiraling down the cone is a tightly crocheted chain/cord worked separately and sewn on. Make a long rope approximately equal to the slant height of the cone (about 60-90 inches, measured along the cone). Use main color.
Round 1 :
Ch 3, join to form loop, ch 1 then sc 6 into loop, sl st to join (6)
Round 2-3 :
Ch 1, sc in each st around (6)
Round 4 :
Ch 1, *work 1 sc in next st, 1 hdc in next st* around to build a slightly thicker rope for texture. Repeat until rope reaches desired length.
Info :
Alternatively work a long chain and then sc back along the chain (sc in 2nd ch from hook and each across), or make a twisted chain by crocheting a long length and twisting before sewing it. Keep rope slightly firm so it holds spiral position when sewn on.
Round 5 :
Fasten off leaving long tail for sewing. If desired, make two ropes — one thicker and one thinner — and braid them lightly before sewing to create the multi-strand look seen in the photos.
— Brim (Worked Outward from Cone Base) :
Info :
Join main yarn at base of cone (last even round of cone at 60 sts). The brim will be worked outward in rounds with increases that produce a gentle, undulating scalloped edge. Keep rounds consistent and use stitch markers every 10 or 12 rounds to monitor flatness.
Round 1 :
Join yarn to any stitch at cone base, ch 1, work 1 sc in same st and 1 sc in each of the next 59 sts (60). Do not join — work continuous spiral rounds or join and sl st based on preference.
Round 2 :
(1 sc, 1 inc) x 20 (80)
Round 3 :
(3 sc, 1 inc) x 20 (100)
Round 4 :
(4 sc, 1 inc) x 20 (120)
Round 5-8 :
1 sc in each st (120)
Info :
At this point the brim is broad and flat. Continue working even rounds to add stiffness and depth. If fabric begins to bowl upward, add a round of increases; if it ruffles too much, add even rounds without increases. Aim for a brim diameter of approximately 11-13 inches depending on desired waviness.
Round 9 :
(5 sc, 1 inc) x 20 (140)
Round 10-12 :
1 sc in each st (140)
Round 13 :
(6 sc, 1 inc) x 20 (160)
Round 14-18 :
1 sc in each st (160)
Info :
If your brim is too floppy for the scalloped look, consider lightly blocking with steam or starching. You can also add a round of slip stitches in a contrasting color along the inner brim to help it sit flat when worn.
Round 19 :
(3 sc, shell) x around where 'shell' = (2 dc, ch 1, 2 dc) made into the same stitch every 8-10 sts to form scallops. Work the shells evenly spaced: for 160 sts, place shell every 10 sts = 16 shells.
Round 20 :
1 sc in each st and 3 sc across each shell to stabilize the scallops (160)
Round 21 :
Work 1 round of sl st in BLO around the last round to create a neat inner ridge (160)
Round 22 :
Edge round for neat finish: *sc in next 4, (sc, ch 2, sc) in shell center, sc in next 4* repeat to the end. This adds a small picot-like lift to each scallop.
Info :
The wave effect comes from the placement and size of the shells. You can increase shell size or frequency to accentuate waves. Blocking while damp and pinning the brim into a wavied shape will set the scallops more permanently.
Round 23 :
Fasten off and weave in ends. If you want a rolled outer edge like in the images, work 1 round of slip stitches tightly around the very outer edge and then 1 round of reverse single crochet (crab stitch) for a twisted cord look.
— Brim Twisted Edge (Optional Rolled Finish) :
Round 1 :
Join yarn at outermost rim, working sl st into each st around in a continuous spiral. For a tighter finish use a 3.25mm hook.
Round 2 :
Reverse sc (crab stitch) around entire outer edge to create a decorative twisted finish. Fasten off and weave in ends.
Info :
Reverse single crochet gives a rope-like edge that helps the scallops hold their shape and gives the neat rolled border pictured in the photo.
— Large Flower (Make 1) :
Round 1 :
Using lighter pink, 6 sc in magic ring (6)
Round 2 :
Inc in each around (12)
Round 3 :
(1 sc, 1 inc) x 6 (18)
Round 4 :
Ch 5, sl st in next st to form first loop; rep around to make 6 loops (6 loops)
Round 5 :
Into each loop work: (sl st, ch 1, 3 tr, ch 1, sl st) to form a petal; repeat in each loop (6 petals)
Round 6 :
Working behind petals, sc around the center to stabilise and create a small raised center. Fasten off leaving long tail for sewing.
Info :
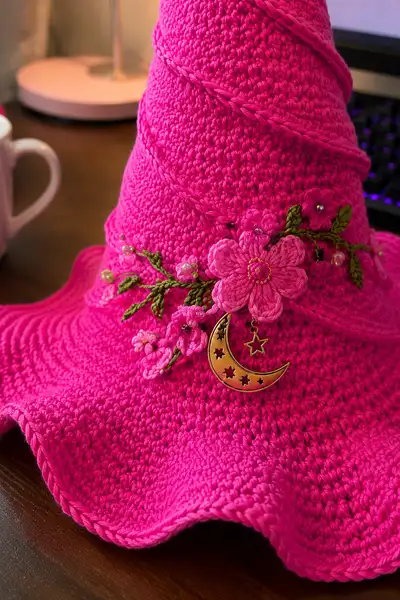
Add a few wraps of metallic thread into the center and secure with tiny stitches to simulate the golden bead detail seen in the photograph. Sew the finished flower onto the cone slightly above where the cone meets the brim.
— Small Flowers (Make 3-5) :
Round 1 :
Using lighter pink, mr, 6 sc in mr (6)
Round 2 :
Ch 4, sl st in next st to make small loops; repeat 5 more times to make tiny petals; fasten off leaving tail (6 tiny petals)
Info :
Attach beads or small pearls in the center of the small flowers for sparkle. These cluster around the large flower to create the floral garland segment visible in the photos.
— Leaves & Stems (Make 6-10 Leaves, Several Stems) :
Round 1 :
Using leaf green, ch 8, sc in 2nd ch from hook, hdc, dc, tr, dc, hdc, sc (leaf formed). Fasten off leaving long tail for sewing.
Round 2 :
For a slightly raised leaf, sl st around the edge of the leaf and work 1 sc in the center chain run to make the leaf plump. Fasten off.
Info :
Stems are created using a twisted chain: ch to desired length (approx 10-20 ch), then using a smaller hook work sc back along the chain to make it chunky. Sew stems in place and attach leaves at intervals, adding beads as dew drops where desired.
— Beaded Accents and Charm Attachment :
Info :
Sew small glass beads or pearls into flower centers and along stems using a beading needle. Attach the metal moon charm to a short chain or jump ring and sew/join it at the flower cluster center so it dangles over the brim as pictured.
— Twisted Brim Cord (Optional) :
Round 1 :
Ch 60 (or longer depending on brim size), join and sl st around to make a neat cord. Alternatively, make 3 long ch cords and plait lightly, then sew around the cone where it meets the brim.
Info :
Sew the cord with small discrete stitches, following the diagonal seam where the cone meets the brim to recreate the wrapped look in the photos. Tuck ends under a flower or embroidery for a seamless finish.
— Assembly & Finishing Touches :
Info :
Position all embellishments before sewing: large flower centered front at the base of the cone, smaller flowers and leaves fanned outward, beads placed to follow leaf veins. Pin pieces and take a photo to ensure balance before final sewing.
Round 1 :
Sew the spiral rope onto the cone beginning near the tip and spiraling down to the base, spacing the wrap approximately every 6-8 rows of cone. Secure ends by stitching to underside of brim and weaving tails in.
Round 2 :
Sew on the large flower with small whip stitches through the flower base and into cone fabric. Attach small flowers and leaves around it, sewing from back to front for a neat finish.
Round 3 :
Attach moon charm using a short chain or jump ring; secure the connecting thread at two points behind the flower cluster so the charm hangs forward naturally.
Info :
Weave in all ends and use a few drops of fabric glue on knots for longevity if the hat will be worn frequently. If you added wire, bend and shape the wire so the curl looks natural and then stitch the curl firmly in place.
— Optional Internal Support & Shaping Notes :
Info :
For a stable tall hat that keeps its curl, use a length of floristry wire or a light plastic-coated wire inserted inside the cone with its end wrapped and secured. Alternatively, create a light cone-shaped interfacing out of felt or craft foam and insert it before closing the base; sew through the felt to anchor the cone to brim securely.
Round 1 :
If using felt cone: cut a cone to match the inner measurements of the crocheted cone, insert and tack at 6-8 points around the base before adding the brim. This prevents the cone from collapsing and helps keep the curl position.
Info :
Final blocking: pin the brim into the scalloped shape and lightly steam; allow to dry. For a crisp hold, mix a 1:1 water to fabric stiffener or white glue to water and brush lightly on the brim before pinning. Allow to dry fully before attaching embellishments permanently.
This bright pink spiral witch hat is equal parts dramatic and delightful! Each stitch and embellishment adds personality — from the curled tip to the scalloped brim and floral garland with its moon charm. This pattern rewards patient shaping and creative finishing touches; you'll end up with a wearable statement piece perfect for costumes or display. I hope you enjoyed making it; share your finished hat and add your own colors and motifs for endless variations! 🎀✨