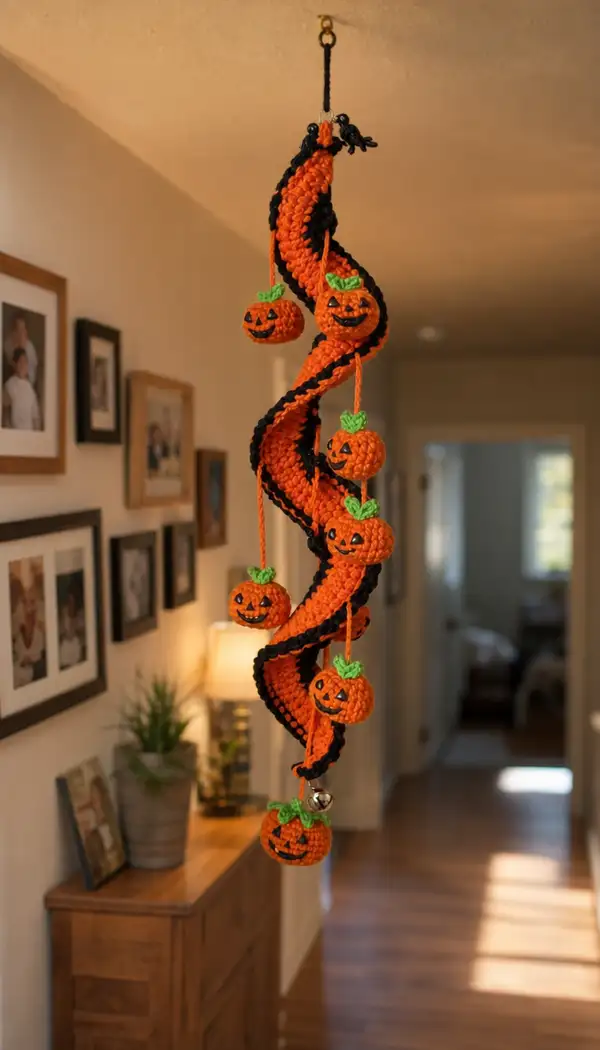
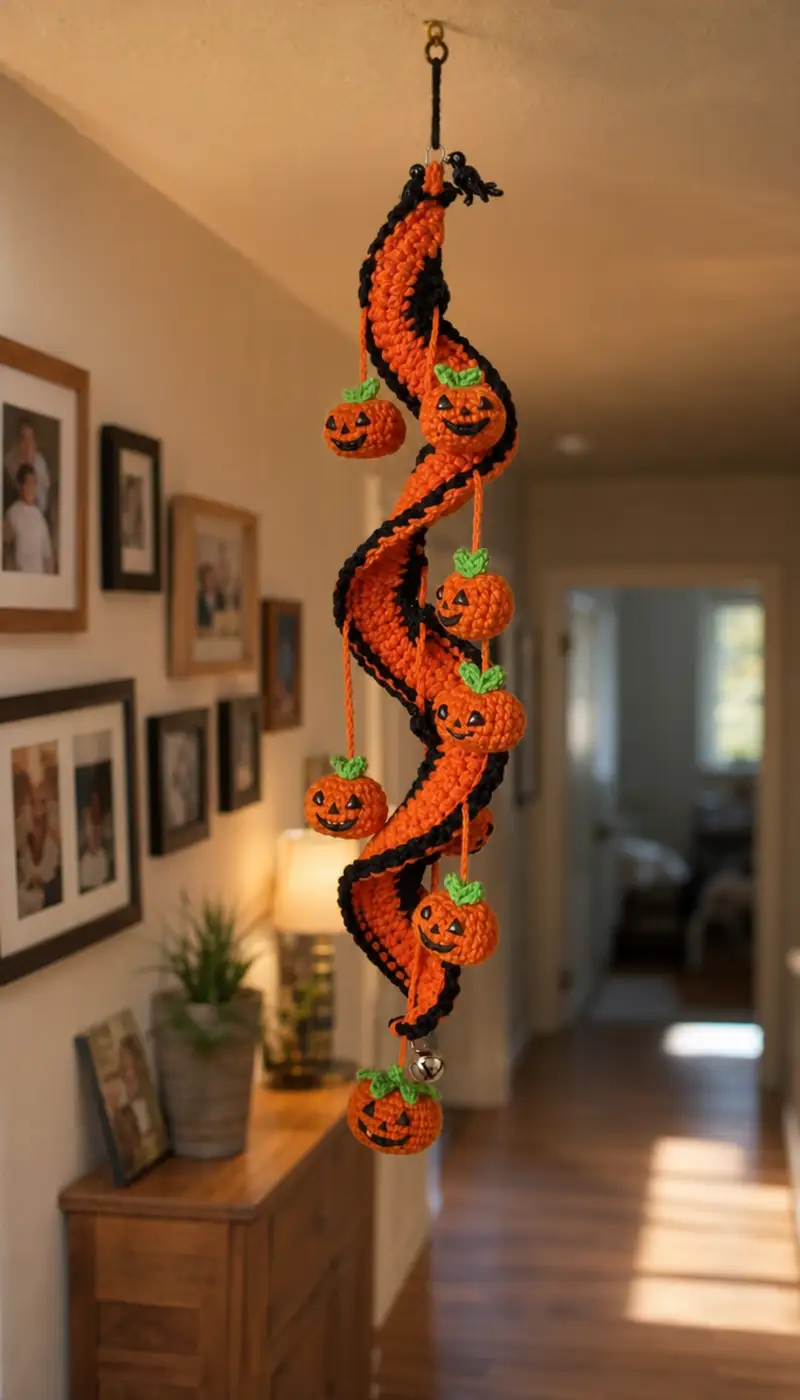
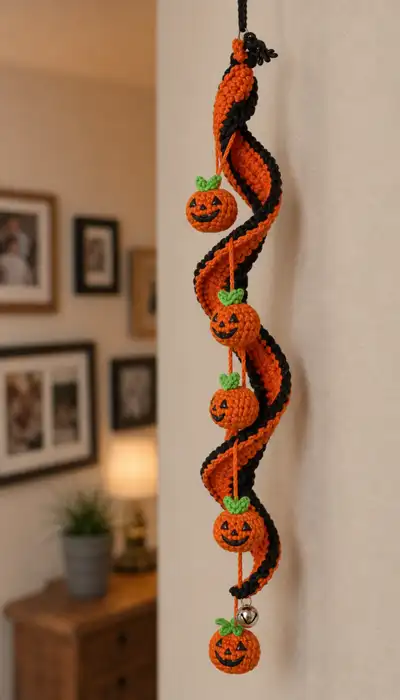
A whimsical hanging Halloween garland featuring a twisted orange-and-black spiral and seven tiny jack-o'-lantern pumpkins dangling at intervals. This decorative piece is light, cheerful, and perfect for doorways, porches, or as seasonal indoor decor. The pattern uses simple amigurumi pumpkins, small crocheted leaves, and a long tubular spiral that twists into a helix for eye-catching movement. Finished with a jingle bell at the bottom for a playful touch.
Progress Tracker
0% Complete
— Main Spiral (make the long orange tube and the black edge strip) :
Overview :
The spiral is built from two long pieces: a wide orange tubular strip (the main body), and a narrower black strip that will be sewn along one edge of the orange tube to create the bold stripe. After both strips are completed you will twist the orange tube into a helix and sew the black strip to the outside edge to lock the twist. Tube measurements: the sample pictured is approximately 28-32 inches long after blocking and twisting. Adjust number of rounds to shorten or lengthen.
Orange Tube - Round 1 :
6 sc in magic ring (6)
Round 3 :
(1 sc, 1 inc) x 6 (18)
Round 4 :
(2 sc, 1 inc) x 6 (24)
Round 5 :
(3 sc, 1 inc) x 6 (30)
Round 6 :
(4 sc, 1 inc) x 6 (36)
Round 7 :
(5 sc, 1 inc) x 6 (42)
Round 8 :
(6 sc, 1 inc) x 6 (48)
Info :
At round 8 you should have a stable circumference of 48 stitches. This is the sample tube circumference. If you prefer a thicker tube, continue increasing by the same pattern until you reach 54 or 60 stitches circumference, keeping increases evenly spaced around the round.
Round 9-12 :
1 sc in each st (48)
Info :
Work several even rounds to set the tube shape before you begin the long length. These rounds form the foundation of the tube and make the edge easier to sew the black strip to later.
Round 13-80 :
1 sc in each st (48) — Repeat for a total of 68 rounds of even single crochet from round 13 to reach round 80 (this will produce the long tube length used in the sample). Adjust final round number to make the tube longer or shorter as desired.
Info :
If you want a slightly flattened tube that twists more visibly, on the last 6 rounds switch to BLO (1 sc in each st BLO) to create a subtle ridge that helps the tube keep its spiral. Also leave a long tail (approx 18-24 inches) of orange yarn for finishing and sewing.
Orange Tube - Finish :
Fasten off leaving long tail. Weave in tail later through inside of tube or use it to secure the black strip
Black Edge Strip - Round 1 :
Make black narrow tube: 6 sc in magic ring (6)
Round 3 :
(1 sc, 1 inc) x 6 (18)
Round 4 :
(2 sc, 1 inc) x 6 (24)
Round 5 :
(1 sc in each st) around for 2 rounds (24)
Round 6-80 :
1 sc in each st (24) — Continue even rounds until the black strip matches the same round-count length as your orange tube (i.e., same number of rounds after the initial increases). Leave a long tail for sewing.
Info :
The black strip should be narrower than the orange tube; it will be sewn along one edge of the orange tube. Keep both pieces flat when you set them side-by-side and count rounds to ensure they are the same length so the stripe will lay even when positioned on the spiral.
Edge Attachment :
Pin the black strip along the desired edge of the orange tube with 1/4 inch spacing between pins, right sides facing out. Using the long tails, whipstitch or mattress stitch the black strip to the orange tube along the top loop only so that the black sits as a raised edge when twisted. Do not sew too tightly or you will pull the orange tube toward the black; you want the black to act as a contrast ridge.
Info :
If you prefer a crocheted join instead of sewing, slip-stitch the black strip to the orange tube by folding the black strip's first round over the orange tube edge and working even sl st through both loops. That method gives a neater single-crochet-like finish but can be slower over the long length.
Helix Formation :
Once the black strip is attached, gently twist the orange tube into a helix. Start at one end and slowly rotate the tube, forming 'S' shaped curves and encouraging the black ridge to sit on the outside of the curves. Pin the twisted shape onto a blocking board or drape gently over a long cylinder (a rolled towel works). Use long mattress stitches to tack the spiral shape along several points to keep the twist locked. Sew through inside loops only so the seam is invisible on the outside.
Info :
If you want a firmer spiral, insert a thin flexible wire or pipe cleaner lengthwise through the center of the orange tube before you close the final opening. Seal ends securely and hide wire ends by folding them in and stitching over the opening. Use protective tape around wire ends to avoid pokes.
— Pumpkin (Make 7 identical small pumpkins) :
Overview :
Each pumpkin is a small spherical amigurumi worked in continuous rounds. The sample pumpkins are about 1.4 to 1.6 inches (3.5-4 cm) in diameter using worsted weight yarn and a 3.5mm hook. Make seven pumpkins of the same size. These instructions are for one pumpkin; repeat to make 7.
Round 1 :
6 sc in magic ring (6)
Round 3 :
(1 sc, 1 inc) x 6 (18)
Round 4 :
(2 sc, 1 inc) x 6 (24)
Round 5 :
(3 sc, 1 inc) x 6 (30)
Round 6 :
(4 sc, 1 inc) x 6 (36)
Info :
Rounds 1-6 establish the sphere diameter. Check your gauge: 36 stitches around yields small palm-sized rounds; if you want slightly larger pumpkins, add one more increase round to reach 42 sts circumference: (5 sc, 1 inc) x 6 = 42.
Round 7-11 :
1 sc in each st (36)
Info :
After round 11 you have the maximum girth of the pumpkin. These even rounds create the rounded center. Begin stuffing after round 9-10 to shape the pumpkin — use small amounts of fiberfill pushed to the outer edge to maintain the roundness.
Round 12 :
(4 sc, 1 dec) x 6 (30)
Round 13 :
(3 sc, 1 dec) x 6 (24)
Round 14 :
(2 sc, 1 dec) x 6 (18)
Info :
Continue stuffing as you reduce. For jack-o'-lanterns it's best to stuff firmly but not overpacked so the embroidery will sit smoothly on the surface.
Round 15 :
(1 sc, 1 dec) x 6 (12)
Round 17 :
Fasten off leaving a 10-12 inch tail for sewing and hanging. Use needle to close the hole by weaving tail through remaining 6 sts and pulling tight. Weave tail into the center of the pumpkin and knot securely (6)
Info :
After finishing, smooth the pumpkin by massaging with fingers. If you want the slight vertical ribbing typical of pumpkins, use a length of yarn to stitch from top to bottom around the circumference, forming segments. See the 'Ribbing' Info below.
Ribbing (optional) :
Take a long length of yarn (approx 20 inches) and thread a tapestry needle. Insert needle at the top center, then stitch down over the surface passing through the center bottom and up again offset by 1/6 of the circumference. Repeat around the pumpkin 6-8 times to create distinct ribs (evenly space passes). Tighten slightly to create indentations. Tie off and hide ends inside pumpkin.
Face Embroidery :
Using black yarn or embroidery thread, embroider triangular eyes and a smiling mouth. For placement on a 36-st circumference pumpkin, position the eyes approximately across one row of stitches on the widest round (usually rounds 8-10). Space eyes about 6-8 stitches apart depending on desired expression. Use satin stitch to fill the triangles and small backstitch to create the smiling mouth. Secure embroidery at the inside and hide knots into stuffing.
Leaf and Stem :
Make 1 small leaf for each pumpkin following the Leaf section below. Attach leaf to the top of the pumpkin by sewing its base into the center top. Use a short length (approx 4-6 inches) of orange yarn for the hanging cord, knot securely through top center and leave equal lengths for hanging.
Make :
Repeat this pumpkin pattern seven times (7 pumpkins total). Consider making one slightly larger pumpkin for the bottom if you want a focal piece; to enlarge, start by increasing to 42 sts circumference instead of 36 at round 6.
— Leaf (Make 7 leaves + extras for top) :
Round 1 :
Ch 6, sl st in 2nd ch from hook, sc in next ch, hdc in next ch, dc in next ch, sl st in last ch. (Small leaf chain) (leaves are flat)
Round 2 :
Turn and work along the other side of the chain: sl st in next ch, dc in next ch, hdc in next ch, sc in next ch, sl st in last ch. Fasten off, leaving a long tail for sewing.
Info :
For a more textured leaf, work Round 2 in BLO and add a small embroidered vein using darker green yarn. Make one leaf per pumpkin and an extra for the top hanging loop decoration.
Alternative small leaf :
mr, ch2, 6 sc in mr working a small round leaf, pull tight, fasten off and flatten to a teardrop shape. This is used for tiny decorative leaves.
— Hanging Cord & Top Hanger :
Top Hanging Loop :
Make a chain of approx 35-45 ch in black yarn (or length to suit your doorway height) and join ends with sl st to form a loop. Reinforce by working 2 rounds of sc around the chain loop to make it sturdier. Fasten off and weave ends.
Info :
Attach a small split ring or key ring at the top of the loop for easy hanging on a hook. Reinforce the attachment with extra stitches and a small knot to avoid slippage.
Braided Pumpkin Cords :
Cut seven lengths of orange yarn, each about 18-20 inches long (adjust to create the staggered hanging seen in the photos). Braid each length into a tight 3-strand braid and knot at both ends. Use one braid per pumpkin. For a neater look, you can chain about 20-30 and then slip-stitch back over the chain to create a cord instead of a braid.
Info :
Decide your spacing: the sample garland uses gradually spaced pumpkins along the spiral creating an alternating rhythm. Typical spacing between pumpkins on the cord when attached to the spiral is 3-4 inches, but you can vary this for an organic look.
— Bell & Bottom Accent :
Optional bell cover :
You may want to make one larger pumpkin for the bottom to enclose a small jingle bell. Follow the pumpkin pattern but increase circumference to 42 stitches at round 6. Before closing the final hole, insert small bell then finish closing the pumpkin. Tie off and secure the bell so it doesn't rattle loose.
Info :
To attach a metal bell outside the pumpkin, sew a small loop of thread through the top and attach the bell to the loop. Make sure all metal bits are tucked safely under stitches if children will touch the garland.
— Assembly & Final Shaping :
Step 1 :
Plan the layout: Lay the twisted spiral flat and arrange pumpkin cords along the inside curve of each spiral loop where you want them to hang. The sample uses 7 pumpkins: 1 near the top, 5 spaced down the length, and 1 larger pumpkin with bell at the bottom. Space them evenly or stagger as desired.
Info :
Pin each pumpkin in place before sewing — view the garland from a distance or hang temporarily to check the drape before final sewing.
Step 2 :
Sew each braided/punched cord to the inside of the spiral tube by inserting needle through the inner tube fabric and catching the braid knot. Use a few tight passes of yarn to secure and knot inside the tube to hide the ends. For additional security, stitch through the pumpkin base and the tube fabric to anchor each one.
Step 3 :
Attach leaves: sew a small leaf at the top of each pumpkin covering the cord knot for a tidy finish. Hide leaf stitches into the top center of the pumpkin where the yarn tail was left.
Step 4 :
Finish top hanger: sew the top hanging loop into the very top rounds of the spiral tube. Use multiple reinforcing passes of yarn to ensure strength. Optionally add a decorative bow or small cluster of leaves at the top.
Step 5 :
Final touches: weave in all loose ends inside the spiral or pumpkins, trim excess, and steam-block lightly if desired to set the shape. Hang and adjust any stitches to perfect the spiral drape.
Info :
To make the spiral keep its shape, add tacking stitches at 6-8 points along the length, sewing through inside loops only. This secures the helix while keeping the outside visible clean and smooth.
Congratulations — you've created a playful spiral pumpkin garland that brings seasonal charm to any doorway! This project blends simple amigurumi pumpkins with a sculptural crocheted spiral for dramatic impact. The detailed steps and tips help you reproduce the twist, attach pumpkins securely, and customize spacing and size. Hang it proudly or give it as a handmade fall gift — it's a delightful accent that's sure to bring smiles. 🎃🧶