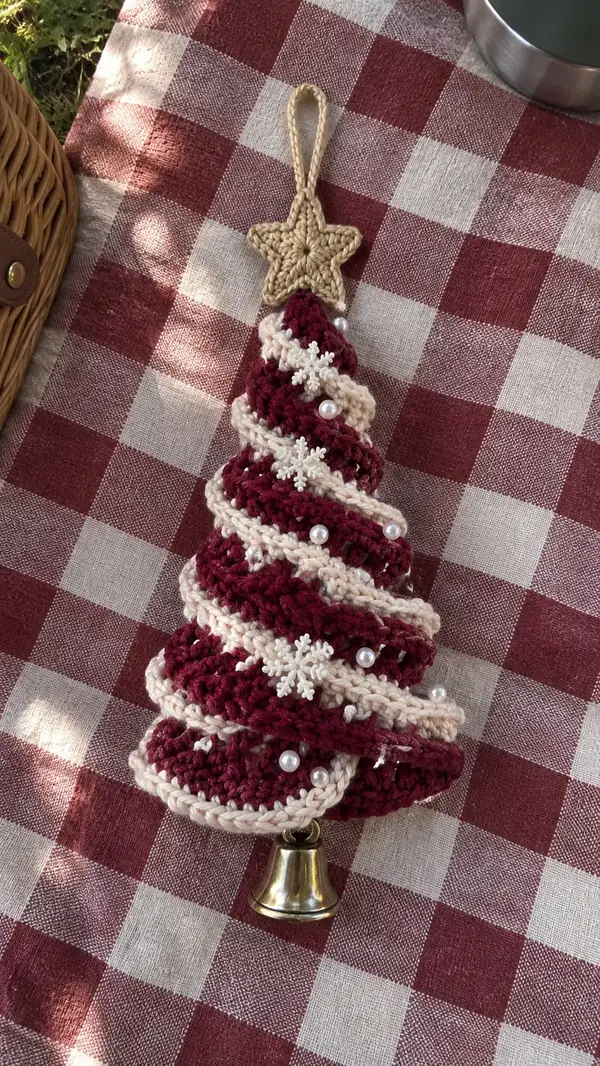
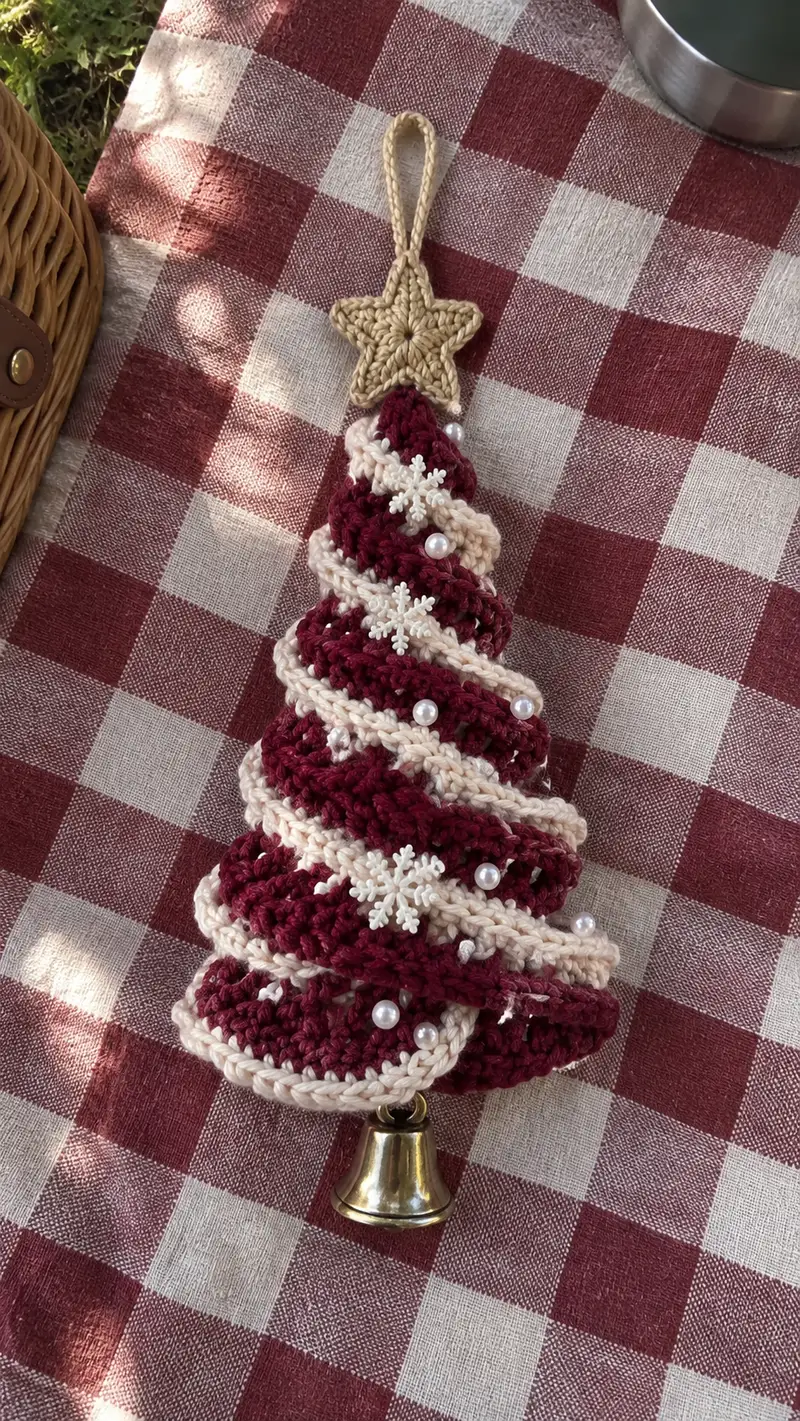
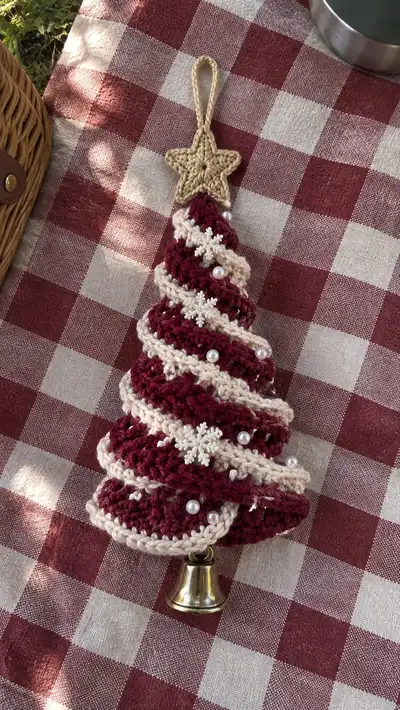
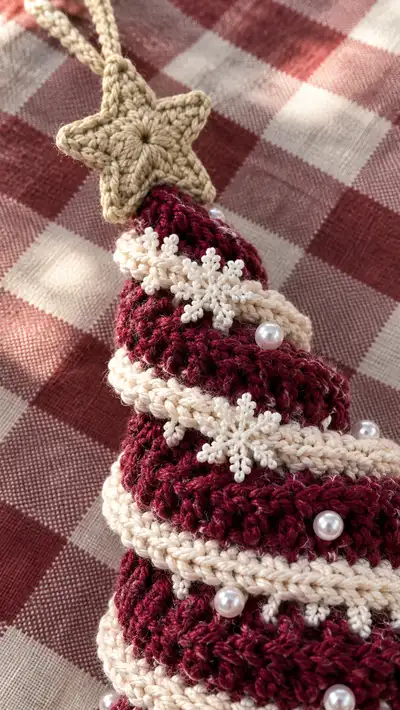
A charming spiral ruffle Christmas tree ornament worked in deep burgundy and soft cream, topped with a small gold star and finished with pearls, tiny snowflake embellishments and a brass bell. The pattern uses simple rounds, color changes and a separate ruffle strip wrapped in a graceful spiral to create textured tiers. This ornament is sturdy, lightly stuffed for shape, and perfect for tree, wreath or table display.
Progress Tracker
0% Complete
— Cone Body (worked top-down in continuous rounds) :
Round 1 :
6 sc in magic ring (6)
Info :
Work in continuous (spiral) rounds. Place a stitch marker in the first stitch and move it up each round. This top point will be the top of the tree where the star is attached.
Round 3 :
(1 sc, 1 inc) x 6 (18)
Round 4 :
(2 sc, 1 inc) x 6 (24)
Round 5 :
(3 sc, 1 inc) x 6 (30)
Round 6 :
(4 sc, 1 inc) x 6 (36)
Info :
At these early rounds the cone is still very narrow. If you prefer a taller tree, add a couple of even rounds here before continuing increases.
Round 7 :
(5 sc, 1 inc) x 6 (42)
Round 8 :
(6 sc, 1 inc) x 6 (48)
Round 9 :
(7 sc, 1 inc) x 6 (54)
Round 10 :
(8 sc, 1 inc) x 6 (60)
Info :
Continue increasing evenly to shape a smooth cone. Keep tension consistent to avoid bumps. This cone uses classic circle increases so stitch counts increase by 6 each round.
Round 11 :
(9 sc, 1 inc) x 6 (66)
Round 12 :
(10 sc, 1 inc) x 6 (72)
Round 13 :
(11 sc, 1 inc) x 6 (78)
Round 14 :
(12 sc, 1 inc) x 6 (84)
Round 15 :
(13 sc, 1 inc) x 6 (90)
Info :
At around round 14-16 check your cone diameter against a small bell or the intended base size. For the sample ornament, round 20 yields approx. 6-7 cm diameter at the base when using worsted yarn and a 3.5mm hook.
Round 16 :
(14 sc, 1 inc) x 6 (96)
Round 17 :
(15 sc, 1 inc) x 6 (102)
Round 18 :
(16 sc, 1 inc) x 6 (108)
Round 19 :
(17 sc, 1 inc) x 6 (114)
Round 20 :
(18 sc, 1 inc) x 6 (120)
Info :
Round 20 produces a broad base circumference. From here we will work a number of even rounds to create vertical height for the cone. This is a good place to start stuffing lightly — add a small amount of fiberfill now so the very tip remains shapely.
Round 21-26 :
1 sc in each st (120)
Info :
Work rounds 21-26 even to build height. Keep your stitches tight so the stuffing does not show through. If you prefer a narrower or taller tree, add or remove even rounds here.
Round 27 :
(18 sc, 1 inc) x 6 (126)
Round 28 :
1 sc in each st (126)
Round 29 :
(19 sc, 1 inc) x 6 (132)
Round 30 :
1 sc in each st (132)
Info :
These additional increases give generous volume to the cone so the spiral ruffle sits with soft folds rather than a flat wrap. At this stage lightly stuff the cone through the base opening (we will close later), aiming for a gently rounded profile, not rock-hard stuffing.
Round 31-34 :
1 sc in each st (132)
Info :
Continue stuffing gradually until the cone keeps its shape when held upright. The sample cone is lightly filled so the ruffle wraps naturally and the bell can be attached without pulling the base out of shape. Fasten off leaving a long tail for sewing to the base/rim as needed.
— Spiral Ruffle Strip (worked flat; wrap around cone) :
Info :
The ruffle is made as a long flat strip in alternating colors (burgundy + cream). When finished, wrap the strip around the cone in a spiral and secure with small, evenly spaced stitches. For the sample, a foundation chain of 120 stitches was used — this gives a long strip that can be ruffled and wrapped into 6-8 tiers around our 132-st cone. If your cone circumference differs, chain until the strip comfortably wraps around the widest part with some overlap.
Row 1 :
With burgundy, ch 120 (sample length). Sc in 2nd ch from hook and in each ch across (120)
Row 2 :
Turn, ch 1, (sc, inc) x 60 (where inc = 2 sc in same st) (180)
Info :
Row 2 adds volume — the (sc, inc) repeat doubles the length of the next row, creating the first ruffle. Count is mathematically consistent: 60 repeats consume 120 baseline stitches and insert 60 extra stitches for 180 total.
Row 3 :
Turn, ch 1, 1 sc in each st (180)
Row 4 :
Turn, ch 1, (2 sc, inc) x 60 (where repeat consumes 3 sts; total increases = 60) (240)
Info :
Row 4 uses (2 sc, inc) x 60. Calculation: 3 stitches consumed per repeat x 60 = 180 stitches consumed; each inc adds 1 more stitch, so total becomes 180 + 60 = 240 stitches. This builds a fuller ruffle edge.
Row 5 :
Turn, ch 1, sc in each st (240)
Row 6 :
Turn, ch 1, (3 sc, inc) x 60 (where repeat consumes 4 sts) (300)
Info :
Keep an even edge: counts above escalate but are intentional to create rolling ruffles. If you prefer a subtler ruffle, pause increases after Row 4 and repeat Rows 3-4 for desired fullness instead of continuing to increase.
Row 7 :
Turn, ch 1, sc in each st (300)
Row 8 :
Turn, ch 1, (4 sc, inc) x 60 (where repeat consumes 5 sts) (360)
Info :
By Row 8 you've produced a very full ruffle. For the sample ornament, the strip of 8 rows (back-and-forth) produced enough gathered fabric to wrap into 6 spiral tiers. If you want more tiers, continue repeating the increase pattern every other row to lengthen the strip.
Row 9 :
Turn, ch 1, sc in each st (360)
Row 10 :
Turn, ch 1, (5 sc, inc) x 60 (where repeat consumes 6 sts) (420)
Info :
Continue this alternating pattern of one sc row, then one increasing row (increase by inserting an extra sc at the specified interval) until the strip length feels right for wrapping. In the sample, Rows 1-12 were used then the strip was blocked lightly and wrapped.
Row 11 :
Turn, ch 1, sc in each st (420)
Row 12 :
Turn, ch 1, (6 sc, inc) x 60 (where repeat consumes 7 sts) (480)
Row 13 :
Turn, ch 1, sc in each st (480)
Info :
If your strip is longer than needed, do not worry — you can gather or slightly overlap tiers. The ruffle's purpose is to create soft waves, so minor length differences are forgiving. If you need to shorten later, trim at the ends before final sew-down.
Row 14-24 :
Repeat pattern: One sc row followed by one increasing row, keeping the repeat counts scaled as above (sample continues increases every other row to Row 24). After Row 24 sample length = approx. 960 sts (very full ruffle)
Info :
Color changes: For the cream spiral garland effect, switch to cream yarn after an even row (for a clean edge). To make the white/cream raised spiral, you will create a narrow separate cream strip as well, or use single-row color changes at intervals as described below.
Row 25 :
With cream, join at one short edge to create a narrow spiral rope: ch 2, work 1 hdc in each of next 8 sts, sl st to end; repeat small rope rows lengthwise to create a 1-row thick cream garland approximately matching the length of the burgundy ruffle (sample used a 1x360 chain rope worked in hdc)
Info :
Two approaches to the cream spiral: (A) create a narrow rope (hdc) in cream and wrap it on top of the burgundy ruffle, or (B) change color in the burgundy strip at regular intervals to create a cream ridge. In the sample we made a separate cream rope and sewed it spirally for a clean contrast edge.
Row 26 :
Fasten off the burgundy ruffle strip and lightly block to set the waves. Fasten off the cream rope and leave long tails for sewing. We will join them around the cone in the Assembly section.
Info :
Tip: When blocking, pin the ruffle on a towel or foam board to shape the waves. Lightly steam from a distance if your yarn permits, or wet-block and allow to dry fully to maintain the spiral shape when sewn in place.
— Star Topper (make 1) :
Info :
Star is worked flat and stuffed lightly for dimension. Use a small hook (3.0-3.5mm) and gold yarn or warm beige. This little star sits on top of the cone and is sewn to round 1-2 of the cone.
Round 1 :
With gold, mr, ch 2 (counts as first stitch for top loops), work 10 hdc into ring, pull tight, join with sl st to first hdc (10)
Round 2 :
Ch 2, (1 dc, ch 1, 1 dc) in next st, sl st into next st, *(1 dc, ch 1, 1 dc) in next st, sl st into next st; rep from * around to make 5 points. End sl st to first ch (star base formed)
Round 3 :
Work into each point: sl st into first dc of point, ch 1, (sc, hdc, dc, tr) in point center, (dc, hdc, sc) back down, sl st at base. Repeat for each of 5 points to shape and slightly cup the points. Fasten off leaving long tail for sewing.
Info :
Make two star pieces (front and back) for a plump star: stitch around edges with mattress stitch, stuff very lightly between layers before closing. If you prefer a flat star, make one piece and edge with single crochet to firm up and leave unstuffed.
Round 4 :
Assemble 2 star pieces: place right sides together, whip stitch around edges leaving a 1cm opening. Stuff lightly and finish closing with invisible stitch. Weave in tails.
Info :
Attach a short hanging loop to the back of the star or integrate the braid loop through the top point so the star and loop are a single assembly — this keeps it tidy when hanging the ornament.
— Hanging Loop and Top Assembly :
Round 1 :
With gold (or matching star yarn), ch 30 (or length desired for hanger). Join ends with sl st to form a loop and sc around the join to tidy (30)
Info :
Optional: Insert a short length of craft wire inside the ch loop before joining to create a stiffer hanger. Braid three short strands of yarn and stitch them together to form a decorative loop if preferred.
Round 2 :
Slip the loop through the star top and fasten securely with a few rounds of sc around the intersection so the star and hang loop become one piece. Use the long tail to sew the star assembly onto the cone apex (through rounds 1-2 of the cone). Sew tightly and weave in ends.
Info :
Position the star so the seam hides behind a point. Sew from star back through round 2 and 3 of the cone to anchor. Use small whip stitches and keep stitches hidden on the inside if possible.
— Bell Attachment (base) :
Round 1 :
At the base opening of the cone, fold the final round inwards slightly to create a narrow rim. Use the tail from the cone body to whip stitch the rim closed around a small ring or split ring that the bell hangs from. Secure ring with multiple stitches (no stitch count)
Info :
Attach the brass bell to the ring and ensure it hangs centered at the cone base. If you want the bell detachable, secure it to a small jump ring through a few stitches rather than sewing it directly to the cone.
Round 2 :
Fasten off and weave the cone tail through the inner side for a neat finish. Trim excess tail. If your cone base feels floppy, add a small cardboard disc inside the bottom before closing to give rigidity, then sew closed over the disc.
— Embellishments & Finishing Touches :
Info :
Positioning: Place the burgundy ruffle around the cone in a spiral starting from top (rounds 2-4) and working downward. Use pins to hold the ruffle in place roughly every 1-1.5 cm along the edge. The cream rope is then wrapped slightly above the burgundy ruffle to mimic garland and will be sewn at a few anchor points to fix placement.
Step :
Wrap the burgundy ruffle around the cone in a clockwise spiral. Start with a small tuck at the apex and overlap the ruffle edges slightly to create continuous tiers. Pin at 6-8 evenly spaced points per tier.
Info :
Sewing the ruffle: Use a yarn needle and matching thread to place tiny stitches through the cone fabric and the ruffle underside at each pinned spot. Do not stitch through the visible outer ridges — take short, nearly invisible stitches to keep the look neat.
Step :
Wrap the cream rope in a slightly higher spiral, letting it sit on top of the burgundy waves. Pin and sew at spaced intervals (approx. every 8-10 cm of rope) to prevent slippage. Small stitches can be hidden in the underside of the rope.
Step :
Sew pearl beads and snowflake embellishments: Using sewing thread and small stitches, attach pearl beads into the troughs of the burgundy ruffle where they nestle naturally. Add small plastic snowflakes spaced around three tiers for balance. Secure each bead/snowflake with multiple passes of the needle and knot on the inside then weave tail into the cone interior.
Info :
Placement tip: A pleasing layout alternates single pearls and snowflakes every 1.5 - 2 tiers, focusing more beads near the lower half so the visual weight sits lower with the bell at the bottom.
Step :
Final inspection: Check stitches, trim stray fibers, weave all tails in securely. Gently shape waves with fingers if needed. Hang and admire!
Info :
If you prefer a less bulky ruffle, substitute the large ruffle strip with a narrower shell-edged strip (e.g., sc rows with shell edging every 6th row). The assembly and embellishment steps remain the same.
This spiral ruffle Christmas tree ornament blends classic crochet stitches with whimsical texture and vintage-inspired adornments. The layered ruffle and contrasting cream garland give each tier soft movement while the gold star and bell add festive charm. It’s a delightful small project that makes a thoughtful gift or treasured keepsake. 🧶✨ Hang it on your tree or use it as a special gift topper — every stitch carries holiday cheer! 🎄🔔