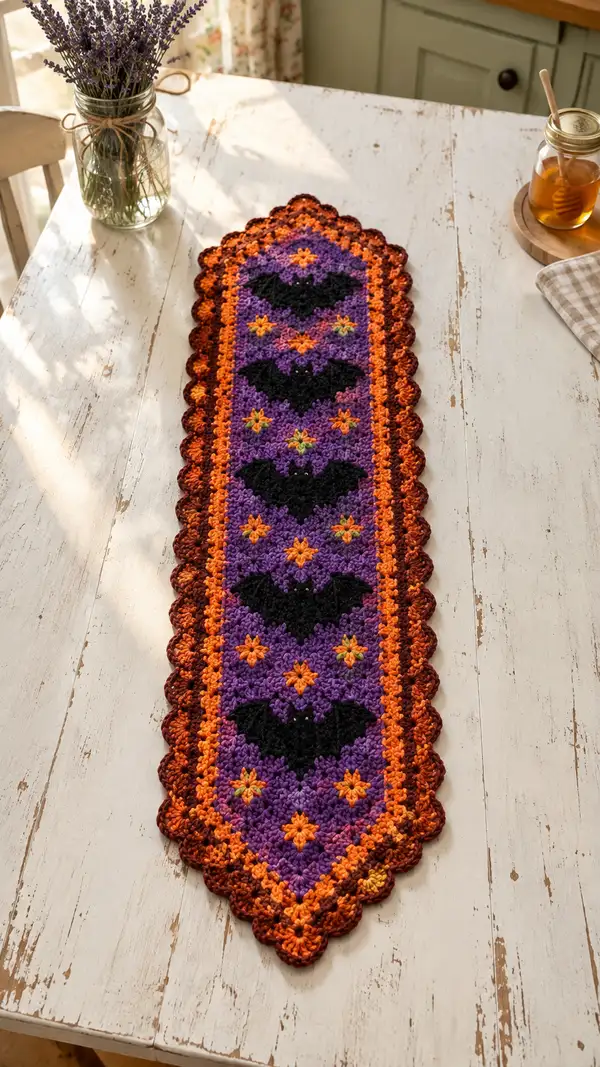
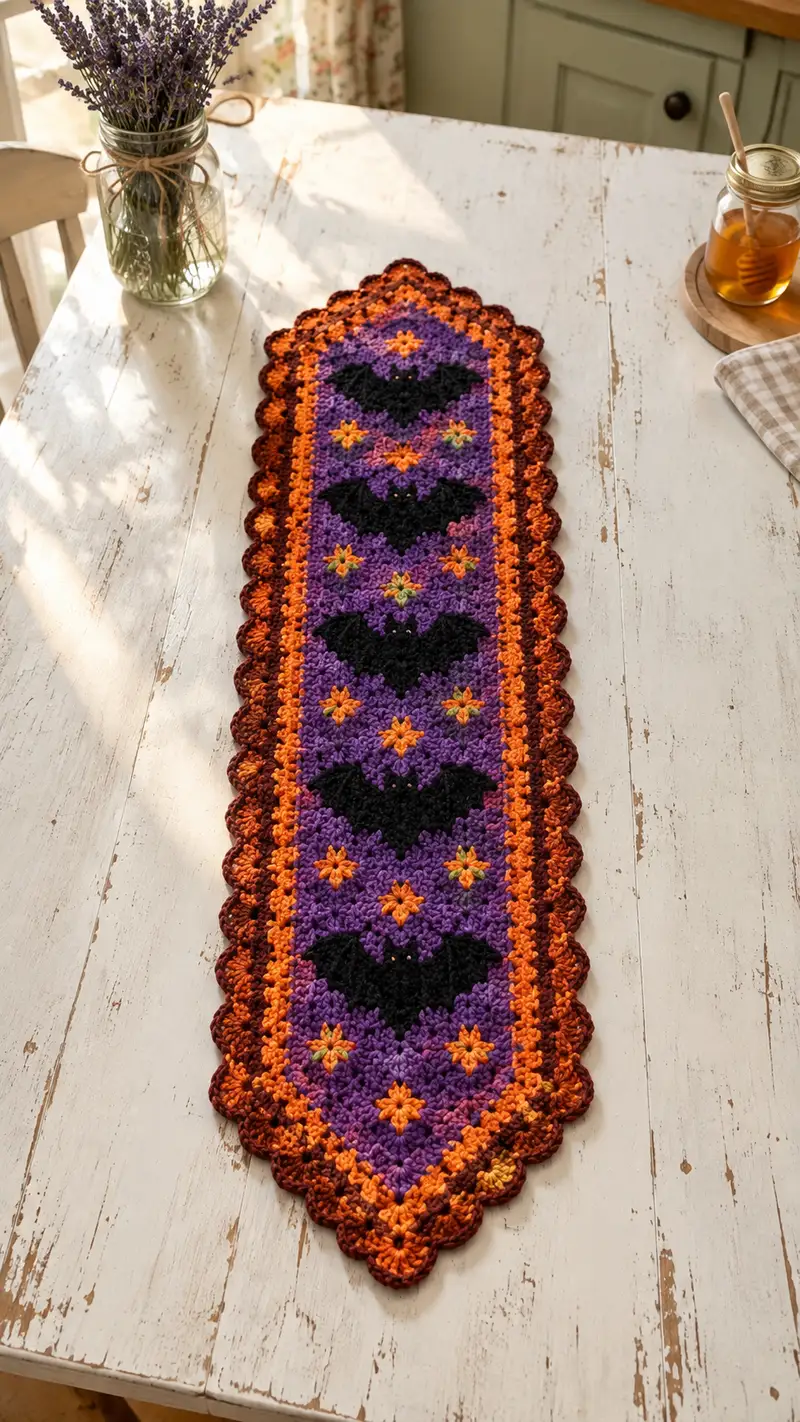
This long, festive table runner brings Halloween cheer with bold purple field, repeating black bat silhouettes and bright orange star accents. A warm variegated scalloped edge frames the runner and gives it a cozy, vintage farmhouse look. Worked in tapestry and simple cluster stitches, the pattern repeats for an elongated runner perfect for a dining table or console. Detailed instructions include colorwork placement, star stitch accents, and a layered scallop border for a polished finish.
Progress Tracker
0% Complete
— Notes & Gauge :
Info :
This runner is worked from one pointed end to the other. You will begin with a small triangle (point), increase each RS row until full width is reached, continue even rows to create the length, then decrease symmetrically to form the opposite point. Throughout the pattern 'V-st' refers to (dc, ch1, dc) worked into the designated stitch or space. Gauge is not critical, but a tighter tension gives clearer tapestry colorwork and crisper scallops. Suggested gauge: in V-st pattern, 10 V-st = approx 8.5 cm across with 4.0mm hook and worsted yarn.
Info :
We will refer to each row as a 'Round' here to match pattern structure and to keep counts clear. The panel grows by 2 V-st every increase row (one at each side). Final full width for this pattern is 35 V-st across (70 dc). If you prefer a wider runner, continue increases on both sides until desired width, then follow the even-row and decrease counts proportionally.
— Center Panel (point to full width) :
Round 1 :
Start: ch 3 (counts as first dc), work 1 V-st into the 1st chain space by making (dc, ch1, dc) into the base chain loop to create the first tiny triangle foundation. You now have 1 V-st (1 V)
Round 2 :
RS: Ch3 (counts as first dc), turn. Add 1 V-st into the same base space as the turning chain to make the first side increase, then work 1 V-st into top of turning ch. Finish the row by adding 1 V-st into the opposite end space so there are 3 V-st across. (3 V = 6 dc)
Info :
From here on every RS increase row starts with ch3, then make one extra V-st into the first V's first space to form a left-side increase and ends with one extra V-st in the final space to form a right-side increase. Mark the first and last V of each row with removable stitch markers to keep track of edges.
Round 3 :
RS: Increase both sides: work so that this row measures 5 V-st across (5 V = 10 dc)
Round 4 :
RS: Increase both sides to 7 V-st across (7 V = 14 dc)
Round 5 :
RS: Increase both sides to 9 V-st across (9 V = 18 dc)
Info :
Check for curling: if the triangle curls up, work one even row (no increases) in the next RS to relax the fabric before continuing increases. Maintain consistent tension across color changes for even tapestry appearance.
Round 6 :
RS: Increase both sides to 11 V-st across (11 V = 22 dc)
Round 7 :
RS: Increase both sides to 13 V-st across (13 V = 26 dc)
Round 8 :
RS: Increase both sides to 15 V-st across (15 V = 30 dc)
Round 9 :
RS: Increase both sides to 17 V-st across (17 V = 34 dc)
Info :
By this point you have a clear triangular point forming. Keep your floats tidy for tapestry: crochet over unused yarn when floats are shorter than 6 stitches, or use separate bobbins to avoid long floats across the wrong side.
Round 10 :
RS: Increase both sides to 19 V-st across (19 V = 38 dc)
Round 11 :
RS: Increase both sides to 21 V-st across (21 V = 42 dc)
Round 12 :
RS: Increase both sides to 23 V-st across (23 V = 46 dc)
Round 13 :
RS: Increase both sides to 25 V-st across (25 V = 50 dc)
Info :
Place a contrasting-color removable marker at the central V-st when you reach odd numbers — this helps you centre bat motifs later. The center V will be V number 13 when width is 25 V; update marker when you reach full width, which will be V 18 of 35 V.
Round 14 :
RS: Increase both sides to 27 V-st across (27 V = 54 dc)
Round 15 :
RS: Increase both sides to 29 V-st across (29 V = 58 dc)
Round 16 :
RS: Increase both sides to 31 V-st across (31 V = 62 dc)
Round 17 :
RS: Increase both sides to 33 V-st across (33 V = 66 dc)
Info :
Last few increases before full width: ensure your center marker is precisely at the center V. If your stitch count drifts by ±1, correct now by noting whether an extra V-st was added accidentally and remove it in the next row.
Round 18 :
RS: Increase both sides to full width of 35 V-st across (35 V = 70 dc). This is the first full-width row. From here you will work even across the row to establish the runner length and insert four bat motifs spaced down the center.
Info :
Mark the center V as V #18 (35 V across). We will place the first bat motif starting on Round 28. Place temporary markers at both edges and at the center to assist with tapestry placement across long rows.
Round 19-27 :
RS: Work 9 rows even (1 V-st in each V across) in main purple color. Maintain 35 V across each row (35 V = 70 dc). Use these rows to stabilize the panel before the first bat appears. (Repeat: 1 V-st in each V across)
Info :
Star accents: we will add orange/yellow/lime star stitches in between bats. Stars sit in V positions 9 and 27 across the row (count left to right). On rows where star appears you will replace that V-st with the star stitch; instructions for the star stitch are provided below in the 'Special Stitches' section.
— Bat Motifs and Star Accents (tapestry colorwork) :
Info :
Bat silhouettes are achieved with tapestry color changes to black across 7-row tall blocks. Each bat block is 7 consecutive even-width rows centered on the runner center. Each bat covers varying V positions across the 35-V width. Work each color change by carrying yarn along the WS or using bobbins; always catch floats shorter than 6 V by crocheting over them to keep the back neat.
Bat block 1 (Rows 28-34) — placement :
Center on Round 31. The bat occupies horizontal V positions roughly 11–25 across. Exact row-by-row instructions are below. Replace color name 'PURPLE' with your main color yarn and 'BLACK' with bat yarn.
Round 28 :
RS: 1 V in PURPLE in V positions 1-14, 7 V in BLACK in positions 15-21, 1 V in PURPLE positions 22-35 (counts: left purple 14, black 7, right purple 14 = 35 V)
Round 29 :
RS: 1 V in PURPLE positions 1-11, 11 V in BLACK positions 12-22, 1 V in PURPLE positions 23-35 (left 11, black 11, right 13 = 35 V)
Round 30 :
RS: 1 V in PURPLE positions 1-10, 15 V in BLACK positions 11-25, 1 V in PURPLE positions 26-35 (left 10, black 15, right 10 = 35 V)
Round 31 :
RS: 1 V in PURPLE positions 1-8, 19 V in BLACK positions 9-27, 1 V in PURPLE positions 28-35 (left 8, black 19, right 8 = 35 V). This is the widest/middle row of the bat
Round 32 :
RS: Mirror Round 30: 1 V PURPLE positions 1-10, 15 V BLACK positions 11-25, 1 V PURPLE positions 26-35 (35 V)
Round 33 :
RS: Mirror Round 29: 1 V PURPLE positions 1-11, 11 V BLACK positions 12-22, 1 V PURPLE positions 23-35 (35 V)
Round 34 :
RS: Mirror Round 28: 1 V PURPLE positions 1-14, 7 V BLACK positions 15-21, 1 V PURPLE positions 22-35 (35 V)
Info :
Between bat blocks, we will add star accents. On the star rows, replace the V at position 9 and at position 27 with a star stitch in ORANGE; inside the star use a small center of YELLOW and lime GREEN for layered effect. See 'Star Stitch' section for technique.
Round 35-35 :
RS: Round 35 is an ORANGE star-row: 1 V PURPLE positions 1-8, star st in ORANGE at pos9 (see star stitch instructions), 1 V PURPLE pos10-26, star st ORANGE at pos27, 1 V PURPLE pos28-35. Maintain 35 V units, with the star stitch replacing V-position units, creating two star motifs across the row.
Info :
Star stitch note: the star stitch replaces a V-st unit and slightly alters the height. Use the same turning chain approach at row ends, and when inserting a star, work the star into the center of the V space so the overall row height remains consistent.
Rounds 36-42 (Bat block 2) :
Repeat the 7-row bat silhouette sequence, centered on Round 39. Use the same per-row black V placements as for rows 28-34: start with a narrow top wing (positions 15–21), expand to center (positions 9–27), then contract. Maintain all other V positions in PURPLE. After bat block 2, insert an orange star row as above (replace V at positions 9 and 27 with star st).
Rounds 44-50 (Bat block 3) :
Repeat bat silhouette sequence centered on Round 47 with the same per-row placement described above. Insert orange star row after block.
Rounds 52-58 (Bat block 4) :
Repeat bat silhouette sequence centered on Round 55 with the same per-row placement described above. Insert orange star row after block.
Round 59-70 :
RS: Work even rows in PURPLE (1 V in each V across) for stabilization and spacing between bat sections. Keep total 35 V across each row. (Rounds 59-70 = 12 rows even)
Info :
If you prefer fewer or more bats, you can space the bat blocks further apart by adding more even rows between the blocks. For a denser look add star rows between each bat as desired.
— Center Panel (decrease to opposite point) :
Round 71 :
RS: Begin decreases — work a decrease at the start and end of the row so that the total V-st reduces by 2 (from 35 V to 33 V). Decrease method: at the start, work the first V normally, then skip the next 1 V and join the next V to form a neat edge decrease by crocheting the last dc of one V together with the first dc of the next V using a dc2tog technique; reflect symmetrically at the end. (33 V = 66 dc)
Round 72 :
RS: Decrease both sides to 31 V (31 V = 62 dc)
Round 73 :
RS: Decrease both sides to 29 V (29 V = 58 dc)
Info :
Keep your decreases neat: use a dc2tog where you work dc into two adjacent V units and finish them together to remove exactly one V at each side per row. Check center marker to ensure motif center remains aligned as you narrow the panel.
Round 74 :
RS: Decrease both sides to 27 V (27 V = 54 dc)
Round 75 :
RS: Decrease both sides to 25 V (25 V = 50 dc)
Round 76 :
RS: Decrease both sides to 23 V (23 V = 46 dc)
Round 77 :
RS: Decrease both sides to 21 V (21 V = 42 dc)
Info :
At narrowing widths you may notice slight puckering near decreases; if desired, on one decrease row add a short even row (no decreases) to relax the fabric before continuing to decrease to maintain a smooth taper.
Round 78 :
RS: Decrease both sides to 19 V (19 V = 38 dc)
Round 79 :
RS: Decrease both sides to 17 V (17 V = 34 dc)
Round 80 :
RS: Decrease both sides to 15 V (15 V = 30 dc)
Round 81 :
RS: Decrease both sides to 13 V (13 V = 26 dc)
Info :
Your narrow rows are forming the second point. Keep the tension consistent; if the point feels too loose, on the final few rows work the last V-st as a short V-st (hdc, ch1, hdc) to slightly reduce height and add stability.
Round 82 :
RS: Decrease both sides to 11 V (11 V = 22 dc)
Round 83 :
RS: Decrease both sides to 9 V (9 V = 18 dc)
Round 84 :
RS: Decrease both sides to 7 V (7 V = 14 dc)
Round 85 :
RS: Decrease both sides to 5 V (5 V = 10 dc)
Round 86 :
RS: Decrease both sides to 3 V (3 V = 6 dc)
Round 87 :
RS: Decrease both sides to 1 V (1 V = 2 dc). Fasten off and weave in tail carefully. This completes the center flat panel from point to point.
Info :
Blocking: Before adding borders, lightly block your panel to 100% dry to even out stitch tension and set the shape. Pin the points to a blocking mat and gently steam or spray and let dry. This ensures the scalloped border sits evenly.
— Special Stitches :
Star Stitch :
The star stitch replaces a V unit on star rows. To make a star stitch into the center of a V-space: *Yarn over, insert hook into the center of the targeted V-space, yo and pull up loop, repeat the pull-up 4 more times into same space (total 5 loops on hook), yo and draw through all 5 loops, ch1 to close the star. Secure with a small invisible stitch of yellow in the center by threading a short strand and pulling through the middle to create a small eye of color (about 3-4 mm). Finish the star by making a short sc either side into adjacent space to maintain row width.* This will visually look like a small 6-point star once the center is added in a contrasting color.
V-stitch reminder :
V-stitch = (dc, ch1, dc) all worked into the same space. Work one V-st into each marked space. When replacing with star stitch, treat the star as occupying that V-space so counts remain constant.
— Inner Border (orange contrast) :
Info :
After blocking, attach orange yarn at any corner/point tip with a sl st and work around the entire outer perimeter in V-st units to create a narrow orange frame that sits just inside the scalloped final border. This is worked in rounds rather than rows; maintain the runner orientation and work along edges with increases on points to turn the corner neatly.
Round 1 :
Attach ORANGE at one tip. Ch3 (counts as dc), work V-st ((dc,ch1,dc) into same edge space) along the side edge into the top of each V from the panel, placing 1 V every row-end. At the wide center sections work 1 V into each V across the long straight sides. When you reach the opposite tip, work increases (two V-st into the tip row) and continue down the other side symmetric to maintain a neat rectangular point-to-point orange frame. Join with sl st to first ch3. (Even perimeter; counts vary by panel size)
Round 2 :
Work 1 sc evenly into the back loops only (BLO) around the orange frame to create a ridge for scallop attachment. If your stitch count is uneven, ease in small increases evenly along longer straight sides to maintain evenness. Join and fasten off ORANGE leaving tail for weaving. This BLO ridge location will be used as the foundation for the scalloped outer border.
Info :
If the orange frame pulls or puckers at the long sides, add a second round of ORANGE V-st across just the straight sides before the BLO ridge to even tension. The aim is a stable narrow band that contrasts with the purple and visually frames the bats.
— Outer Scalloped Border (variegated edge) :
Info :
The scalloped border is worked in variegated brown-orange yarn and creates that rich, vintage edge shown in the photo. We will work shell clusters around the perimeter anchored into the BLO ridge from the orange inner border. Each shell is 5 dc into the same stitch for a pronounced scallop.
Round 1 :
Attach VARIEGATED yarn to the BLO ridge with a sl st. *Skip 2 BLO, 5 dc into next BLO (shell), skip 2 BLO, sl st into next BLO*. Repeat around. Work 4 shells into each triangular tip area (place shells evenly and use extra small sl st spacing to turn the point without gaping). Join and do not fasten off.
Round 2 :
Ch1, sc into same stitch, *ch2, skip next shell (land across its center), sc into center dc of next shell; repeat* around to give scallop lift. Join with sl st. This creates the lifted scallop spacing.
Round 3 :
Working into ch-2 spaces between shells, make (3 dc, ch1, 3 dc) as a clustered scallop in each ch-2 space to deepen the scallop. Adjust shell counts at tips by adding an extra ch1 or small sc at sharp corners to eliminate gaps. Join and fasten off. Weave in ends neatly.
Info :
For fuller scallops, add one more round where you place 5 dc shells into each ch-2 space instead of 3 dc, or work alternative shell heights for a layered look. Blocking the scalloped edge lightly after finishing will open the shells beautifully.
— Finishing :
Info :
Weave in all ends using a yarn needle. When weaving, follow the edge stitches for the neatest finish; bury ends across the WS and trim close. Block the entire runner to the final dimensions and pin scallops carefully to open shells. Allow to dry completely before use.
Info :
Optional embellishments: attach tiny plastic beads or French knots in the star centers for sparkle. If you prefer embroidered eyes or highlights on the bat wings, use satin-stitch detail in a very small diameter thread so the silhouette remains strong.
Info :
Pattern variations: To change runner length, add or remove even rows in the center section before beginning decreases. To change width, continue increasing rows until the desired V-st count, remembering to adjust the bat motif placement proportionally.
This Spooky Bat Table Runner turns a simple crochet panel into a standout seasonal accent that reads beautifully on any table. Detailed colorwork and layered scalloped edging make it feel like a vintage heirloom with modern Halloween charm. Each bat and star you complete adds character and celebrates the handmade process — a delightful project to gift or display. 🧶🦇🎃