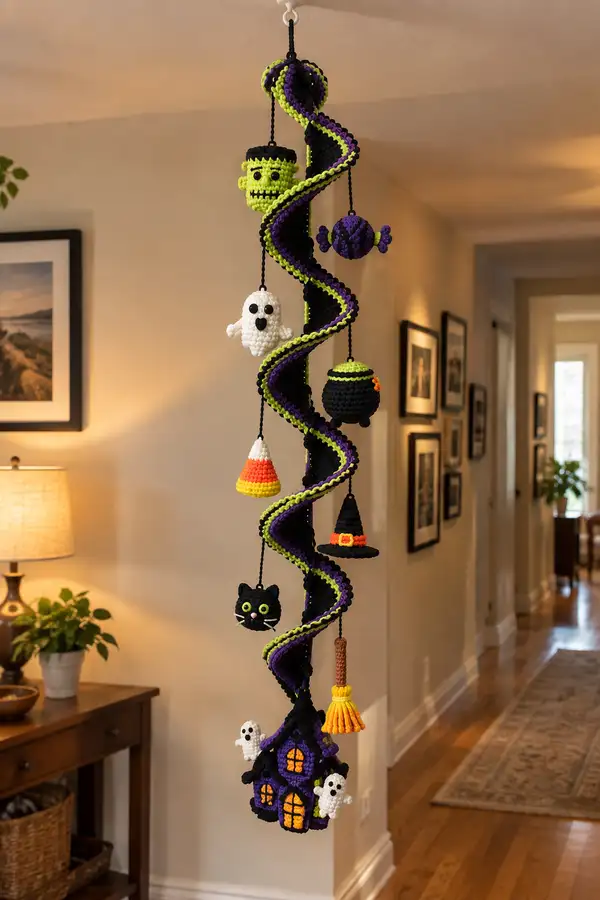
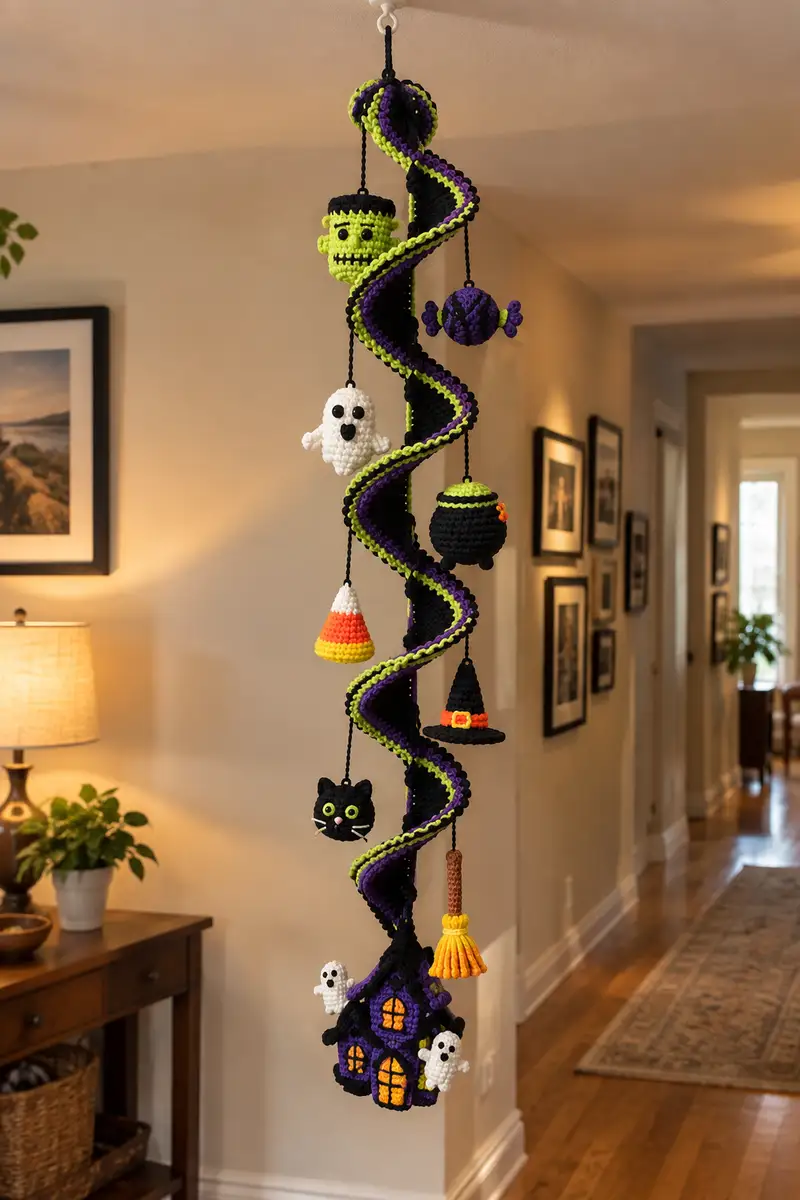
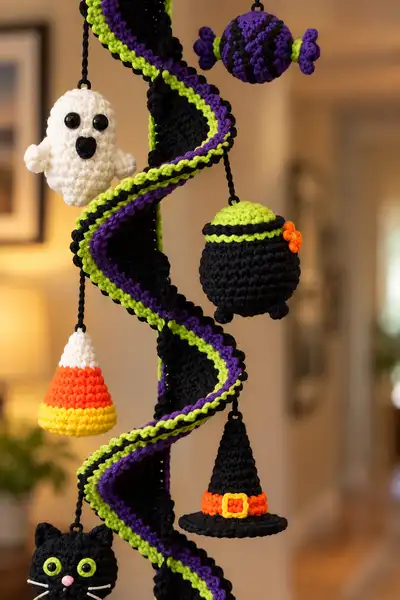
Create a spooky, whimsical hanging mobile featuring a twisted spiral ribbon with Halloween-themed amigurumi charms: Frankenstein, ghosts, candy, cauldron, witch hat, black cat, broom and a haunted house. Bright lime, deep purple and black trim create a dramatic spiral effect while small stuffed motifs dangle along the length for a playful, seasonal display. The modular design makes it perfect for gifting or seasonal home decor; assemble and hang from a ceiling hook for instant Halloween charm.
Progress Tracker
0% Complete
— Supplies & Gauge :
Info :
Gauge is not critical for the mobile, but for consistent motif sizes work 16 sc x 20 rows = 10cm square in worsted weight using 3.5mm hook. Use tight tension for small stuffed motifs so stuffing does not show.
— Spiral Core Column :
Round 1 :
6 sc in magic ring (6)
Round 3 :
(1 sc, inc) x 6 (18)
Round 4 :
(2 sc, inc) x 6 (24)
Round 5 :
(3 sc, inc) x 6 (30)
Round 6-10 :
1 sc in each st (30) - work 5 rounds to form a stable core base (30)
Info :
Stuff lightly as you work the core column so it holds shape but remains compressible where spiral wraps around. This core will be slightly stiffer than charms.
Round 11-30 :
1 sc in each st (30) - continue even rounds to reach desired mobile height; these rounds form the inside column the spiral will wrap around. Make a total core height of about 60 rounds total if you want a long spiral, or shorter if you prefer. (30)
Info :
When core reaches intended length (we recommend 60 rounds total for a 60-70cm mobile), fasten off leaving long tail for attaching spiral strip and for hanging loop. Do not overstuff; the core should be slightly flexible to allow spiral tension to hold shape.
— Spiral Ribbon Strip (worked flat then shaped) :
Info :
The spiral is worked as a long flat strip that will be edged in three contrasting colors to form the dramatic twist. Work a rectangular strip ~8cm wide and long enough to wrap around the core several times. I used black for the center (main strip), then purple and lime worked along the long edges.
Row 1 :
Using black, ch 36. Starting in 2nd ch from hook, 35 sc across (35)
Row 2 :
ch 1, turn, 1 sc in each st across (35)
Row 3-48 :
Repeat Row 2 until strip measures approximately 140-160cm or long enough to spiral around core at least 4-5 times (35)
Info :
For a more open spiral reduce rows; for a denser spiral add rows. Keep an even stitch count; this strip forms the 'face' of the spiral so tension must be consistent. Fasten off black and weave in ends at one end only; leave the other end open to attach to core later.
Edge Trim Prep :
We will add purple and lime scalloped trims along the long edges to create the triple-color spiral. Trim rows are worked in rounds along each long edge.
Edge Round 1 (Purple) :
Join purple at one short end into the top loop of first long edge, ch 1, work sc evenly along edge placing approximately 1 sc per row end (approx 48-52 sc depending on length). Sl st to join to starting sc. (est. 50)
Edge Round 2 :
ch 1, 1 sc in each sc around edge (50)
Edge Round 3 :
ch 1, *1 sc, ch 2, 1 sc in same st* repeat along to form small loops for the scallop (25 scallops approx). Sl st to join (50 inc half loops)
Info :
Repeat the same edging on the opposite long edge using lime green. Keep stitch counts similar so both edges align when strip is twisted. This scalloped edging provides the visual stripe when spiral is twisted.
Edge Round 1 (Lime) :
Join lime at opposite long edge and repeat the purple edging sequence to create matching scallops (est. 50)
Finishing Strip :
Weave all ends in, leaving three long tails for sewing the top and bottom of strip to core and for hanging loop. Block or lightly steam the strip to even stitches if desired.
Info :
When wrapping the strip to form the spiral, attach one short end near the top of the core column with a few secure whip stitches. Twist the strip so purple and lime edges alternate, then tack the strip at several points to the core to hold the spiral shape. Use the long tails to secure both ends to the top hook ring and bottom of core.
— Hanging Cord (for charms) :
Info :
Make several short twisted cords by chaining 60-100 depending on desired drop and slip-stitching first and last loops to form a tight cord. Alternatively Braid three strands of scrap yarn. Secure each cord to the strip or core and hang charms at regular intervals.
— Frankenstein Head :
Round 1 :
6 sc in magic ring (6)
Round 3 :
(1 sc, inc) x 6 (18)
Round 4 :
(2 sc, inc) x 6 (24)
Round 5 :
(3 sc, inc) x 6 (30)
Round 6 :
(4 sc, inc) x 6 (36)
Round 7-12 :
1 sc in each st (36) - Work even rounds to build forehead and height (36)
Info :
Place safety eyes between rounds 9 and 10 about 8-10 stitches apart depending on desired expression. Mark positions with stitch markers. Also keep two small black embroidered eyebrow stitches in mind for later.
Round 13 :
(4 sc, dec) x 6 (30)
Round 14 :
(3 sc, dec) x 6 (24)
Round 15 :
(2 sc, dec) x 6 (18)
Info :
Begin stuffing head firmly but not overpacked. Firm stuffing helps hold the flat top and defined jawline that characterizes Frankenstein. Add safety eye backs now and ensure alignment before proceeding.
Round 16 :
(1 sc, dec) x 6 (12)
Info :
Fasten off leaving 20cm tail for sewing. Close top with needle and weave tail into top opening for a flat top. For the signature flat head, add a short band of black on top: using black yarn, join and work 2–3 rounds of sc across the top surface and crochet a short fringe of 6–8 sc around the top edge to simulate hair.
Top Hair Band :
With black, join at top edge, ch1, work 24 sc evenly around top rim and sl st to join. Fasten off and weave in ends.
Face Details :
Sew small black saved yarn or embroider a stitched mouth: 6 horizontal satin stitches or a narrow ladder of black. Add small pink or beige half circle nose using a few sc stitches sewn to front. Add two small 'bolt' ears: 2 flat rounds of lime (6 sc) sewn to sides at rounds 8-9.
Info :
Attach a short cord to top of head and secure to core near the top spiral turn. Use a small loop so head hangs slightly away from spiral for visibility.
— Ghost (small, make 2) :
Round 1 :
6 sc in magic ring (6)
Round 3 :
(1 sc, inc) x 6 (18)
Round 4 :
(2 sc, inc) x 6 (24)
Round 5-7 :
1 sc in each st (24) - build body (24)
Round 8 :
(2 sc, dec) x 6 (18)
Round 9 :
1 sc in each st (18)
Info :
Stuff lightly; ghosts should be soft and slightly squishy so they bob on the mobile. Before completely closing, insert a small loop of black yarn at the top for hanging cord, then close securely.
Round 10 :
(1 sc, dec) x 6 (12)
Round 11 :
6 dec (6) - leave tail, close and shape a small scalloped base by stitching small loops along bottom edge if you like a ruffled skirt
Face :
Sew two 6mm safety eyes on round 5 or embroider eyes using black yarn. Add a small mouth with 3-4 black stitches. For tiny ghosts at house base, make even smaller versions by stopping at round 7 and flattening the base.
— Candy Ball with Twisted Ends :
Round 1 :
6 sc in magic ring (6)
Round 3 :
(1 sc, inc) x 6 (18)
Round 4 :
(2 sc, inc) x 6 (24)
Round 5-8 :
1 sc in each st (24) - work even to create sphere body (24)
Round 9 :
(2 sc, dec) x 6 (18)
Round 10 :
(1 sc, dec) x 6 (12)
Round 11 :
6 dec (6) - stuff and close leaving small opening to attach twisted ends
Twisted Ends :
Make two short cords by chaining 12 and slip stitching back to make a narrow rope. Gather ends and sew each cord to opposite sides of ball, crochet 4 small petal shapes in purple or lime at ends to look like twisted wrapper ties.
Info :
Use contrasting colors in alternating rows before stuffing to create striped candy; secure ends firmly so they do not pull out while the mobile hangs.
— Cauldron (make 1) :
Round 1 :
6 sc in magic ring (6)
Round 3 :
(1 sc, inc) x 6 (18)
Round 4 :
(2 sc, inc) x 6 (24)
Round 5 :
(3 sc, inc) x 6 (30)
Round 6-9 :
1 sc in each st (30) - form rounded body (30)
Info :
After Round 9 change to lime for the lid accent. Stuff lightly so the cauldron retains a bowl shape and will not flatten when hung.
Round 10 (Change color to lime for lid) :
With lime, join at top rim, ch1, sc around top 30 sc (30)
Round 11 :
1 sc in each st (30)
Round 12 :
(3 sc, dec) x 6 (24) - shape dome lid slightly
Round 13 :
(2 sc, dec) x 6 (18)
Round 14 :
(1 sc, dec) x 6 (12)
Round 15 :
6 dec (6) - close, leave tail for sewing lid to cauldron body if desired. Add small orange flower detail sewn to side using 6 sc petal motif.
Info :
Sew a short hanging cord into the cauldron lid center or attach the cauldron by stitching through topmost rounds of the black body so it hangs level. Trim excess yarn ends and weave inside.
— Candy Corn :
Round 1 :
6 sc in magic ring (6)
Round 3 :
(1 sc, inc) x 6 (18)
Round 4 :
(2 sc, inc) x 6 (24)
Round 5-7 :
1 sc in each st (24)
Info :
Change color to orange for middle band here: join orange and work two rounds even to form middle color, then change to yellow for base. This creates the characteristic three-color candy corn stripes.
Round 8 (Change to orange) :
1 sc in each st (24)
Round 9 (Change to yellow) :
1 sc in each st (24)
Round 10 :
(2 sc, dec) x 6 (18)
Round 11 :
(1 sc, dec) x 6 (12)
Round 12 :
6 dec (6) - stuff lightly and close. Fasten off and attach a short cord to the top for hanging.
— Witch Hat :
Round 1 :
6 sc in magic ring (6)
Round 3 :
(1 sc, inc) x 6 (18)
Round 4 :
(2 sc, inc) x 6 (24)
Round 5-7 :
1 sc in each st (24) - form cone portion (24)
Round 8 :
(3 sc, inc) x 6 (30)
Round 9-12 :
1 sc in each st (30) - height for the cone (30)
Round 13 (Brim start) :
Switch to brim: ch 1, work 2 sc in first st then 1 sc in next st across to create slight flare - increase 10 stitches total to form a wider brim (40)
Round 14-15 :
1 sc in each st (40) - work two even rounds
Round 16 :
For decorative band, join orange and work 1 sc in each st around the cone junction (40)
Buckle :
With yellow, ch 6, sl st to form small square, embroider a rectangle shape and sew to orange band as buckle. Fasten off and weave in ends.
Info :
For a slightly floppy brim, use a larger hook for the brim rounds or add a row of dc to accent. Attach a short cord to top of hat for hanging.
— Black Cat Head :
Round 1 :
6 sc in magic ring (6)
Round 3 :
(1 sc, inc) x 6 (18)
Round 4 :
(2 sc, inc) x 6 (24)
Round 5-10 :
1 sc in each st (24) - build head (24)
Round 11 :
(2 sc, dec) x 6 (18)
Round 12 :
1 sc in each st (18)
Round 13 :
(1 sc, dec) x 6 (12)
Round 14 :
6 dec (6) - stuff and close leaving tail for sewing
Ears (Make 2) :
ch 2, 3 sc in 2nd ch from hook (3), turn, (1 sc, inc) x1 (4), sl st across, fasten off leaving tail. Sew to top of head spaced about 6 sts apart.
Face :
Sew 6mm or 8mm green safety eyes at round 6. Embroider whiskers with white yarn: 3 short straight stitches on each side of a small pink stitched nose. Attach hanging cord to top center.
Info :
Make the cat slightly flattened at bottom so it hangs in profile. Stuff less in head to keep it light and allow gentle swing.
— Broom (handle + bristles) :
Handle :
With brown, ch 2, work sc in second ch from hook 3 times (3), continue working spirally for 10 rounds to create a narrow cylinder (3)
Info :
For a stiffer handle add a short length of floral wire inside handle before continuing bristle attachment. Fold wire ends and conceal under bristles for safety.
Bristles :
With yellow, make 8 small tassel bundles by looping yarn 10 times and tying end, then trim to length ~2.5cm. Sew bundles around one end of handle in a circular fashion to create broom head. Secure with a small band of orange or brown yarn around base of bristles to form the broom tie.
Info :
Attach a short hanging loop to the top of the handle. Make the broom lightweight so it swings gently from the spiral.
— Haunted House Base :
Bottom Base Round 1 :
6 sc in magic ring (6)
Round 3 :
(1 sc, inc) x 6 (18)
Round 4 :
(2 sc, inc) x 6 (24)
Round 5 :
(3 sc, inc) x 6 (30)
Round 6-8 :
1 sc in each st (30) - form floor and lower walls (30)
Walls Round 9 :
Change to purple. Work 1 sc in each st around for 12 rounds to create tall walls (30)
Info :
Fenestrations (windows) will be added after walls are completed: use small appliques of yellow to simulate glowing windows sewn into walls. Work even rows for a boxy house shape.
Roof Start Round 21 :
Switch to black, dec evenly to taper toward roof top: (3 sc, dec) x 6 (24)
Round 22 :
(2 sc, dec) x 6 (18)
Round 23 :
(1 sc, dec) x 6 (12)
Round 24 :
6 dec (6) - continue to shape pointed roof by working additional small cone on top of house if desired (6)
Windows & Door :
Make 3 small yellow appliques: ch 5, sc across back loops to make narrow panels, fasten off and stitch to front of purple wall to create windows. For the door, use small orange rectangle and stitch at base center. Embroider black window panes and outline with black yarn for depth.
Mini Ghosts at House :
Make two small ghosts (use Ghost pattern to round 7) and sew them to the roof and side of house as accents. Position them at rounds 6-8 of wall for playful placement.
Info :
Stuff house lightly; maintain boxy shape. Use pins during assembly to keep windows aligned and to guide placement of ghosts and other appliques before sewing permanently.
— Small Decorative Details & Assembly Prep :
Info :
Make small accent shapes like a little orange flower (ch 3, 6 sc in ring) and polymer buckle for hat using yellow yarn crochet chain square. Create braided cords for hanging charms by chaining 60 and fold into a twisted cord by slip stitching back along chain. Make 7–9 cords total of varying lengths to space charms along spiral.
Info :
Pin each charm to the spiral to check balance before final sewing. Hang the mobile temporarily and observe whether any charms swing too heavy; redistribute if necessary.
— Final Finishing of Spiral & Secure Hanging :
Info :
Sew the long black strip to the core at several tack points (top, mid, bottom) using mattress stitch. The scalloped purple/lime edges should alternate as the strip spirals. Secure top short end to a metal ring or ceiling hook. Add a loop of yarn at the top for hanging. Weave in all ends and trim flush.
Final Balance :
Attach all charms using small stitches through the top rounds or cords and knot inside the spiral so knot is hidden. Adjust cord lengths so charms hang staggered rather than in a straight line. Give the mobile a gentle twist to set spiral tension before final securing.
Info :
If mobile droops in spots, insert a few extra tacking stitches between strip and core to tighten that turn. Use a small dab of fabric glue at each knot for long-term security if mobile is displayed outdoors or in high-traffic rooms.
This Halloween Spiral Mobile is a fun, modular project that combines architecture (the spiral) with sweet miniature amigurumi characters. Each charm is a tiny delight to crochet and assembling them into the spiral is a satisfying finishing task. Hang it in a doorway or near a window to catch movement and light — it makes a festive focal point or a handmade gift full of personality. Happy stitching and enjoy your spooky creations! 🎃🧶