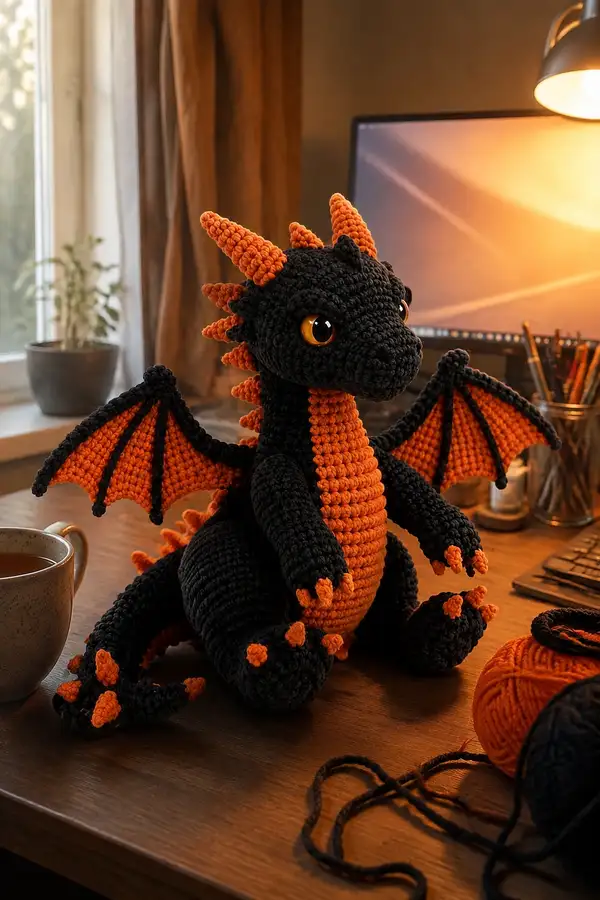
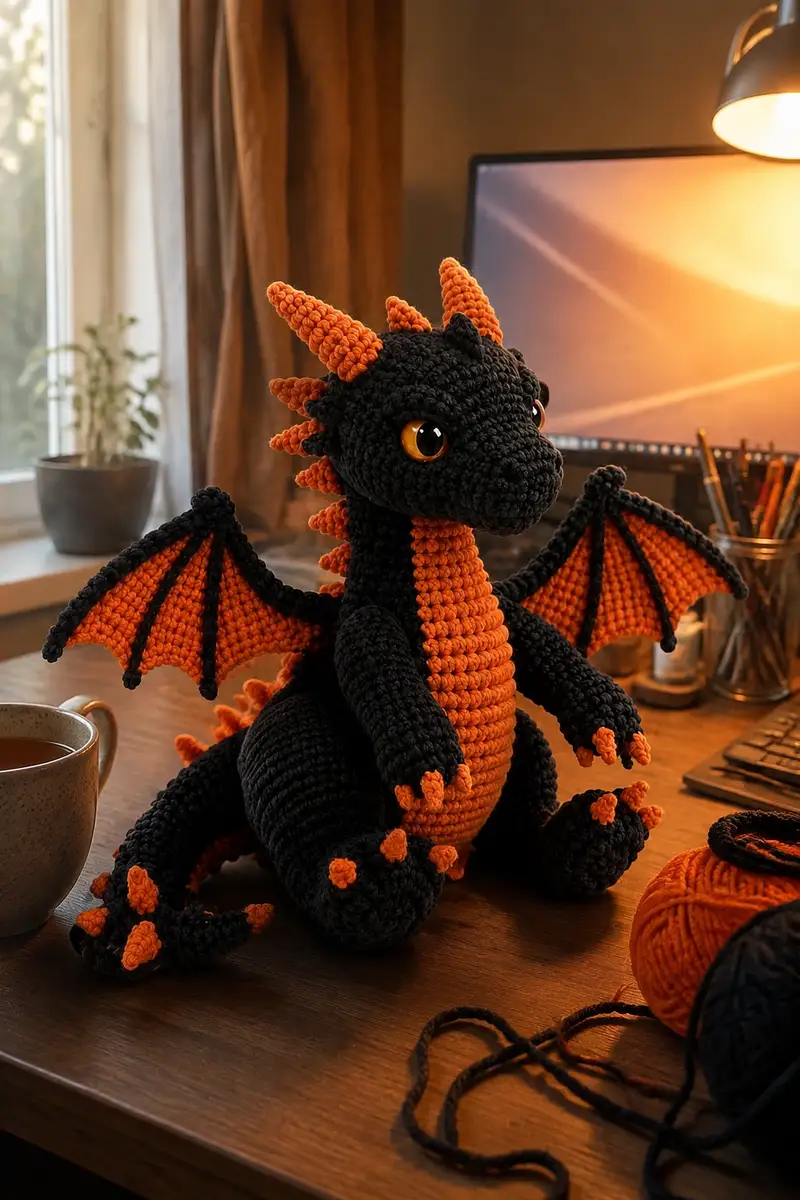
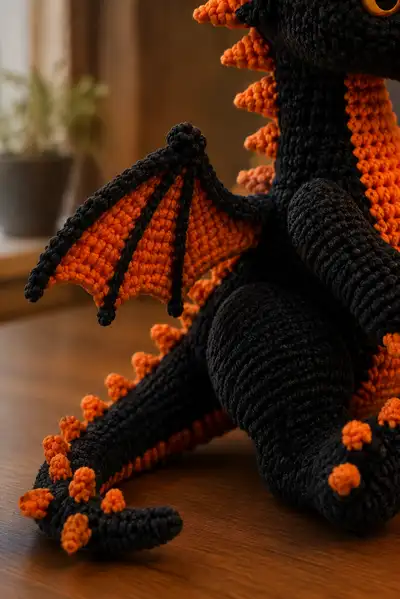
This adorable Halloween-themed dragon pairs deep black yarn with bright pumpkin-orange accents for a charming, slightly spooky look. Features include big amber safety eyes, a ribbed orange belly, articulated wings with black battens, pointy horns and a row of orange spikes down the back. A medium-sized, cuddle-ready amigurumi with plenty of personality — perfect for seasonal gifting or a cozy desk companion.
Progress Tracker
0% Complete
— Head :
Round 1 :
6 sc in magic ring (6)
Round 3 :
(1 sc, inc) x 6 (18)
Round 4 :
(2 sc, inc) x 6 (24)
Round 5 :
(3 sc, inc) x 6 (30)
Round 6 :
(4 sc, inc) x 6 (36)
Round 7 :
(5 sc, inc) x 6 (42)
Round 8 :
(6 sc, inc) x 6 (48)
Round 9 :
1 sc in each st (48)
Round 10 :
1 sc in each st (48)
Info :
Place safety eyes between rounds 11-12, approximately 12 stitches apart center-to-center (about 6-7 sts between eyes). Use stitch markers to mark eye placement. Insert eyes before heavy stuffing.
Round 11 :
1 sc in each st (48)
Round 12 :
1 sc in each st (48)
Round 13 :
1 sc in each st (48)
Round 14 :
(6 sc, inc) x 6 (54)
Round 15 :
1 sc in each st (54)
Round 16 :
1 sc in each st (54)
Info :
At the end of round 16 you should have a gently rounded forehead. Begin light stuffing now so the face holds its shape; use small amounts of fiberfill to avoid lumps.
Round 17 :
(7 sc, inc) x 6 (60)
Round 18 :
1 sc in each st (60)
Round 19 :
1 sc in each st (60)
Round 20 :
(8 sc, inc) x 6 (66)
Round 21 :
1 sc in each st (66)
Round 22 :
1 sc in each st (66)
Info :
Start shaping the snout by working the next rounds with slight front-loop tension: place hands around the snout area to find where you want the muzzle to project. Keep stuffing firmer at the nose area for structure.
Round 23 :
(8 sc, dec) x 6 (60)
Round 24 :
(7 sc, dec) x 6 (54)
Round 25 :
(6 sc, dec) x 6 (48)
Round 26 :
(5 sc, dec) x 6 (42)
Round 27 :
(4 sc, dec) x 6 (36)
Info :
Continue stuffing head firmly. Ensure the eye area is rounded and the snout remains slightly elongated; adjust stuffing to create a soft but structured muzzle.
Round 28 :
(3 sc, dec) x 6 (30)
Round 29 :
(2 sc, dec) x 6 (24)
Round 30 :
(1 sc, dec) x 6 (18)
Info :
Fasten off leaving a long tail for sewing the head to the body. Finish stuffing to desired firmness and close the hole using a yarn needle. Weave end through several stitches to secure.
— Neck :
Round 1 :
6 sc in magic ring (6)
Round 3 :
(1 sc, inc) x 6 (18)
Round 4 :
1 sc in each st (18)
Round 5 :
1 sc in each st (18)
Round 6 :
1 sc in each st (18)
Info :
Work the neck in black. You will later join the neck into the body opening. Leave a tail for sewing if crocheting separately or attach directly when assembling.
Round 7 :
(2 sc, inc) x 6 (24)
Round 8 :
1 sc in each st (24)
Round 9 :
1 sc in each st (24)
Info :
Begin light stuffing as you form the neck, making it firm enough to support the head but flexible for a pleasant pose. Keep the stitches tight.
— Body :
Round 1 :
6 sc in magic ring (6)
Round 3 :
(1 sc, inc) x 6 (18)
Round 4 :
(2 sc, inc) x 6 (24)
Round 5 :
(3 sc, inc) x 6 (30)
Round 6 :
(4 sc, inc) x 6 (36)
Round 7 :
(5 sc, inc) x 6 (42)
Round 8 :
(6 sc, inc) x 6 (48)
Round 9 :
1 sc in each st (48)
Info :
Switch to working rounds in black for main body. Work tightly to avoid gaps in dark yarn. This body will be joined to the neck at a later stage; leave top open for sewing or attach neck directly.
Round 10 :
1 sc in each st (48)
Round 11 :
1 sc in each st (48)
Round 12 :
1 sc in each st (48)
Round 13 :
(6 sc, inc) x 6 (54)
Round 14 :
1 sc in each st (54)
Round 15 :
1 sc in each st (54)
Info :
If adding the orange belly panel, now change to orange yarn and work the panel as a separate strip which will be sewn to the front. For an integrated belly, change color at next round and continue.
Round 16 :
Change to pumpkin orange. 1 sc in each st (54)
Round 17 :
1 sc in each st (54)
Round 18 :
1 sc in each st (54)
Round 19 :
1 sc BLO around front 18 sts, 1 sc in remaining sts (54)
Info :
Working the belly in BLO on the black rounds creates a defined ridge where the belly meets the body. Stuff body moderately firm to support sitting pose — not as firm as the head.
Round 20 :
1 sc in each st (54)
Round 21 :
(7 sc, dec) x 6 (48)
Round 22 :
1 sc in each st (48)
Round 23 :
(6 sc, dec) x 6 (42)
Round 24 :
1 sc in each st (42)
Round 25 :
(5 sc, dec) x 6 (36)
Round 26 :
(4 sc, dec) x 6 (30)
Info :
Begin heavier stuffing at round 22-26, distributing fiberfill so the bottom is flat enough for the dragon to sit. Insert neck into body opening and whip stitch if attaching now; otherwise leave top open to sew head on later.
Round 27 :
(3 sc, dec) x 6 (24)
Round 28 :
(2 sc, dec) x 6 (18)
Round 29 :
(1 sc, dec) x 6 (12)
Info :
Fasten off leaving a long tail for closing the body hole or sewing to a base. Flatten and close using yarn needle. If you left the neck separate, sew the neck securely into the body opening before closing completely.
— Belly Panel (worked separately, then sewn) :
Round 1 :
6 sc in magic ring (6)
Round 3 :
(1 sc, inc) x 6 (18)
Round 4 :
1 sc in each st (18)
Round 5 :
1 sc in each st (18)
Round 6 :
1 sc in each st (18)
Info :
Create a long oval strip by continuing even rounds until the panel reaches desired length (approx 22-28 rows). Keep edges neat and use a smaller hook if you want a tighter rib.
Round 7-26 :
1 sc in each st (18) — work until the belly panel measures roughly from neck base to bottom of body (approx 10-12 cm depending on tension)
Info :
Sew the belly panel to the front center of the body aligning the top with the neck seam and curving gently. Use mattress stitch for invisible join.
— Front Arms (Make 2) :
Round 1 :
6 sc in magic ring (6)
Round 3 :
(1 sc, inc) x 6 (18)
Round 4 :
1 sc in each st (18)
Round 5 :
1 sc in each st (18)
Round 6 :
(2 sc, inc) x 6 (24)
Info :
Form the hand by working a few tighter rounds and adding claw bumps in orange later. Stuff the paw firmly for shape before continuing up the arm.
Round 7 :
1 sc in each st (24)
Round 8 :
1 sc in each st (24)
Round 9 :
Dec evenly to shape wrist: (2 sc, dec) x 6 (18)
Round 10-15 :
1 sc in each st (18)
Round 16 :
(1 sc, dec) x 6 (12)
Round 17 :
1 sc in each st (12)
Info :
Leave a long tail for sewing. Insert a small amount of stuffing to give arms soft, flexible feel. Attach orange claws as small cones or bobbles at the hand's tip (see claw instructions).
— Back Legs (Make 2) :
Round 1 :
6 sc in magic ring (6)
Round 3 :
(1 sc, inc) x 6 (18)
Round 4 :
(2 sc, inc) x 6 (24)
Round 5 :
(3 sc, inc) x 6 (30)
Round 6 :
1 sc in each st (30)
Round 7 :
1 sc in each st (30)
Round 8 :
(4 sc, inc) x 6 (36)
Round 9 :
1 sc in each st (36)
Round 10 :
(5 sc, inc) x 6 (42)
Round 11-15 :
1 sc in each st (42)
Info :
To create a large foot pad, stuff the foot area firmly so the leg can support the dragon sitting upright. Work additional rounds if you want larger thighs.
Round 16 :
(5 sc, dec) x 6 (36)
Round 17 :
(4 sc, dec) x 6 (30)
Round 18 :
1 sc in each st (30)
Round 19 :
(3 sc, dec) x 6 (24)
Round 20 :
(2 sc, dec) x 6 (18)
Round 21 :
1 sc in each st (18)
Info :
Leave long tail for sewing. Attach orange toe-bobbles or small cones (see spike/claw instructions) to the foot front (3-4 per foot) to recreate the look in the photo.
— Horns (Make 3 large + 4 small back horns) :
Round 1 :
6 sc in magic ring with pumpkin orange, use 3.0mm hook for tighter shape (6)
Round 3 :
(1 sc, inc) x 6 (18)
Round 4 :
1 sc in each st (18)
Round 5 :
(2 sc, dec) x 6 (12)
Round 6 :
(1 sc, dec) x 4 then sc around (8)
Info :
Stuff lightly, shape into a cone. Sew three large horns to top of head (two side horns and one central back horn). Small back horns use same pattern but stop at round 3-4 for a stubby cone.
— Spikes / Back Cones (Make 12) :
Round 1 :
6 sc in magic ring (6)
Round 3 :
(1 sc, inc) x 6 (18)
Round 4 :
1 sc in each st (18)
Round 5 :
(1 sc, dec) x 6 (12)
Info :
Make 12 spikes in pumpkin orange; smaller ones stop after round 3 or 4. Attach them down the spine from back of neck along body in even spacing, and one at tail tip. Sew base securely to body stitches.
— Tail :
Round 1 :
6 sc in magic ring (6)
Round 3 :
(1 sc, inc) x 6 (18)
Round 4 :
(2 sc, inc) x 6 (24)
Round 5-12 :
1 sc in each st (24) — work even to create length
Round 13 :
(2 sc, dec) x 6 (18)
Round 14 :
(1 sc, dec) x 6 (12)
Info :
Sew orange spikes along the top of the tail at even intervals. Stuff tail moderately and bend slightly before final closure to give a natural curve. Attach to lower back center using strong whip stitch.
— Claws & Toe Bobbles (Make 10-12) :
Round 1 :
4 sc in magic ring (4)
Round 3 :
1 sc in each st (8)
Info :
Use pumpkin orange for claws. Leave a tail and sew three claws to each hand and four to each foot as shown. For rounded bobbles, work a tiny bobble stitch of 3 dc cluster fastened to the base stitch.
— Wing Outer Edge (Black) :
Round 1 :
Ch 20, join to form a loop, 1 sc in each ch around to create a 20-st ring (20)
Round 2 :
Work 2 rounds of 1 sc in each st (20)
Round 3 :
Ch 3, 1 dc in next st across to create slight curvature; repeat to form an arched frame (20)
Info :
This creates a curved wing outer edge frame. You can add a pipe cleaner inside the final row before stitching the wing membrane to give poseable structure.
— Wing Membrane (Make 2) :
Round 1 :
Using pumpkin orange, ch 12, sc in second ch from hook and across (11)
Round 2 :
Ch1 turn, sc across (11)
Round 3 :
Ch1, sc, inc, sc x 7, inc, sc (13)
Round 4 :
Ch1, sc around adding increases evenly at the ends to create a triangular membrane (approx 17)
Round 5-8 :
1 sc in each st (work until membrane is about 8-9 cm tall). Keep edges neat for sewing to wing frame
Round 9 :
Switch to black, sc around edge to create a defined border (same st count)
Info :
Sew the membrane into the curved outer frame, aligning edges. Use black yarn to embroider 3-4 rays (battens) from base to outer edge with raised surface slip stitches or secure thin piping inside for visible batten lines.
— Wing Batten Embroidery :
Round 1 :
Use black yarn and surface slip stitch from top of wing base in three or four evenly spaced lines to the outer edge to form wing ribs
Info :
Make the ribs slightly raised by working through both layers of membrane and catching the outer frame so the ribs appear three-dimensional.
— Small Decorative Ear Folds (Make 2) :
Round 1 :
6 sc in magic ring with black (6)
Round 2 :
(1 sc, inc) x 3 (9)
Round 3 :
1 sc in each st (9)
Info :
Sew these small triangular ear folds near the top-back of the head to break up the silhouette and support horn placement.
— Finishing Touches & Assembly Info :
Info :
Before sewing pieces together, block any flat pieces lightly with steam (avoid safety eyes). Arrange parts on the body and pin head, arms and legs in place to check symmetry. Use ladder stitch or whip stitch for secure but invisible joins.
Info :
Weave in all ends as you go. Secure safety eyes with washers and add an embroidered mouth with brown or black yarn if desired. For extra stability on a shelf, tack the base of the body to a small felt disc inside.
This spooky sweet Halloween dragon brings together bold color contrast and friendly expression for a lovable seasonal companion. Each carefully crafted section — from the ribbed orange belly to the articulated wings and tiny orange spikes — makes this project satisfying to create and display. Enjoy assembling the parts and giving your dragon a personality with eye placement and pose. 🧶🖤🎃