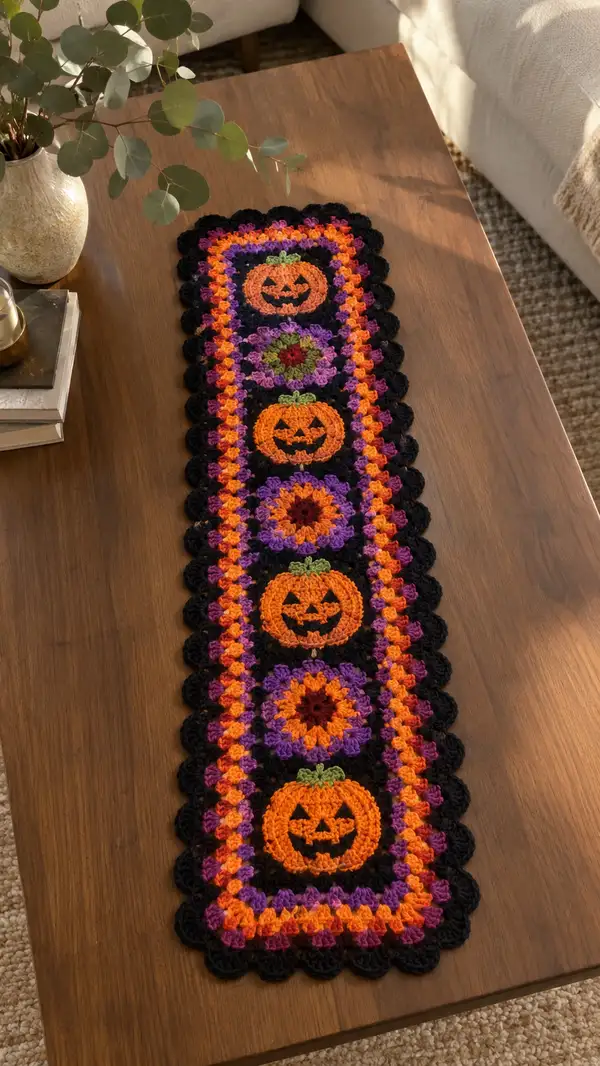
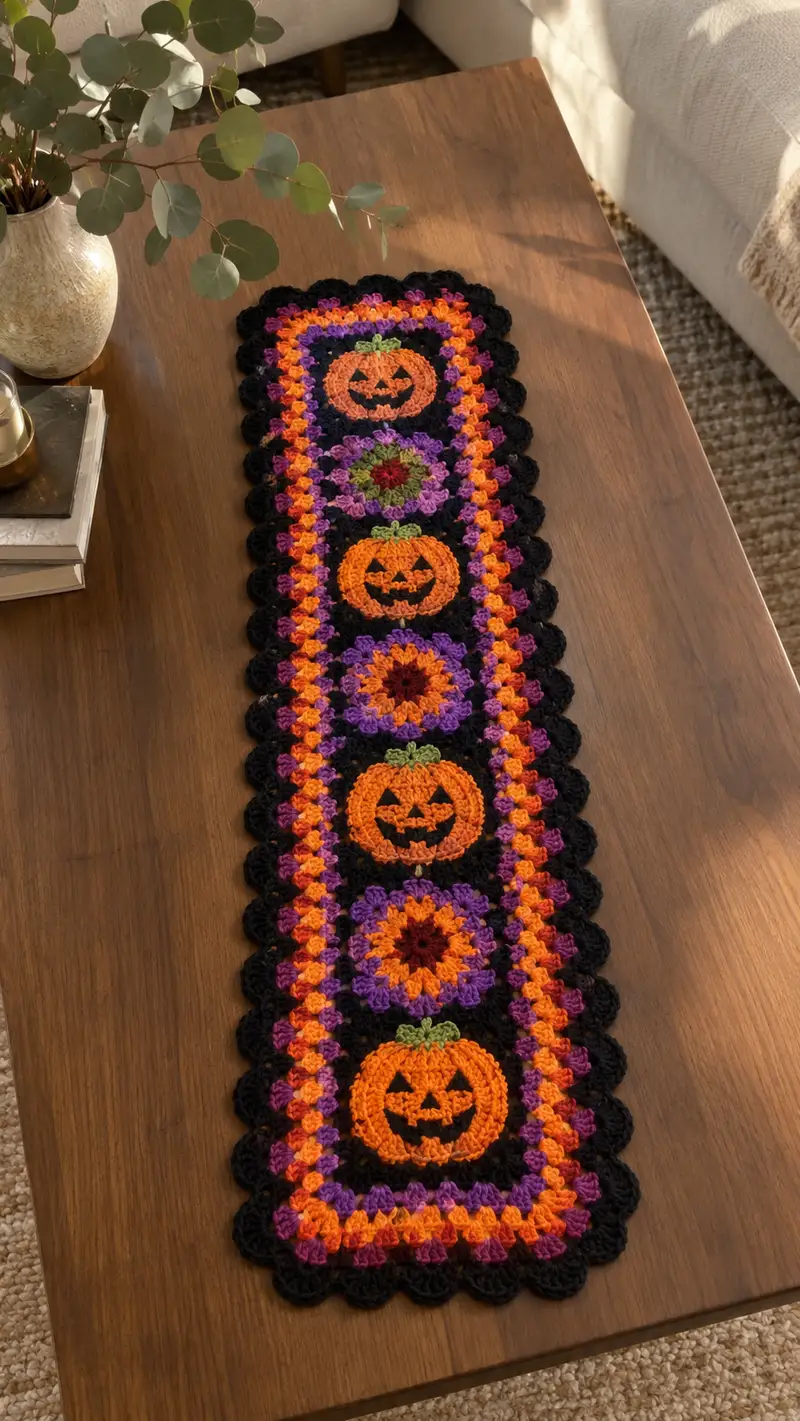
A festive Halloween table runner made from repeated pumpkin and floral granny squares, framed in bold black and trimmed with a scalloped edge. This long rectangular runner features alternating jack-o-lantern granny centers and floral medallions in bright orange, purple, fuchsia and green, connected into a strip and finished with colorful rounds and a black scallop border. Perfect for adding seasonal charm to a coffee table, buffet or mantel.
Progress Tracker
0% Complete
— Notes & Gauge :
Info :
Gauge is not crucial for this runner, but consistent tension matters for square size. For reference, one finished granny square used in the runner measures approximately 5.5 x 5.5 inches when worked with worsted yarn and 4.0mm hook. Measure and adjust your hook size if your squares are significantly larger or smaller.
Info :
Colors used in the sample: Black (frame & scallop), Pumpkin Orange (pumpkin center & stripe), Purple (flower petal rounds), Fuchsia (accent round), Green (stem), Burgundy (flower center). You can substitute any contrasting autumn palette.
— Pumpkin Granny Medallion (Make 3) :
Round 1 :
With pumpkin orange, make a magic ring. Ch 3 (counts as first dc), work 11 dc into ring. Sl st to top of ch3 to join. (12 dc)
Round 2 :
Ch 3, (1 dc, inc) x 6 around. Sl st to top of ch3. (18 dc)
Round 3 :
Ch 3, (2 dc, inc) x 6. Sl st to join. (24 dc)
Round 4 :
Ch 3, (3 dc, inc) x 6. Sl st to join. (30 dc)
Info :
Keep these first rounds flat and check for cupping. If the circle starts to ruffle, skip an increase in one repeat; if it cups inward, add an extra increase evenly spaced. This fast growing circle builds the pumpkin body.
Round 5 :
Ch 3, (4 dc, inc) x 6. Sl st to join. (36 dc)
Round 6 :
Ch 3, (5 dc, inc) x 6. Sl st to join. (42 dc)
Round 7 :
Ch 3, 1 dc in next 6 sts, *hdc in next 6 sts* across to create a slight texture row; this row evens the surface. Sl st to join. (42 total stitches worked as mix of dc/hdc)
Round 8 :
Ch 1, sc in each st around working evenly (42 sc). Sl st to join. (42 sc)
Info :
We will now define pumpkin ribs by working 6 shallow ridges with front post stitches over short groups of dc. These create the illusion of pumpkin segments. Count and place ridges evenly by dividing 42 by 6 = 7 stitches per segment.
Round 9 :
Change to pumpkin orange still. Ch 2 (does not count), *FPdc around the post of the next 3 sts, bpdc (back post dc) around the next 4 sts*; rep from * to * 6 times for 6 segments. Sl st to first stitch. (visual ribbing; stitch count remains 42)
Round 10 :
Ch 1, sc in each st around (42 sc). Sl st to join. This evens the front post texture into the surface. (42 sc)
Info :
If you prefer deeper ribs, repeat a front-post round here. For a flatter pumpkin, skip the front-post round and continue in sc.
Round 11 :
Change to black yarn for the inner frame round. Ch 3 (counts as dc), work 11 dc evenly spaced around, placing 3 dc in four roughly equal corner positions to begin squaring the round into a box. Aim for 4 small increases to form soft corners rather than a perfect circle. (approx. 46-48 dc; you will work increases spaced evenly)
Round 12 :
With black, ch 1, work 1 sc into each dc around, placing (sc, ch 2, sc) into the four corner increase points made in previous round to create corner spaces. This forms the start of a black square frame around the pumpkin. Maintain even tension so sides fall flat. (stitch total will be the same number of sc plus 4 corner ch-2 spaces)
Info :
When you begin converting a circular medallion into a granny-style square, look for four equal quadrants on your circle to place corner increases. Pin the work flat to see where corners fall before stitching.
Round 13 :
With black, join yarn in any side sp. Ch 3 (counts as first dc), *(2 dc, ch 2, 2 dc) in corner ch-2 sp, skip to next corner, along sides work (dc, ch1) across each side spacing clusters evenly so each side has 3 cluster groups*. Continue around and sl st to top of ch 3. This creates a granny-style square shell with 3 clusters per side and ch-2 corners. (12 clusters, 4 corner spaces)
Round 14 :
With black, join in any ch-1 sp from last round. Ch 3, (2 dc, ch 2, 2 dc) in each corner ch-2 space; in each side between corners work (dc, ch 1, dc) in each ch-1 space from previous round so each side now has three filled spaces between corners. Sl st to join. Your pumpkin should now be visibly framed in a black square. (clusters and dcs total will vary by spaces but the structure is 3 clusters per side)
Round 15 :
With black, ch 1 and sc evenly around the square working 2 sc in each corner (top and side of corner shell) to slightly firm the frame. Sl st to join. (sc count approximates earlier dc count with corner increases included)
Round 16 :
Change to green. For the stem, join green to the top center edge (choose a corner or side center as desired). Ch 1, sc 4 across the top center (or make small leaf: ch 5, sl st to base to make 1 small leaf), fasten off. We will add a small leaf cluster next round. (stem/leaf placed)
Round 17 :
With green, make 2 short bobble leaf clusters above the stem: ch 2, (hdc, dc, hdc) in same st to make a tiny leaf; fasten off and weave ends. This gives the pumpkin its little stem/leaf accent. (decorative)
Info :
Face detail: embroider or surface-slip-stitch the jack-o-lantern face in black yarn. Place the eyes approximately two rounds below the top of the orange circle and centered horizontally, spaced about 6-8 stitches apart depending on desired expression. Use satin stitch or surface slip stitch for solid black shapes.
Round 18 :
Weave in ends from color changes. Block lightly if needed to square the motif before joining.
— Floral Granny Medallion (Make 2) :
Round 1 :
With burgundy (flower center), make a magic ring. Ch 3 (counts as dc), work 11 dc into ring. Sl st to join. (12 dc)
Round 2 :
Change to purple. Ch 3, (1 dc, inc) x6. Sl st to join. (18 dc)
Round 3 :
Ch 1, *ch 3, sl st into top of next group to make petal loops* around to form 6 petal loops. Sl st to first ch to join. This round creates a base for petals. (6 ch-3 loops)
Round 4 :
Into each ch-3 loop work (sc, hdc, 3 dc, hdc, sc) to form full petals. Fasten off purple. (6 full petals)
Info :
You can make the petals taller with an extra dc if you want a larger floral medallion. Keep petal shapes even by counting stitches and using a stitch marker at the start of each petal while working.
Round 5 :
Join fuchsia to the base between petals. Ch 3, work 2 dc in the same sp, *ch 1, 3 dc in space between petals* around, placing (3 dc, ch 2, 3 dc) in the 4 corner positions as you convert to square; position corners approximately every 3 petals to form a balanced square. Sl st to join. (approx 12 clusters plus 4 corner shells)
Round 6 :
With black, join in any ch-1 sp. Ch 3, work (2 dc, ch 2, 2 dc) in each corner ch-2 space; in each side space work (dc, ch1, dc) to form a granny square shell around the flower. Sl st to join.
Round 7 :
With black, ch 1 and sc evenly around the square, placing 2 sc in each corner shell to reinforce corners. Sl st to join. (sc count will equal the number of side spaces adjusted with corner increases)
Round 8 :
Change to purple; ch 3, work 1 dc in each sc across to build a bright ring, placing (2 dc, ch2, 2 dc) in corners to keep the square shape. Sl st to join. This bright round helps the floral medallion read as a colorful square in the runner.
Info :
Keep the center flower slightly proud by using a larger hook for the flower rounds or inserting 1-2 extra stitches in each petal if you'd like more texture.
Round 9 :
With fuchsia, ch 1 and sc evenly around to clean the edge. Fasten off and weave ends. Block to match size to pumpkin squares if necessary.
— Black Connector Frame / Extra Squares (Make 5 frames) :
Round 1 :
With black, start with a magic ring or join to the edge of a completed motif if working join-as-you-go. Ch 3 (counts as dc), work 11 dc into ring; sl st to join. (12 dc)
Round 2 :
Ch 3, (1 dc, inc) x 6. Sl st to join. (18 dc)
Round 3 :
Ch 3, (2 dc, inc) x 6. Sl st to join. (24 dc)
Round 4 :
Work a square-conversion round: ch 3, *(2 dc, ch 2, 2 dc) in corner point made by spacing, dc in each side sp* repeat to make a small black square shell round. This round provides additional black framing in between motifs if you prefer to place small black panels (optional). (clusters and corner shells as created)
Info :
You may opt to use only pumpkin and flower motifs and join them directly without additional black connector squares. The connector squares are optional to add extra black negative space like the sample image.
— Join-As-You-Go Strip & Placement :
Info :
Layout: The sample runner alternates Pumpkin - Floral - Pumpkin - Floral - Pumpkin (total 5 motif squares). Arrange motifs in your desired order and orientation. We will use a join-as-you-go (JAYG) slip-stitch method to connect squares into a continuous strip for a flat stable seam.
JAYG Round 1 :
Place two squares with right sides facing up. Align edges. Join black yarn at the corner ch-2 space of the left square. Ch 1, sc in same corner, then work sc evenly along side of left square into each ch or space; when you reach corresponding side of right square, *sl st through the same side space of the right square and sc into next side space of left square* repeating across to join the two squares with paired sc/sl st stitches. Fasten off. This creates an invisible ladder-like join. (number of join stitches equal to number of side spaces)
JAYG Round 2 :
Repeat the join process for each adjacent pair until all motifs are joined into a strip. For three pumpkins and two flowers, you will perform 4 joins to make a 5-square strip. Pin each pair before joining to ensure evenly matched edges.
Info :
Alternative join: Use whip stitch for a slightly raised seam, or mattress stitch for almost invisible joining. The JAYG slip-stitch join keeps the runner flat and makes continuous border rounds simpler.
— Stripe Rounds Between Motifs (Color Banding) :
Round 1 :
With orange, join to any side st of the strip. Ch 3, work 1 dc in each st across the entire perimeter of the joined strip to create a continuous orange band. When you reach a corner, work (2 dc, ch2, 2 dc) to form corner shells. Sl st to join. (dc count equals perimeter stitches)
Round 2 :
Change to purple. Ch 1, sc evenly around the strip to create a clean edge and prepare for the next cluster round. Place 2 sc in each corner shell. Sl st to join.
Round 3 :
Change to fuchsia. Ch 3, work granny-cluster style: *(3 dc) in same sp, ch 1 finish cluster* across the long sides and (3 dc, ch 2, 3 dc) in each corner to keep the square/rectangle shape. Sl st to join. This round creates the colorful repeating cluster rows visible next to the black frame.
Info :
Work these stripe rounds evenly on both long sides of the strip. If your strip is slightly wavy, block lightly after these rounds to even tension before working final scallop edge.
— Final Scalloped Black Border :
Round 1 :
With black, join in any ch-1 or sc at the edge. Ch 1, sc evenly around the entire strip, placing 2 sc in each corner to strengthen them. Sl st to join. This is a tidy preparation round for the scallop.
Round 2 :
Ch 1, *skip 2 sts, (5 dc) in next st, skip 2 sts, sl st into next st* repeat around to form a scallop shell every 3-4 stitches. Adjust spacing so 5-dc shells sit evenly along the long sides and ends. Sl st to join. (scaffolded shells create the rounded scalloped edge seen in the sample)
Round 3 :
Repeat Round 2 to deepen scallops if desired. Work the 5-dc shells directly into the shells from the previous round for a bold scallop. Fasten off and weave ends. The scalloped border gives the runner its finished look.
Info :
If scallops are too large for a tidy look, reduce to 3 dc per shell and decrease spacing. For a pronounced edge like the sample, 5 dc shells create a chunky scallop in worsted yarn.
Round 4 :
For extra firmness, work a final round of sc in black around the base of the scallops (working into spaces where scallops attach) to lock their shape. Weave in all ends and block the finished runner to flatten and set the shape.
— Finishing Touches & Face Embroidery :
Info :
Jack-o-lantern faces: Use black yarn and a yarn needle to embroider triangular eyes and a wide smile with teeth. Place eyes approximately 2 rounds down from pumpkin top and spaced evenly — about 6-8 stitches apart on the 42-st pumpkin round. Make small attempts on a scrap before committing to motif.
Round 1 :
Use surface slip stitch or satin stitch to fill triangular eyes and nose. For a solid mouth, surface-crochet a chain that you then fill by working satin stitch over it, or embroider using a whip satin stitch with yarn. Secure the ends by weaving under several stitches on the back.
Info :
Work facial details before the final black border where possible so you have a clean, flat surface to embroider onto. If a motif is already joined into the strip, embroider gently and support the back with a small piece of cardboard or leftover yarn to stabilize the stitches while you work.
Round 2 :
Final block: Lay the runner flat and damp-block if desired, pinning scallop edges to a blocking board to set shape. Allow to dry fully. Trim any protruding fibers and hide tails behind shells or in the join seams.
Info :
Optional trimming: Add a small fringe or tassels at the ends for a boho look, or leave ends clean for a modern aesthetic. The sample image shows no fringe, keeping the scalloped edge as the focal trim.
This Halloween runner brings a joyful mix of classic granny-work and seasonal flair to your table! The repeating pumpkin motifs and bright color bands create a cheerful, handcrafted centerpiece. As you finish each square and watch the strip grow, you’ll feel the satisfaction of a project that’s equal parts decorative and functional. 🎃🧶 Share it with friends or keep it as a festive accent — either way, you’ve created something special. Happy stitching and enjoy the cozy seasonal vibe! 🍂