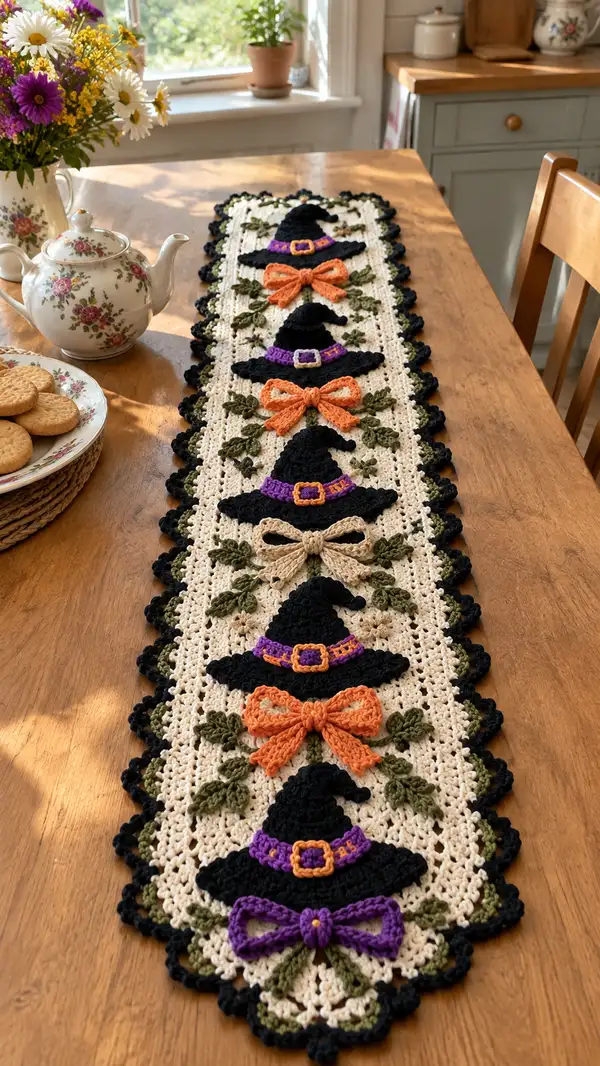
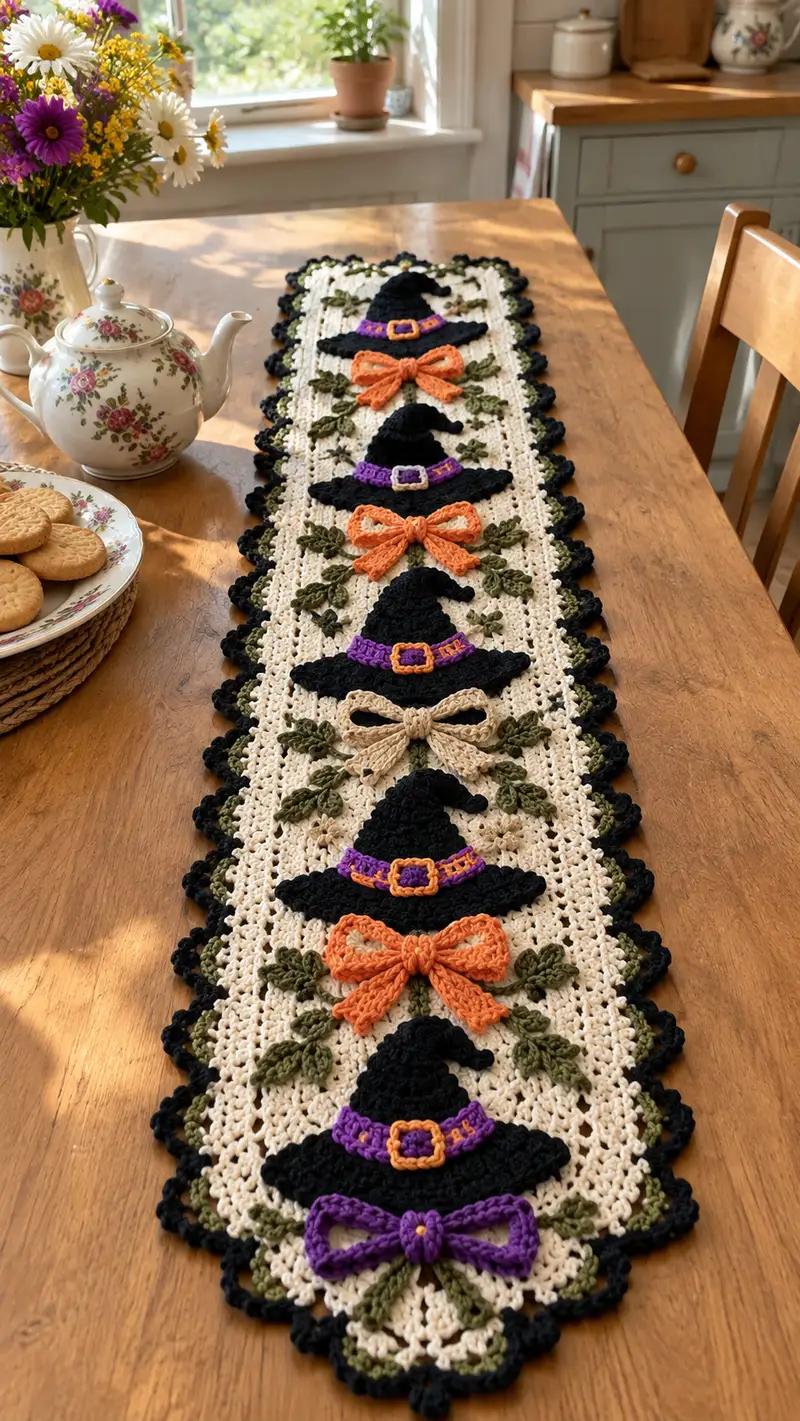
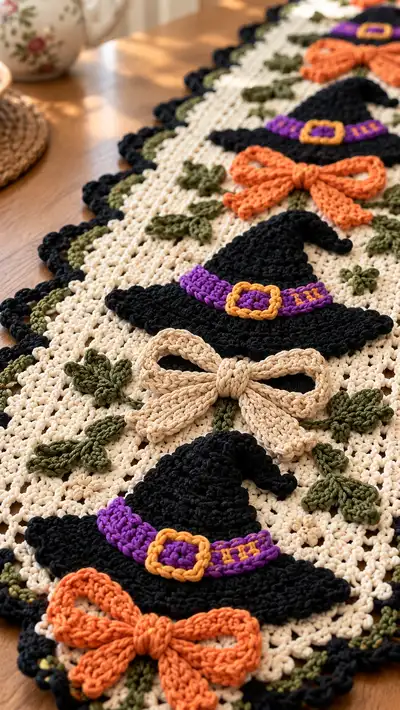
A charming Halloween table runner featuring five 3D witch hat appliques, large decorative bows, leafy vines, and a scalloped black edge. Worked in cream for the lacy background with bold black hats and bright purple, orange, tan and olive accents, this runner brings vintage cottage style with a festive twist. The pattern uses simple crochet motifs combined into a long runner that dresses any table for autumn gatherings.
Progress Tracker
0% Complete
— Notes & Overview :
Info :
This pattern is written in US crochet terms and is worked in several separate pieces: a long lacy background panel (worked flat in rows), multiple appliques (witch hats, hat bands & buckles, bows, and leaves), and a scalloped border that is worked after all appliques are attached. The background panel measured in the sample about 10.5" wide and 48" long with five full hat motifs; adjust the number of background repeats to fit your table. Gauge is not critical but affects drape and final size—use a 4.0mm hook with worsted weight for similar results.
Info :
Throughout the pattern, place Info blocks every few rounds with tips for shaping, color changes, and assembly. Use stitch markers at the beginning of each row when working the background to keep track of turning chains and pattern repeats. When sewing on appliques, tack with pins first, then use a whip or invisible stitch to secure.
— Background Panel (Main Runner) :
Notes :
The background is worked flat in rows using a V-stitch and simple lace spacing. The sample runner uses alternating rows of V-stitches and single crochet rows to create a tight but airy fabric. The piece is worked in cream yarn. The initial chain is calculated for a width of 10.5"; adjust multiple of 6+2 for pattern repeats.
Row 1 :
Ch 128 (multiple of 6 + 2) using cream yarn. Turn. (128)
Row 2 :
Working into 2nd ch from hook: sc in each ch across. Turn. (128)
Info :
Work a firm but not tight sc base row to give a sturdy starting edge. If you want a narrower runner, start with fewer chains in multiples of 6.
Row 3 :
Ch 3 (counts as dc), *sk next ch, (dc, ch1, dc) in next ch (V-stitch made)*; rep from * across ending with dc in last ch. Turn. (Approx 42 V-spaces)
Info :
V-stitch row creates the lacy holes where vines and leaves will be sewn later. Keep counts by marking every 6th V-space with a removable marker so motifs align vertically.
Row 4 :
Ch 1, sc in each stitch and ch-space across (work 1 sc in each dc and 1 sc into each ch-1 space). Turn. (128)
Row 5 :
Ch 3, *V-stitch in next V-space (dc, ch1, dc)* across. Turn. (approx 42 V-spaces)
Row 6 :
Ch 1, sc in each stitch and ch-space across. Turn. (128)
Info :
Repeat Rows 3-6 until panel length reaches pattern measurement or until you have created 40 full rows of the established pattern in cream (this creates a balanced lacy texture). For the sample runner to fit 5 hats, work 40 repetitions of the 4-row repeat (total 160 rows) OR work until length is approximately 48". If you prefer fewer motif positions, shorten accordingly.
Row 7-40 :
Rep Rows 3-6 (continue alternating V-stitch row and sc row) until panel length is desired. Keep the final row an sc row for a stable edge. (Maintain 128 sts across)
Info :
When you reach the desired length, fasten off and block the panel lightly to open the lace. Blocking helps the appliques sit flat and makes the scalloped edge easier to attach.
— Scalloped Border (worked after appliques attached) :
Info :
Border is worked with black yarn around the entire perimeter. Work evenly spaced single crochet rounds to create a firm margin before scallops. Measure stitches along edge and divide by scallop repeat to place scallops evenly (sample has 32 scallops along long sides and 6 on each short side).
Round 1 :
With right side facing and black yarn joined at a corner, work 1 sc evenly around the entire runner, working 3 sc in corners to keep a smooth turn. Work 1 sc in each sc row edge and 1 sc in each row end along the sides, placing 3 sc in each corner. Join with sl st to first sc. (Total st count will vary by panel length; maintain even spacing.)
Round 2 :
Ch 1, sc in same st, *sk 2 sc, 5 dc in next sc (scallop made), sk 2 sc, sc in next sc*; rep around, working 5 dc in corner scs. Join with sl st to first sc. (Place scallops evenly; adjust if needed.)
Info :
If you prefer a larger scallop, work 7 dc instead of 5 and adjust spacing. Be sure to work scallops symmetrically on both long sides and mirror on the short sides for a balanced finish.
Round 3 :
Optional: sl st in each dc around scallops for a tighter edge or add a final picot row for a decorative finish: *sc in top of scallop, ch 3, sl st in 3rd ch* around.
Info :
Fasten off and weave in long tails to the wrong side. Border will be attached after appliques are sewn on so scallops frame completed motifs.
— Witch Hat Applique (Make 5) :
Notes :
Each hat is worked flat in black yarn and seamed with a single crochet border to create a slightly three-dimensional, firm hat. The hat has three main parts: brim, crown increases, and a curved apex. Work hats using a 3.5-4.0mm hook for a slightly denser fabric than the background so they sit raised on the panel.
Round 1 :
Using black yarn, ch 6, join with sl st to first ch to form a loop. Ch 1, 12 sc in loop. Join with sl st. (12)
Round 2 :
Ch 1, inc in each st around (24)
Round 3 :
Ch 1, (1 sc, inc) x 12 (36)
Round 4 :
Ch 1, (2 sc, inc) x 12 (48)
Round 5 :
Ch 1, (3 sc, inc) x 12 (60)
Info :
Rounds 1-5 produce a wide flat disc that will form the brim base. If you'd like a wider brim, work one additional increase round (4 sc, inc) x 12 to reach 72 sts, but note that slope and sizing for the crown will need adjustment.
Round 6 :
Ch 1, sc in each st around (60) — do not join back to a ring; work in continuous rounds for a smooth brim curve or join and sl st to hide seam as you prefer.
Round 7 :
Ch 1, BLO: sc in each st around (60) — working in BLO creates a slightly lifted brim edge. Join. (60)
Round 8 :
Fasten off brim leaving a long tail for sewing to crown. Fold brim up slightly and press into shape while you begin crown piece.
Round 9 :
For crown: with black yarn, ch 1 and pick up loops across the center 20-24 stitches where crown will attach (pick a half-moon from disc center) then work 1 sc across picked-up sts, join in the round to form a small cup shape. For clarity: join yarn to center of disc where crown will sit, ch 1, make 18 sc around that area in a semicircle and join to start of crown to work in rounds. (18)
Round 10 :
Ch 1, inc in each st around (36)
Round 11 :
Ch 1, (1 sc, inc) x 12 (48)
Round 12 :
Ch 1, (2 sc, inc) x 12 (60)
Info :
Work the crown in continuous rounds without joining to create a smooth spiral. If your crown seems too tall relative to brim, stop adding increases and go into even rounds to build height.
Round 13 :
Ch 1, sc in each st around (60)
Round 14 :
Ch 1, sc in each st around (60)
Round 15 :
Ch 1, (8 sc, dec) x 6 (54)
Round 16 :
Ch 1, (7 sc, dec) x 6 (48)
Round 17 :
Ch 1, (6 sc, dec) x 6 (42)
Info :
Begin shaping the crown toward a tapered top. Stuff crown lightly with a small amount of fiberfill if you want a slightly firm apex — sample hats have a soft curve and are not heavily stuffed to remain floppy and whimsical.
Round 18 :
Ch 1, (5 sc, dec) x 6 (36)
Round 19 :
Ch 1, (4 sc, dec) x 6 (30)
Round 20 :
Ch 1, (3 sc, dec) x 6 (24)
Round 21 :
Ch 1, (2 sc, dec) x 6 (18)
Round 22 :
Ch 1, (1 sc, dec) x 6 (12)
Round 23 :
Ch 1, dec x 6 (6)
Info :
At Round 23 the crown is nearly closed. Leave a small opening to lightly stuff if you like a soft, rounded top. Fasten off and weave the tail through remaining sts and pull tight to close. Leave a long tail for sewing crown to brim if not already joined.
Round 24 :
Sew crown to brim: position the base of crown inside the central opening of the brim disc and whip stitch through both layers with black yarn, pulling gently to create a smooth join. Fasten off and weave in ends. (No numeric st count)
Info :
Optional shaping: after sewing crown to brim, you can pinch the crown's side and tack a few stitches to create the curled witchy tip as seen in the photo. Use a short length of matching black yarn and sew a small gather at the tip to sculpt the curl.
— Hat Band & Buckle :
Round 1 :
Using purple yarn for band: ch 26 (or length to travel across largest part of brim), sl st in 2nd ch from hook and across to end to make a narrow strap: 25 sc across (25). Fasten off and leave long tail for sewing.
Round 2 :
Wrap band around brim where desired and tack in a few places with matching purple yarn using mattress stitch. Do not pull too tight; band should lie flat with a little lift under it.
Round 3 :
Buckle: with gold/mustard yarn, ch 8, join with sl st to form a loop, ch 1, sc in each around (8). Join and work another round of sc (8). Fold into a small square and sew center to secure. Alternatively, work ch 6 and sc around to make a small rectangle. Sew buckle centered on band. Add two small embroidered stitches with contrasting thread on belt to mimic buckle holes.
Info :
Make hat bands and buckles in contrasting colors to add pop. You can vary band colors (purple, orange, tan) down the runner for visual rhythm. Attach buckle securely with small stitches so it will not pull free when handled.
— Bow Applique (Make 5 - assorted colors) :
Notes :
Bows are worked in worsted yarn with a slightly smaller hook for a crisp shape. Each bow has two loops and two tails that are crocheted separately and assembled. The bows pictured vary in color: orange, tan, purple; center knots are formed by wrapping yarn around the middle and stitching the knot closed.
Round 1 (Loop A) :
Ch 18, sc in 2nd ch from hook and across (17), ch 1, turn. (17)
Round 2 :
Sc across 17, fold and sl st through both layers across base to form a rounded loop shape (17). Fasten off leaving long tail for assembly.
Round 3 (Loop B) :
Repeat Loop A. Make two identical loops for a full bow.
Round 4 (Tail 1) :
Ch 10, sc across (9). Working back along chains on opposite side if you want a doubled tail, sc back across to thicken tail into a strap. Fasten off leaving tail for sewing. Repeat for second tail.
Round 5 :
Assembly: overlap two loops slightly and tack together in the middle with a few stitches. Position tails beneath loops and stitch tails to under side of bow. Wrap a length of matching yarn around centre several times to form the knot; secure with a few stitches on the back. Trim ends and weave through to wrong side.
Info :
For a fuller bow, make loops with more chains (22-26) and double the tail by working back along opposite side of chain to create thickness. Lightly steam-block bows if you want firmer shape, or starch lightly for a stiffer bow.
— Leaf & Vine Applique (Make multiple sets) :
Notes :
Leaves are worked in olive/green yarn and attached in small clusters around each hat and bow. Each leaf is small and textured by working front post stitches or picot tips to simulate leaf points.
Round 1 (Leaf Base) :
Ch 8. Row 1: sc in 2nd ch from hook across (7). Turn. (7)
Round 2 :
Ch 1, sc in first st, hdc in next, dc in next 3 sts, hdc in next, sc in last. (7)
Round 3 :
Ch 1, sc across shaping the leaf tip with a picot: sc, hdc, dc, tr, picot (ch 3, sl st in 3rd ch), tr, dc, hdc, sc. Fasten off leaving tail for sewing. Leaf total length ~1.25".
Round 4 (Vine Stem) :
For vine stems, ch to desired length (approx 8 ch), sl st along chain to make a cord-like stem, or use a thin chain sewn on top of panel. Use olive yarn; attach leaves to vine by sewing down the middle with a small stitch.
Info :
Arrange small leaf clusters (3-5 leaves) around each bow and hat. For natural look, vary angles and overlap slightly. Sew leaves to the wrong side of bows and hats so stitching is hidden under elements.
— Small Decorative Flowers/Stitches :
Round 1 :
Make small 5-petal flowers: ch 2, (5 dc in ring), sl st to first dc, ch 2, *sl st to next dc, ch 3, sl st in same space to form petal*; rep for 5 petals. Sew tiny flower centers with contrasting gold yarn as seen between leaves.
Info :
These tiny flowers fill gaps and add a subtle vintage touch—use sparingly to avoid cluttering the runner. Tuck small flowers under bows and hat brims for depth.
— Alternate Hat Band Variation (Tan band with orange stitches) :
Round 1 :
Work a tan band as for purple band: ch 26, sc across (25). Wrap and tack to brim.
Round 2 :
With contrasting orange yarn, embroider 2 short sl st dashes across band to mimic woven embroidery as in photo. Secure ends on wrong side.
Info :
Vary band color down runner to create color balance: purple for first hat, orange, tan, purple, etc., mirroring photo rhythm. Ensure buckles contrast with band for visibility.
— Detailed Round-by-Round for One Complete Hat Set (Brim to Finished with Band & Bow Underneath) :
Round 1 :
Ch 6, join to form ring. 12 sc in ring (12)
Round 2 :
Inc in each st (24)
Round 3 :
(1 sc, inc) x12 (36)
Round 4 :
(2 sc, inc) x12 (48)
Round 5 :
(3 sc, inc) x12 (60)
Info :
At this point you have a flat disc. If you have 72 sts change increase pattern accordingly. The sample uses 60 sts to make a brim about 4.5-5" across.
Round 6 :
sc in each st around (60)
Round 7 :
Work 1 round BLO sc to create a defined brim edge (60)
Round 8 :
Fasten off brim, leaving long tail for sewing to crown
Round 9 :
Join black yarn at selected center point and sc 18 across a semicircle to form crown base; join ends to work in rounds (18)
Round 10 :
Inc in each st (36)
Round 11 :
(1 sc, inc) x12 (48)
Round 12 :
(2 sc, inc) x12 (60)
Round 13-14 :
Sc around (60) for two rounds to build height
Round 15 :
(8 sc, dec) x6 (54)
Round 16 :
(7 sc, dec) x6 (48)
Round 17 :
(6 sc, dec) x6 (42)
Info :
Lightly stuff from inside the crown only if you want it to have a rounded look. The hat in the photo has a soft floppy crown with a curved top; stuffing should be minimal and placed at the tip if used.
Round 18 :
(5 sc, dec) x6 (36)
Round 19 :
(4 sc, dec) x6 (30)
Round 20 :
(3 sc, dec) x6 (24)
Round 21 :
(2 sc, dec) x6 (18)
Round 22 :
(1 sc, dec) x6 (12)
Round 23 :
Dec x6 (6) — close and weave tail through to finish apex
Round 24 :
Sew crown to brim with tail left from brim or crown. Join securely and shape tip into a little curl with a couple of tacking stitches to create the pointed witchy top.
Round 25 :
Attach band and buckle: work band ch 26, sc across, and sew centered on brim. Make buckle and attach as previous section. Add a few small embroidered stitches in contrasting yarn to simulate woven detail if desired.
Round 26 :
Place bow underneath brim: make bow as described and sew bow tails to front center of brim, allowing loops to sit above and tails below as in photo. Fasten off and hide ends.
Info :
Repeat complete hat set-making steps for each hat motif. For the runner sample, five hat sets are created in repeating color order: purple band with purple bow, orange band and orange bow, tan band/tan bow, repeat sequence to create interest down the runner.
— Assembly & Positioning :
Info :
Lay the blocked background panel flat and map out motif positions before sewing. The sample places hats centered across the width with approximately 8-9 inches between centers vertically. Use pins to hold each hat in place and check spacing before sewing.
Round 1 :
Position first hat approx 2" from either narrow end and center across width. Mark center point on panel and pin hat in place. Ensure the brim edge overlaps lacy V-spaces slightly to tuck into the panel texture for a strong hold.
Round 2 :
Sew hat to panel using a yarn needle and long tail. Use small whip stitches around brim, catching a few strands of the background panel at each stitch so the brim is secure but slightly raised. Sew crown to avoid movement. Fasten off and weave in ends to the underside.
Round 3 :
Pin bow directly beneath hat so the center of the bow aligns with center of hat brim. Sew through center knot and down through panel behind so bow is secure. Attach leaves on each side of bow and tiny flowers as filler, sewing to wrong side.
Info :
Keep all sewing stitches small and on the wrong side where possible to hide threads. For extra hold, tack a few stitches from the inside of the hat brim down to the panel between the whip stitches on the outer brim.
— Finishing Touches :
Round 1 :
After all appliques sewn and woven ends secured, block runner flat again. Gently steam or wet-block to settle seams. Attach black scalloped border as described earlier to frame entire piece. Weave in any remaining ends.
Round 2 :
Trim stray fibers and check all applique attachments. If any motifs feel loose, add hidden stitches behind motif into the panel to anchor further.
Info :
Optional: backing the runner with lightweight cotton or felt can protect tabletops and provide extra stability; use fabric glue or hand-sew with slipstitch around perimeter, catching crochet stitches to avoid visible thread on the front.
— Care Instructions :
Info :
Hand wash gently in cool water with mild detergent and reshape while damp, or spot clean delicate appliques. Lay flat to dry. Avoid machine washing to keep applique shapes intact. Store flat or gently rolled to prevent creases in the background lace.
This witch hat table runner brings a touch of handmade enchantment to your seasonal table — a charming mix of lacy background and playful 3D appliques. Each hat and bow is a small project in itself that, when assembled, forms a beautiful cohesive design you'll be proud to display. The detailed steps help you replicate the look accurately, while allowing room for personalization. 🧶🎃 Add this runner to your fall décor and enjoy the compliments from friends and family as they admire your handiwork. ✨