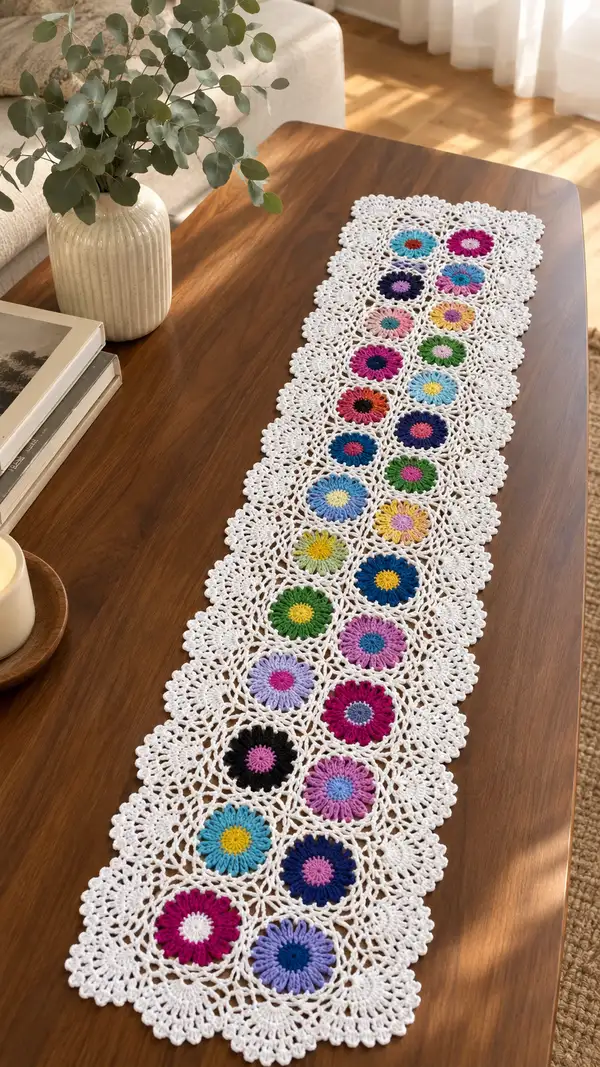
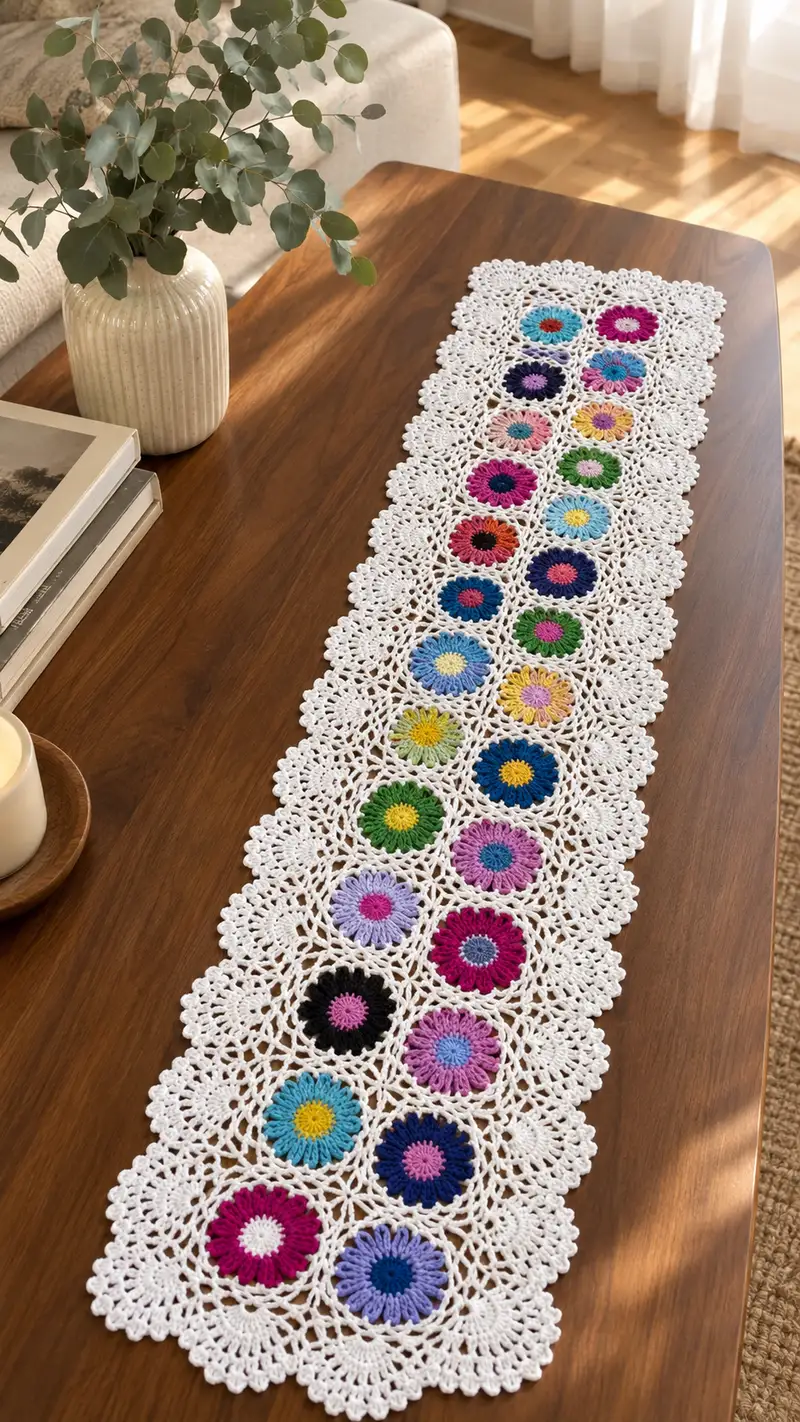
Create a long, elegant table runner made from joined sunburst daisy motifs framed in crisp white lace. This pattern uses colorful daisy centers worked in soft cotton yarn, joined with a delicate white lace square and finished with a scalloped border — perfect for a dining table, sideboard or dresser. The finished runner shown has 3 columns of round floral motifs joined in a long strip, offering a modern farmhouse look with vintage lace charm.
Progress Tracker
0% Complete
— Overview :
Info :
This pattern describes a modular sunburst daisy motif that is framed with white lace and assembled into a long rectangular runner using join-as-you-go (JAYG) technique. Each round below is written in full for clarity. The motif is worked in the round for the colorful center and petals, then expanded into a square lace frame. Work consistently with the same hook and yarn to keep all motifs the same size. Block motifs after completion before joining for best results.
— Motif: Sunburst Daisy Center and Petals (Make one motif then repeat) :
Round 1 :
Make magic ring, ch3 (counts as first dc), work 11 dc into ring; join with sl st to top of ch3 (12 dc) (12 clusters)
Info :
The magic ring provides a tidy center. Pull the ring tight so the center hole is small but not puckered. Use a color for Round 1 that will be the central disc color (often a contrasting yellow or dark shade).
Round 2 :
Change to second color (petal base) - ch1, *sc in next st, ch3, sk next st* around, finishing with sc into last dc; sl st to first sc (12 sc, 12 ch3 sps)
Info :
This round creates 12 little chain spaces that serve as bases for petals. If you want a two-tone center, use a different color for this round to form a ring before the petals.
Round 3 :
Change to petal color (same as Round 2 or new); in each ch3 space work the following: (ch2, 5 dc in ch3 sp, ch2, sl st in same ch3 sp) to form a tall petal puff; repeat in each of the 12 ch3 spaces; sl st to join at base (12 petal clusters)
Info :
Work the 5 dc cluster directly into the ch3 space. Keep tension even so all petals lie flat and are consistent in height. If your petals look too tall, reduce dc to 4 per petal.
Round 4 :
Ch1, *sc in top of petal cluster, ch3* around working sc into the top of each petal and between petals where structure allows. You will have 12 sc and 12 ch3 spaces; sl st to first sc (12 sc, 12 ch3 sps)
Round 5 :
Change to a contrasting color for petal rim: in each ch3 sp work (sc, hdc, dc, hdc, sc) to create a scalloped petal edge. Sl st to join (12 scallops)
Info :
These stitches build a defined petal edge. Keep the same stitch pattern in each petal to maintain symmetry. At the end of Round 5 fasten off if you plan to change to white for the lace surround.
Round 6 :
Change to white (or motif frame color): join with sl st into any sc at petal base, ch4 (counts as tr), *sk next petal rim, tr into next sc at petal base, ch2* around making 12 tr pairs and 12 ch2 spaces; sl st to top of beginning ch4 (24 tr including ch4 count)
Info :
This round begins transitioning the motif from round flower to framed square. The taller stitches create lacy space for the next rounds to add openwork and corners.
Round 7 :
Ch1, *sc in top of each tr, ch5, sk 2 tr* around creating 12 sc and 12 ch5 sps; sl st to first sc (12 sc, 12 ch5 sps)
Round 8 :
In each ch5 sp work: (sc, ch3, 5 dc, ch3, sc) to make a small shell standing away from the center (12 shells); sl st to join
Info :
These shells help begin the square shaping by bulking up the midpoints of each side. Keep shell stitch counts identical so later corner rounds align evenly.
Round 9 :
Ch1, sc in each sc and sc in top of each shell ends; between shells where you want corners, work: *after shell, ch2, (sc, ch2, sc) in gap* repeat as you go so that the round forms a slightly squared shape; sl st to join (you will have 48 sc equivalent placements around)
Round 10 :
Ch3 (counts as dc), in each sc around work dc, ch1 alternating to create an open mesh: *dc in next sc, ch1* around; sl st to top of ch3 (48 dc, 48 ch1 sps)
Info :
Now is a good time to verify that the motif is lying flat. If it cups, your stitches may be tight or you need more ch1 spaces; if it ruffles, remove a few ch1s or change tension. Block the motif flat if needed before doing the next framing rounds.
Round 11 :
Ch1, sc in same st, *ch5, sc in next ch1 sp* around to create lacy loops; adjust loops so that you have 24 ch5 loops positioned between petal zones; sl st to first sc
Round 12 :
In each ch5 loop work: (sc, ch3, 3 dc, ch3, sc). This creates a decorative lacy petal extension and begins to square the motif. Fasten off and weave ends.
Info :
After Round 12 your motif should be a roughly square lace with a colorful center. Make a sample motif and block it to measure. Aim for each finished motif to be approximately 9-10 cm (3.5-4 in) square unblocked and 10-12 cm after blocking depending on yarn and tension. Adjust hook size if necessary to match desired motif size for consistent joining.
— Motif Alternate Petal Variation (Optional) :
Round 1 :
MR, ch2, work 12 hdc into ring; sl st to first hdc (12 hdc)
Round 2 :
Ch1, *sc, ch4, sk next hdc* around to form 12 ch4 sps; sl st to join (12 sc, 12 ch4)
Round 3 :
In each ch4 sp: (ch2, 7 dc, ch2) then sl st to base to form larger puff petals (12 large petals)
Info :
This variation creates a fuller daisy suitable when you want the colorful centers to be the focal point. Adjust subsequent framing rounds accordingly so that squares remain even.
— Motif Lace Framing to Square (Detailed variant to ensure consistent squared motif) :
Round 1 :
From the finished petal edge join white yarn in any ch space between petals, ch1, sc around into petal tops and gaps to make a tidy round of sc (count will vary but aim for 48 sc around)
Round 2 :
Ch3 (counts as dc), dc in same st, *ch2, sk 2 sc, (2 dc, ch2, 2 dc) in next sc (creates corner block), ch2, sk 2 sc, 2 dc in next sc* continue establishing corner blocks at four evenly spaced points; sl st to join (this round introduces 4 corner blocks)
Info :
When making corners, plan to space them at 90-degree intervals to convert the round into a square. Mark the corner blocks with stitch markers as you go so that when you join motifs later the corners meet cleanly.
Round 3 :
Ch1, sc around maintaining corners where (sc, ch3, sc) sits in the middle of each corner block; along sides work sc into dc and ch2 spaces to flatten sides. Sl st to join (approx 64 sc depending on spacing)
Round 4 :
Ch4 (counts as tr), tr in each sc around creating a taller mesh; at corner scs work (3 tr, ch2, 3 tr) to strengthen corners; sl st to top of ch4 (stitch count will be 64-72 depending on side increases)
Info :
These rounds ensure the motif becomes a square. If necessary add an extra round of mesh to reach desired square size so all motifs match before joining.
Round 5 :
Ch1, *sc in next 3 trs, ch3, sk 2 trs* repeat across each side and in corner spaces work (sc, ch5, sc) to create larger corner loops that will be used for join-as-you-go. Sl st to join
Round 6 :
In each ch3 side loop work (sc, hdc, 3 dc, hdc, sc). In each ch5 corner loop work (sc, ch3, 5 dc, ch3, sc). Fasten off and weave ends. Each completed motif is now a square lace with a colorful sunburst in the center.
Info :
Make as many motifs as your runner needs. The pictured runner uses 33 motifs in a 3-column by 11-row layout; arrange motifs before joining to balance color placement and avoid clustering similar colors.
— Join-As-You-Go (JAYG) Method: Joining Motifs into Rows :
Round 1 :
Work motif 1 completely and finish Round 6 but do not fasten off. Prepare motif 2 and when you reach the round equivalent to Round 5 (where ch3 side loops exist) begin JAYG: on motif 2 in the last round, when you come to a side loop that meets an adjacent completed motif loop, work sc into loop on motif 2, then sl st into the corresponding loop on motif 1 to join, then continue pattern for that loop on motif 2 (as sc, hdc, 3 dc, hdc, sc). Continue across side so that motifs are joined along one edge by connecting loops (approx 8-12 connection points per side depending on pattern)
Info :
When joining, maintain consistent tension on joins so motifs sit flat and seams are not puckered. Use the same white yarn for the joining round so seams blend invisibly into the frame. Pin motifs before joining if needed to ensure alignment.
Round 2 :
For motifs joined in the middle of a row: continue joining subsequent motifs to the last joined motif using JAYG along the long side until the row reaches desired length. For the second row, join motifs along their long side to the motifs of the first row at the same round points: match corner loops and side loops so that grid lines stay straight.
Info :
To maintain a straight runner edge, check alignment of corner blocks every 3 motifs. If necessary, adjust the number of ch spaces in side rounds to keep motifs square and consistent in dimension. Join rows one at a time, keeping the runner flat as you progress.
— Joining Corners and T-Junctions (where four motifs meet) :
Round 1 :
When joining a motif that shares both a side and a corner with previously joined motifs, perform the JAYG for the side loops first, then when you reach the corner ch5 loop, insert hook and work: sc into corner loop of motif being joined, sl st into corner loop of motif on the left, sl st into corner loop of motif above (if present), then finish corner by working the remaining stitches into the motif being joined (sc, ch3, 5 dc, ch3, sc) so the corner is connected to up to three other motifs if needed.
Info :
Corner joins often require more attention. Keep tension relaxed here to avoid drawing corners inwards; evenly distribute slack across the three or four connection points and check the plane with a blocking mat.
— Assembling Full Runner Layout :
Info :
Layout Example (Pictured Runner): 3 columns x 11 rows = 33 motifs. You can adapt to any column/row configuration. Assemble motifs into rows first, then join rows together using the same JAYG method along the long edges so seams match where motifs meet.
Round 1 :
Join the first two motifs in a row as described. Continue adding motifs until the row length is complete. Repeat for all rows desired. Then attach rows together by pairing motifs and joining along the long side loops and corner loops where they meet.
Info :
If you prefer, you can sew motifs together after blocking using mattress stitch or whip stitch; JAYG is faster and creates a seamless look, while sewing allows more control if motifs differ slightly in size.
— Outer Scalloped Border (Work around entire assembled runner) :
Round 1 :
With runner laid flat and seams secure, join white yarn to any outer loop at the edge, ch1, sc evenly around edge working 1 sc into each ch loop or stitch along the outermost round of motifs. Maintain an even stitch count along straight edges — for a 3x11 runner expect approximately 600 sc total around depending on motif size; distribute sts so that the edge is smooth.
Info :
Count stitches along the long edge of a single motif and multiply by number of motifs in that direction to estimate total stitch count. Adjust with increases or skips at seams to keep the border lying flat.
Round 2 :
Ch3 (counts as dc), *dc in next 4 sc, ch2, sk 2 sc* repeat around; at corners work 3 dc, ch3, 3 dc into corner point to create a pronounced corner shell; sl st to join
Round 3 :
Ch1, sc around working sc into each dc and sc and in ch2 spaces work (sc, ch3, sc) to form looped points across each side; at corners work (sc, ch5, sc) into the ch3 corner pockets; sl st to join
Round 4 :
In each ch3 side loop work (sc, hdc, 5 dc, hdc, sc) to form larger scallop shells along the entire edge. In each ch5 corner loop work (sc, ch3, 7 dc, ch3, sc) to create larger corner fans; sl st to join
Info :
These wide scallop shells provide the delicate scalloped finish you see in the picture. Keep stitch counts regular so scallops look uniform. Adjust the number of dc in scallops if you prefer larger or smaller scallops.
Round 5 :
Ch1, *sc in each dc across scallop, ch4, sk to next scallop center* around; in corner fans work (sc, ch6, sc); sl st to join
Round 6 :
In each ch4 side loop work (sc, 3 hdc, sc) to create subtle laddered loops between scallop fans. Fasten off and weave in ends. Optionally block again lightly to shape scallops perfectly.
Info :
For a more pronounced filet-lace look you can add an extra round of mesh (dc, ch1) before the scallop rounds. For a sturdier runner consider working an additional backing round of sc to add stability before scallops.
— Decorative Reverse Round (Optional, for added stability) :
Round 1 :
Working from the wrong side, join white yarn to any outer sc and work 1 sc in each stitch around to reinforce joins and tidy edges. This can also hide join tails and make the edge slightly thicker which helps the runner lie flat under table objects.
Round 2 :
Ch1, *sc in next st, BLO sc in next st* repeat around to create a subtle ridge line. Fasten off and weave ends securely into the lace structure so they are invisible from the right side.
Info :
This reverse round is optional but recommended if the runner will see travel across tables or frequent placement of heavier objects; it increases durability and keeps scallops from stretching.
— Finishing Touches and Blocking :
Info :
Carefully wash and block your runner. Pin scallops evenly and shape corners to be square. Let dry fully. If you want a firmer runner for display, spray with diluted fabric stiffener or starch while pinned and allow to dry. Trim any visible stray ends and weave remaining tails at least 4-6 cm inside the lace before trimming.
Info :
To lighten and brighten white cotton after washing, use a gentle oxygen bleach soak (follow yarn care instructions). Avoid chlorine bleach which can weaken fibers over time.
— Sizing and Customization Notes :
Info :
The pictured runner uses 33 motifs (3 across x 11 long). To make a table centerpiece runner for a small table reduce rows (e.g., 3x7=21 motifs). To make a longer runner add more rows. To make a table cloth or square mat, increase columns and rows until the desired coverage is achieved. Keep motif size consistent by maintaining same hook and tension across all motifs.
Info :
To change style, work centers in tonal palettes (pastels, jewel tones, monochrome) and maintain white framing for contrast, or switch framing color for a cohesive modern look.
— Troubleshooting Common Fit Issues :
Info :
If motifs appear to distort after joining, unpick a small section and adjust join tension, or add a reinforcement round of sc across joined seams to stabilize. If the runner waves or cups, block harder and add one more even round of sc to even out the sides.
Info :
If two adjacent motifs differ slightly in size, add or remove a small ch loop (ch1 or ch2) in the seam round to bring them into alignment rather than recounting entire motif rounds.
— Care Instructions :
Info :
Hand wash or machine wash on gentle cycle in cold water. Reshape and dry flat. Avoid tumble drying. Iron on low if needed with a cloth between iron and lace, or use steam while blocking to restore scallops.
Congratulations — you just finished a stunning sunburst daisy table runner that brings colorful cheer and delicate lace to any surface! Each motif comes together like a little work of art and the join-as-you-go method keeps finishing simple and satisfying. Block and press to show off those scalloped edges, then style your runner with candles or a vase to see it truly shine. 🧶🌼✨