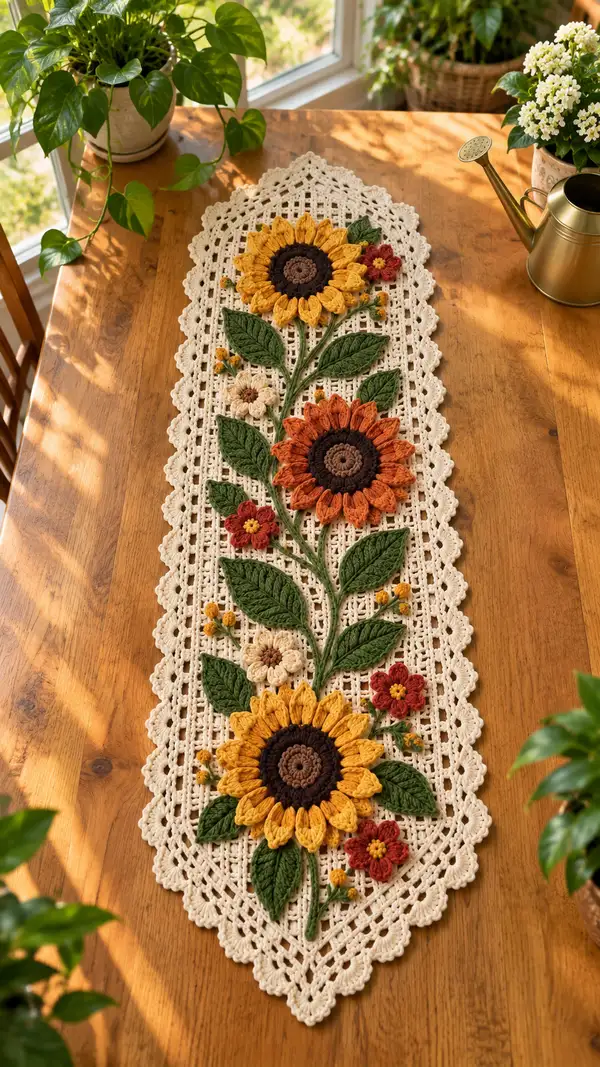
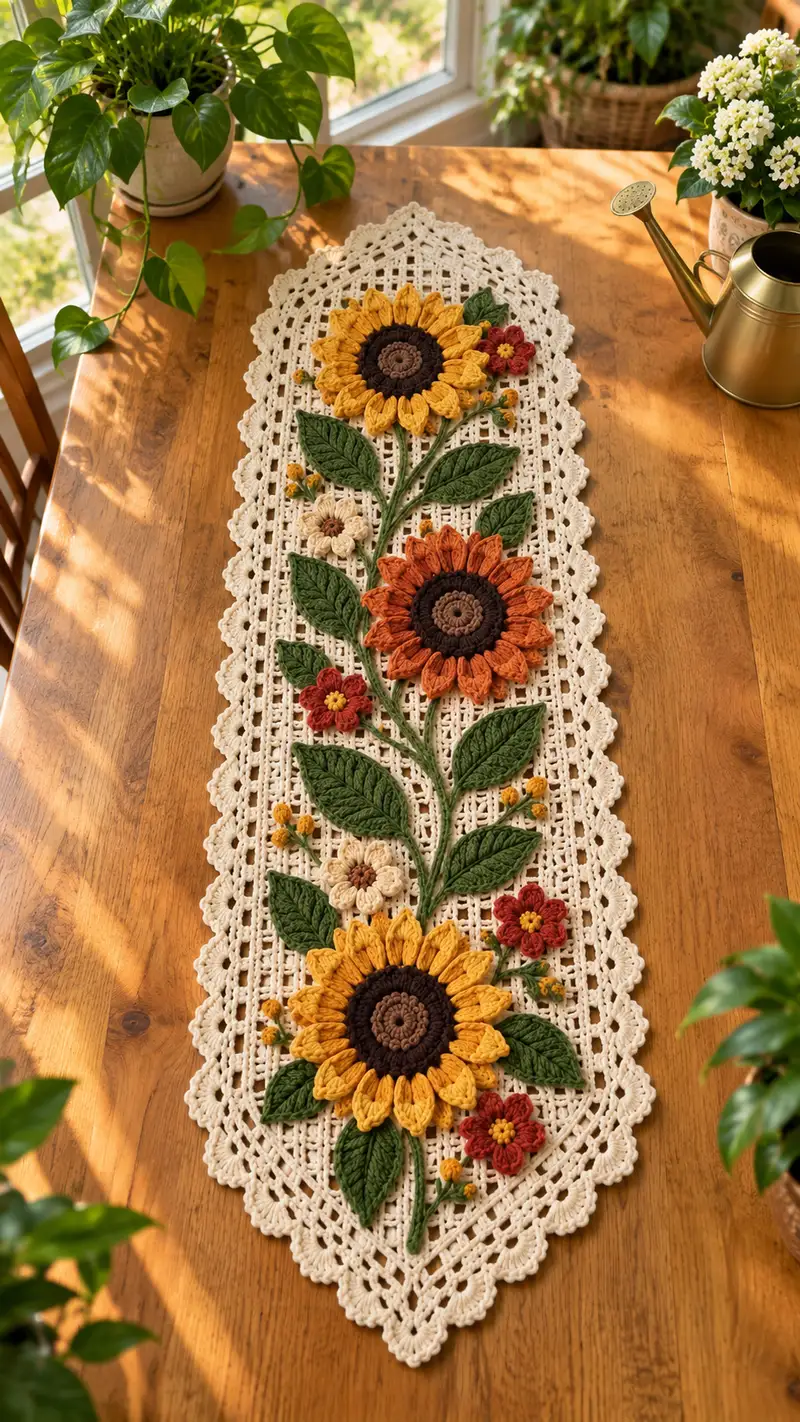
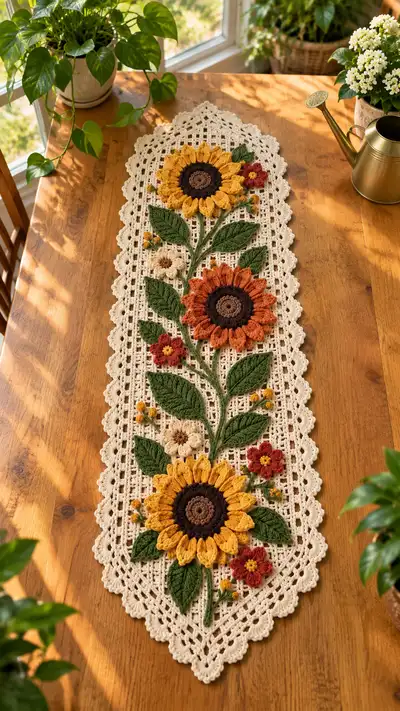
A warm, vintage-inspired table runner featuring three dimensional sunflower appliques, textured leaves and tiny floral accents on a delicate lacy background. This long runner showcases raised petals, layered centers and rich autumn colors set against a neutral open-lace filet base. Detailed instructions guide you through every motif, leaf, stem and the finishing scalloped border — perfect for bringing handmade charm to a dining table or console.
Progress Tracker
0% Complete
— Materials & Special Stitches :
Info :
Special stitch: Puff (Yarn over, insert hook, yarn over, pull up a loop) x 4 times into same stitch, yarn over and pull through all loops, ch1 to close puff. Work tight enough so puffs sit proud but stable. Use 3.25mm hook for puffs if you want tighter texture.
Info :
All pieces are worked in rounds unless noted. The base is worked in rows (treated as rounds here). Use stitch markers for ends of rows and for motif placement. Measurements in parentheses are stitch counts unless otherwise noted.
— Base Panel (Filet Lace Row Work) :
Round 1 :
Foundation chain: ch 120. Add turning ch 3 (counts as dc). (120 base ch)
Round 2 :
Row 1 (RS): dc in 4th ch from hook, *ch1, sk 1 ch, dc in next ch* repeat across to last ch, dc in last ch. (approx 60 dc, 60 ch-1 sps)
Round 3 :
Row 2 (WS): ch3 (counts as dc), turn, *dc in next dc, ch1, sk next ch-1 sp, dc in next dc* repeat across. End with dc in top of turning ch. (same count as row before)
Round 4 :
Row 3: Repeat Row 2 maintaining filet open mesh. Continue repeating Rows 2-3 for a stable mesh. (work until Runner length minus 6 inches; total rows after repeats = 28)
Info :
Work the mesh steady for 28 rows total (including the initial rows). This will create the long central panel where appliques are sewn. Keep tension even; count your filet spaces so motif placement aligns later.
Round 5-12 :
Rows 4-11: Continue filet pattern: dc row, dc row with ch-1 spaces; maintain counts. (no change in stitch count)
Round 13 :
Row 12: At this row mark the vertical centerline with a removable stitch marker to help align motifs later. (no stitch change)
Round 14-28 :
Rows 13-27: Continue filet mesh until you've worked 28 rows total for the main center panel (measuring roughly 28" long depending on gauge). Keep both ends identical for scalloped edge later.
Info :
If you prefer a longer runner, add sets of 4 filet rows (2 repeats) until desired length; keep the count of filet spaces divisible by design repeat (10 mesh spaces) so applique placement remains symmetrical.
Round 29 :
Row 28: Work one solid row of dc in each dc and ch-1 space to create a firm foundation for attaching border: dc across (approx 120 dc).
Info :
Fasten off but leave long tail for sewing the facing border if you prefer to seam an additional backing. Block base panel flat and square before attaching appliques. Blocking will open the lace making alignment easier.
— Scalloped Edge Border (Make 2 for long sides, and 2 for ends) :
Round 1 :
Join cream at long side edge with sl st at bottom corner center, ch1, sc evenly around edge along the side into each dc and ch-1 space: sc 120 around (adjust to match your stitch count). (120)
Round 2 :
*ch3, sk 2 sc, sc in next sc* repeat to end to create small picot-like spacing. (approx 40 shells)
Round 3 :
*In next sp work (sc, hdc, 4 dc, hdc, sc) for scallop; sk next 3 sc* repeat along side. (approx 40 scallops)
Info :
Repeat the same border on both long sides, then work identical smaller scallops on each end (work directly into ends with evenly spaced sc then scallops). Make sure scallops meet cleanly at the corners — increase or decrease a sc between scallops to adjust spacing.
Round 4 :
Work decorative picot round: *sl st into center dc of each scallop, ch3, sl st into same st* repeat to highlight scallops. Fasten off and weave tails. Block scalloped edges carefully to shape points.
Info :
Blocking tip: use rust-proof pins to pin scallop points and soak the piece thoroughly; allow to dry flat for sharp edges. Reposition appliques after blocking for best fit.
— Sunflower Center (Make 3; two large, one medium) :
Round 1 :
6 sc in magic ring (6)
Round 3 :
(1 sc, inc) x 6 (18)
Round 4 :
(2 sc, inc) x 6 (24)
Round 5 :
(3 sc, inc) x 6 (30)
Round 6 :
(4 sc, inc) x 6 (36)
Info :
Change to dark brown for layer 2 of the center to create a rich contrast. We will make two concentric rounds in darker brown for textured rings before adding the puff ring.
Round 7 :
Join dark brown, ch1, sc in each st around (36)
Round 8 :
1 sc in each st around (36)
Round 9 :
Switch to mid-brown, ch1, sc around (36)
Round 10 :
Work texture ring: *puff stitch in next st, sl st in next st* repeat around to create raised seed texture (18 puff, 18 sl st). Fasten off leaving tail for sewing. (36)
Info :
For medium-sized sunflower center use rounds 1-8 only and end with puff round of 12 puffs by reducing initial increases (work to 30 sc instead of 36); math must be adjusted accordingly if you want a slightly smaller center.
— Sunflower Petal Ring (Make 18 petals; work joined to center for each sunflower) :
Round 1 :
Attach petal color (golden yellow or burnt orange) to the base of the center by sl st between two puffs, ch1.
Round 2 :
Petal foundation: ch2, (hdc, 3 dc, hdc) all in same st, sl st in next base st to anchor petal. Repeat to make 18 petals evenly spaced around center. (18 petals)
Round 3 :
Second petal layer (depth): In each petal base: sl st into top of petal, puff stitch 5 times into top of petal (see special stitch), ch1 closing, sl st to center base; move to next petal. This makes the sculpted raised petal look. (18 puffs)
Info :
Stuff petals lightly by pinching a small bit of fiberfill between the front and back loops before closing the second petal layer. This gives petals a subtle convex shape but keeps them flexible for sewing.
Round 4 :
Edge finish: sc around base of all petals to tidy joining points and close any gaps (approx 54 sc depending on petal base width). Fasten off leaving long tail for sewing to base panel. (approx 54)
Info :
Arrange petals slightly overlapping like a realistic sunflower — when sewing to base, use mattress or whip stitch through the center underside to keep petals fanning naturally.
— Small Floral Accents (Make 6 small flowers and 8 tiny buds) :
Round 1 :
Small flower: 6 sc in magic ring (6)
Round 2 :
(1 sc, inc) x 3 (9)
Round 3 :
Petal round: *ch2, (3 dc) in same st, sl st in next st* repeat 3 times to create 3 small petals. Make 6 of these in rust red and warm beige. (3 petals each)
Round 4 :
Tiny bud: ch2, 4 sc in 2nd ch from hook, sl st to close, sew yellow French knot center later. Make 8 buds. (4)
Info :
Sew tiny yellow French-knot-like centers by wrapping yarn twice around a darning needle and pulling gently through the center st to create raised dots, or use small yellow puff stitches sewn in place.
— Leaves (Make 10 leaves of varying sizes) :
Round 1 :
Leaf small (leaf A): ch 12, sc into 2nd ch from hook, hdc in next, dc in next 2, tr in next 2, dc in next, hdc in next, sc in next, sl st into last chain to finish tip. Turn to work the opposite side: sc in same st, hdc next, dc next, tr next 2, dc next 2, hdc next, sc next, sl st to base. (approx 22 sts along leaf)
Round 2 :
Leaf shaping and veins: Using olive green, work 1 sc in each st around leaf edge to tidy, then 1 sl st to join. Fasten off leaving long tail for sewing. (approx 22)
Round 3 :
Leaf medium (leaf B): ch 18, shape with larger center lobes: sc, hdc, dc2, tr 3, dc2, hdc, sc across, then mirror on opposite edge; sc around to tidy. (approx 34)
Round 4 :
Leaf large (leaf C): ch 26 and build larger lobed leaf with 2 tr peaks in center (work symmetrical increases). Edge with sc tidy round. (approx 46)
Info :
After finishing each leaf, use surface embroidery with darker green yarn to stitch a central vein: from tip to base use backstitch or sl st to emphasize veins. You can also use a yarn needle and run a strand along the leaf center and tack it down with small stitches to create a ribbed look.
Round 5 :
Vein detail: Using mid-brown or deep olive, with wrong side facing, stitch a central vein: insert needle at leaf tip, bring through to base and back, using evenly spaced stitches to create raised rib. Secure ends and weave tail. (no stitch count change)
Info :
For the most lifelike leaves, block each leaf pinned over a curved shape so the center vein is slightly raised. Damp-block and allow to dry pinned for best results.
— Stems (Make 3 main stems and several small branch stems) :
Round 1 :
Stem i-cord: With olive green, ch 3, turn. Row1: sc in back bump of ch across (2 sc). Continue in continuous spiraled sc: sc in BLO around chain edge to create narrow tube. Work length of stem to match placement: approx 60 sc for full long stem (counts as rounds). (approx 60)
Round 2 :
Continue i-cord: sc in each stitch around for required length. Fasten off leaving long tail for sewing. For thicker stems, work 2 rows of sc around to create a 3-stitch tube.
Info :
To add rigidity, thread a length of florist wire inside the i-cord before stuffing and before final fastening off; fold wire ends and secure them inside stitches to avoid poke-through. Wire allows you to gently shape stems along the runner.
— Assembly & Placement of Motifs (Layout Guidance) :
Info :
Block base and all appliques first. Lay your base on a table and mark a centerline (both length and width). The main composition places three sunflowers along the center: one near each end and one in the center offset slightly to the side to create a flowing vine look. Leaves and small flowers radiate from each sunflower's stem.
Round 1 :
Placement guide: Measure 3 equal zones along the runner: Zone A (bottom 1/3), Zone B (center), Zone C (top 1/3). Place sunflower centers at the following distances from bottom edge: 6", 17", 28" (adjust to your runner length). Pin centers with rust-proof pins.
Round 2 :
Pin petals around each center, working petals to radiate evenly — 18 petals recommended for large sunflowers, 14-16 for medium. Use extra pins to flatten petals while you position leaves.
Info :
Lay stems as curved lines connecting flowers; pin leaves and small blossoms along stems to visually balance both sides. Step back and check symmetry before sewing. If using wire, bend stems gently to follow layout, then tack them down at a few points with invisible stitch.
— Sewing Appliques (Detailed Step-by-Step) :
Round 1 :
Attach sunflower center: Using long tail from center, position center on base and sew through base mesh using mattress stitch around 12-14 anchor points to secure. Sew through underside of center to keep visible stitches hidden. (approx 12-14 anchor stitches)
Round 2 :
Sew petal bases: With a blunt yarn needle and matching petal color, stitch through the base of each petal to the filet base at 2-3 points per petal: one near center and one near outer tip to secure shape. Use small, even stitches to avoid puckering. (36-54 small stitches per sunflower)
Info :
When sewing leaves down, catch only the mesh edge and the leaf underside, not the visible leaf face. This keeps seams invisible. Use small whip stitches along the leaf midrib and a few lateral stitches near the tip to secure larger leaves.
Round 3 :
Sew small flowers: Using their long tails, tack small flower bases down with 4-6 stitches, then sew tiny yellow centers over their hubs with small overcast stitches to secure. Sew buds in clusters with 2-3 stitches each. (4-6 stitches per small flower)
Round 4 :
Secure stems: Use long tail of stem i-cord to thread through mesh spaces, then secure with small hidden whip stitches at 3-4 anchor points along each stem. Add a few diagonal tacking stitches across the stem and mesh to prevent it from moving during wash or use. (3-4 anchor points each stem)
Info :
As you sew, adjust petal overlap and leaf curl by re-positioning stitches. Use pins to simulate final look and sew gradually working from center outward so tension remains even.
— Additional Texture & Surface Embroidery :
Round 1 :
Surface veins on leaves: With contrasting darker green, use a yarn needle to couch a strand along center of each leaf. Secure ends with small backstitches. Add tiny side veins with backstitch from center line outward. (no counted stitches)
Round 2 :
Seed clusters and accents: Use small French-knot-like loops (wrap yarn twice around a blunt needle and pull through a single base mesh space) to add tiny seed-like dots in the sunflower center and small yellow dots near buds. Tuck ends securely. (10-20 accent dots per runner)
Info :
For a secure finish on high-touch runners, apply a small dab of washable craft glue beneath heavily handled elements or secure thread ends with a couple extra overhand knots hidden under petals.
— Final Blocking & Finishing :
Round 1 :
Block the entire assembled runner on a padded board: pin scalloped edges to open points, shape petals and leaves as desired. Use steam or damp-blocking depending on yarn instructions. Allow to dry 24 hours. (no stitch change)
Round 2 :
Trim stray fibers and weave all tails securely to the inside of the runner structure. Press lightly with steam if safe for yarn, avoiding direct heat on raised petals to prevent flattening.
Info :
Check all sewn anchors again after blocking; tighten any loose tacks by stitching through similar-colored thread to blend in. If you used wire, bend gently to final shape after blocking to avoid distorting stitches.
— Pattern Variations & Scaling :
Info :
Make the runner narrower by reducing the foundation chain in multiples of 10 to keep filet repeats aligned. To change the scale of sunflowers, alter the number of petal repeats or use a different hook/yarn weight: finer yarn = more intricate smaller motifs; thicker yarn = bold oversized appliques.
Round 1 :
Alternate petals: Use front post double crochet (fpdc) rows inside petals for greater ridge definition. Work a row of fpdc across the petal center before finishing edge. (no strict stitch count change)
Info :
For a spring version, swap gold and orange petals for pastel pinks and lavenders and use lighter green leaves. For holiday styling, integrate deep reds and metallic gold thread highlights in centers.
This sunflower table runner is a delightful combination of heirloom lace and bold 3D florals — an eye-catching centerpiece for any table! Each element is made with care and can be customized to match your decor. The layered petals and textured leaves turn simple stitches into a vibrant botanical scene. 🧶🌻 Treat yourself or make one as a thoughtful handmade gift — there is joy in every stitch! ✨