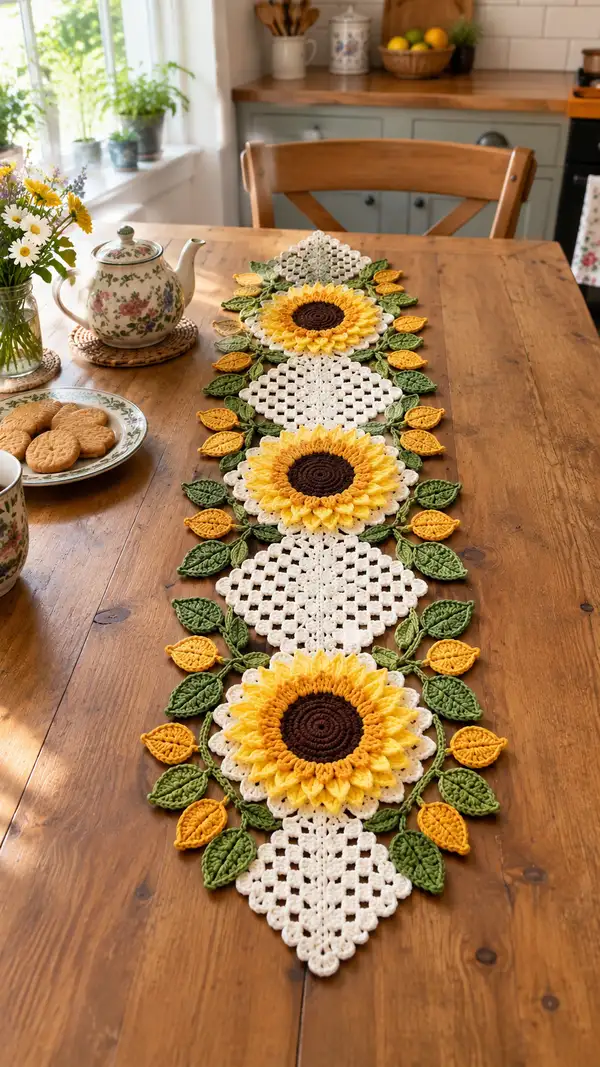
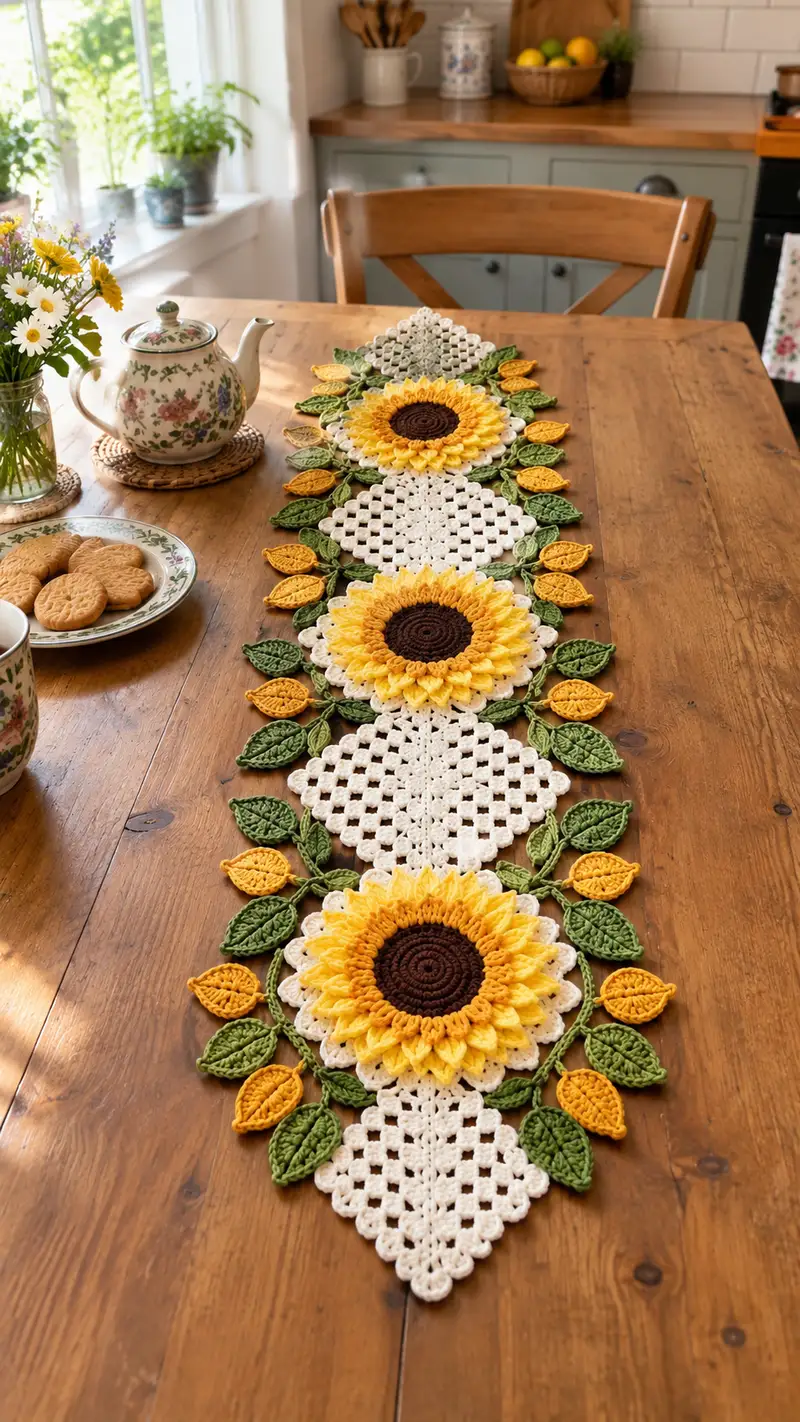
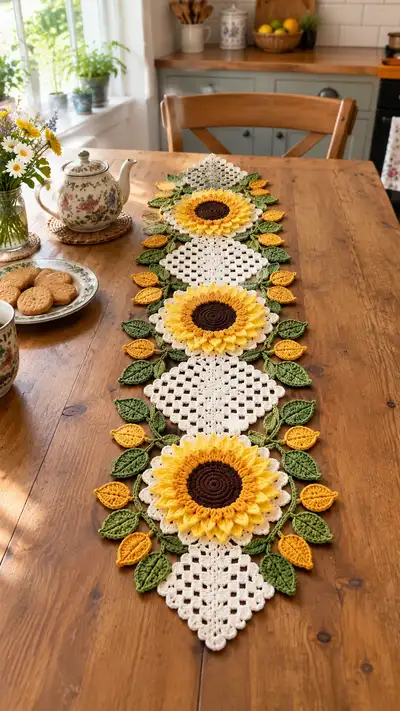
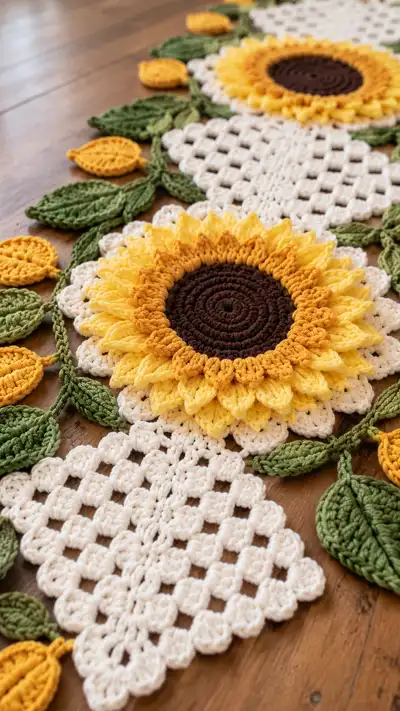
Bright, vintage-inspired sunflower table runner worked in rich yellows, warm brown centers, leafy greens and creamy ivory. This modular design features three large 3D sunflowers with layered petals, diamond granny motifs, and leafy vines for a charming centerpiece. Constructed from individual motifs joined into a long runner, the pattern emphasizes texture and dimensional petals for a handmade touch. Perfect for seasonal decor or a sunny, year-round table accent.
Progress Tracker
0% Complete
— Overview :
Info :
This pattern is modular: you will make three large sunflower motifs, four diamond granny motifs to act as spacers, a collection of large leaves and small bud leaves, and a long crocheted vine used to join and space the motifs. All motifs are made flat and blocked then joined using a slip-stitch join and sewn tidy seams where needed. Use worsted cotton yarn for crisp definition; choose a hook that gives you a firm fabric with minimal gaping.
Info :
Gauge is not critical but for sizing reference the pictured runner is approximately 14–16in wide and 48–52in long when motifs are joined in this layout. Adjust number of diamond panels to make runner longer or shorter.
— Sunflower Center (Make 3) :
Round 1 :
6 sc in magic ring (6)
Round 3 :
(1 sc, 1 inc) x 6 (18)
Round 4 :
(2 sc, 1 inc) x 6 (24)
Round 5 :
(3 sc, 1 inc) x 6 (30)
Round 6 :
(4 sc, 1 inc) x 6 (36)
Round 7 :
(5 sc, 1 inc) x 6 (42)
Round 8 :
(6 sc, 1 inc) x 6 (48)
Info :
At this point the flat center circle measures roughly 3.75–4 inches across with worsted cotton if using the suggested hook. If you prefer a slightly larger center reduce hook by 0.25mm and rework rounds; for a smaller center stop increases at round 7.
Round 9-11 :
1 sc in each st (48)
Info :
These rounds build the central disk height so the petals will sit neatly. Keep tension even. Place a stitch marker at the start of round 9 and move with each round to preserve even spacing for later petal counts.
Round 12 :
(6 sc, 1 dec) x 6 (42)
Round 13 :
(5 sc, 1 dec) x 6 (36)
Round 14 :
1 sc in each st (36)
Info :
Fasten off brown center color leaving a long tail for sewing if you prefer to sew the center to the petal round later. Many crocheters prefer to leave the center attached and work petals from the same piece; both methods given in petal section.
— Petal Base Ring and First Petal Layer :
Info :
Change to Golden Yellow (contrast ring) or start the next round in the sunflower yellow if you want a single color petal base. The first petal ring creates a short decorative ridge that the main petals will overlap.
Round 15 :
Join Golden Yellow in any st, ch1, 1 sc in same st, *ch2, skip 1 st, 1 sc in next; rep from * around to create small chain loops for petal anchors (24 ch2 spaces) (24 sc)
Info :
There should be 24 ch2 loop spaces overall. We will use these 24 anchor points to make 24 petals for a balanced sunflower. Count carefully and adjust if you have slightly different stitch counts by changing to ch1 spaces.
Round 16 :
Slip into first ch2 sp, *(petal: 3dc cluster/puff in ch2 sp, ch1, sl st in same sp), sl st to next ch2 sp; rep around (24 petals)
Info :
Petal stitch: yarn over, insert hook, pull up loop, yarn over, pull through two loops — repeat to form puff so that each petal is a 3dc puff or 4dc cluster according to your tension. Ensure petals sit upright by pulling up loops slightly taller than regular dc before closing the puff.
Round 17 :
Ch1, 1 sc in same sp behind petal to secure, *ch3, sc behind next petal between cluster base; rep around (24 sc/24 ch3 picots) — adjust to keep even (48 total elements)
Info :
This round creates small connecting points behind the first petal layer to anchor the second, larger petal layer. Keep the sc worked at petal base hidden behind the petals for neat appearance.
— Second, Larger Petal Layer :
Info :
Switch to Sunflower Yellow (main petal color). These petals will be larger and sit between and slightly overlapping the first layer for depth.
Round 18 :
Slip to a ch3 sp behind a petal, *(large petal: (ch2, 5tr cluster/puff into same space) ch2, sl st into same space), sl st into next ch3 behind next small petal; rep around to create 24 larger petals (24 large petals)
Info :
Make each large petal tall so they curl outward slightly. You may instead work (fpdc cluster) to shape petals differently; keep clusters consistent for a regular look. Use blocking later to shape petals to fan outward.
Round 19 :
Ch1, sl st around petal bases to tidy: 1 sc in each space between large petals across the back (24 sc)
Round 20 :
Optional second petal row: in each large petal ch2 top, make a small 3dc puff to add a row of tips (24 small puffs)
Info :
If you want a two-tone bloom, work round 18 in a darker golden yellow and round 20 in the lighter sunflower yellow for a natural gradient. Finish flower by weaving in ends and blocking petals so they lie flat and sculpted.
— Sunflower Backing & Scallop (Cream) :
Info :
The backing is a simple scalloped round built in the cream/ivory that acts as a halo and helps connect the sunflower to the diamond granny. Work a circular scallop large enough to extend about 1–1.25in beyond the petal base.
Round 21 :
With cream, join to back loop of the center ring or join by sl st at petal base, ch3 (counts as dc), 11 dc in same st, sl st to same st to create a raised scallop anchor (12 dc total cluster)
Round 22 :
Ch1, 1 sc down around the outside to even the edge across 48 sts (48 sc)
Round 23 :
(*ch3, skip 2, sc in next) around to create 16 ch3 loops for shell placement (16 ch3 loops)
Round 24 :
In each ch3 loop: (sc, hdc, 3 dc, hdc, sc) — shell stitch (16 shells)
Info :
Make sure shells sit centered between petals. The shells are slightly offset to fill the spaces and create a broad scallop that will overlap the diamond granny corners when joined.
— Diamond Granny Panel (Make 4 for pictured layout, adjust for desired length) :
Info :
This diamond granny is worked from the center and built outward in rounds creating a square rotated to look like a diamond. The pictured panel is 9 rounds and finishes approx 6.5in corner-to-corner with worsted cotton using the specified hook. Block flat after completing.
Round 1 :
Make a small rossette: ch5, join to form loop, ch3 (counts as dc), 11 dc in loop, join with sl st (12 dc total)
Round 2 :
Ch3, dc in same st, *ch1, skip next dc, 2 dc in next dc; rep around; join — this forms small chain spaces across the round (24 dc, 12 ch1 sps)
Round 3 :
Ch3, (2 dc, ch1, 2 dc) in each ch1 sp to form four cluster corners — the panel starts to square out (32 dc with 8 ch1 spaces along edges)
Round 4 :
Ch3, dc across each st until corner; (2 dc, ch2, 2 dc) in corner ch1 spaces; continue around — this expands into a larger square (48 dc with 12 ch2 corner chains)
Round 5 :
Ch3, dc across edges, (2 dc, ch3, 2 dc) in each corner ch2 to enlarge diamond shape; join — panel now reminiscent of a small filet diamond (64 dc approx)
Round 6 :
Ch1, 1 sc around edge to tidy (64 sc)
Round 7 :
For decorative border: *(ch4, sl st into next ch space) across edges to create lattice loops; rep around (approx 16 ch4 loops)
Info :
The diamond granny relies on even placement of clusters in each corner. Block square and measure; if your diamond is too small, add an extra round of dc increase in each corner (2 dc,chX,2 dc) to reach desired size.
— Large Leaf (Make 14–16 total, several in two greens) :
Info :
Leaves are worked flat, starting at the base with an increasing center spine, then decreasing to a point. Some leaves are worked longer as large leaves and some shorter as buds. We give instructions for a large leaf (~8 rounds) and a small bud (~6 rounds).
Round 1 :
With leaf green, ch11 (or ch13 for longer leaf), sc in 2nd ch from hook, sc across (10 sc) (for ch11)
Round 2 :
Ch1, 1 sc in first st, inc in next st, sc across to last 2 sts, inc, sc in last st — add 2 sts (12 sc)
Round 3 :
Ch1, sc in first st, (inc in next, sc in next) across until two sts remain, (inc, sc in last) — increase evenly to expand leaf width (approx 14 sc)
Round 4 :
Ch1, sc across even to apex of leaf, then turn and sc along opposite side to base, working same stitch count to create a smooth edge; end with sl st to join base — total sts unchanged (14 sc each side)
Round 5 :
For central vein: with contrasting olive, attach at base, ch1, *1 sc down center of leaf along each stitch chain, turn and sl st back into base to secure (creates a raised vein); fasten off (stitches equal to leaf length)
Info :
To get a 3D lift, work the final round in BLO and pick up the front loops to push the leaf center up. Alternatively, after finishing, block leaves with light starch to hold shape.
Round 6 :
Optional edge: with same green, make a picot border by working (sc, ch3, sl st in first ch) around to add decorative bite (keeps leaf edges crisp)
— Small Bud Leaf (Make 12–16) :
Round 1 :
Ch7, sc in 2nd ch from hook and across (6 sc)
Round 2 :
Ch1, inc in first st, sc across until last st, inc in last st (8 sc)
Round 3 :
Ch1, sc across one side, sc around tip with 3 sc, sc back down opposite side to base — creates a small point (8–10 sc)
Info :
Bud leaves are worked in a golden mustard color for variation and help mimic small sunflower seeds or outer bracts in the original piece. Crochet a small chain stem at the base (ch5) to join to vine later.
— Long Connecting Vine (Make 1 long chain or multiple segments) :
Info :
The vine is a long crocheted cord made by a chain with periodic sc stems where leaves and buds attach. Length between motifs in photo is roughly 6–7 inches of chain plus leaf clusters. Work a vine long enough for your table and pin motifs to test spacing before securing.
Round 1 :
With medium green, ch120 (or ch to desired length in multiples of 6) — work long chain to connect motifs (adjust length for shorter or longer runner)
Round 2 :
Starting 4 ch from one end, *sc in next 6 ch, ch6 (leaf placement loop), skip 6 ch, sc in next 6; rep across — create regular loops for slipping in leaf bases and to create natural spacing (approx 16 loop points)
Info :
Rather than making one extremely long chain, make multiple 24–30 ch segments and join with sl st to avoid stretching. Pin motifs and leaves onto the vine to test natural curvature and adjust chain counts between motifs for visual balance.
— Attaching Leaves & Buds to Vine :
Round 1 :
Position a large leaf base over a ch6 loop, use a short length of yarn to sew base of leaf through loop and around vine, then secure with a few sl st to hide tail (sew through 6–8 stitches for stability)
Round 2 :
Attach small bud leaves in pairs between large leaves using the small ch5 tail left at base of buds; wrap the chain tail around vine and secure through several sl sts to form a small cluster (repeat along vine)
Info :
Space leaves asymmetrically for a natural look. The pictured runner alternates large leaves (two per sunflower side) with small bud leaves arranged in pairs; pin everything before final securing to check balance.
— Joining Sunflower Motifs to Diamond Granny Panels :
Info :
Lay out the runner: diamond granny panels form the negative space between sunflowers: the layout in the image alternates sunflower - diamond - sunflower - diamond - sunflower forming a long column. Use slip stitch joins at scallop points or sew with yarn needle for a stronger join. We provide both options; choose what suits your table use.
Round 1 :
Align scalloped edge of sunflower with corner of diamond granny. Use slip stitch join: with cream yarn and wrong sides together, insert hook through loop of scallop and corresponding ch-loop on diamond, sl st to join; continue around 4–6 connection points per sunflower to secure evenly.
Round 2 :
After slip stitching, reinforce joins on the back with a yarn needle and long tail by sewing through corresponding stitches in a ladder stitch fashion — helps the runner lay flat.
Info :
If you prefer a visible decorative join, use a decorative blanket stitch or surface slip stitch along joins in contrasting green to mimic vine stitching. Keep stitches small to avoid warping the motifs.
— Final Edge & Border Around Completed Runner :
Round 1 :
With cream yarn, join at one corner and ch1, work 1 sc evenly around entire runner edge across motif edges and joins; place 3 sc in corners where diamond points meet to maintain flatness. Keep count approximate but aim for even distribution (work to run entire edge).
Round 2 :
Ch3, *(skip 2 sc, shell (5 dc) in next sc, skip 2 sc, sc in next) across to form scallop border; rep around, adjusting shells at corners to maintain shape.
Round 3 :
Optional picot finish: *(sc in next, ch3, sl st in first ch for picot) between shells around to add crisp points if desired.
Info :
Blocking entire runner after border is critical. Damp-block motifs pinned to shape; allow to dry fully to set scallops and petal curves. Use mild spray starch on petals only if you want them to remain upright permanently.
— Final Assembly & Finishing Touches :
Round 1 :
Weave in all ends from motifs into nearby stitches with yarn needle. On the back, trim tails close after weaving 2–3in to secure.
Round 2 :
Pin runner flat to a blocking board large enough for your final dimensions and allow to dry overnight. Reposition any petals and leaves so they fall naturally outward.
Info :
To strengthen the runner for heavy items (vases, teapots), you may apply a thin fabric stiffener to the underside only, or back with a thin layer of interfacing before final assembly. Do not over-stiffen petals — they are meant to be soft and tactile.
Round 3 :
Final inspection: check all joins for loose stitches and reinforce if needed. Hang or lay flat on table and enjoy.
This sunflower table runner brings sunshine to any table with layered petals, crisp diamond panels and lively leaves. Each motif is a mini project in itself — a lovely break between larger projects. As you join the pieces, you’ll see the runner grow into a warm, welcoming centerpiece that feels both vintage and fresh. I hope this pattern inspires you to create a bright table accent that brings joy every time you walk past it. 🌻🧶