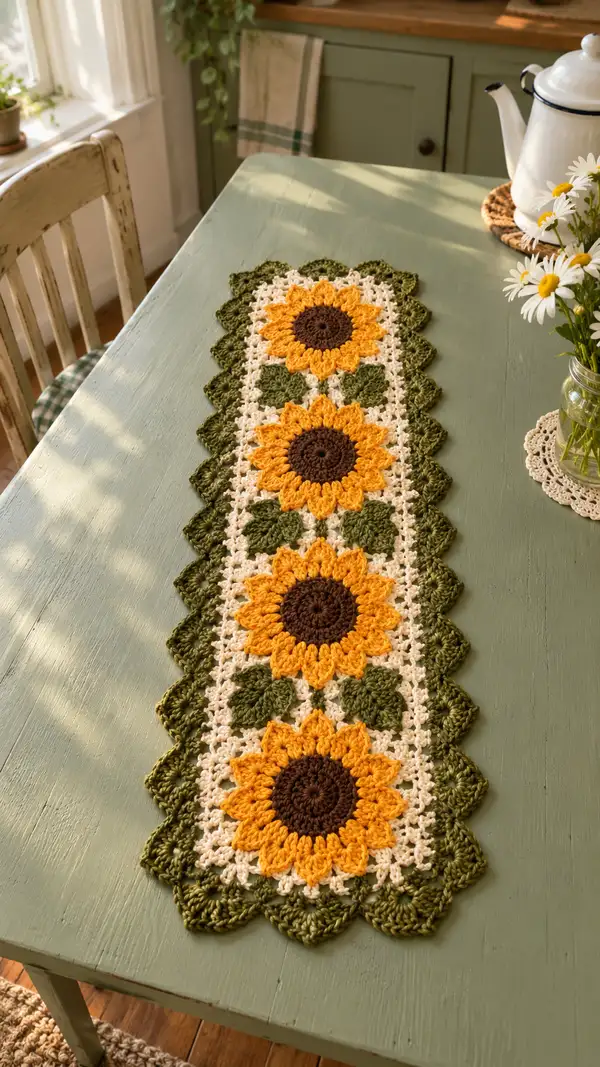
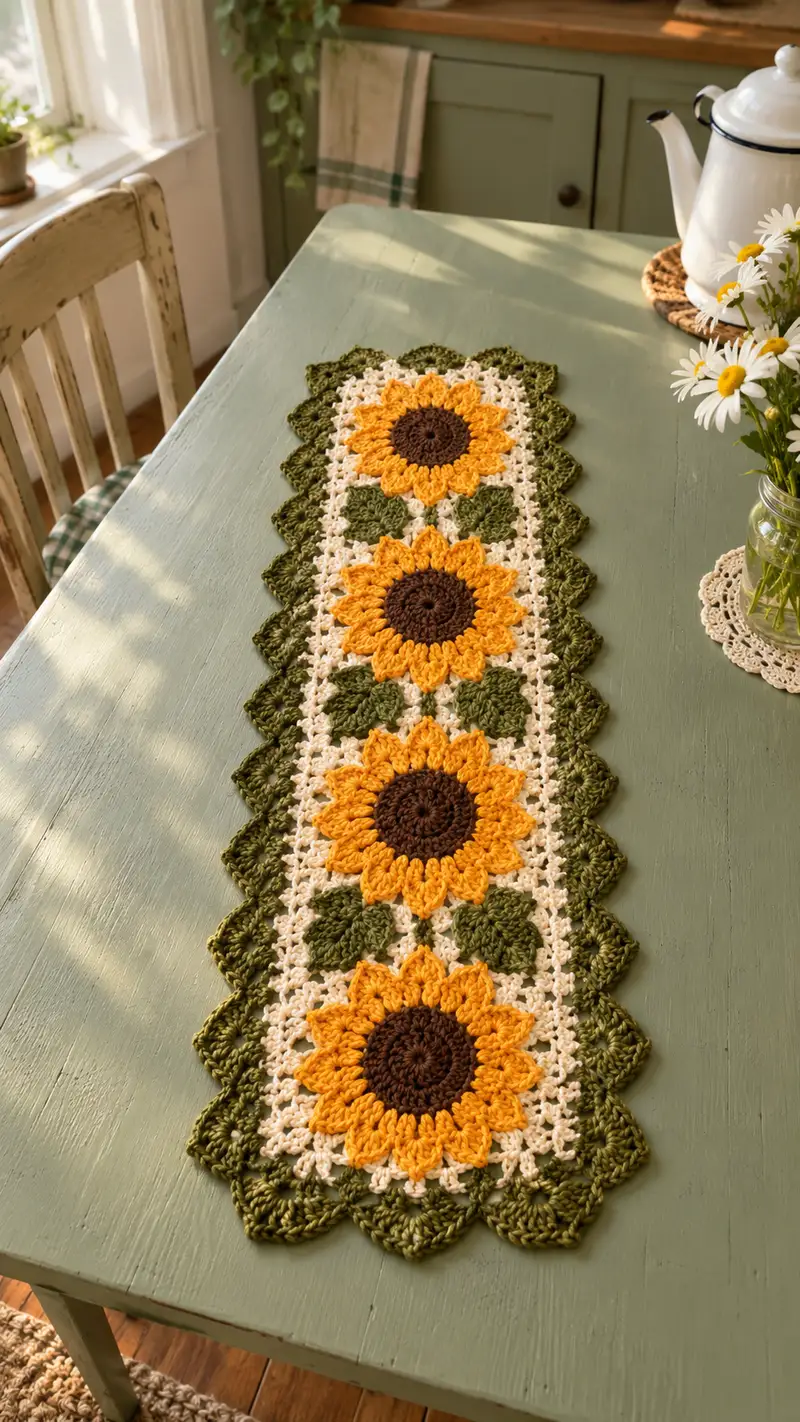
Bring sunshine to your table with this crocheted sunflower runner featuring three bold sunflower motifs, leafy diamond connectors, and a scalloped green border. Worked in modular square motifs with join-as-you-go construction, it combines textured sunflower petals, a warm brown center, soft cream background, and leafy green edging for a vintage farmhouse look. Perfect for brightening a kitchen table, sideboard, or windowsill. The pattern is modular and easy to size up or down to fit your space.
Progress Tracker
0% Complete
— Sunflower Center (make 3) :
Round 1 :
6 sc in magic ring (6)
Round 3 :
(1 sc, 1 inc) x 6 (18)
Round 4 :
(2 sc, 1 inc) x 6 (24)
Round 5 :
(3 sc, 1 inc) x 6 (30)
Round 6 :
(4 sc, 1 inc) x 6 (36)
Info :
Work centers in chocolate brown. Keep tension slightly firm so the center holds the petals. Use a 3.5mm hook if your yarn is particularly soft to reduce gaping.
Round 7 :
1 sc in each st around (36)
Round 8 :
1 sc in each st around (36)
Info :
Fasten off brown. Weave tail toward the back of the circle and leave long tail if you prefer to tack center to square later; otherwise fasten and weave in securely.
— Petals (attach to center, make 3) :
Info :
Join golden yellow in any stitch on the outer round. For 12 petals, we will work petals anchored to every 3rd stitch; the center has 36 sts so the math divides evenly (36/12=3).
Round 1 :
Join in yellow with sl st, *ch1, sc in next st, ch2, (dc,dc,dc) in next st, ch2, sc in next st, sl st in next st; rep from * 11 more times (work will create 12 petals around) (36 anchor points used)
Info :
The instructions above use groups of 3 anchor stitches: the petal cluster sits on the middle anchor. The slip stitch between petals secures spacing. Count clusters to ensure you have 12 petals.
Round 2 :
Working around petals: *ch1, sc evenly around the base of the petal pushing clusters up to create three-dimensional petals; in the sl st anchor, work 1 sc; rep from * around (36)
Round 3 :
Optional texture row: *in the space between petals, work (hdc, dc, hdc) to add a shallow ridge behind petals; sc in anchor stitches; rep around (36)
Info :
Use a lighter hand on the petals so they remain fluffy. If you prefer flatter petals, substitute 2 dc clusters instead of 3 dc clusters in Round 1.
— Petal Finishing and Blocking :
Info :
After finishing petals, lightly wet-block each sunflower motif to open petals and flatten the center. Pin the motif to a circular shape, smoothing petals outward. Let dry fully before adding background rounds.
— Leaf Diamond Motif (make 2 between each sunflower) :
Round 1 :
With green, ch6, join with sl st to form loop, ch3 (counts as first dc), 11 dc into loop, join with sl st to top of ch3 (12 dc total) (12)
Round 2 :
Ch1, sc in same st, *ch2, skip next dc, sc in next dc; rep around to create spaced arches; end with sl st to first sc (12 sc anchors, 12 ch-2 spaces)
Round 3 :
In each ch-2 sp: (sc, hdc, dc, hdc, sc) to form a mini leaf fan; sl st to join (12 mini leaf fans)
Round 4 :
Turn diamond into a quatrefoil connector: ch3, dc in same st, *sk fan, 3 dc in next fan; rep across; sl st to join (36 dc anchors)
Info :
Leaf diamonds are slightly smaller than sunflower squares and will be joined in the lattice spaces between sunflower squares. Block gently to stabilize shape before join-as-you-go.
— Background Square (make 3, one around each sunflower) :
Info :
We will convert the round sunflower motif into a square by working alternating chain spaces and shells in cream. The finished square is designed to be a vertical rectangle when joined; each square measures approximately 8.5" x 8.5" using worsted yarn and 4.0mm hook. Adjust hook if your gauge differs.
Round 1 :
Join cream to any outer anchor stitch (sl st), ch3 (counts as dc), dc in same stitch, *ch2, sk 2 anchors, (2 dc, ch2, 2 dc) in next anchor to form corner; rep around placing four corners spaced evenly (corners created every 9 anchors) (this round creates 4 corner shells and side anchors)
Round 2 :
Ch3, dc in next st, *dc in each dc along to corner, (2 dc, ch2, 2 dc) in corner ch-2 sp; rep around, sl st to top of ch3
Round 3 :
Ch1, sc in each dc across sides, sc in each dc of corner groups (this tidies sides) (count will depend on how many dc per side, aim for square edges ~28-30 sc per side)
Info :
We are aiming to create a smooth square that frames the sunflower and provides regular points for join-as-you-go. If your sides are too short or long, adjust Round 2 by adding or removing a dc in each side to reach even sides.
Round 4 :
Working in cream: *ch3 (counts as first dc), sk 2 sc, (dc, ch2, dc) in corner sc to keep corners, continue alternating shells and chain spaces along sides to build a lacy lattice edge; sl st to join
Round 5 :
Optional Openwork Round: ch1, sc across anchors and in ch-3 spaces work (ch3, sl st in next ch-3) to make openwork; fasten off and weave ends (square now measures target size)
Info :
If your sunflower petals extend beyond the square boundary visually, you can trim petal edges slightly by tucking back or blocking. The petals should peek over the square for a layered look.
— Joining Squares (Join-As-You-Go Vertical Strip) :
Info :
You will join sunflower squares with leaf diamond motifs between them using join-as-you-go (JAYG). Work the first sunflower square completely. For the second square, join on the last round at designated side and corner points; use slip-stitch joins to create a neat seam.
Round 1 (first join) :
Place first square face up; align second square on top so sides match. With cream, on the last round of the second square, when you reach the joining edge, perform: *sl st into corresponding ch-3 sp of first square, ch3 (counts as dc) into second square, continue around joining side every shell or ch-3 sp; when corner is reached, join corner to corner with sl st, repeat on other side* until second square is attached along one side (seam will be flat)
Round 2 :
After joining the two sunflower squares vertically, work leaf diamond placement: position a leaf diamond in the gap between squares and join its tips to the cream lattice of both squares using sl st in the leaf tip st to square ch-3 spaces (use 3 sl st points per leaf to secure)
Info :
Repeat this joining method for the third sunflower square. The runner in the photo features three sunflower squares separated by two leaf diamonds. If you want a longer runner, keep adding squares and diamonds in the same sequence.
— Narrow Lattice Fill Rows (Top and Bottom of Each Square Strip) :
Round 1 :
With cream, along the long sides of the strip, work a row of mesh to equalize edge height: attach in side ch-3 sp with (ch4, sc in next side ch-3 sp) across the full length. This creates chain loops for the scalloped edging to attach to later (count will depend on number of side ch-3 spaces; approx 70-78 ch-loops total for 3 squares)
Info :
Ensure your chain loops line up: pin the runner on blocking board to measure even spacing between loops. This will make the scalloped border lay flat when added.
— Green Scalloped Border (Edging Around Full Runner) :
Round 1 :
Join green at a corner. Working into the chain loop row along the long side: *sl st into loop, ch1, (sc, hdc, 3 dc, hdc, sc) in same loop (large scallop shell), skip next loop, sl st in next loop; rep along side to corner* (create large 6-stitch shells spaced by skipped loops)
Info :
The scallops should align with the petals visually; adjust shell width if your gauge makes scallops too tight or too loose. The photo shows elongated scallops producing a soft wave edge.
Round 2 :
At corners: work (sc, ch2, sc) to round corner smoothly and continue shells along adjacent side. On the short ends of the runner, work smaller shells to mirror the triangular scalloped points in the photo: *sl st, (sc, 2 dc, sc) in corner loops* to produce diamond-like points.
Round 3 :
Optional Textured Ridge: With same green, work 1 sc in each base stitch behind the scallops to add a raised edge (work into back loops only where possible) to stabilize the scallops (total stitches depend on scallop count)
Info :
The photo shows a pronounced scalloped lattice with pointed diamonds at the runner ends. To recreate this, execute a final picot or ch3 loop at the top of each scallop: after each shell, ch3, sl st in top of shell to create a small peak.
— Decorative Detail: Small Leaves into Outer Lattice :
Round 1 :
With green, pick every other scallop valley and work a small leaf: in chosen valley, sl st, ch3, (sc, hdc, dc, hdc, sc) in same valley; sl st to secure (creates small leaves along inside edge)
Info :
These small leaves echo the larger diamond leaves between sunflowers and add visual continuity. Use fewer leaves for a subtler look or place them symmetrically for a balanced feel.
— Final Round: Clean Edge and Weave In :
Round 1 :
With cream or green, sc evenly around entire runner in back loops only to give a finished ridge: sc in each stitch (approximate final count will depend on scallop density; expect 220-260 sc for full perimeter)
Info :
Work this final ridge to hide join threads and to create a neat border. Fasten off and weave all ends to the wrong side, trimming neatly.
— Blocking and Finishing Touches :
Info :
Lightly steam or wet-block the entire runner pinned to the final shape. Ensure scallops and diamond points are evenly spaced and symmetrical. Use rust-proof pins and let dry 24 hours. After blocking, check joins and add any extra whip stitches where seams need reinforcement.
Info :
If you want a stiffer runner for decorative use only, spray with diluted fabric stiffener or starch and allow to dry pinned. For table use, machine wash is not recommended; spot clean gently.
— Variations and Sizing Notes :
Info :
To make a shorter runner use two sunflower squares; to make a longer runner add additional sunflower squares and leaf diamonds repeating the established join pattern. Swap colorways: try burgundy petals and sage border for an autumnal table runner.
Info :
If using a thicker yarn (chunky), use a larger hook and reduce the number of rounds for background squares to prevent an overly bulky runner. Conversely, for a smaller, more delicate runner use sport weight yarn and a 3.5mm hook, expect the runner to shrink proportionally.
This sunflower table runner brings warmth and vintage charm to any table with its layered petals and leafy diamonds. Each modular motif comes together into a graceful, scalloped-edged centerpiece you can be proud of. Enjoy the slow, satisfying progress of petals, lace, and scallops as your runner grows row by row. 🧶💛 Display with fresh flowers and a cup of tea for the perfect cozy moment. Happy stitching! 🌻