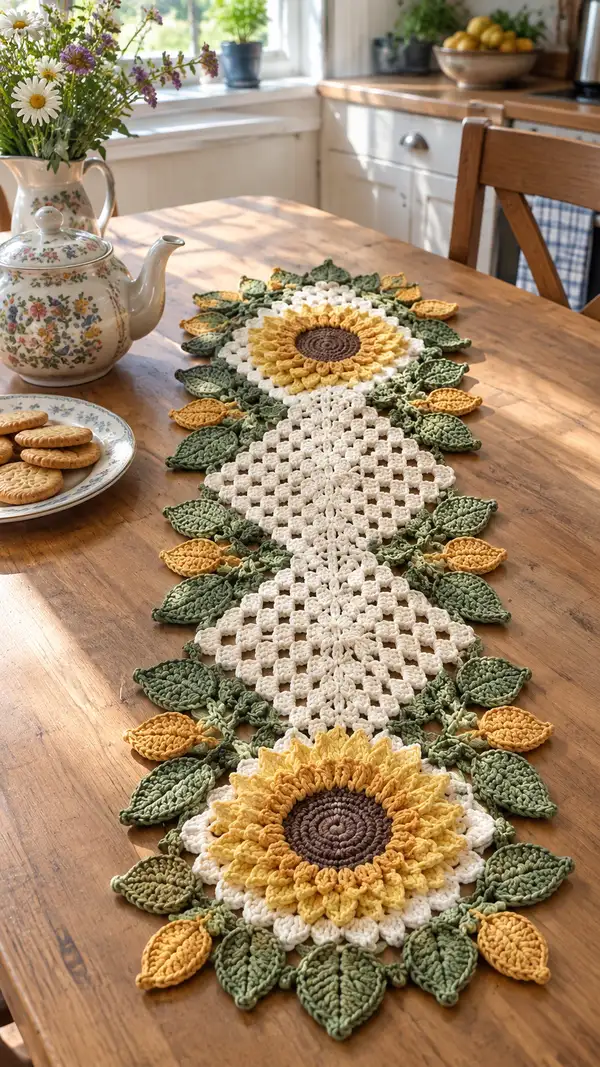
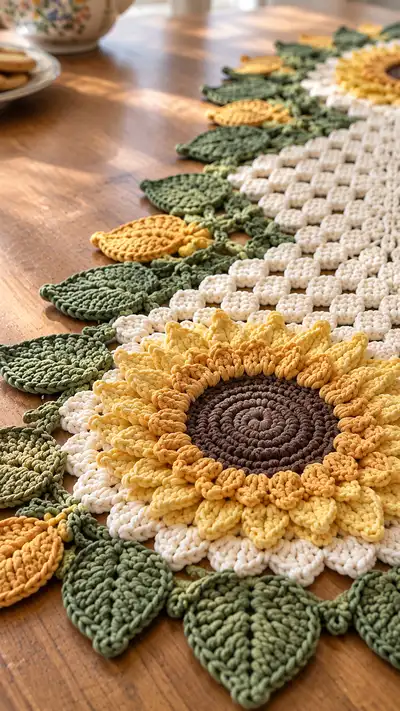
Bring sunshine to your table with this detailed sunflower table runner. The design features two large 3D sunflower motifs at each end, three diamond granny mesh panels down the center, and layered green and golden leaves along the edges. Textured petals, raised centers, and delicate buds create a vintage farmhouse look—perfect for spring and summer table decor.
Progress Tracker
0% Complete
— Materials & Gauge :
Info :
Gauge: 14 sc x 16 rows = 10cm in worsted cotton yarn using 4.5mm hook. Gauge is not critical for decorative runner but will affect final size; check the sunflower center gauge to ensure petals align.
— Sunflower Motif (Make 2: one for each end) :
Round 1 :
Using brown yarn. Make a magic ring, 6 sc in magic ring (6)
Round 3 :
(1 sc, 1 inc) x 6 (18)
Round 4 :
(2 sc, 1 inc) x 6 (24)
Round 5 :
(3 sc, 1 inc) x 6 (30)
Round 6 :
(4 sc, 1 inc) x 6 (36)
Round 7 :
(5 sc, 1 inc) x 6 (42)
Round 8 :
(6 sc, 1 inc) x 6 (48)
Info :
The brown center is worked flat in the round. Keep stitches loose enough to lie flat but firm enough that the puff petal layer will attach neatly. Use a stitch marker at the first stitch of each round for tracking.
Round 9 :
(7 sc, 1 inc) x 6 (54)
Round 10 :
(8 sc, 1 inc) x 6 (60)
Round 11-12 :
1 sc in each st (60)
Info :
Slip st to finish round 12. Fasten off brown and weave in tail on the back. The brown center should measure approximately 8-9 cm across depending on yarn. If it is smaller or larger, adjust rounds 11-12 to make it flatter.
Round 13 :
Change to mustard yellow (first petal layer). Join with sl st to any stitch on outer round (60). Ch 1, sc in same st, *ch 2, skip 2 sts, sc in next st; rep around to make 20 petal base spaces (20 ch-2 loops)*. End with sl st to first sc (20 ch-2 loops)
Round 14 :
Working into each ch-2 loop to make puff petals: *[yarn over, insert hook in ch-2 loop, yarn over and pull up loop] 4 times (9 loops on hook), yarn over and pull through all loops, ch 1 to close puff, sl st to base of puff; ch 1, skip next sc; rep around to create 20 puff petals (20 puffs)
Info :
Keep puff cluster tension consistent. Use your finger to push puffs outward as you make them for a nice sunflower curve. If puffs appear tall, work them into next round to flatten slightly.
Round 15 :
Sl st to the back of the first puff to anchor. Ch 1, *sc between puffs (in skipped sc), ch 3, sc between next two puffs; rep around making 20 ch-3 eyelets. Sl st to first sc (20 ch-3 loops)
Round 16 :
Change to lighter yellow. Work into each ch-3 loop: *Ch 2, [3 dc in loop, ch 1] x 1 to make elongated petal base, sl st to next sc anchor; rep around forming 20 elongated petals (20)
Round 17 :
Turn petals outward by working behind each elongated petal: attach yarn at base of a petal on back side, ch 2, (3 dc, ch 2, 3 dc) into the ch-1 space of that petal to form a fuller petal; sl st to next petal base; rep for all 20 petals creating a double layer (20 larger petals)
Info :
Use a smaller hook (4.0mm) for the next decorative rounds to make the petal tips firmer and sculpted. Fold petals slightly and steam lightly after finishing to shape. Place one stitch marker at the midpoint between every third petal to help orient when joining to white scallop base.
Round 19 :
Change to white/cream for scalloped petal base. Join with sl st to the top of a petal base on the outer edge, ch 1, *sc around the base for two stitches, ch 3, skip to the next designated base stitch; rep around making 20 ch-3 scallop loops (20)
Round 20 :
In each ch-3 loop work 5 dc cluster to create a scallop: *5 dc in ch-3, sl st to next sc base; rep around (20 scallops)
Round 21 :
1 sc in each st around the scalloped edge to tidy and add a small ridge (approximately 60 sc depending on spacing)
Info :
Check the sunflower motif diameter now against the intended runner width. Each sunflower should be approximately 20-22 cm in diameter before leaf attachment. If yours is significantly larger, consider omitting one outer scallop round or using a slightly larger hook for the cream rounds.
Round 23 :
Finish petal top details: Using lighter yellow, work picot tips to each of the 20 larger petals—attach yarn at petal tip back loop, ch 3, sl st in third ch to create a picot, sl st back to base and tie off. Repeat for all petals (20 picots)
Round 24 :
Weave in ends on the back. Block sunflower motif lightly by pinning petals outward on blocking mat and steaming gently. Let dry.
Info :
Make two identical sunflower motifs. Keep one aside for each end of the runner. Make sure petals are blocked in the same orientation so the runner looks symmetrical when joined.
— Diamond Granny Panel (Make 3 panels and join lengthwise) :
Round 1 :
Using cream yarn. Ch 6, sl st to form a ring, ch 3 (counts as dc), 2 dc in ring, ch 2, *3 dc in ring; rep 3 times to make 4 clusters separated by ch-2 corners. Sl st to top of turning ch (12 dc total clusters)
Round 2 :
Ch 3, turn work to start first corner: (3 dc, ch 2, 3 dc) into each ch-2 corner space, in spaces between clusters work (3 dc) in the top of center dc. Continue around making 8 corner shell spaces total. Sl st to top of first ch-3 (approximately 36 dc)
Round 3-6 :
Continue building the diamond by repeating round 2, adding shells on each side to expand the square shape until you reach a diamond approximately 18-20 cm across when measured corner-to-corner. Aim for 6 rounds of expansion to create a medium diamond; typical stitch count by round 6 will be approx 9 shells per side (varies by yarn).
Info :
Work these panels flat and block them to the same size. The three panels will be sewn together with joining chains; use identical hook and tension to keep dimensions uniform.
Round 7 :
After desired size is reached, add a tidy border: working in BLO, 1 sc in each dc and (1 sc, ch 1, 1 sc) in each corner ch-2 space to maintain a clean edge. Fasten off and weave in ends.
Round 8 :
Make three identical diamond panels. Block so the center runner panels sit flat and measure the full desired runner length when laid end to end with spacing for joining vines and leaves between them.
— Large Leaf (Make 18-20 depending on layout) :
Round 1 :
Using sage green. Ch 12, sc in 2nd ch from hook and across (11 sc). This is the foundation for a pointed leaf. (11)
Round 2 :
Ch 1, turn, sc in first 3 sts, hdc in next 3 sts, dc in next 2 sts, hdc in next 2 sts, sc in last st. This builds increasing shape (11)
Round 3 :
Working along edge: ch 1, sc evenly along edge to tip (approx 6 sts), at tip work 3 sc in same st to turn the leaf tip, continue sc back along opposite edge to base. When you reach base, join with sl st to first sc at base. Approx total rounds create 22-24 sc around in final perimeter.
Round 4 :
Now add central vein: Ch 1, working on top surface (FLO) make 1 sc in base, *ch 6, sl st into the center of the leaf near the tip to create a vein loop; rep 2-3 times depending on leaf length*. Secure and weave tail on back.
Info :
For a sculpted cupped leaf, place a small amount of surface stitches at the tip and steam-block with pinning that curves slightly upward. Make at least 18-20 large leaves to fit both sides of runner and sunflower ends.
Round 5 :
Optional: For a more textured leaf, work 2 rows of raised hdc in back loop only along the sides to create a ribbed edge. This will increase perimeter by approx 8-10 sts.
— Small Bud Leaf (Make 16-20) :
Round 1 :
Using mustard/gold. Ch 8, sc in 2nd ch from hook and across (7)
Round 2 :
Ch 1, turn, sc in first 2 sts, hdc in next 2 sts, sc in last 3 sts (7)
Round 3 :
Ch 1, work sc in each st across, then 3 sc in tip to turn, sc back along opposite side, then sl st to base. Fasten off leaving long tail for attaching. These small leaves measure approx 4-5 cm.
Info :
Small bud leaves tuck between larger leaves and sunflower edges for a layered look. Use a few mustard leaves around each sunflower for color contrast.
— Connector Vines & Joining Chains :
Round 1 :
Using olive green, ch 40-60 for vine length between motifs and panels. The exact chain length depends on spacing; hold panels next to each other and chain accordingly so leaves can be attached in natural intervals (approx 40 ch between each diamond panel).
Round 2 :
Turn, sl st back along chain to form a cord approximately 40 sl st long. This cord will be used to sew and attach leaves—make 3-4 cords for redundancy and decoration. Fasten off leaving long tail for sewing.
Info :
Vines are decorative and functional. Sew them along panel joins and sunflower edges to anchor leaves and create the illusion of trailing foliage. Pin the vines first, then tack with whip stitch every 6-8 sts for stability.
— Assembly: Attachment of Motifs and Panels :
Round 1 :
Lay the three diamond granny panels lengthwise on a flat surface with a small overlap (approx 1.5-2 cm) and pin. Place sunflower motifs at each end, oriented so petals slightly overlap the cream panel edges.
Round 2 :
Using matching cream yarn, sew the panel edges together with a whip stitch through both border rounds (see Diamond Panel Round 7 border). Make sure the seams are invisible; stitch every 4-6 sts. Leave central seam slightly flexible for natural drape.
Round 3 :
Attach sunflower motifs to the outer panels by aligning the white scalloped base to the diamond corners. Pin carefully so petals radiate outward from the runner ends. Use long brown yarn tails or matching cream yarn to whip stitch through the base and panel border, sewing every 5 stitches to secure the motif firmly.
Info :
Sew only through the back loops of the scallop base and the border of the diamond panel to keep the top surface smooth. Check alignment frequently and adjust pins before stitching the final few anchors.
Round 4 :
Using olive vine cords, position a cord along each seam between panels to hide join edges. Sew vine in place with small stitches at intervals to hold the cord flat. Attach a mix of large leaves and small bud leaves along the vine by sewing the long tails through vine and panel base. Alternate leaf orientation for a natural feel.
Round 5 :
Attach remaining leaves around sunflower perimeters. Start at the center of the sunflower base and miter outward with a pattern of large leaf - small leaf - leaf bud repeating to the edge. Secure each leaf with a few stitches through its base and vine cord so it sits slightly overlapping the petals.
Info :
When attaching leaves, tip them slightly upward and away from the runner center to create movement and shadow. If a leaf lies flat, add a small tacking stitch near the tip and pull slightly to raise the curve.
— Leaf Veining & Surface Detail :
Round 1 :
With a length of darker green yarn, use surface slip stitch or embroidered backstitch to create a center vein and 3-4 lateral veins on each large leaf. Start from base and stitch toward tip, making short angled veins on both sides.
Round 2 :
Use a lighter thread to add small raised ridges or french knot-like bobble stitches near the leaf base for realistic texture. Secure each knot underneath and weave tail to back.
Info :
Surface work should be subtle; don't overfill leaf with embroidery. A few well-placed stitches create a convincing veined look and add to the handmade charm.
— Edging & Final Border :
Round 1 :
Using cream yarn, add a unifying border around the entire runner. Attach yarn at a corner near a sunflower petal base, ch 1, sc evenly around the runner edge (including around petal scallops and leaf tips). Approximate stitch count will vary; aim for 1 sc per approx 0.5 cm of edge.
Round 2 :
Edge scallops: *in every 6th sc work (sc, ch 3, sc) to create a small loop; skip next sc; rep around to create decorative picot-like loops. Sl st to first sc and fasten off.
Round 3 :
Optional: Add small single crochet bobbles between leaf clusters in olive green to echo vine nodes. Work (sc, ch 3, sc) into selected border points for balance and decoration. Fasten off and weave in all ends on the back.
Info :
Once edging is applied, block the entire runner to set shape. Pin all leaf tips and petal edges in desired positions and lightly steam the surface to relax and hold curves. Allow to dry fully before use.
— Finishing Touches & Care :
Round 1 :
Trim any visible yarn tails and weave all ends securely to the back using a yarn needle. Snip close to weave but leave a small tail tucked for stability.
Round 2 :
Care: Hand wash in cool water with mild soap, reshape and lay flat to dry. Cotton will relax slightly when wet; re-block if necessary to restore crisp petal edges.
Info :
Place a thin non-slip pad under runner if used on polished furniture to prevent sliding. Avoid direct heat on cotton motifs to preserve color and texture.
This sunflower table runner brings sunshine indoors and creates a warm focal point for any table. The layered petals and sculpted leaves give a charming, heirloom feel, perfect for seasonal decorating or gifting. Each crochet section is satisfying to make and the modular construction makes assembly easy and fun. 🧶🌻 Enjoy the process and share your beautiful finished piece — it will brighten every mealtime. ✨