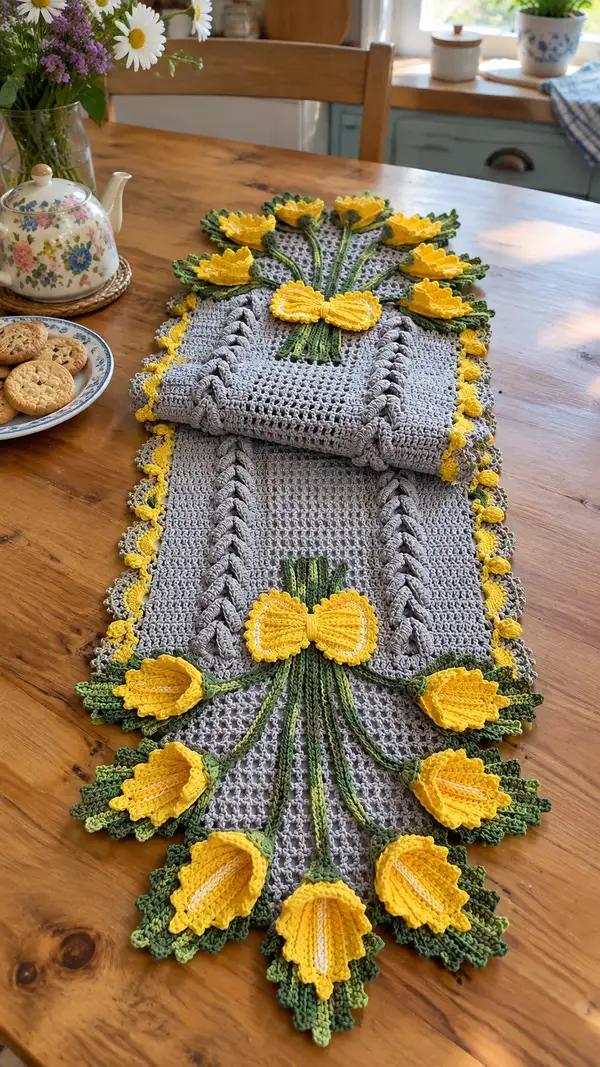
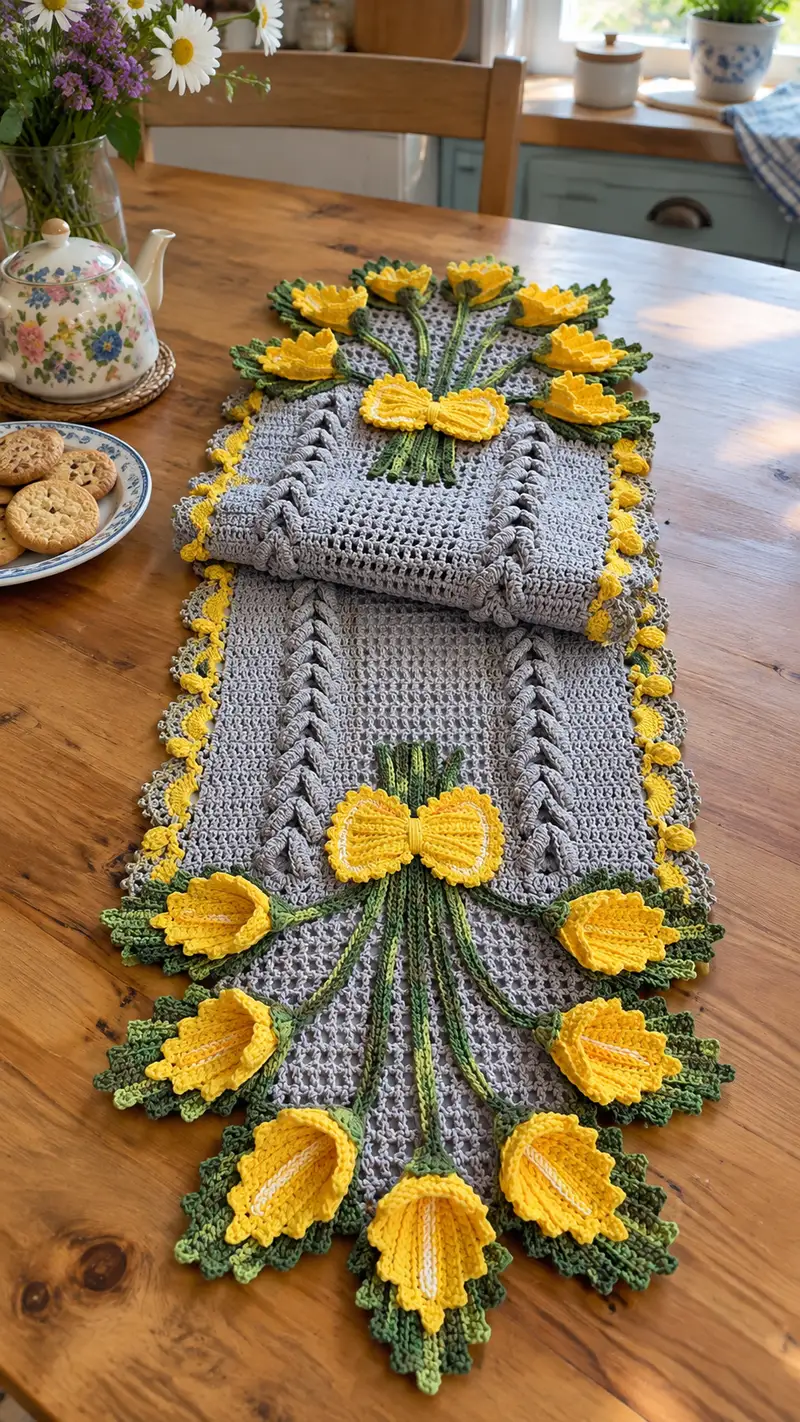
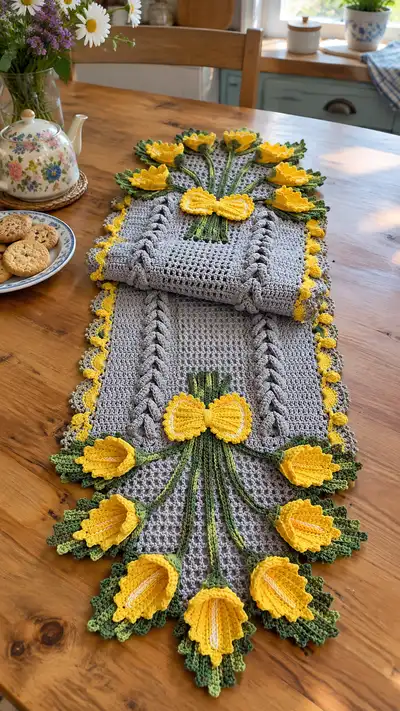
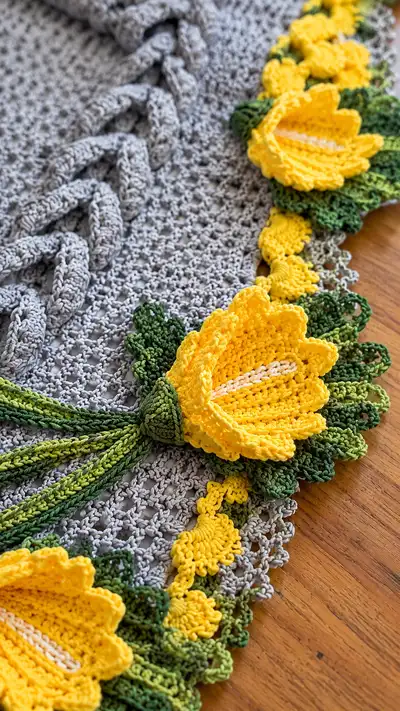
A charming crocheted table runner featuring a soft grey lace panel, braided cable accents and bright yellow tulip appliques with layered green leaves. This pattern creates an elegant centerpiece with dimensional flowers and a scalloped yellow edge—perfect for spring or anytime you want a cheery table accent. Detailed instructions guide you step-by-step through panel construction, braided cords, tulip petals, leaves, stems and finishing touches.
Progress Tracker
0% Complete
— Materials & Gauge :
Info :
Gauge: 18 dc and 10 rows = 4 inches (10 cm) using worsted weight cotton and 3.5mm hook in a simple swatch. Gauge is approximate; runner sizing will change proportionally with gauge.
— Main Panel (Make 1 flat panel):
Row 1 :
With main color (grey), ch 132, dc in 4th ch from hook (counts as dc + ch-2 turning), dc in each ch across. (130 dc)
Row 2 :
Ch 3 (counts as dc), turn, dc in next st and across to last st, dc in top of turning ch. (130 dc)
Row 3 :
Ch 3, turn, *dc in next 3 sts, ch 1, sk 1, dc in next 2 sts*, rep from * to * across, ending with dc to last stitch. This begins a subtle mesh/cross for lace. (still 130 dc and mesh spaces)
Row 4 :
Ch 3, turn, dc in each dc and ch-1 space across maintaining the pattern established. (130 dc)
Row 5 :
Ch 3, turn, dc in next 2 sts, (ch1, sk1, dc in next 2 sts) across; work to edge. This alternates mesh placement and creates the ground for cable placement. (130 dc)
Info :
Place two stitch markers to mark the cable panel edges: measure in 20 sts from each short edge to locate start of left and right cable areas. These markers help align braided cables later when sewing.
Row 6-8 :
Repeat Row 4 (even rows) three times to stabilize the lace ground. (130 dc)
Row 9 :
Ch 3, turn, dc in next 10 sts, place marker at next st as cable panel center start, dc across until 10 sts remain from opposite edge, dc in final 10 sts. The center section will carry the main lace repeat; maintain counts. (130 dc)
Row 10-15 :
Work pattern: ch 3, turn, dc across in established mesh motif, keeping marked stitches visible. Continue until panel reaches desired length. For this runner, work 36 rows total for a medium-length runner repeat (rows 1-36). (130 dc each row)
Info :
Block the main panel lightly once you reach row 36; this helps smooth the lace and set the edges before attaching braids and flowers. Use pins to square the panel and damp block if using cotton yarn.
Row 16-36 :
Repeat Rows 4-10 motif to complete rows 16 through 36. Keep tension consistent and keep the stitch markers for cable placement. (130 dc each row)
Info :
If you desire a longer runner, continue in pattern in multiples of 4 rows to extend length before finishing edge rows. Keep the same count (130 dc).
— Cable Braid Panel (Make 2 identical braids then attach):
Info :
Each braid is crocheted as a 4-strand chain tube that will be interlaced and sewn to the panel. Tubular cords are made by crocheting around a foundation chain to form a firm I-cord. Make two braids for the central lane, each measuring approximately the length of the runner minus 6 inches to allow splaying of flower stems.
Round 1 :
With grey, ch 72. Join to first ch with sl st to form a ring being careful not to twist. (72 ch)
Round 2 :
Ch 1, sc in each ch around working through both loops to create a tube; do not join, sl st to first sc to close. (72 sc)
Round 3 :
Ch 1, sc in each st around in continuous spiral for 10 more rounds to create thickness. (72 sc)
Round 4-12 :
Continue sc in each st around (72 sc) until cord reaches about 12-14 inches long; make four cords like this to braid later. (72 sc each round)
Info :
Make four tubular cords of equal length for each braided panel. Use stitch markers at the start of each tube if working in spiral to track starting point. Use a smaller hook (3.0mm) if your tube is too loose.
Round 13 :
Fasten off leaving long tails for sewing and joining ends later. Create four tubes total per braid (so 8 tubes total). Flatten each tube and weave the ends through the next tube with the tails to prepare for weaving into a braid.
Info :
Braid technique: pin the four cords vertically on the panel, then weave them into the classic 4-strand braid: move strand 1 over strand 2, strand 4 under strand 3, repeat alternating until braided length matches panel. Secure with whipping stitches at both ends using matching yarn tails.
Round 14 :
Sew braid onto the main panel aligning with the markers placed at Row 5. Use long tails and mattress or whip stitch to attach along the full braided length, sewing through the back of the braid and into the panel edge stitches. Secure with several passes. (Attachment, no stitch count)
Info :
Ensure the braid sits slightly raised above the panel. Do not pull too tight when sewing; keep a small ridge for dimensional texture. Repeat for second cable on the opposite side, mirrored placement.
— Tulip Petal Cup (Make 10 flowers: 6 large, 4 small variation):
Info :
Each tulip is made from layered petals worked in rows to form a cup. There is an inner stamen strip in cream, a base petal layer in yellow, and an outer scalloped petal layer in yellow. Use 3.0mm hook for crisp petals. For large tulips use the large petal counts below; for small ones reduce foundation chain and some repeats.
Round 1 :
With cream, ch 18, hdc in 2nd ch from hook and across to end. Turn and work 2 rows total to create a narrow stamen strip. (16 hdc)
Round 2 :
Fasten off cream leaving long tail for sewing into center of petal cup. With yellow, join at one end of the cream strip to begin inner petal layer.
Round 3 :
Inner Petal Layer Start: ch 1, sc evenly along length of cream strip working into the ends and loops to form a closed oval cup base. Aim for 34 sc around total. (34 sc)
Round 4 :
(1 sc, inc) x 11, 1 sc in remaining 12 sts to smooth corner increases (45 sc). This rounds out the cup shape.
Round 5 :
Ch 2 (counts as hdc), hdc in next st, *dc in next 2 sts, tr in next st, dc in next 2 sts, hdc in next st* across to form petal ridges. (45 sts across shaped into points)
Info :
At this stage shape each petal by pulling the stitch cluster slightly outward before finishing the stitch. Use minimal stuffing if you want petals to cup outwards. For large petals, be gentle with stuffing so petals remain flexible.
Round 6 :
Sc in each st around to secure base of petals; sl st to join. (45 sc)
Round 7 :
Outer Petal Layer Start: Join yellow at base of inner petals, ch 4, sk 1 st, sc in next, ch 4 sk 1 sc across to create loops for scallops: (ch4, sk1, sc) x 11, finish with sc to close. (11 loops)
Round 8 :
In each ch-4 loop work: sc, hdc, 3 dc, hdc, sc to form a petal scallop. Repeat in each loop. Fasten off leaving tail for sewing. (Each scallop uses 8-9 stitches)
Round 9 :
Optional: Add a decorative picot at each scallop tip by joining with sl st, ch 3, sl st in same st before moving to next scallop for a crisp scalloped edge around the petals.
Info :
For small tulips, reduce foundation cream chain to 14 and aim for 28 sc in Round 3 and proportionally reduce the scallop loop count to 9 loops. Keep petals smaller and fewer rows.
Round 10 :
Shape the cup by sewing the short ends of the oval base together so the petal layers form a cupped tulip. Use the long tail from earlier to gather and sew a neat seam. Repeat to make 10 tulips (6 large, 4 small).
Info :
When sewing cup, insert a small amount of fiberfill into the base of the cup to keep it rounded if desired. Do not overfill—this will flatten the scallops.
— Leaf Motif (Make 12 large leaves and 12 small filler leaves):
Round 1 :
With dark green, ch 14. Row basis for leaf shaping: sc in 2nd ch from hook and across (13 sc). Turn at end of chain and work along opposite side to close leaf frame: sc in same base st and across back down to start forming an elongated oval (26 sc total around).
Round 2 :
Ch 2, hdc in next 3 sts, dc in next 4 sts, tr in next 3 sts (leaf tip), dc in next 4 sts, hdc in next 3 sts, sl st to start. (26 total shaping stitches)
Round 3 :
FLO: ch 1, sc in each st around working in the FLO to create a textured ridge on one side for dimension. (26 sc)
Round 4 :
Edge picot: *sc in next 2 sts, picot (ch3, sl st to first ch)* rep around to form scalloped leaf edge. Fasten off. (approx. 9 picots depending on counts)
Info :
For two-tone leaves, switch to a lighter green on the last round and work picot edge in lighter shade to mimic variegation from the photograph. Block lightly to shape leaf tips upward.
Round 5 :
For small filler leaves: ch 10, sc around to close (20 sc), shape with hdc and dc on tip and picot edge (fasten off). Make 12 large and 12 small leaves total.
— Stems (Make one for each flower; length varies):
Info :
Stems are crocheted as tubular I-cord style rods to keep them firm and slightly flexible. Use a smaller hook (3.0mm) and green yarn. Make stems in varying lengths to match layout in photo (approx. 8-12 inches each for main flowers, 4-6 inches for edge buds).
Round 1 :
Ch 48, sc in 2nd ch from hook and across to create sturdy cord, sl st to join. (46 sc)
Round 2 :
Work in continuous spiral: sc in each st around for 20 rounds to form a firm tube. (46 sc)
Round 3 :
Tighten tube by pulling a sewing thread through the foundation chain if desired, or fold flat and sew lengthwise to reduce diameter. Fasten off leaving a long tail for sewing to flowers and the panel.
Info :
For a tapered look, decrease every 8th stitch toward the top of the stem in the final 4 rounds to narrow the diameter before attaching to the petal base. Secure all ends and hide tails inside the tube if possible.
— Bow Accent (Make 1):
Round 1 :
With yellow, ch 30, hdc in 2nd ch from hook and across (28 hdc). Turn and work 6 rows even to form a flat rectangular bow loop. Fold into a bow shape and secure center with a short length of yarn wrapped several times around the center to form a bow knot (no stitch count).
Round 2 :
Optional scalloped edge: sc along perimeter, work a picot in each 4th st for decorative edging. Fasten off and stitch bow to center of runner between the two braids as seen in the photo.
Info :
Bow size is adjustable: fewer chains make a smaller bow. Secure tightly so it holds shape when placed on the runner.
— Small Bud Motifs (Make 16):
Round 1 :
With yellow, ch 8, sc in 2nd ch from hook and across to form a small oval (6 sc). Join ends with sl st.
Round 2 :
Join yellow to oval edge, ch 3, 3 dc in next st, ch 3, sl st in next, repeat around to make 6 small scalloped petals. Fasten off and steam-shape lightly.
Info :
These small buds become the yellow scallop border accents. Attach them along the long edges of the runner between the leaves and scalloped edge for a playful fringe.
— Scalloped Yellow Border :
Round 1 :
With yellow, join at one corner of the main panel, ch 1, sc evenly around the entire panel edge placing 3 sc in corner stitches for a smooth turn. Work a row of sc around. (stitch count equals panel perimeter / even distribution)
Round 2 :
Ch 4, *sk 2 sc, sc in next sc* around to create small looped border. Adjust loops to get uniform spacing. (approx 44 loops across long edges and proportionate for short edges)
Round 3 :
In each ch-4 loop work: sc, hdc, 3 dc, hdc, sc to form scallop; fasten off at end of each scallop and join next with a sl st. Repeat around entire runner. (one scallop per loop)
Round 4 :
Work small bud motifs between scallops by sewing one bud to the base of each scallop along the long edges using a few whip stitches. Space buds evenly (approx every other scallop). Fasten off tails securely.
Info :
For a double-tone scallop, after Round 3 join a slightly darker yellow or gold and work a single round of sc along the lower edge of each scallop to add definition before attaching buds.
— Assembly & Attachment :
Info :
Layout all pieces on a flat surface in the order you will attach them: panel down, braided columns pinned to markers, bow in center, stems radiating from bow to flowers, leaves around flowers and smaller buds along edges. Pin pieces before sewing to check composition and spacing.
Round 1 :
Sew braided cable panels onto panel along marked lines using long yarn tails and whip stitch. Take care to keep braid centered with consistent spacing from edge markers (approx 20 sts from each short edge in our panel). Secure ends with several passes and weave tails into the back side of panel.
Round 2 :
Attach stems: Position stems to radiate from the central bow area; tack them down at three points: base, middle and near the flower to ensure a natural curve. Use mattress stitch for invisible joins and knot tails firmly.
Round 3 :
Sew tulip bases to the ends of stems by inserting the stem tail into the base seam of each tulip and stitching through the inner base layer into the stem tube to anchor. Add a few hidden stitches around the petal base for stability. (Attachment step)
Round 4 :
Arrange leaves under each tulip and sew them into place. For a natural look, position one large leaf and one small leaf per tulip slightly overlapping. Use hidden whip stitches to anchor leaf bases to the underside of the petal base and to the panel where a seam will hide them.
Round 5 :
Sew bow in place at the braid center using the long tail to stitch through the runner and secure tightly. Tuck and sew ends of the bow under to hide seam and keep the bow sitting flat.
Info :
Use extra passes where stems meet the panel to prevent pulling. Stitch through both panel and stem tube to lock them in place so stems cannot be tugged loose. Weave in all tails and trim excess yarn flush to the stitches.
— Finishing Touches :
Round 1 :
Gently steam or spray-block the finished runner to set the shapes. Use pins to nudge petals outward if necessary and let air dry fully. This helps scallops sit crisply and the braid settle into a neat ridge.
Round 2 :
If desired, add a small dab of fabric glue inside the petal base where it meets the stem to prevent rotation. Test glue on a scrap first as it is permanent.
Info :
Flip the runner over and inspect reverse side for any loose tails; weave them in neatly. Trim any stray fibers for a clean finish. The runner can be hand washed gently and reshaped while damp. Avoid machine washing if heavy structure or glued pieces were used.
This cheerful tulip runner brings sunshine to any table—handmade texture and bright petals combine for a beautiful centerpiece 🌼. Each carefully placed braid, stem and layered petal adds character and warmth. Enjoy the soothing rhythm of repetitive stitches while assembling a piece you'll be proud to display. Share your creation and brighten someone's day with a thoughtful, handmade accent. Happy crocheting and may your table bloom with color! 🧶🌞