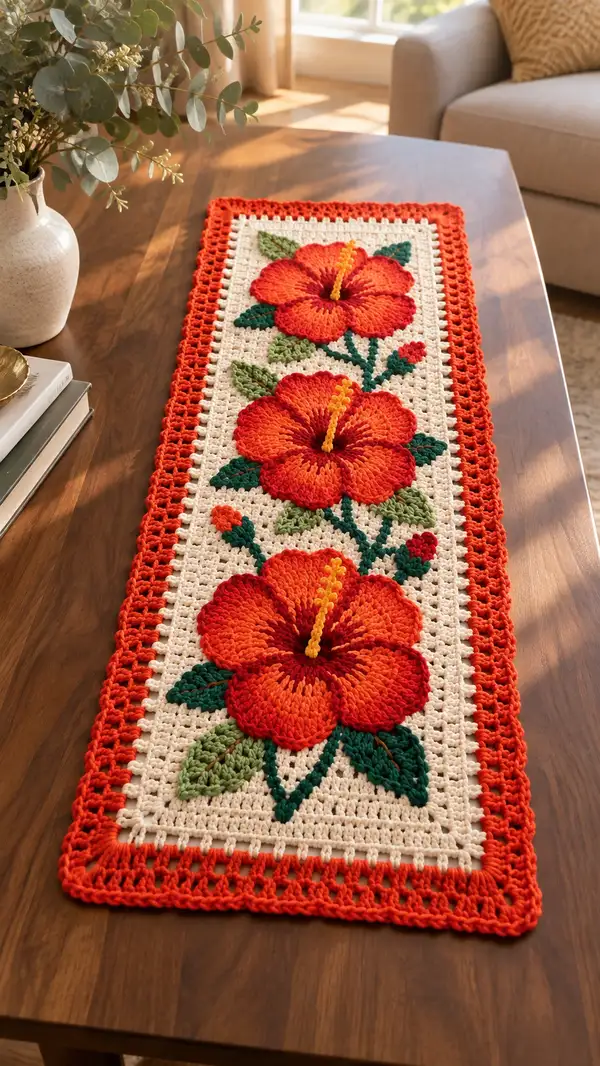
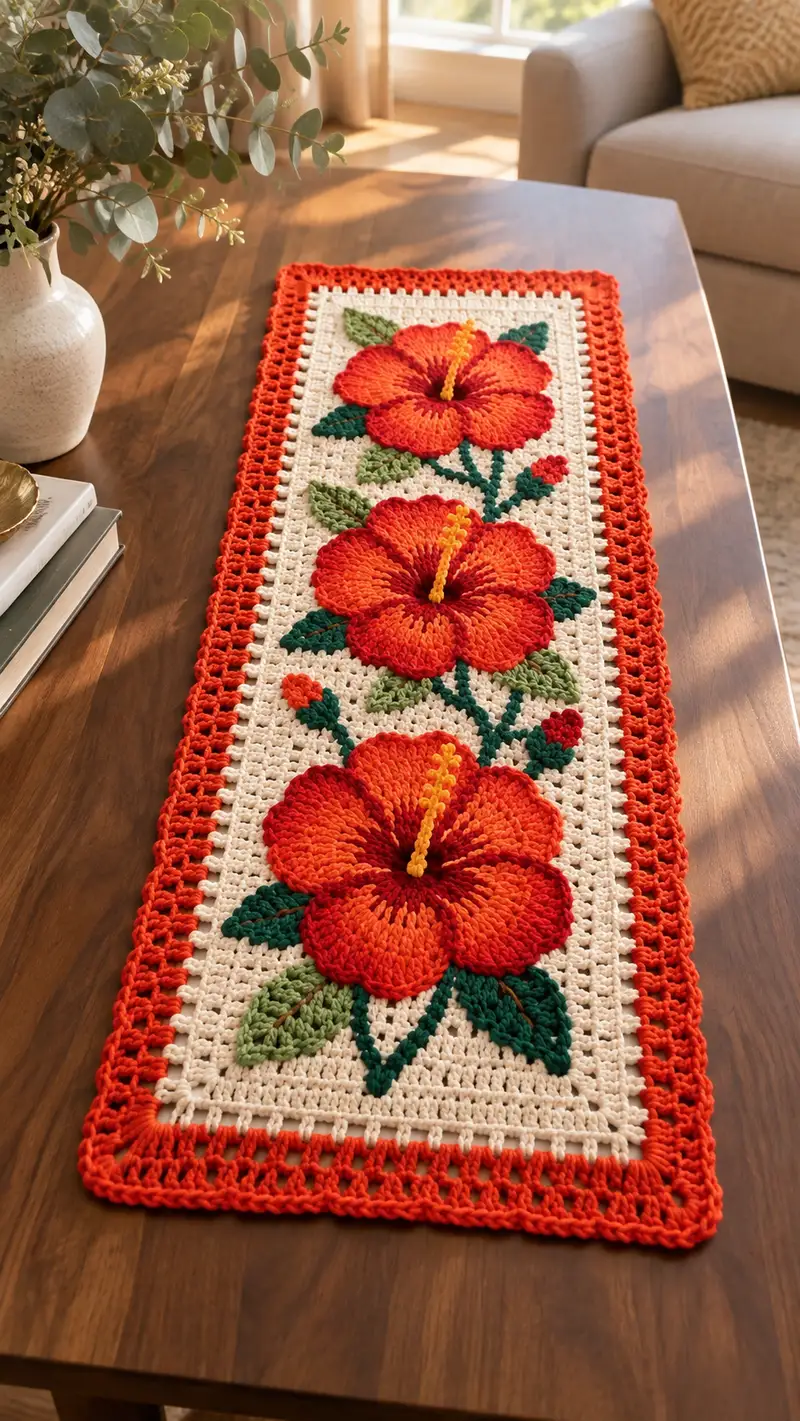
Create a vibrant tropical table runner featuring three large hibiscus appliques in fiery orange and red, set against a soft cream openwork background with a bold orange scalloped border. This pattern combines layered appliques, textured leaves, and a lacy rectangle panel to produce a long statement runner perfect for dining or console tables. Detailed instructions guide you through each petal, leaf, stem and border row for a professional finish.
Progress Tracker
0% Complete
— Materials & Gauge :
Info :
Gauge is not strict for this decorative runner, but for reference: 14 dc x 8 rows = 4 inches in worsted cotton with a 4.0 mm hook. Adjust hook to match your tension and maintain flat panel rows.
Info :
Finished size with the given stitch counts and tension: approximately 36" long x 10.5" wide (before blocking). You can increase foundation chain in multiples of 2 to create a narrower/wider runner while keeping height proportional by adding or subtracting even numbers of panel rows.
— Main Panel (Base Rectangle) :
Foundation :
ch 121 (this is the width; adjust by multiples of 2 if you prefer a different width).
Row 1 :
Join with chosen cream color: dc in 4th ch from hook (counts as first dc) and dc in each ch across—121 dc (121)
Row 2 :
ch 2, turn. 1 dc in each st across (121)
Row 3 :
ch 2, turn. 1 dc in each st across (121)
Row 4 :
ch 2, turn. 1 dc in each st across (121)
Info :
Maintain even tension for each row. Use a stitch marker to mark the first stitch of each row so you can spot count and keep edges straight.
Row 5 :
ch 2, turn. 1 dc in each st across (121)
Row 6 :
ch 2, turn. *1 dc, ch 1; sk next st* repeat across ending last repeat with 1 dc (creates subtle lacy texture); approximate stitch count across remains 121 dc spaces and 60 ch-1 spaces
Row 7 :
ch 2, turn. 1 dc in each dc and ch-1 space across to return to solid row (121)
Row 8 :
ch 2, turn. 1 dc in each st across (121)
Row 9 :
ch 2, turn. *dc in next 3 sts, ch 1, sk 1* repeat across to form a regular openwork grid; total dc placements remain 90 and ch-1 spaces 15 depending on edge corrections
Info :
The openwork rows mimic the background seen in the image and create a lightweight, breathable panel. You will work most of the runner in alternating solid and slightly lacy rows so appliques sit nicely on top.
Row 10 :
ch 2, turn. 1 dc in each st across (121)
Row 11 :
ch 2, turn. 1 dc in each st across (121)
Row 12 :
ch 2, turn. *dc in next 4 sts, ch 1, sk 1* repeat across to continue restful variation (121)
Row 13 :
ch 2, turn. 1 dc in each st across (121)
Info :
At Row 13 you are approaching the first flower placement zone. Note that the runner in the photo shows a pattern of three flowers roughly centered along the length with generous cream margins top and bottom. We'll mark centers for the three flowers at rows 16, 32 and 48 (counting from your foundation row as Row 1).
Row 14 :
ch 2, turn. 1 dc in each st across (121)
Row 15 :
ch 2, turn. 1 dc in each st across (121)
Row 16 :
ch 2, turn. 1 dc in each st across (121) — Flower placement marker: center of first flower sits at this row.
Info :
Place a removable stitch marker in the center stitch at Row 16 to guide sewing of the first hibiscus center. Repeat marking at Rows 32 and 48 for subsequent flowers. If you are customizing spacing, move markers accordingly, keeping equal spacing between flower centers.
Row 17 :
ch 2, turn. *1 dc, ch 1, sk 1* across to keep a balanced texture beneath assembled petals (121)
Row 18 :
ch 2, turn. 1 dc in each st across (121)
Row 19 :
ch 2, turn. 1 dc in each st across (121)
Row 20 :
ch 2, turn. *dc in next 3 sts, ch 1, sk 1* across to maintain airy pattern (121)
Info :
Continue alternating 3-5 solid rows with one lacy row throughout the panel to achieve a similar texture to the photographed runner. Keep your three flower markers visible so you can check placement as you go.
Rows 21-28 :
Repeat Rows 10-17 pattern sequence (1 dc rows with intermittent lacy rows) — maintain 121 stitches across each solid row.
Row 29 :
ch 2, turn. 1 dc in each st across (121)
Row 30 :
ch 2, turn. 1 dc in each st across (121) — Second flower center marker will fall at Row 32
Row 31 :
ch 2, turn. 1 dc in each st across (121)
Row 32 :
ch 2, turn. 1 dc in each st across (121) — Mark this center for second hibiscus
Info :
At this point, block the panel lightly if you choose: wet block or steam block carefully to flatten and open the lacy rows. Blocking helps you position appliques accurately and gives a polished final look. Allow to dry fully before sewing on appliques.
Rows 33-40 :
Repeat the pattern of alternating solid dc rows and lacy rows to Row 40 — 1 dc each row (121)
Row 41 :
ch 2, turn. 1 dc across (121)
Row 42 :
ch 2, turn. 1 dc in each st across (121)
Row 43 :
ch 2, turn. *dc in next 4 sts, ch 1, sk 1* across (repeat motif) (121)
Row 44 :
ch 2, turn. 1 dc in each st across (121)
Info :
Third flower center marker will be placed at Row 48; continue to maintain consistent stitch counts and measure distance between centers to ensure even spacing.
Row 45-47 :
Repeat Rows 40-42 neat solid rows (121 each)
Row 48 :
ch 2, turn. 1 dc in each st across (121) — Mark center stitch for third hibiscus here.
Row 49-60 :
Continue the established solid-and-lacy pattern for additional rows until you reach Row 60 (121 each). Finish with a final solid row at Row 60 for a neat base for border attachment.
Info :
Fasten off cream after Row 60 and weave in ends long enough to be secured to reverse side. Block the entire panel flat on a blocking board for best result. Make sure each flower center marker is visible—these will be reference points for applique placement.
— Flower Applique (Make 3 identical flowers) :
Notes :
Each hibiscus is built from 5 petals worked flat in an increasing fan shape, a small center disc, and a short stamen cord. Petals are worked in two colors to mimic shading: Deep Red at the base and Bright Orange for the outer area. Make 5 petals for each flower and then assemble around the center disc.
— Petal (Make 15 total; 5 petals per flower) :
Round 1 :
Begin with Deep Red: mr, ch 2 (counts as first dc), work 5 dc into ring — join with sl st to first dc. (6)
Round 2 :
Ch 2, turn and work 2 dc in each st around (12)
Round 3 :
Ch 2, turn. (1 dc, inc) x 6 → (18)
Round 4 :
Ch 2, turn. (2 dc, inc) x 6 → (24)
Round 5 :
Ch 2, turn. (3 dc, inc) x 6 → (30)
Info :
These first rounds form the curved base near the flower center. Keep stitches even and work into both loops so the first rows remain flat and fan-shaped.
Round 6 :
Ch 2, turn. (4 dc, inc) x 6 → (36)
Round 7 :
Ch 2, turn. (5 dc, inc) x 6 → (42)
Round 8 :
Ch 2, turn. (6 dc, inc) x 6 → (48)
Round 9 :
Ch 2, turn. 1 dc in each st around (48)
Info :
At Round 9 change color to Bright Orange using invisible join after last dc of Round 9. Carry red tail behind or weave in later. Switching to orange creates the bright outer petal shading visible in the runner.
Round 10 :
Ch 2, turn. 1 dc in each st around in Bright Orange (48)
Round 11 :
Ch 2, turn. (6 dc, inc) x 6 → (54)
Round 12 :
Ch 2, turn. 1 dc in each st around (54)
Round 13 :
Ch 2, turn. (7 dc, inc) x 6 → (60)
Round 14 :
Ch 2, turn. 1 dc in each st around (60)
Info :
If you prefer a larger petal, continue rounds of (n dc, inc) x 6 to expand evenly. The counts above make a petal approximately 3.5" wide when using specified gauge; adjust as desired for proportion.
Round 15 :
Ch 2, turn. Work a scalloped edging: *sk 1 st, 5 dc in next st, sk 1, sl st in next st* repeat around to add ruffled outer edge — expect about 10 scallops depending on counts (approx. 60)
Round 16 :
Info :
Fasten off leaving a 12" tail for sewing each petal to center disc. Make 5 petals per flower. Lightly steam-block each petal flat on a blocking surface to shape scalloped edges if desired and allow to dry.
— Center Disc (Make 3) :
Round 1 :
With Deep Red: mr, 6 sc in ring (6)
Round 2 :
Inc in each st around (12)
Round 3 :
(1 sc, inc) x 6 → (18)
Round 4 :
(2 sc, inc) x 6 → (24)
Round 5 :
1 sc in each st around (24)
Info :
Fasten off leaving long tail for sewing. If you want a slightly raised center, add a tiny bit of polyester fiberfill inside the disc before closing completely.
— Stamen (Make 3) :
Round 1 :
With Golden Yellow, ch 30 (or desired length), sl st back along chain to create a narrow cord—this creates the raised stamen seen in the photograph.
Round 2 :
Fold cord in half and join center with a few stitches to secure; create 2-3 small tufted yellow french knots or surface sl sts near the tip for pollen detail. Fasten off leaving a tail for sewing to center disc.
Info :
Alternatively, create a 3-4 stitch i-cord by working sc in back loops only around a 4-6 ch foundation for a slightly thicker stamen. Sew stamen into center before attaching petals for stability.
— Leaves (Make 6-9 per runner total, assorted sizes) :
Round 1 :
With Olive Green: ch 10, sc in 2nd ch from hook, hdc, 2 dc, hdc, sc across to last ch — this forms the left side curve. Chain 1, turn to work along opposite side: sc, hdc, 2 dc, hdc, sc back into base to mirror the curve; sl st to join. (approx. 18 sts)
Round 2 :
Ch 1, work 1 sc in each st around for a neat border (18)
Round 3 :
Info :
Switch to Dark Teal Green and work a central rib using surface slip stitch or a neat embroidery line with yarn needle to mimic leaf vein. Fasten off and leave long tail for sewing. Make leaves in two sizes: small (as above) and large (ch 14 base and scale increases proportionally to reach approx 22 sts).
— Assembly of Each Flower :
Step 1 :
Arrange 5 petals around the center disc: position the disc in the center and gently overlap petal bases so the petal tips fan out evenly. Pin each petal in place temporarily. The petals should overlap about 8-12 sts at their base so the center covers the joins.
Step 2 :
Using the long tail from the center disc, sew each petal to the disc with mattress or whip stitches through the base of each petal and through the center disc, securing evenly. Use small, neat stitches so sewing is invisible on the flower face. Make sure petal orientation replicates a five-point star arrangement.
Step 3 :
Sew stamen into the center: position the yellow cord (stamen) so it projects from the center and secure with several stitches through the center disc from back to front. Fasten off and hide ends inside disc if you used a small bit of stuffing; otherwise weave tails to the back of the disc and glue for extra stability if necessary.
Info :
Make 3 flowers following the same assembly procedures. Lay them near their placement markers on the blocked panel to confirm spacing and orientation (petal overlap should be relaxed and natural-looking, not too tight).
— Placement & Sewing Flowers to Panel :
Step 1 :
With the cream panel fully blocked and dry, place the first flower center over the marker at Row 16—center it on the width of the runner. Pin through the disc and into the panel at several points to hold in place.
Step 2 :
Using coordinating thread or yarn and a sharp tapestry needle, sew the center disc to the runner with small whip stitches around the disc edge. Then sew through petal bases to anchor petals to the background. Make stitches into the dc fabric only—avoid sewing through multiple layers of lacy chain spaces which can cause puckering.
Step 3 :
Attach leaves and small buds: position leaves on either side of each flower as pictured, and sew down with discreet stitches along the center of each leaf. For small red buds, make tiny 6-8 st bud cones by working a magic ring of 6 sc and 2 rounds of inc/shaping; sew into place.
Info :
Check both sides of the panel as you sew to make sure stitches are hidden and applique lies flat. If any petals lift, add a few more securing stitches near the petal base. Weave all ends to the back and trim close to the fabric when secure.
— Border (worked after all appliques are attached) :
Round 1 :
With cream color rejoined at any corner, attach yarn with sl st to corner stitch. ch 2, work 1 dc in each stitch and 3 dc in each corner st all the way around to form a uniform frame; total will be approx. 121 dc per long edge and 3-dc clusters at corners to maintain square corners.
Round 2 :
ch 2, turn. 1 dc in each st across but when you hit corner clusters, work (1 dc, ch 1, 1 dc) into the center dc of the 3-dc corner cluster to give room for outer rounds. Maintain counts across—edges still read as 121 approximate dc positions.
Info :
Round counts around the rectangle will be similar on both long sides; short sides adjust naturally due to corner clusters. Keep symmetry by counting corner repeats and verifying equal stitches per side before moving to color border rows.
Round 3 :
Switch to Orange for an accent border: join color with sl st, ch 3 (counts as dc), *skip next st, dc3tog shell over next 3 sts (work 3 dc in one st as a shell), skip next st, sl st into next* repeat around to create a scalloped lattice effect. Work 3 dc into each corner cluster to maintain shape.
Round 4 :
Ch 3, turn. Work V-stitch border in orange: *(dc, ch 1, dc) in next ch-space or chosen stitch to form airy scallops* repeat across. This creates the open, lacy outer frame seen in the image.
Round 5 :
Ch 3, turn. 1 dc in each dc and V-space across to tidy edges. Finish extra shell cluster into each corner for a rounded corner look.
Round 6 :
Ch 1. Fasten off with neat sl st edging or optional crab stitch reverse single crochet around entire runner in orange for a slightly raised finished rim. Weave in ends thoroughly.
Info :
The bold orange scalloped border is a signature look. If you prefer a subtler finish, work two rounds of cream dc then one round of orange shell scallops. The border width shown is approximately 1.25" after blocking using the yarn and hook suggested.
— Finishing Touches :
Step 1 :
Final blocking: After all sewing is complete, block the entire runner again, pinning around edges gently to the desired rectangle. Steam lightly or wet block depending on yarn label instructions.
Step 2 :
Trim stray fibers, weave in all remaining ends on the wrong side, and if necessary add a touch of craft glue to the back of the centers to ensure long-term durability for table use.
Info :
When used on a dining table, consider using a non-slip felt pad underneath to protect both runner and tabletop. Hand wash gently when needed and press flat while damp to preserve shape.
Completing this Tropical Hibiscus Table Runner is such a rewarding experience — the large sculptural flowers add dramatic color, while the lacy cream background keeps the piece light and elegant. The bold orange border frames the design and gives the runner a finished, professional look. Whether for your own dining table or as a heartfelt gift, this runner brings summer energy to any home. 🧶🌺✨