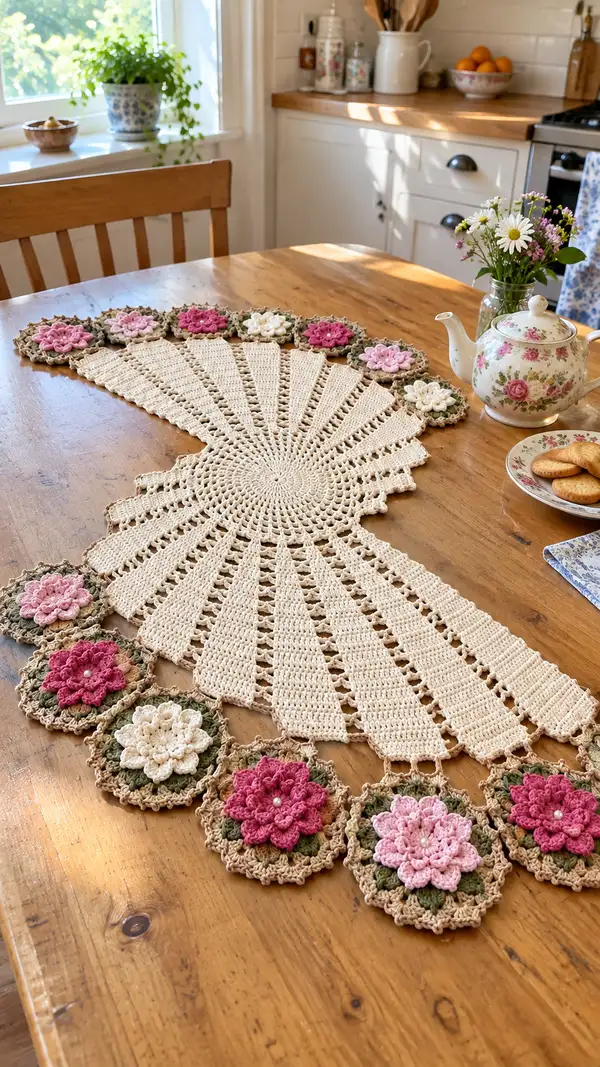
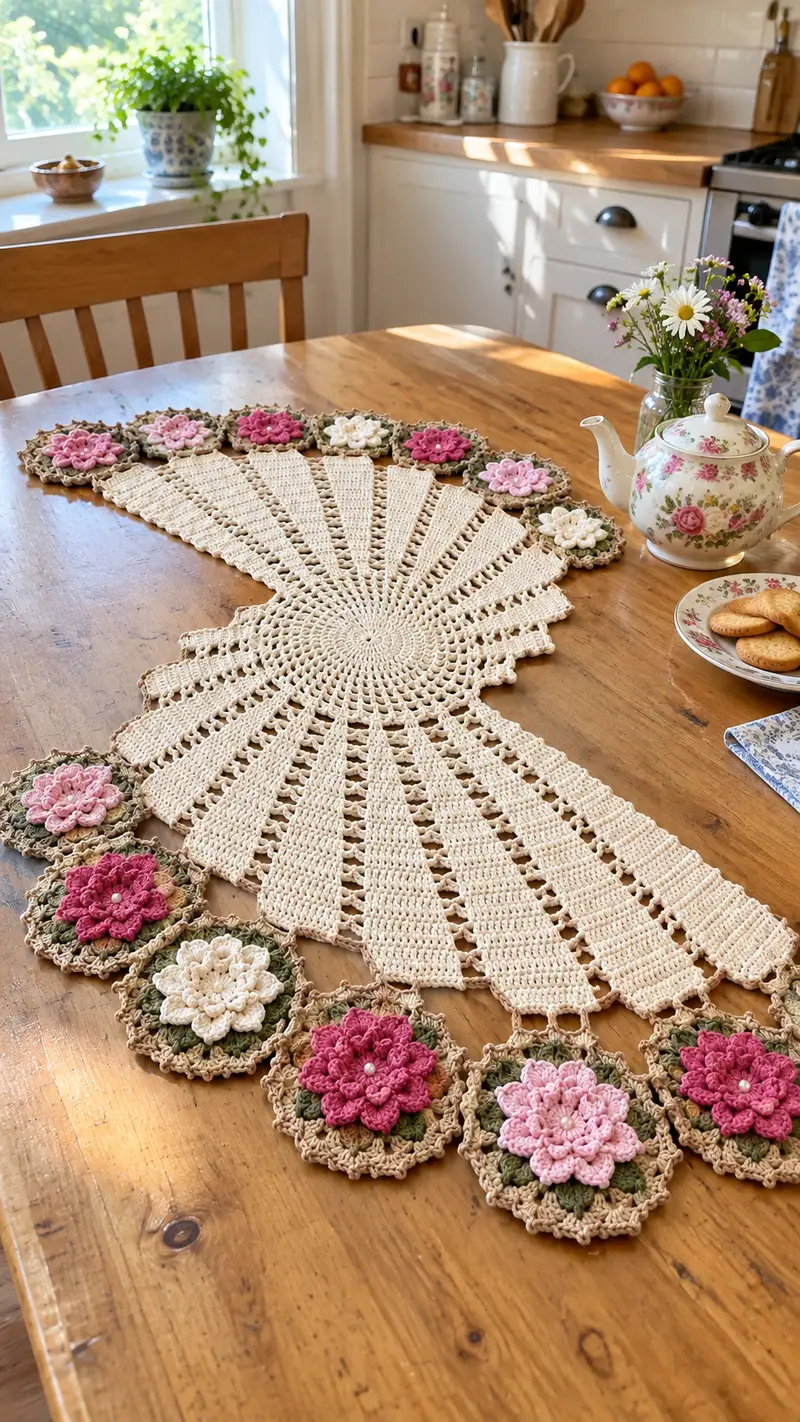
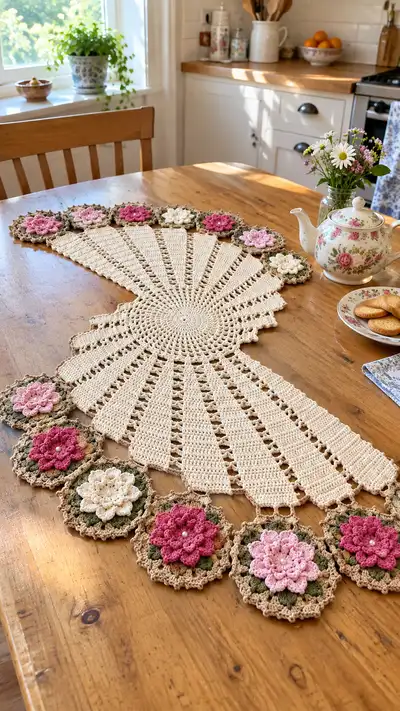
A classic, vintage-inspired fan table runner edged with raised floral medallions in soft pinks, cream and sage. This elegant piece combines a radiating fan-style central panel with joined 3D flower motifs and a delicate picot scallop border. Perfect for a sunny kitchen table or dressing a sideboard, the runner showcases textured petals, leafy rounds, and a neat join-as-you-go finish for a professional look.
Progress Tracker
0% Complete
— Materials & Gauge :
Info :
Gauge is not critical for overall shape but affects final size. Using 3.5mm hook with listed yarn yields approximately 18 dc x 10 rows = 10cm in flat swatch worked in dc. Keep consistent tension and block finished pieces to accurate shape.
— Center Medallion :
Round 1 :
Make a magic ring, ch1, 8 sc in ring. Pull tight (8)
Round 2 :
Inc around: 8 inc (16)
Round 3 :
(1 sc, inc) x 8 (24)
Round 4 :
(2 sc, inc) x 8 (32)
Round 5 :
(3 sc, inc) x 8 (40)
Info :
Check your circle is lying flat. If it buckles, loosen tension or drop a subtle increase round to even it out.
Round 6 :
(4 sc, inc) x 8 (48)
Round 7 :
(5 sc, inc) x 8 (56)
Round 8 :
(6 sc, inc) x 8 (64)
Round 9 :
1 sc in each st (64)
Round 10 :
1 sc in next 4 sts, ch3 (counts as dc), skip 2 sts, *1 sc in next 5 sts, ch3, skip 2 sts; rep from * around to create evenly spaced ch3 ladder loops. Finish with 1 sl st to first sc. Keep stitch count of sc sections even for later wedge joins (64 sc sections integrated with spaces).
Info :
These ch3 ladder spaces will later be used to attach the fan wedges; mark every 8th repeated space with a stitch marker to divide center into 8 radial points.
Round 11 :
Work into each ch3 loop: (sl st, ch3, 3 dc, ch3, sl st) around, anchoring into sc sections between loops. This forms a low arch ridge to accept fan panels (64)
Round 12 :
1 sc in each sc and 1 sc in each ch3 arch stitch around to tidy edge. Maintain 64 sc equivalent placement (64)
Round 13 :
Switch to BLO for a ridge round: 1 sc in each st BLO around (64)
Info :
Begin blocking this center medallion flat while you prepare the fan panels. A flat center ensures fan panels join evenly without puckering.
Round 14 :
Actually treat as 1 sc each st (64)Round 14 :
1 sc in each st (64)
Round 15 :
Chain placement round: *ch4, skip 3 sc, sc in next sc; rep from * around creating open loops for fan base. Aim for 16 ch4 loops evenly spaced (64 equivalent)
Round 16 :
Work into each ch4 loop to create base posts: (sc, hdc, 3 dc, hdc, sc) in each loop. This yields 16 raised posts forming the anchor points for the fan wedges.
Info :
At the end of Round 16 you should have a sturdy, slightly raised ring of 16 anchor posts. These will be the base for the fan wedges. If you have fewer or more posts, adjust spacing in Round 15 so you have exactly 16.
— Fan Wedge (Make 16) :
Info :
Each wedge is worked from the center outward and then joined to its neighbors. Work wedges one at a time. Use a stitch marker to mark the first st of each wedge. The wedge instructions below form one full fan section; repeat 16 times and join at outer rounds as described in Joining section.
Round 1 :
Attach yarn to one anchor post with a sl st. Ch2 (counts as hdc). Work 3 hdc evenly into anchor post, ch2, turn to work row foundation outward. You now have a short foundation for row shapes.
Round 2 :
Row work outward along foundation: ch2, turn, 1 hdc in each of the 3 hdc, 1 hdc in the base sl st (5 hdc). End with ch2 turning chain.
Round 3 :
Increase row: ch2, turn, (1 hdc in next 2 sts, inc (2 hdc in next st)) x2, 1 hdc in last st. Total now 7 hdc.
Round 4 :
Ch2, turn, 1 hdc in each st across (7 hdc).
Round 5 :
Ch2, turn, (2 hdc, inc) across to expand fan: work pattern: 1 hdc in first st, (1 hdc in next 2 sts, inc) repeat until end; end with 1 hdc in last st. Count increases to bring total to 11 hdc.
Info :
Work these initial rows flat outward so each wedge builds in height. Keep edges square by keeping 1 hdc at first and last st of each row to create a clean flange for joining.
Rounds 6-10 :
Work even rows of 1 hdc in each st, turning at the end of each row. Increase on Row 8 only by adding 2 evenly spaced incs to create a gentle curve (final count around 15 hdc on outermost row).
Round 11 :
Edge shaping: ch3 (counts as dc), turn, 1 dc in each st across then finish with 3 dc in final st to create a soft scallop tip. Count approximately 17-19 dc depending on small increases earlier.
Info :
If your wedge is narrower than photographed, add one more increase row mid-way to reach matching width. Keep all wedges consistent by measuring against blocked center as you go.
Round 12 :
Work a decorative openwork row along wedge: ch4, skip 2 dc, sc in next st; rep to end forming vertical chain spaces that will create the visible 'spoke' galleries in the finished runner. Aim for 6-8 chain spaces depending on wedge width.
Round 13 :
Return row: sc in each st and bridge spaces with (sc, ch2, sc) into each ch4 space to produce a lacy lattice. This produces a neat rectangular panel per wedge when worked in multiples.
Rounds 14-18 :
Work alternating textured rows: Row A - 1 hdc in each st; Row B - BLO sc round to create a ridge every second row. Repeat A/B until wedge reaches target length of approximately 22-26 rows from center (measure visually against photo length and neighboring wedges). End with an even sc round to tidy edge.
Info :
Keep track of the number of rows for each wedge—consistency is key. Place a marker at the start of each wedge and write down the final row count so each of the 16 wedges matches in height and shape.
Round 19 :
Outer scallop formation: ch1, sc evenly along outer edge spacing 1 sc per 2 hdc (approx 10-12 sc). Into each sc: *ch3, sl st in same sc to form tiny picot loop; rep across to create picot fringe. Fasten off and weave tail.
Info :
Repeat the Fan Wedge instructions 16 times, joining each wedge to its corresponding center anchor post during the first round. For perfectly even spacing around the medallion, attach each wedge into the 16 anchor posts created at Round 16 of the Center Medallion.
— Fan Assembly & Shaping :
Round 1 :
Lay out all 16 wedges around the center medallion. Using a contrasting temporary thread or pins, position them so that outer scallops meet evenly. Adjust blocking as needed before final joining.
Round 2 :
Join wedges to each other along side edges with sl sts worked evenly through both edge stitches. Work slowly and maintain matching row counts. Aim for 2 sl sts per 3 rows to avoid pulling.
Info :
If some wedges are slightly different lengths, ease the longer ones by decreasing 1 or 2 edge sts in the join to get an even outer line. Blocking will correct minor mismatches.
Round 3 :
Work a tidy sc round through all joined seam stitches and sc rounds from the medallion to produce a continuous fabric. This unifies the medallion and fan panels into one flat runner base.
Round 4 :
Edge stabilization: Work 1 sc in each st around the entire piece, placing 3 sc in corners or junctions to keep the edge flat. Expected stitch count will vary by final size; maintain even spacing for a smooth border.
Info :
At this stage, the fan-shaped runner should look like the central radiating form in the photo. Set aside and prepare flower motifs. Blocking now will help with motif placement.
— Flower Motif (Make 12) :
Info :
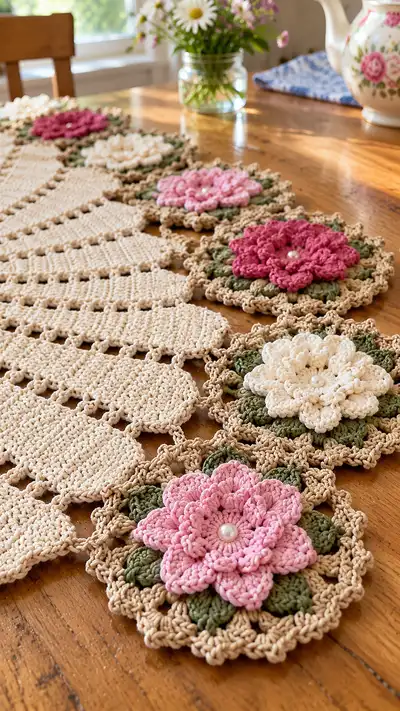
Each flower medallion includes a layered petal center, a small leaf round beneath, and an outer scallop that matches the sandy-beige accent. Work a single motif and then make 12 total in the color sequence pictured (dark pink, medium pink, pale pink, cream) or your own choice.
Round 1 :
Using petal color, make a magic ring, ch1, 8 sc in ring (8)
Round 2 :
Inc in each st around (8 inc) (16)
Round 3 :
(1 sc, inc) x 8 (24)
Info :
Round 3 provides a neat base for the petal cluster. Keep stitches snug so the puff petals sit high and don't flatten over time.
Round 4 (Petal Layer 1) :
*ch2, work a puff stitch into next st: yarn over, insert hook, pull up loop, yarn over, insert again, pull up loop (3 times total), yarn over and draw through all loops leaving a small opening, ch1 to close puff; sl st into next st; rep from * around to make 8 puff petals. Fasten off petal color and weave ends (8 puff petals).
Round 5 :
Join leaf color in back loops of base round: (ch2, 2 dc in next st, ch1, sl st in next st) around to create 8 small leaf arches. This forms the green leafy base visible beneath the petals.
Round 6 (Petal Layer 2) :
Join the petal color again behind the leaves to work a second, slightly larger petal round. Attach yarn behind a leaf arch, ch2, make a puff stitch cluster of 4 loops (as before but slightly larger) into each space between leaves, ch1 to secure. Make 8 larger puff petals layered on top of the small ones for a double petal look.
Round 7 :
Center finish: with same petal color, secure a small bead or pearl in the center by sewing through the base ring from behind and tying securely. Alternatively work a tiny rosette: ch3, sl st into ring; repeat to create several loops and sew down.
Info :
Be careful when sewing beads—use a beading needle and small knot hidden under petals. Weave the yarn ends back through the base to hide and secure them well so the bead doesn't come loose.
Round 8 (Outer Scallop) :
Change to sandy-beige. Around leaves and petal base: *sc into each st around base (about 24 sc), then ch3, skip 1 st, sc to create a scalloped edge; rep around. Work 8-12 scallops depending on base stitch count. Fasten off and weave ends neatly on the back.
Info :
Make 12 motifs in total: 3 dark rose, 3 medium rose, 3 pale blush, 3 cream (or arrange per your table length). Block motifs gently to smooth petals if needed before joining.
— Leaf Accent Round (Optional Extra Texture) :
Round 1 :
For additional dimensional leaves, work a small round beneath each motif: join green yarn to the motif back, ch1, 12 sc into ring (12)
Round 2 :
(sc, inc) x4 (16)
Round 3 :
Work leaf shaping: *ch2, skip 1, sc in next 3 sts, ch2, sl st in next; rep to make 4 lobed points that peek from under petals.
Info :
This leaf accent is optional but recommended; it helps create the layered green ring visible between each flower and the outer scallop in the photo.
— Motif Joining (Join-As-You-Go) :
Info :
Motifs are joined to the runner's outer edge in a single final round so they sit flush and neatly. Pin each motif at the outer perimeter so centers point inward and scallops align with the fan scallop gaps.
Round 1 :
Place the first motif centered over a wedge outer scallop. With sandy-beige, join at the motif scallop edge and the adjacent runner scallop using: sc in motif scallop, sl st into runner outer space, *ch2, sc in next motif scallop, sl st into runner; rep around to attach. Aim for 6-8 connection points per motif to secure it firmly.
Info :
Join motifs one at a time and check that the runner remains flat. Pin motifs then join, rather than joining and pinning later. Use spare yarn tail to whipstitch across small gaps for stability where sl sts don't reach.
— Outer Border & Final Scallop :
Round 1 :
With sandy-beige, work 1 sc evenly around entire runner including motif edges and any gaps created during motif joins. Place 3 sc in the seam junctions to flatten corners and curve of fan tips. This unifies motifs and fan edges.
Round 2 :
Decorative picot scallop: *sc in next 2 sts, (dc, picot, dc) in next st (picot = ch3, sl st into base), sc in next 3 sts; rep around. This yields the fluted scallop seen in the photo.
Round 3 :
Finish edge loops: ch3, sl st in next sc to make tiny loops for a refined edge picot. Work evenly until the entire border is encircled. Fasten off and weave ends on the back.
Info :
Blocking tip: After all joins are complete, wet block the entire runner gently and pin to the desired fan shape to ensure the scallops and fan tips sit flat. Allow to dry completely for a professional finish.
— Finishing Touches :
Info :
Sew any remaining pearl beads to motif centers, trim loose ends and weave them into the backside securely. Press lightly with a dry iron over a towel if necessary to relax any cotton stiffness, but avoid high heat on mercerized cotton with beads.
Extra Info :
For protective use, line with a backing fabric glued or stitched on the underside if you plan to place hot items on the runner. Otherwise use coasters and trivets to preserve the crochet fabric and pearls.
Project Notes :
This pattern intentionally gives many small Info steps to ensure consistent shaping across many repeated motifs and wedges. If you prefer a shorter runner, reduce the number of fan wedges and motifs, keeping the same join logic. Conversely, add more wedges and motifs to lengthen it for a larger table.
Completing this fan table runner is so rewarding — every scallop and petal layers into a timeless, vintage-inspired accent for your home. The 3D flowers and pearl centers give it extra charm, and the join-as-you-go finish looks professional. Place it on your table for tea, gift it to a friend, or display it on a sideboard and enjoy the handmade warmth. 🧶🌸✨