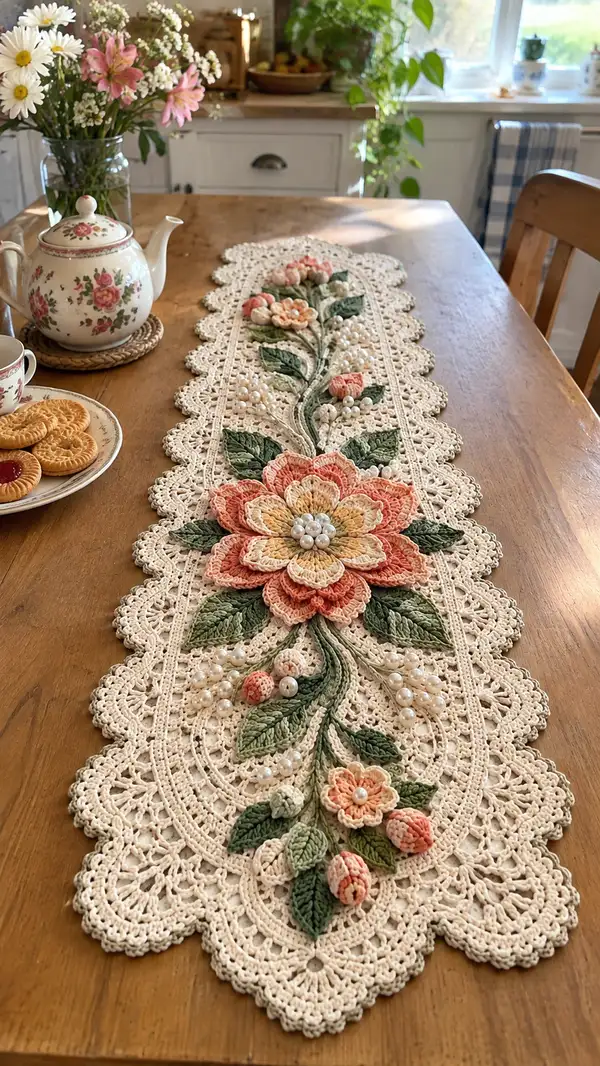
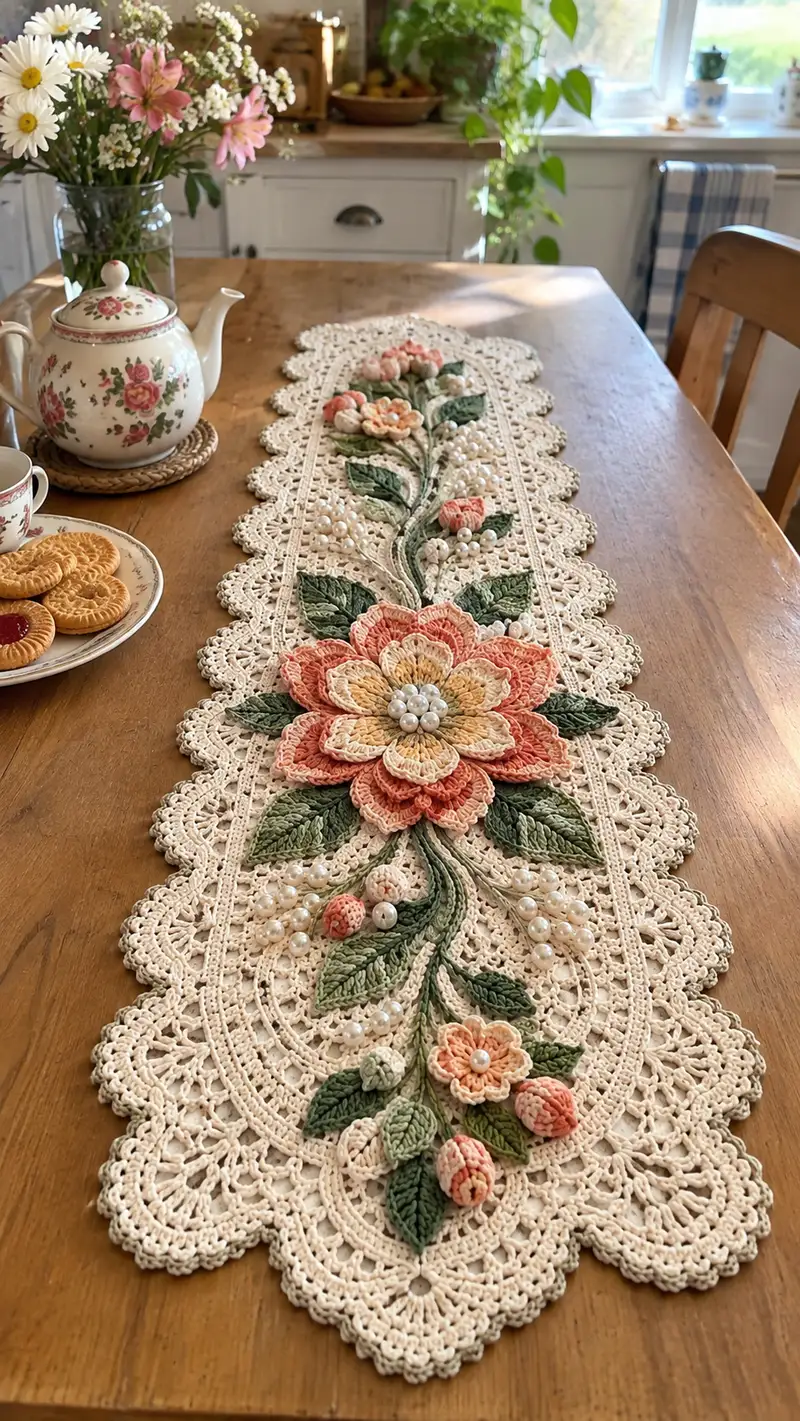
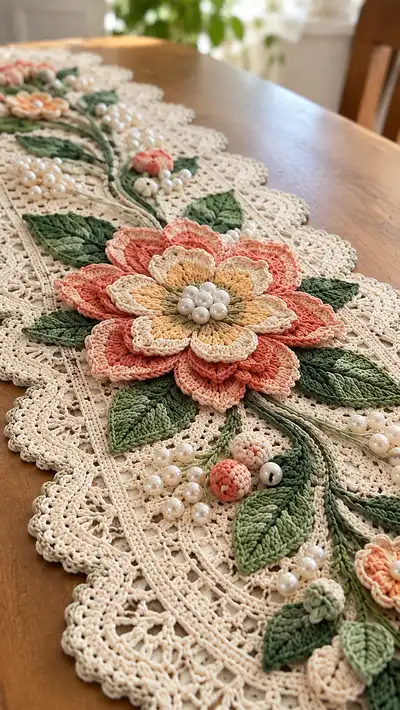
A beautifully detailed vintage-style crochet table runner featuring layered 3D flowers, sculpted leaves, delicate buds and pearl accents on a lacy oval background. This pattern recreates the elegant stitched petals and scalloped border seen in the photos, with step-by-step rounds, assembly tips and bead placement guidance. Designed for experienced crocheters who love thread work and surface applique, this runner makes an exquisite heirloom centerpiece or special gift.
Progress Tracker
0% Complete
— Materials and Notes :
Info :
Work with size-10 cotton thread and a 1.5–1.75 mm hook. Maintain tight even tension for crisp lace. Throughout this pattern 'st' refers to the same stitch unless noted. The runner is worked in two main parts: an oval lace base (worked in rounds) and multiple appliqued 3D motifs (flowers, leaves, buds) sewn on. Block the lace base flat before attaching motifs for even placement.
— Base Oval Lace (foundation rounds 1-40) :
Round 1 :
Foundation: ch 110, join with sl st to form an elongated ring taking care not to twist (110 chs around)
Round 2 :
ch 3 (counts as dc), 1 dc in next 4 ch, *(2 dc, ch 2, 2 dc) in next ch (this creates an end increase), work 1 dc in each of next 54 ch along side, (2 dc, ch 2, 2 dc) in opposite end ch, 1 dc in each remaining 54 ch back to join; join with sl st to top of ch 3. Total approximate dc count around: 2 increases of 4 dc each + 110 = 118 dc plus corner spaces
Info :
This round establishes the oval shape. When working increases at each chain-turn end, treat the corner as (2 dc, ch 2, 2 dc) to keep an even oval curve. Place a stitch marker at the join to mark round starts.
Round 3 :
ch 4 (counts as tr), tr in next 5 sts, *in ch-2 corner sp: (2 tr, ch 2, 2 tr), tr in next 55 sts, repeat corner, tr in remaining sts; join. Approx tr count 118 (plus 4 tr per corner).
Round 4 :
ch 1, sc in same st, sc in each tr around working into ch-2 corners: (sc, ch 2, sc) to preserve corner; join. Count: maintain approx 122 sc (corners add ch-sps)
Round 5 :
ch 3, (dc, ch1, dc) in each ch-2 corner space; 1 dc in each sc along sides; join. Keep count consistent; this forms a mesh foundation for the next lace pattern.
Round 6 :
ch 1, sc in each dc and ch-1 sp around, in corner ch-2: (sc, ch 2, sc). This evens the edge to prepare for filet rows.
Round 7 :
Begin filet mesh: ch 3, skip next st, dc in next, ch 1, *skip st, dc in next; in corners work (dc, ch2, dc); repeat around to join. Mesh pattern forms; count depends on initial chain but keep evenly spaced
Round 8-11 :
Work 4 rounds of filet/dc-ch1-dc mesh maintaining the same dc counts across each side; this gives a flat central panel. Keep counts stable each round.
Info :
Use stitch markers to mark the long-side repeats (divide each long side into 10 equal mesh sectors). This helps later when placing stems and smaller motifs precisely in repeats.
Round 12 :
Begin the inner lacy oval frame: ch 5 (counts 1 tr + ch2), *skip 1 mesh sp, (1 tr, ch2) in next dc, repeat around. In corner work (tr, ch4, tr). Join. This creates a decorative raised frame inside the runner to receive stems.
Round 13 :
ch 1, sc around working into tr and ch-2 spaces, in corner sc, ch 4, sc. This rounds the frame and stabilizes it. Keep the stitch count consistent so frame remains oval.
Round 14-18 :
Work 5 rounds: *ch 3, skip next sp, dc in next; repeat* to create an open mesh within the framed oval. Join each round; counts remain the same. These rounds build the raised panel where floral stems will sit.
Info :
At the end of round 18 the base is mostly completed; block the base lightly to open the mesh before working the scalloped edge so your scallops will be even. Use pins and mist or a light steam.
Round 19 :
Start edging detail: ch 2, hdc in each dc and ch-sp around, at corners work (hdc, ch 2, hdc). Join. This round tension should be slightly tighter than mesh rounds to start shaping scallops.
Round 20 :
ch 1, sc in each hdc around. Join. This evens the profile for scallops to sit on.
Round 21 :
Scallop foundation: *(ch 5, sl st in 2nd ch from hook, dc in next ch, tr in next ch, dc in last ch) into next st, sl st in next 4 sts*; repeat around to form scallop arches along sides and ends. Each scallop uses 4 sts base; total number of scallops approx 28–34 depending on initial chain length.
Round 22 :
Work 1 round of sc in each stitch and sl st into scallop arches to anchor them. This secures shape and prevents scallops hanging loose.
Round 23 :
Work decorative picot row: *(sc across scallop, (ch 3, sl st in 3rd ch) in center top of each scallop) repeat*; join. This creates a fine picot edge seen in the close-up photos.
Round 24-28 :
Work 5 rounds of surface loop/chain embroidery foundation: ch 1, sc around, working small looped chains into select mesh spaces to define inner oval lanes for stems — alternate each round to create a double lane. This creates the raised inner lanes visible in photos.
Info :
Mark three points along the runner centerline where the large central flower, top smaller flower and bottom smaller flower will sit. Use pins to reserve these spaces on the blocked base. All appliques are sewn to the blocked base, not crocheted into rounds.
— Central Layered Flower (petals rounds 1-36) :
Round 1 :
Using peach/coral, make a magic ring, ch 1, 8 sc in ring (8). Pull tight and join with sl st to first sc.
Round 2 :
(1 sc, inc) x 8 (24)
Round 3 :
(2 sc, inc) x 8 (32)
Round 4 :
(3 sc, inc) x 8 (40)
Info :
This small circle forms the base disc for attaching the first petal layer. Fasten off leaving a long tail for sewing onto the lace base and for joining inner petals later.
Round 5 :
Rejoin pale yellow in the front of any stitch to begin first petal layer: ch 3, (3 dc, ch 2, 3 dc) in next st (first petal), *skip 2 sts, (3 dc, ch 2, 3 dc) in next st* repeat 8 petals total creating 8 large petals. Join. Each petal occupies approx 3 base sts.
Round 6 :
sc across base between petals to tidy edge: sc in each base st and 2 sc in each ch-2 corner space where petals meet. Join and fasten off pale yellow with long tail to sew.
Round 7 :
Return to peach/coral and make second petal tier on top of the first: Attach in base between two petals, ch 3, 5 dc cluster in same sp, ch 1, *skip next petal top, slip to next petal base and repeat* to make 8 medium petals stacked between the lower petals. Join.
Round 8 :
Secure petals with sc around base; weave in ends on the underside. This secures the first two petal layers and begins shaping a dome.
Round 9 :
Create a third (larger) outer petal layer using a lighter peach or blended variegated thread: Attach in front loop of base between two medium petals; ch 3, (1 tr, ch1, 1 tr, ch1, 1 tr) in same sp to create a tall textured petal peak; skip to next petal base and repeat for 8 tall outer petals. Join (8 tall petals).
Round 10 :
Front finish: sc around base of outer petals and add a picot or small shell at the tip of each tall petal using (sc, ch3, sl st in 3rd ch) to create the scalloped petal edge visible in the photo. Fasten off and weave ends.
Info :
At this point the flower should read as three distinct layers. Use small pins to shape petals outward and steam-block lightly (careful with cotton thread). Leave the tail long for sewing the flower center and adding the pearl cluster.
Round 11 :
Center bead cluster base: using light sage green, make a small disc: magic ring, ch1, 6 sc (6). Fasten off leaving long tail to position at center under pearls.
Round 12 :
Sewing pearls: Position 7 larger pearls in a tight circular cluster on top of the green disc (6 around 1). Use fine sewing thread to anchor each pearl into the disc and through the flower center, pull tightly so pearls sit flush and secure. Tie off thread on underside and hide tail through stitches.
Round 13 :
Make six small inner petals (between the yellow and peach layers) in pale cream: ch 2, 5 sc in magic circle (5) then flatten and form small shell: attach to inner ring between the yellow petals and sew in place evenly. Repeat x6 to create the subtle inner petals seen in photo.
Round 14 :
Light finishing and shaping: use wool needle to slightly gather petal bases if needed to create the layered dome. Adjust overlap so each petal edge is visible. Fasten all ends under the flower and trim.
Info :
Use narrow, tight stitches when sewing the flower onto the base to keep it secure; sew through both the green disc at the center and the lace base for stability. Attach flower at the previously pinned central point on the base.
— Secondary Flowers and Small Blossoms (each small flower rounds 1-16, make 4-6) :
Round 1 :
Magic ring, ch1, 6 sc (6). Fasten off with long tail for sewing. This is the base for a 5–6 petal mini blossom.
Round 2 :
Rejoin contrasting peach: *(ch 2, 5 dc in same st, sl st to ring to form petal) repeat 5 times to create 5 petals (x5 petals). Join and leave long tail for sewing.
Round 3 :
Optional center bead: sew a single 6mm pearl or embroidered french knot at the center. This small flower is attached along the runner at marked positions to balance the big flower.
Info :
Vary sizes slightly by using 4 or 6 dc petals for variety. Tuck and sew the small blossoms around the stems as in the photo for a natural, clustered look.
— Buds (make 8-12 buds) :
Round 1 :
Using peach variegated thread, ch 2, 6 sc in magic ring (6). Pull tight and do not join; continue in spiral.
Round 2 :
(inc, sc) x 3 (9)
Round 3 :
sc around 9 (9) — make 2 rounds to form rounded bud shape
Round 4 :
Dec round: (sc, dec) x 3 (6) — fasten off leaving long tail. Insert a tiny amount of stuffing or wrap a short thread nub to slightly fill the bud. Shape into ovoid and sew closed tightly.
Info :
For some buds work an extra round of inc at Round 2 to make larger buds (12 sts). Attach buds clustered near leaves and stems with a couple of tight whip-stitches each so they retain their placement.
— Leaves (many leaves — each leaf rounds 1-14; make approx 20 leaves of mixed sizes) :
Round 1 :
Using deeper leaf green, ch 9 (or adjustable for leaf length). Row 1: sc in 2nd ch from hook and across to end (8 sc). Turn to work along opposite side of foundation chain.
Round 2 :
Working along opposite side of foundation chain: sc in each ch back to the beginning; do not join, continue round in continuous rounds to create pointed leaf tip: sc in next 3 sts, inc, sc in next 3 sts (increase at tip) then continue sc along remaining sts to base. Total approx 18 sc (depends on chain length).
Round 3 :
Start shaping with BLO to form rib: ch 1, 1 sc BLO in each st around for 2 rounds to create textured leaf veins. This creates visible ridges on the leaf surface.
Round 4 :
Begin central vein with post stitches: *sc to center top, hdc around central top, (dc, tr, dtr) down center for a raised ridge, then reverse down other side with same post stitches; finish with sc at base*. Fasten off leaving a tail for sewing.
Round 5 :
Optional: Embroider central vein using contrasting lighter green thread with sl st or surface embroidery to accent veins as seen in photos. Use small running stitches or sl st to trace vein lines.
Info :
Make leaves in three sizes: small (ch6 base), medium (ch9 base), large (ch12 base). Use shallower or deeper post stitches to scale depth of central ridge. Block leaves shaped with a light steam to maintain a slightly cupped natural curve.
Round 6-8 :
Repeat leaf body shaping as needed for each size. Use FLO in one round to create a crisp border ridge if desired. Each leaf should have a long tail for sewing into place on the base.
— Long Twisted Stems and Branches (worked as surface chains and cords) :
Round 1 :
Create long twisted cords by making braided chain cords: ch 120 (or length required for runner section), sl st into every 3rd chain to give a twisted raised cord, or work a 3-strand crochet i-cord style: make 3 chains and slip stitch them together along their length to produce a rope-like stem. Make 6–8 stems of varying lengths to match the routed valleys in the base.
Round 2 :
For a tighter twisted stem: ch 60, fold in half, work sl st through both loops alternating to create a rope; adjust length to fit between floral elements. Fasten off leaving long tail for sewing.
Info :
Arrange stems on the base following the pinned lanes. Stems should curve naturally between motifs. Use pins to lightly tack stems down before sewing. For a more organic look twist two thin cords together and sew the twist down selectively so the twist opens slightly in places.
— Small Clustered Berries (pearl clusters) :
Round 1 :
These are not crocheted but sewn: select a cluster of 6–9 pearls (6–8mm). Using a fine sewing needle and cotton thread, sew pearls in small irregular clusters and anchor through base mesh and motif underside so they sit slightly raised.
Round 2 :
For additional texture, crochet tiny bead-wrapped balls: make magic ring, 6 sc, then use thin thread to sew bead through a couple of sc to secure bead inside the crocheted ball. Fasten off and sew the tiny ball next to pearl clusters for mixed texture.
Info :
Sew each pearl by passing the sewing needle through the runner mesh twice and knotting on the underside. Avoid gluing; if glue is used, use a tiny drop under the bead and wipe excess immediately.
— Leaf Vein and Surface Embroidery (surface rounds and tips) :
Round 1 :
Using contrasting lighter green, outline leaf edges with surface slip-stitch embroidery: insert hook from underside, pull loop through, and work sl st along edge. This sharpens leaf silhouette.
Round 2 :
Work small surface stitches to add veins: with yarn needle, couch a thin strand into raised central vein and secure every 6–8 mm with tiny stitches to keep it in place. This gives the realistic rib detail seen in images.
Info :
Avoid bulky surface stitches; use single-strand embroidery cotton if you prefer finer veining. Keep stitches small and unobtrusive on the lace base to preserve the openwork underneath.
— Border Finalization and Scallop Detail (rounds 29-40 of base finishing) :
Round 29 :
Refine scallops: rejoin cream thread to edge, *ch7, sl st in 4th ch from hook to make a small arch, picot, sl st into base 2 sts ahead*, repeat around to refine outer scallop edge; join.
Round 30 :
Work a small shell on every scallop tip: *(sc in next st, (5 dc shell) in scallop center, sc in next st)* repeat around. This creates the layered scallop visible around the runner perimeter.
Round 31 :
Edge finishing: sc around entire edge, working 2 sc in extreme tip points and 1 sc along valleys to even tension. Join; weave in ends under the edge.
Round 32 :
Add fine beaded trim: Using fine sewing thread, hand-sew a single line of tiny 4 mm pearls spaced evenly inside the inner oval, following the raised lane. These pearls echo the clusters and add shimmer.
Round 33 :
Final blocking: pin the entire runner to desired measurements with even spacing of scallops. Mist lightly and allow to dry fully. This locks in even scallops and opens lace.
Info :
Blocking is essential. Carefully measure both halves to ensure symmetry. Use a tape measure to check scallop spacing on both long sides and adjust pins as needed before drying.
— Assembly and Placement (assembly rounds and Info) :
Round 1 :
Position the large central layered flower at the central pinned point. Using the long tail from the flower's center, sew through the flower disc and the lace base with small tight stitches. Make at least 8 secure passes around the disc perimeter and through the center disc to anchor.
Round 2 :
Sew medium leaves around the central flower in a radial pattern. For each leaf align the center vein with the edge of the petal base and sew with 6–8 small stitches along the midrib. Repeat for 6–8 leaves around the main flower to form full foliage.
Round 3 :
Arrange stems weaving away from the main flower: pin stems to base lanes and sew under the cord every 3–4 cm with invisible whip stitches. Tuck the stem tails under leaves and secure with additional stitches to hide seams.
Round 4 :
Position the smaller blossoms and buds at both ends about 25–30 cm from center oriented along the same lane to balance the composition. Sew each element down with 4–6 tiny stitches and secure tails on underside.
Round 5 :
Attach pearl clusters: place clusters as pictured around the main flower and along the stems. Sew each pearl twice through the runner mesh and into the motif bases for extra strength. Tie thread on underside and cover knots with a small dab of glue if necessary for permanence.
Info :
When sewing motifs, work from center outward. Use a combination of whip stitch and ladder stitch under petals and leaves to keep seams invisible. Pin every motif first; step back visually to ensure balanced spacing before committing with thread.
— Final Finishing Touches (last Info steps) :
Info :
Inspect the runner for loose threads and hidden ends. Weave all tails at least 4 cm into the back of motifs, then trim flush. Steam-block the whole runner once more after beads and motifs are permanently attached to unify the appearance. Store flat or rolled in tissue to preserve shape.
Info :
To launder in future, hand-wash gently in lukewarm water with mild soap, reshape on flat surface and pin to dry. Avoid machine washing to preserve beads and delicate stitches.
This elegant floral lace runner is a true labour of love — each layered petal, leaf and pearl cluster builds into a stunning heirloom that will grace any table for years to come. The tactile layered flowers and scalloped border give a vintage, romantic look that feels both timeless and personal. Working this piece is a satisfying mix of careful threadwork and creative placement; the finished runner makes a beautiful gift or centerpiece. 🧶🌸