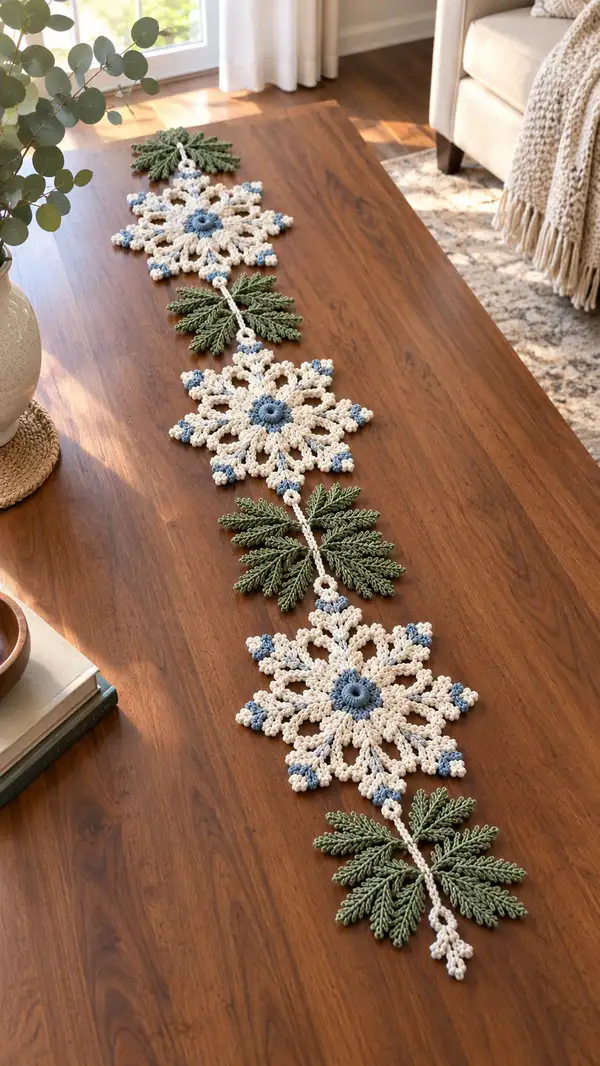
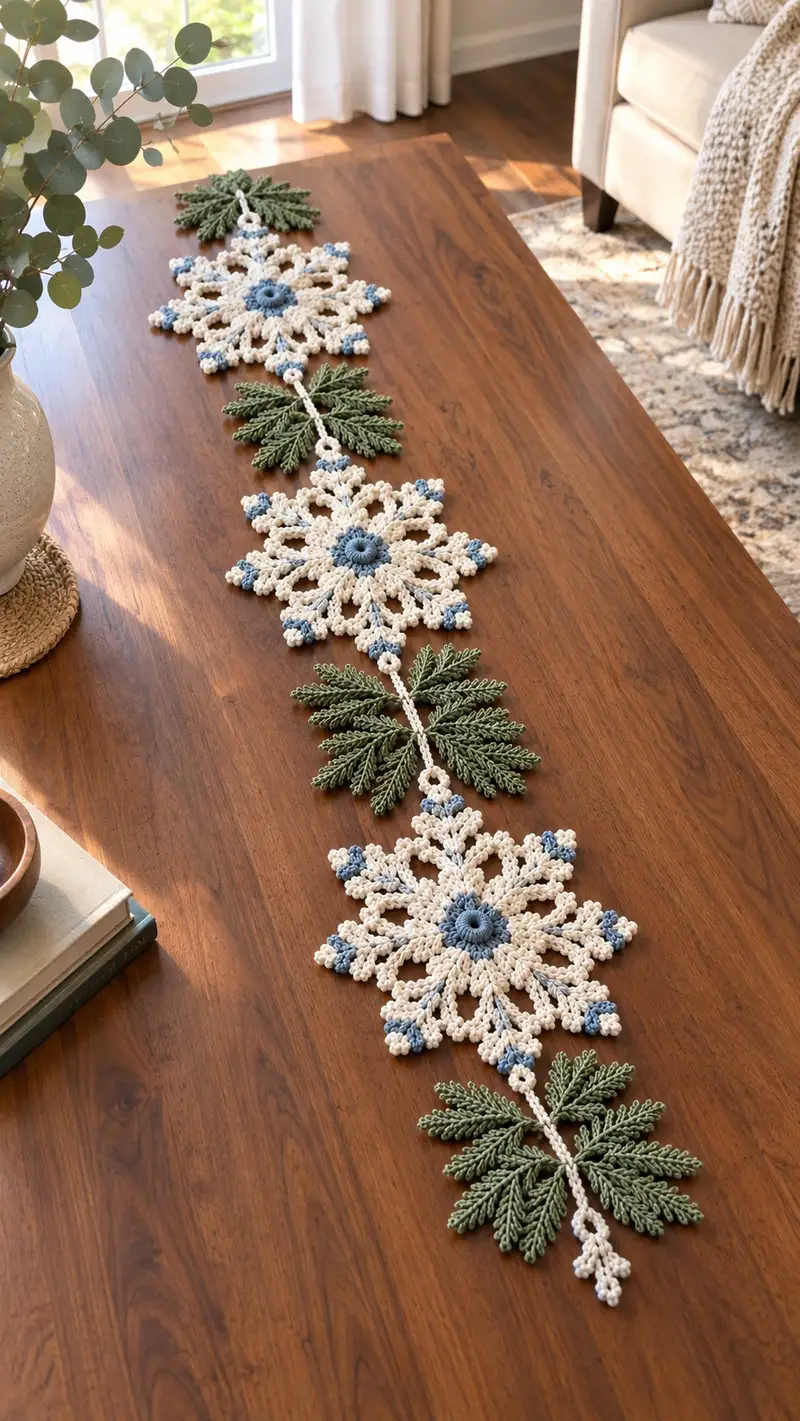
Create a stunning winter table runner featuring delicate crocheted snowflakes linked by cedar-like greenery. This pattern uses soft ivory, dusty blue, and sage green to mimic frosted florals and evergreen sprigs. The finished runner lays flat with three large snowflake medallions separated by layered cedar branches, perfect for a holiday table or winter vignette.
Progress Tracker
0% Complete
— General Notes :
Info :
This pattern is written in US terms. Work each snowflake motif flat in rounds; each round is joined with a sl st unless otherwise noted. Use stitch markers at the beginning of each round to keep track of rounds. When changing colors, finish the final yarn over of the last stitch with the new color and carry short tails inside open spaces, or fasten off and weave in ends for a crisp look. Block each motif before joining to ensure flat, consistent shapes. The counts provided are mathematically consistent; check your stitch counts every 2-4 rounds.
— Snowflake Medallion (Make 3) :
Round 1 :
With dusty blue, mr, ch1, 8 sc into ring, pull tight and join with sl st to first sc (8)
Round 2 :
Ch3 (counts as first dc), dc in same st, (2 dc in next st) x7, join with sl st to top of ch3 (16)
Round 3 :
Change to ivory on final yarn over of last dc. Ch1, sc in same st, *(ch4, sk next dc, sc in next dc) repeat from * around to create 8 chain loops, join with sl st to first sc (8 ch4 loops)
Info :
These ch4 loops will form the base for the lace spokes. Keep tension relaxed so they lay flat. If your loops are tight, use ch5 instead.
Round 4 :
Work in each ch4 loop: *(into ch4 loop: sc, hdc, 3 dc, hdc, sc) - this creates a petal. Repeat in each loop around (8 petals). Join with sl st to first sc.
Round 5 :
Ch2 (counts as hdc), hdc in same st, *(ch3, sk to top of petal, sl st in next top of petal) across to next petal center; between petals make picot clusters: in space between petals ch3, 3 sc, ch3, sl st back into same space to form a small bobble cluster). Complete around and join (8 picot clusters)
Info :
Change to ivory reserved. This round establishes the snowflake mid ring and begins spoke formation. Work loosely where ch-spaces are called to keep lacy effect.
Round 6 :
Ch1, sc in same st, *(ch5, into next petal top sl st make 3 sc separated by ch2 loops to create a ladder spike, then sc in next petal top) repeat around to make 8 elongated ch5 spikes; join with sl st (8 spikes)
Round 7 :
Work along each ch5 spike: sl st into first ch space, sc, hdc, (3 dc, ch2, 3 dc) into center of spike to form fan, hdc, sc, sl st to base. Repeat for all 8 spikes and join (round forms 8 fans)
Round 8 :
Ch1, sc in same st, *(ch7, sk to next fan, join with sl st at the base of next fan) repeat around to create 8 long loops (ch7 loops). Join.
Info :
These long loops are the skeleton for snowflake arms. Keep ch7 loops consistent in size so the arms are even. You can use a removable stitch marker to hold the loop length while working.
Round 9 :
In each ch7 loop work: sc, hdc, 5 dc, picot (ch3 sl st to first ch), 5 dc, hdc, sc. Repeat in each loop (8 arms). Join.
Round 10 :
Ch2, hdc in next st, *(in space between arms: ch3, 3 sc, ch3 then sl st to base of adjacent arm) make a small connecting bobble. Work 8 connecting bobbles around; join.
Info :
Change to dusty blue for tiny tip accents. These will appear at the end of each arm for the frosted look. Cut ivory and join dusty blue with a standing sc where desired at the tip of each arm.
Round 11 :
Working in dusty blue at the tip of each arm: join, ch1, (sc, ch2, sc) into tip st to make a small picot cluster. Repeat for each arm tip, complete around and weave in ends.
Info :
Rejoin ivory and work a decorative outer edging to unify the snowflake. Blocking at this point helps the points sit evenly; lightly mist and pin each point straight before continuing outer rounds.
Round 12 :
With ivory, ch1, sc evenly around the entire motif working 1 sc in each dc and 1 sc in each ch-space; when you reach each arm tip work (sc, picot, sc) to emphasize points. Join and fasten off (final count approx 120-140 sts depending on tension).
Info :
Optional reinforcement: if your snowflake feels floppy, work one more round in BLO with hdc across to create a subtle ridge that stabilizes the medallion.
Round 13 :
Ch1, 1 hdc in each st BLO around (120-140 hdc). Join and finish off. Weave ends. Block flat.
— Small Accent Bobble (Make many) :
Round 1 :
With dusty blue, ch4, join to form ring, ch1, 6 sc in ring, join (6)
Round 2 :
Ch2, 2 dc in each st around (12 dc). Pull ring closed slightly and sl st to first dc, finish off leaving short tail. These small bobbles are used at snowflake point junctions and on the connector chain.
Info :
Make 12-18 bobbles to use as accent clusters between snowflake points and along connector chain. Fasten off and weave tails tightly to avoid bobble unraveling.
— Cedar Leaf Sprig (Make 6 between snowflakes) :
Info :
The cedar sprig is constructed as a central stem with multiple 'leaflets' worked as picot loops edged with hdc to create feathery texture. Each sprig consists of a central chain foundation with symmetrical leaflets on each side. Work with sage green and stitch tightly for crisp leaf edges.
Round 1 :
With sage green, ch28 (this makes the central stem and room for leaflets). Sc in 2nd ch from hook and across to end (27 sc). This forms the base row; do not turn.
Round 2 :
Ch1, sc in first 3 sts, *ch10, sl st in next st to form a long loop (left side leaflet), sc in next 3 sts; rep from * across until you reach the end. You will create 4 leaf loops per side (total 8 loops) if chain count and repeats are exact. Join with sl st to final sc.
Info :
Leaf loop length (ch10) can be adjusted for larger or smaller leaves. Maintain even loop sizes for symmetry. Use a stitch marker at the base of each loop to identify attachment points for subsequent edging.
Round 3 :
Working into each ch10 loop individually: join, sc, hdc, 5 dc, hdc, sc; sl st to base. Repeat around each loop to create textured leaflets. Work the sequence for all leaf loops on both sides. After finishing leaflets on one side, mirror the same along the opposite side of the stem by working into the same base sts from the other side so the sprig is symmetric.
Round 4 :
Ch1, sc across stem tops to create a narrow ridge at the stem (27 sc), join and finish off. Weave in ends. Lightly block each leaflet outward to create an even fan shape.
Info :
To create layered texture, you can add a second pass of smaller picot loops: rejoin sage green at tip of each leaflet, ch3 picot, sl st into tip, repeat to create tiny picots along outer edge. This adds a frosted needle-like appearance.
Round 5 :
Optional: At each leaflet tip, join and make a picot (ch3, sl st into lead ch). Repeat for added texture; weave ends.
— Cedar Mini Connector Motif (Make multiples to join chain) :
Round 1 :
With ivory, ch6, join to form small ring, ch1, 8 sc into ring, join (8)
Round 2 :
Ch3, dc in same st, *(ch2, dc in next st) around to create 8 small loops; join. Fasten off leaving long tail for sewing as connector spacer between snowflake and sprig.
Info :
These small ivory connector motifs are decorative anchors where the long connecting chain meets motifs; make 6-8 as needed for spacing when assembling your runner.
— Assembling Snowflake to Sprig (Join-As-You-Go Method) :
Info :
Weave ends and block motifs first. Arrange snowflake, small connector motif, and cedar sprig on a flat surface spaced evenly (photo spacing shows approx 10-12 inches between snowflake centers). Use pins to hold in place. Join with slip-stitch through outer edge stitches or by sewing with yarn and tapestry needle for invisible seams. Use the long tail from connector motifs for sewing in place.
Round 1 :
Sewing instruction: With ivory yarn and tapestry needle, run mattress stitch around the edge where the connector motif meets snowflake at two points, pulling gently to bring pieces flat. Make 10-14 evenly spaced small stitches to secure each join. Knot and weave tails inside motif.
Info :
Position cedar sprigs so leaflets splay outward from the runner centerline. Sew the sprig base to the connector motif and to small stitches on the snowflake outer edge to secure and avoid flipping during use.
— Long Connector Chain (Make 1 long chain to link three medallions) :
Round 1 :
With ivory, ch120 (or desired length to fit your table; ch120 gives about 32-36 inches with slight drape). Join with sl st to form a very loose chain if you want a closed loop, or leave unjoined for linear runner. Work measures and lay across assembled motifs to check fit.
Round 2 :
Along the chain, every 20 ch: join small ivory connector motif by inserting the connector's tail and sewing or slip-stitching ch to motif; add dusty blue bobble cluster at every junction (sl st into bobble center and secure). Continue until chain is attached to both snowflakes and sprigs evenly.
Info :
If you prefer a sturdier connection, instead of a plain chain work 'chain with even sc' by chaining 6 then turn and sc across the chain foundation to make a thicker braided decorative cord. This will be less likely to twist and will hold the motifs more flatly.
— Decorative Outer Edging and Final Reinforcement :
Round 1 :
With ivory, join at one edge of snowflake and work 1 sc in each outer st and 3 sc across each outer picot space to even out edge. When you reach points between motifs, work ch5 loops to create tiny connecting arches that visually link motifs.
Info :
For a unified look, work one more pass where you slip-stitch into the back ridge of the previous round (BLO) and add evenly spaced picots (ch3, sl st) to mimic frost crystals. This adds a subtle raised texture visible in the finished photo.
Round 2 :
Work 1 sc in each st BLO around the entire runner edges where needed, and add picots at regular intervals (approximately every 10 sts) to create consistent decoration. Fasten off and weave all ends behind the runner body.
— Finishing Touches and Blocking :
Info :
Block each snowflake and cedar sprig while wet or steamed. Pin to a blocking mat, stretching each arm and leaflet to the desired shape and size. Allow to dry completely. After drying, check joins and reinforce with small whipstitches where needed. Trim any visible stray fibers. If desired, brush lightly with fabric-safe sheen spray to add a soft frosted sheen.
Info :
Care instructions: Spot clean only; cotton yarn may be gently hand washed and re-blocked flat. Avoid tumble drying to preserve shape.
— Optional Variation: Single Motif Placemat or Runner Extension :
Info :
To make individual placemats, create single snowflake medallions and work the decorative edging fully around one motif without connecting chains. For longer runners, repeat motifs and sprigs in sequence and adjust chain length accordingly. If you want a denser look, add an extra pair of cedar sprigs between snowflakes.
— Stitch-by-Stitch Count Summary :
Info :
Typical snowflake final count after edging: 120-140 sts. Cedar sprig stem: 27 sc across with 8 leaflets. Connector small motif: 8 sc in ring. Long chain: ch120 baseline. Adjust counts proportionally if you alter hook or yarn weight. Always check counts at the end of critical rounds listed above.
Completing this table runner is a joyful blend of lacework and botanical texture — every snowflake and cedar sprig comes together to create a cozy, elegant centerpiece. The mix of ivory, dusty blue, and sage green gives a vintage frosted look that’s perfect for seasonal decor or year-round charm. Blocked and joined neatly, this runner will be a handmade accent you’ll smile at every time you see it. 🧶❄️🌿