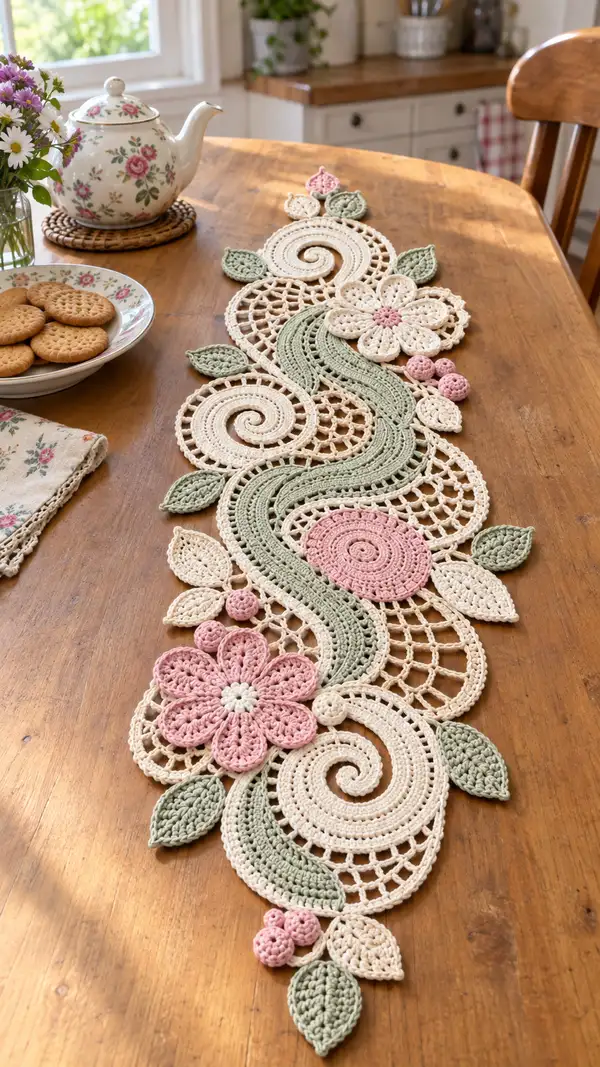
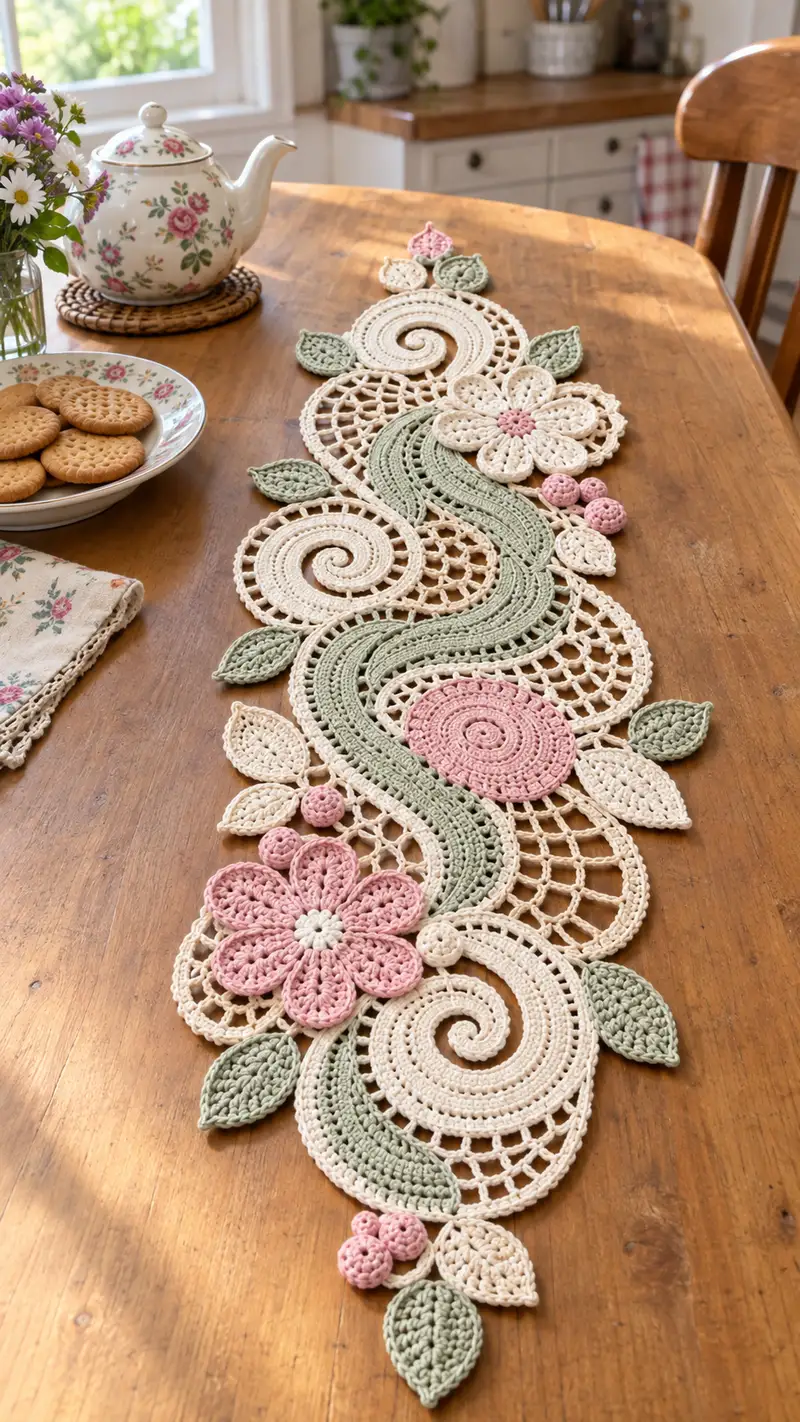
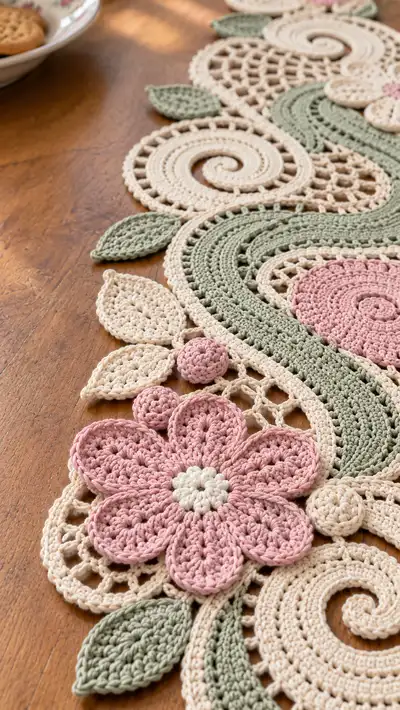
Create an elegant vintage-inspired floral lace table runner featuring spiral motifs, open mesh panels, sinuous leaves and layered flowers in soft cream, dusty rose and sage green. This detailed pattern guides you through each motif — spirals, wavy bands, large layered flowers, tiny berries and leaves — and shows how to join and edge them into a long, romantic runner. Perfect for special occasions or everyday cottage-style charm.
Progress Tracker
0% Complete
— Notes & Overview :
Info :
This runner is assembled from modules: Large Spiral Motifs (cream), Open Mesh Semicircles (cream), Wavy Bands (sage), Large Layered Flowers (dusty rose with cream center), Small Rosette Circles (dusty rose), Leaves (sage & cream) and Small Berries (dusty rose). Work each module flat following stitch counts then join using slip-stitch seams and chain-lattice connections described in the Joining section. Keep the same hook for consistent gauge. Block motifs flat before final joining for best results.
Info :
Gauge is not critical for overall look but will affect final runner length. With worsted cotton and 3.5mm hook, one large spiral motif measures approximately 11-12cm diameter when blocked. The sample runner in the photo measures approximately 90cm long and 20-22cm wide; adjust module repeats to change length.
— Large Spiral Motif (Make 4-6 as shown) :
Round 3 :
(1 sc, 1 inc) x 6 (18)
Round 4 :
(2 sc, 1 inc) x 6 (24)
Round 5 :
(3 sc, 1 inc) x 6 (30)
Round 6 :
(4 sc, 1 inc) x 6 (36)
Round 7 :
(5 sc, 1 inc) x 6 (42)
Round 8 :
(6 sc, 1 inc) x 6 (48)
Info :
Work these increases evenly around. Place a stitch marker at the start of each round to maintain a true spiral center. Keep tension even so the small disk stays flat; if it cups, loosen tension slightly and block later.
Round 9 :
1 sc in each st (48)
Round 10 :
1 sc in each st (48)
Round 11 :
(7 sc, 1 inc) x 6 (54)
Round 12 :
(8 sc, 1 inc) x 6 (60)
Info :
At rounds 11-12 the disc becomes large enough to begin forming a spiral. The technique to create the spiral coil relies on working a partial turning edge next; the spiral is created by offsetting later rounds with chains and slip stitches to pull the outer edge inward.
Round 13 :
1 sc in each st (60)
Round 14 :
1 sc in each st (60)
Round 15 :
*Sc 6, ch 3, sl st in next st* repeat x10 then sc last 0 (60 anchors used; result forms 10 eyelet groups around outer edge)
Info :
Round 15 forms regular eyelets around the disc; keep chain loops loose so they sit flat. This eyelet round guides the lacy openwork seen along the spiral's outer edge.
Round 16 :
Working into scs and chains as follows: *sc 6 into the next 6 sc anchors, 3 sc evenly in ch-3 loop* rep across (approx 60 sc total once completed)
Round 17 :
1 sc in each st (60)
Round 18 :
*(3 sc, ch2, skip 1) x 12* (this creates 12 lace arches anchored to the disc; anchor count remains 60)
Info :
Use these arches to help pull the outer edge under and create the spiral curl when the motif is lightly blocked and eased toward the center. Pin the motif into a gentle S-shape if desired while blocking.
Round 19 :
1 sc in each anchor stitch to reinforce (60)
Round 20 :
Finish with a neat picot edging: *sc 4, picot (ch3, sl st 3rd ch from hook), sc 2* repeat around (maintain approx 60 anchors)
Info :
Fasten off leaving 20cm tail for joining. Make 4-6 of these spiral modules to match the pictured composition. Block each gently to hold spiral shape; pin the spiral curve inward slightly to resemble the photograph.
— Open Mesh Semicircle Panel (Make 6-8) :
Round 3 :
(1 sc, 1 inc) x 6 (18)
Round 4 :
(2 sc, 1 inc) x 6 (24)
Round 5 :
(3 sc, 1 inc) x 6 (30)
Round 6 :
(4 sc, 1 inc) x 6 (36)
Round 7 :
1 sc in each st (36)
Round 8 :
*sc 4, ch 5, sl st in next st* repeat x6 forming 6 large chain loops around (anchors remain 36)
Info :
The mesh semicircle becomes an airy panel when you crochet chain arches across these initial loops. These semicircles fill the negative space between spirals in the final layout.
Round 9 :
Working into each ch-5 loop: *(sc, ch4, sl st in same loop) x 5* to create a net of 5 small arches in each large loop (approx total anchors 36)
Round 10 :
Join adjacent arches with sc in anchor stitches to lock openwork; 1 sc in each anchor (36)
Round 11 :
Edge round: 1 sc in each st around and in each chain arch space as needed to create a smooth semicircular outline (approx 48-54 stitches depending on chaining) - tally anchor count to keep shape even
Info :
If the semicircle ruffles, go back and adjust chain tension in round 8 and 9. Block semicircles flat before joining to avoid puckering.
Round 12 :
Finish with decorative picot or small crab-stitch edge to match spiral edging; *sc 3, picot* repeat around. Fasten off leaving long tail for joining.
— Wavy Sinuous Band (sage) (Make 2 long bands) :
Info :
The wavy sinuous band is worked as an elongated curved strip and uses short rows to form an S-shape that follows the runner center. Work two mirror-image bands to interleave with spirals and semicircles.
Round 1 :
Ch 40, join to form a loop if making a continuous band or work rows back and forth for curvature. For continuous method, sl st to first ch and work rounds.
Round 2 :
Ch1, 1 sc in same st and in next 39 ch (40)
Round 3 :
Ch1, 1 sc in each st (40)
Round 4 :
Work an increase zone to create bulge: *sc 6, inc* repeat x5 then sc last 0 (45)
Round 5 :
1 sc in each st (45)
Round 6 :
Work 3 rows of fpdc and bpdc to create subtle raised ridges for visual texture: Row A: *fpdc around next st, sc next* rep; Row B: *bpdc around next st, sc next* rep
Info :
Use front-post and back-post double crochet to create a corded ridge that adds definition to the green band—this makes the band stand out against the lacy cream background.
Round 7 :
Decrease on one edge to create curvature: *dec, 6 sc* rep x6 (39)
Round 8 :
1 sc in each st (39)
Round 9 :
Repeat shaping: *sc 5, inc* x6 (45)
Round 10 :
1 sc in each st (45)
Round 11 :
Edge: work 1 sc in each st BLO to create a neat ridge along one side (45)
Round 12 :
Decorative openwork on underside: *ch3, skip 1, sc* across to create small chain openings that echo the lace panels; secure at ends with sc to maintain width (45 anchors)
Info :
Make two bands, mirror them (reverse shaping on second band) and block gently so they sit in a graceful S-curve. Adjust ch foundation length to match the runner length you want.
Round 13 :
Finish edges with crab stitch or sc around; fasten off leaving long tail for joining to surrounding motifs.
— Large Layered Flower (Make 2 main flowers) :
Round 1 :
6 sc in mr (6) using cream for center or small contrast block (cream center as pictured)
Round 3 :
1 sc in each st (12)
Round 4 :
Switch to dusty rose. *ch3, 2 tr in next st, ch3, sl st in same st* repeat around to create 6 tall petal foundations (6 petals)
Round 5 :
Work petals: Into each petal foundation work: sl st to base, (sc, hdc, 3 dc, hdc, sc) all into the petal base; fasten off petal and move to next base (this creates rounded full petals)
Round 6 :
Edge each petal with sc and a small picot to define petal edge; sc around petal then picot at tip before returning to base. Repeat for all 6 petals.
Info :
Petal shaping benefits from a smaller hook if you want crisper petals; using the same hook gives a softer petal. Block petals gently with pins to achieve the flattened layered look in the photographs.
Round 7 :
Create second outward layer using slightly larger petals: Attach rose yarn at gap between petals, ch4, (dc, tr, dc) in same gap then sl st to next gap; repeat to form 6 shallow arches for a second layer
Round 8 :
Work into each arch: *sc, hdc, 2 dc, hdc, sc* to form the outer petal row; finish and fasten off leaving long tail to sew flower to runner.
Round 9 :
Optional center rosette: With cream yarn, make a small 8 sc round in mr and join to flower center using whip stitch to fill center as pictured (8 sc, sl st, fasten off)
Info :
Sew the flower center with small, neat stitches. Use extra thread to slightly cup the petals inwards if you want more dimensional blooms.
— Small Rosette Circles / Textured Disc (Make several) :
Round 3 :
(1 sc, 1 inc) x 6 (18)
Round 4 :
1 sc in each st (18)
Round 5 :
Form a raised textured disc by working 1 sc in BLO around (18)
Round 6 :
Finish with 1 sl st around and fasten off leaving long tail for glue/sewing into lace openings.
Info :
These small discs become the dusty-rose centers and berries shown in photo; make varied sizes by adding one more increase round (24 sts) for a larger disc as desired.
— Sculpted Berries (Make in groups of 2-3 clusters) :
Round 3 :
(1 sc, 1 inc) x 6 (18)
Round 4 :
(1 sc in each st) (18)
Info :
Stuff lightly at this stage with a tiny amount of fiberfill or trim yarn tail for a completely flat berry. If you prefer a spherical berry, continue rounds then decrease and stuff firmly; the pictured berries are lightly domed so minimal stuffing is used.
Round 5 :
Start shaping: (3 sc, dec) x 3 (15)
Round 6 :
(2 sc, dec) x 3 (12)
Round 7 :
(1 sc, dec) x 3 (9)
Round 8 :
3 dec (3) - fasten off leaving long tail for sewing; weave tail through remaining sts and pull closed; secure and hide tail inside berry
Info :
Create clusters of 2-4 berries and sew them grouped near flowers or down the runner edge to emulate the photograph. Alternative: create tiny bobbles by working a popcorn stitch into a disc for additional texture.
— Leaves (Make 18-24 leaf motifs) :
Round 1 :
Ch 9, sc in 2nd ch from hook and across (8 sc) - do not join, work back along other side for pointed leaf
Round 2 :
Work up one side: 1 sc in next 3, hdc, 2 dc, hdc, 1 sc; at tip work 3 sc, then work down opposite side mirroring stitches (total approx 18 sts)
Round 3 :
Edge with sc around leaf; fasten off leaving long tail for sewing. Repeat in both cream and sage to create layered leaves as pictured.
Info :
For larger, sculpted leaves work an extra round with BLO sc to create central ribbing. Optionally insert a tiny piece of craft wire before final sewing for poseable leaves.
Round 4 :
Alternative worked in mr (if you prefer symmetric leaves): 6 sc in mr, (inc, sc) around to shape, finish with sc edge. Size will be similar; choose whichever method is comfortable for you.
— Small Accent Petal / Teardrop Motifs (Make multiple) :
Round 1 :
Ch 6, sc in 2nd ch from hook and across (5)
Round 2 :
Work up one side: (sc, hdc, 2 dc, hdc, sc), at tip sc 2, and work down opposite side to base and sl st to join; fasten off (approx 12 anchors)
Info :
These small teardrop shapes are useful to infill junctions between spirals and semicircles. Work in cream or sage depending on surrounding motifs.
— Joining Modules & Mesh Lace Connections :
Info :
Lay out motifs on a blocking mat and experiment with composition — spirals, mesh semicircles and band should interlock leaving small gaps for flowers, leaves and berries to sit into. Pin every motif in place before sewing. Use long tails left from motifs to whip stitch where appropriate and use short chain-lattice joins (ch-5 arches joined with sc anchors) to create the airy connections visible in the photo.
Round 1 :
Start by joining central wavy band to a row of semicircles: with working yarn and right-side up, align edges and using sc through edge stitches of band and through anchor stitches of semicircle, sew through both layers with whip stitch or slip-stitch as preferred; aim for 2-3 stitches per semicircle anchor to secure (sewing is not an even crochet round but follow anchor points)
Round 2 :
To join spiral to mesh: place spiral so its eyelet arches align with semicircle chain arches; secure by slip-stitching through chain loops and spiral edge st at every 5th stitch to create flexible join (approx 10-12 joins per spiral depending on size)
Round 3 :
Fill remaining gaps by slip-stitching teardrops and small discs into chain-lattice openings; where extra support is needed (for heavier flowers) use a few small running stitches with the yarn needle to anchor flower base to surrounding motifs.
Info :
When joining, keep tension relaxed. If joins are pulled tight the runner distorts. Instead, leave a tiny amount of slack in each join so the final piece lays flat once blocked.
Round 4 :
Once all modules are anchored, create decorative lattice bridging across some open spaces: with cream yarn ch long loops spanning gaps and anchor with sc in motifs on either end. Repeat across runner to achieve balanced negative spaces that mimic the sample photo.
Round 5 :
Edge all exposed module seams with 1 sc around to create a unified border; where modules meet create small picots or looped scs to add delicate scalloping (this neat edge gives the runner a finished, cohesive appearance)
Info :
If any sections pucker after joining, unpick and re-pin, easing small amounts of yarn across the join until the surface is flat before re-securing. Blocking after assembly will significantly improve final flatness.
— Final Edging & Blocking :
Round 1 :
Work a unifying picot scallop around the entire runner: *sc 3, picot (ch3, sl st 3rd ch from hook), sc 2* repeating around all outer edges, adjusting repeats to maintain even scallops across curved edges
Round 2 :
Optional beaded border: If desired, work a row of slip-stitches and add small glass seed beads on every 5th st by threading bead onto yarn before making sl st so it sits on the right side; continue around and fasten off.
Info :
To block: pin runner onto a flat board or mat following the gentle S-curve shown in the photograph. Spray with water or use a steam iron at safe distance and allow to dry fully. Blocking smooths the openwork and helps petals and spirals hold their shape.
Round 3 :
Weave all loose ends to the wrong side using a yarn needle. Trim tails close after securing. Ensure all sewn joins are reinforced with a couple extra passes for durability.
Info :
Final trimming: comb through petals and leaves with a soft brush if using cotton yarn to raise a tiny nap for a vintage look. Alternatively, keep crisp and flat for a modern lace aesthetic.
— Finishing Touches & Variations :
Info :
Color variations: Swap dusty rose for mauve or lavender for different palettes. To make a longer runner add extra spiral & semicircle repeats and extend the wavy bands accordingly. For a placemat version, use a single spiral, one semicircle and a small flower with fewer joins.
Info :
Alternative yarn: Linen or bamboo-blend yarn produces a softer drape; synthetics will produce a smoother sheen. Adjust hook size down slightly for non-cotton yarns to maintain crisp openwork.
Info :
If you prefer a completely flat runner with no raised petals, flatten petals during blocking and reduce the front/back post stitches in the wavy band to flatten ridges.
Completing this lace table runner is a rewarding journey that combines structured spirals with romantic floral motifs. Each carefully crocheted element builds into a graceful table accent that's perfect for gatherings or everyday charm. Enjoy the meditative rhythm of working the open mesh and shaping petals, and treat yourself to the satisfaction of a beautifully finished handmade heirloom. 🧶🌸✨