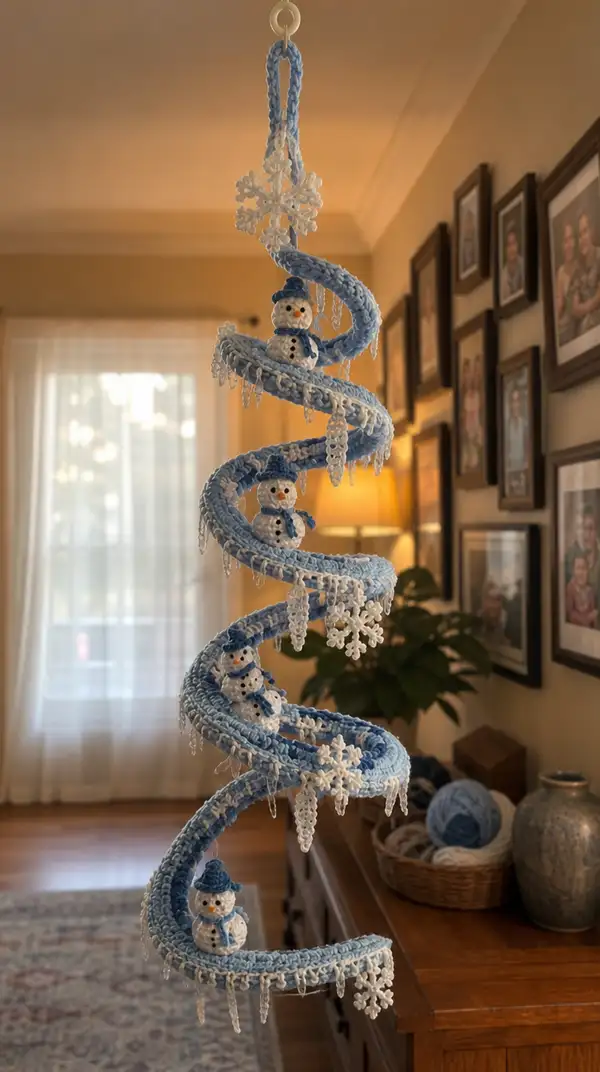
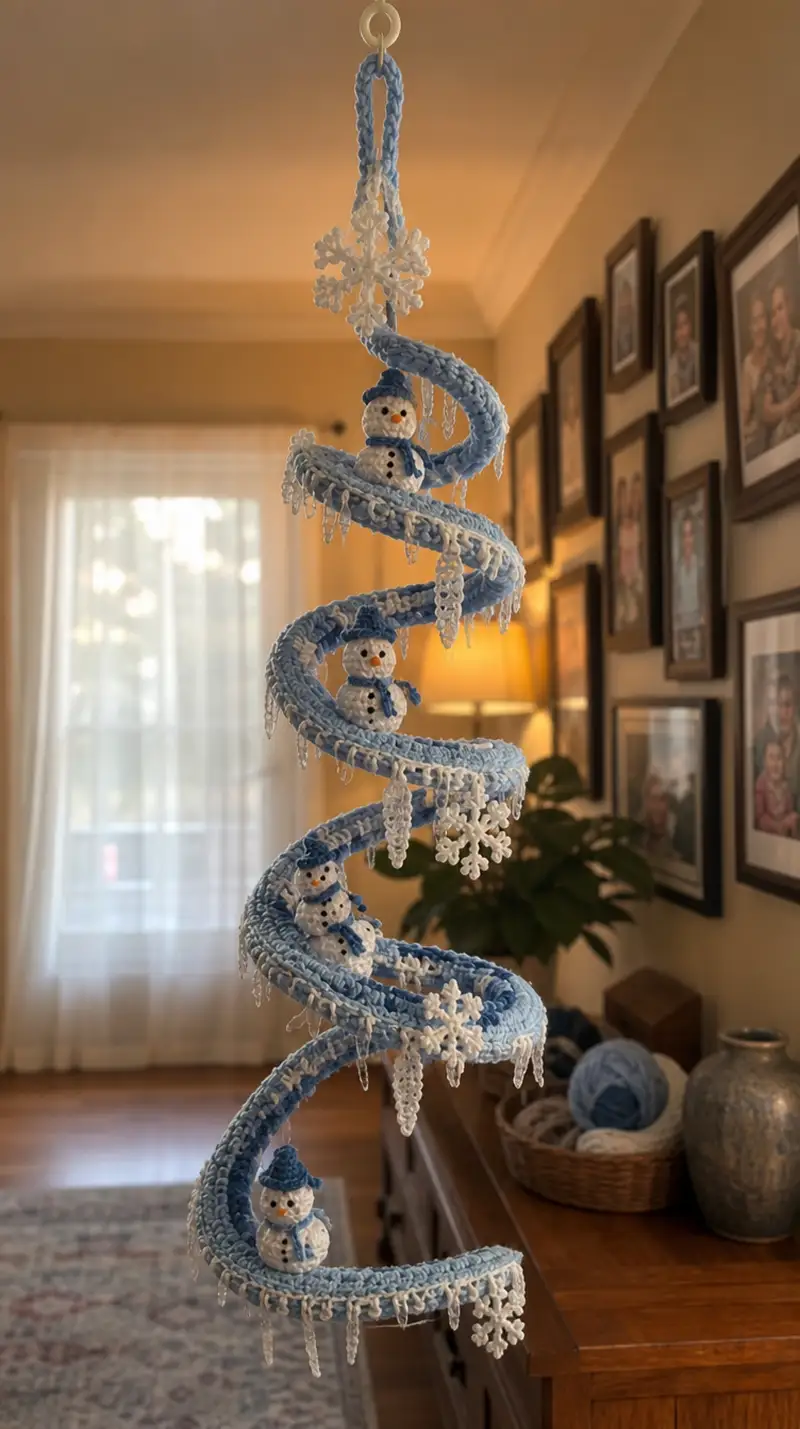
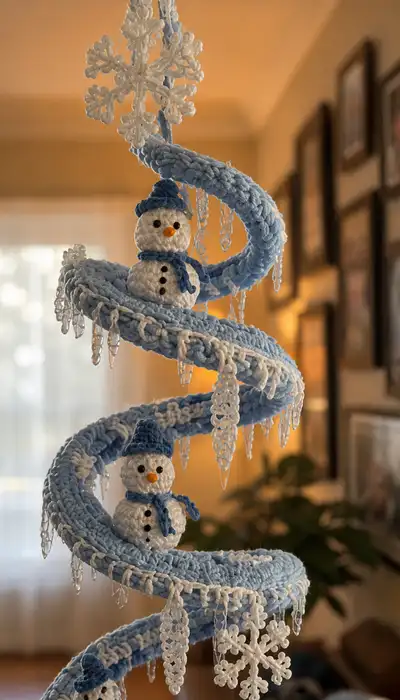
Create a whimsical hanging spiral populated with tiny snowmen, icicles and snowflakes. This airy mobile features a soft, pale-blue spiraled walkway with three sitting snowmen, crocheted white snowflake motifs and sparkling beaded icicles. A blend of plush, super-bulky yarn for structure and finer yarn for details gives this piece a sculptural, festive look—perfect for holiday decor or a cozy winter centerpiece.
Progress Tracker
0% Complete
— Spiral Tower (Main Structural Tube) :
Info :
This long tube is worked in continuous rounds to create a soft but stable spiral 'walkway' that will be coiled into a corkscrew. Use super-bulky yarn and an 8.0mm hook. Insert a flexible craftwire or plastic spiral cable down the center as you work to hold the spiral shape. Plan for approximately 110-140 even rounds for a three-turn spiral roughly 80-120cm long when uncoiled depending on tension. Keep your stitches tight to avoid showing the internal wire.
Round 3 :
(1 sc, inc) x 6 (18)
Round 4 :
(2 sc, inc) x 6 (24)
Round 5 :
(3 sc, inc) x 6 (30)
Round 6 :
(4 sc, inc) x 6 (36)
Round 7 :
(5 sc, inc) x 6 (42)
Round 8 :
(6 sc, inc) x 6 (48)
Info :
We have achieved a comfortable circumference of 48 stitches — this width makes a plush folded walkway that will support small snowmen. If you prefer a wider spiral, continue increases by doing (7 sc, inc)x6 to reach 54 and so on; if you choose this, maintain that count for all even rounds below.
Round 9-18 :
1 sc in each st (48)
Info :
Start planning the position of the three seating platforms by marking round ranges where you will flatten slightly to seat a snowman. Mark these with pins so you can create a firmer, flattened section later with an extra round of surface single crochet or with an applied oval base.
Round 19-28 :
1 sc in each st (48)
Info :
Every 10 rounds, insert the flexible cable/wire and push it gently down the center. Leave a 15cm tail at the top to create the hanging loop later. Test the suppleness of the coil now and again by coiling it loosely around a rolled towel to see how it holds shape.
Round 29-38 :
1 sc in each st (48)
Info :
If you prefer the spiral's top rim to have a contrasting trim (as in the photo), prepare to switch to white yarn for a decorative edge later. You'll carry the white yarn along the edge and work picots or loops to simulate snow icing.
Round 39-48 :
1 sc in each st (48)
Info :
For each seating platform location (we will place three snowmen so space them roughly evenly along the length), plan to flatten an oval platform by working two extra rounds over a 12-14 stitch segment: first, identify the 14 stitches on one side of the tube, then work in FLO for two rounds and add 2-4 sts across that segment to create a slightly wider platform. Mark those stitches with spare yarn.
Round 49-58 :
1 sc in each st (48)
Info :
Begin adding decorative white edging loops: at the end of Round 58, join white yarn and work surface loops around every 3rd stitch for a snow-iced look (details given below). Continue even rounds with blue until the spiral reaches desired length — target an additional 60-80 rounds for three full turns. You will see many even rounds continued below to reach total length.
Round 59-98 :
1 sc in each st (48)
Info :
At rounds 70 and 110 (approx), create the three slight platform bulges: find the stitch markers and in that 12-14 stitch span, work 2 rounds of (BLO) 1 sc in each st, then add an increase round across that span as follows: (3 sc, inc) x 3 across the span to widen it by 3 stitches. This creates a shallow oval seat for each snowman.
Round 99-138 :
1 sc in each st (48)
Info :
Continue until the tube is long enough to coil three times with approximately 15-18cm between each coil when loosely hung. For the exact look in the photo aim for a finished uncoiled length near 120cm. Stop when you have reached your target length and are ready to finish the lower tail of the spiral.
Round 139 :
(6 sc, dec) x 6 (42)
Round 140 :
(5 sc, dec) x 6 (36)
Info :
These decreases give a tapered tail that looks neat when the spiral finishes. Continue stuffing the tube slightly with fiberfill where necessary to preserve the roundness — the tube should be plush but not overstuffed so it can bend around the internal wire.
Round 141 :
(4 sc, dec) x 6 (30)
Round 142 :
(3 sc, dec) x 6 (24)
Round 143 :
(2 sc, dec) x 6 (18)
Round 144 :
(1 sc, dec) x 6 (12)
Info :
Fasten off leaving a long tail to weave into the inside of the tube and secure to the internal wire. If your spiral has the top loop, leave a longer tail (30-35cm) to wrap and bind the wire end and create a neat hanging loop.
— Decorative Edge (Snow Icing and Loops) :
Info :
Work a contrasting white edging along the outer rim of the spiral to create the frosty, scalloped look from the photo. You will work these loops after the spiral is complete, joining white yarn to the outermost edge and working a repeating motif around every 3rd or 4th stitch: chain loop and sc anchor for a droplet effect.
Round A1 :
Join white yarn at an outer edge stitch; *ch 8, sl st into next outer edge stitch; rep from * around, finishing with sl st into join. The chains form looped icicle anchors.
Round A2 :
Working into each ch-8 loop: sl st, ch 1, (picot: ch3, sl st into first ch) 3 times along the loop, sl st into base to secure. This makes short scalloped clusters to look like frozen drips.
Info :
For longer icicle loops attach bead icicles (see Icicle Drops section) to some of the chain loops for variation. Stagger bead icicles and crocheted snowflakes to create visual interest.
— Snowman: Head (Top Ball) :
Info :
Each snowman is a two-ball amigurumi: a larger lower body sphere (body) and a smaller top sphere (head). Use white worsted yarn and a 4.0mm hook. The head section below includes 27 rounds to form a smooth small sphere approximately 3.5–4cm diameter with the recommended yarn/hook. Make three identical sets (heads and bodies) for the mobile.
Round 3 :
(1 sc, inc) x 6 (18)
Round 4 :
(2 sc, inc) x 6 (24)
Round 5 :
(3 sc, inc) x 6 (30)
Round 6-10 :
1 sc in each st (30)
Info :
Place safety eyes between rounds 8-9 spaced 6-7 stitches apart for the sweet expression shown. If using embroidered eyes, add them after stuffing. Start stuffing lightly after round 8 to keep the sphere rounded.
Round 11 :
(3 sc, dec) x 6 (24)
Round 12 :
(2 sc, dec) x 6 (18)
Round 13 :
(1 sc, dec) x 6 (12)
Info :
Fasten off leaving tail for sewing to the body. Stuff firmly but not overstuffed; the head should be rounded and slightly firm to sit neatly on the body sphere. Embroider or glue a small orange nose and stitch small black mouth dots before closing if easier.
— Snowman: Body (Lower Ball) :
Info :
The body sphere is worked slightly larger than the head so the snowman reads clearly. This version has 22 rounds and finishes around 5-6cm diameter. Use same white yarn as head.
Round 3 :
(1 sc, inc) x 6 (18)
Round 4 :
(2 sc, inc) x 6 (24)
Round 5 :
(3 sc, inc) x 6 (30)
Round 6 :
(4 sc, inc) x 6 (36)
Round 7-12 :
1 sc in each st (36)
Info :
Begin stuffing the body firmly after round 9. The body should be plump enough to sit nicely in the shallow platform on the spiral. Add a small amount of stuffing into the bottom to flatten slightly so the snowman sits steady.
Round 13 :
(4 sc, dec) x 6 (30)
Round 14 :
(3 sc, dec) x 6 (24)
Round 15 :
(2 sc, dec) x 6 (18)
Round 16 :
(1 sc, dec) x 6 (12)
Info :
Leave a long tail and do not fasten off completely: you will use the tail to sew the head to the body securely. Stuff firmly and shape the bottom so the snowman can sit with a small flat base if desired.
— Snowman Assembly (Sewing Head to Body and Features) :
Info :
Sew the head to the body using the tail left from the body. Place the head centered on top of the body and use mattress or whip stitch around the seam for an invisible join. Add a small dab of hot glue inside for extra security if the mobile will be handled frequently (optional).
Round S1 :
Using black yarn, embroider or sew three small buttons vertically on the front of the body: tiny French knots or sewn beads create the look of coal buttons.
Round S2 :
Attach small orange cone nose: embroider a tiny satin stitch triangle or sew a small cone of orange yarn to the center of the head between the eyes.
Info :
If using safety eyes, be sure to secure their backings before stuffing fully. If you prefer an embroidered look, use tiny straight stitches for eyes and a small curved line for a smiling mouth using black yarn.
— Hat (Make 3) :
Info :
Little beanie hats are worked in medium blue worsted yarn with a 4.0mm hook; simple top-down beanie pattern fits these small heads. Make three matching hats.
Round 3 :
(1 sc, inc) x 6 (18)
Round 4 :
(2 sc, inc) x 6 (24)
Round 5-7 :
1 sc in each st (24)
Info :
Fold up a small cuff and sl st across to secure if you want a rolled brim like the photos. To create a slightly pointy top like a knit hat, work a decrease round after round 7: (2 sc, dec) x 6 to create shallow shaping then close tightly and fasten off. Sew hat onto head using hidden stitches.
— Scarf (Make 3) :
Info :
Each scarf is a short chain with single crochet rows in blue or contrasting color. Work lightly and leave long tails to tie around the snowman neck. Add fringe by knotting short strands of yarn to the ends.
Row 1 :
Ch 18, sc in 2nd ch from hook and across (17)
Row 2-3 :
Ch 1, turn, 1 sc in each st (17)
Info :
Fasten off leaving a long tail to tie the scarf around the neck. Add 3-4 short fringe strands on each end by folding 3 strands of yarn and pulling through the edge loops, then knotting and trimming evenly.
— Snowflake Motifs (Make 6-8) :
Info :
Small crocheted six-point snowflakes are worked in white fine or worsted yarn using a 3.25–4.0mm hook. These attach to the spiral outer chain loops and are spaced between icicles.
Round 1 :
Ch 6, sl st to first ch to form a ring, ch 3 (counts as dc)
Round 2 :
*(dc, ch 3, dc) in ring to form petal; sl st in ring; rep from * 6 times to create 6 petals (12 dcs total separated by spaces)
Round 3 :
Work into each ch-3 space: (ch 4, sl st into space) x 6 to create decorative loops; fasten off and block gently to flatten snowflake.
Info :
For a more openwork, add a fourth round of picots at the tip of each arm: sl st into outer loop, ch 3, sl st into base to make small picots. Attach snowflakes to the spiral using a few stitches or a clear thread so they dangle freely.
— Icicle Drops (Beaded) :
Info :
The realistic, crystalline icicles in the photos are produced using clear beads strung on monofilament or fine transparent thread. Pre-string 8-18 small glass seed beads in tapered sequences per icicle and secure to chain loops on the spiral. Alternately crochet clear-bead chains if you have beading experience.
Round B1 :
Cut monofilament approx 25–35cm long. String beads in this pattern: (1 small bead, 2, 3, 4, 3, 2, 1) to form a tapered drop — total approx 16 beads. Tie a small knot at the end and secure by flattening with a dab of clear-drying glue inside the bottom bead then trimming excess.
Round B2 :
Attach the top of the bead chain to a chain loop on the spiral by threading the monofilament through the loop and tying several secure knots; hide knot inside the top bead with a dab of glue. Vary the lengths and density around the spiral to imitate natural icicle variation.
Info :
Space icicles roughly every 3rd to 6th outer loop; cluster some groups near snowflakes for a denser sparkle. If you prefer no beads, make crocheted picot drops by chaining 12, working slip stitches back and adding picots.
— Optional Twig Arms (Make 2 per snowman if desired) :
Info :
Snowmen in the featured photos do not have twig arms, but if you want arms, use brown worsted yarn and a 3.5–4.0mm hook to make simple 6-8 round twig-like arms that are lightly stuffed with no wire or with floral wire for poseability. Attach into the side seam of the body before final closing.
Round T1 :
Ch 6, sl st to join into ring, ch1, 6 sc into ring (6)
Round T2-6 :
1 sc in each st (6)
Info :
At round 6 dec with 3 sl st across first 3 stitches to taper the tip, leaving long tail for sewing. Insert a short piece of floral wire if you want poseable twig; fold wire tip and cap with a knot in yarn before stuffing slightly and sewing to body.
— Final Finishing Touches (Blocking, Hanging Loop and Shaping) :
Info :
Once all components are completed, weave in all ends. Coil your spiral gently and shape it around a cylindrical object to form an even corkscrew, adjusting the internal wire as needed. Attach the top hanging loop: bind the top wire tail with yarn and wrap firmly, then form a stitched-covered loop by chaining approx 30 with the super-bulky yarn, join ends and whipstitch the chain to the top to make a neat loop.
Round F1 :
Position the three snowmen along the spiral at the pre-marked platform bulges. Use pins to temporarily hold them in place and adjust spacing until visually balanced (roughly equal distances of the coil between each snowman).
Round F2 :
Sew snowmen to the spiral platform: using the long tail from each snowman body, stitch through the underside of the spiral tube and then up through the center of the snowman base, whipstitching around to secure the seam. Reinforce with 10–12 sturdy stitches per snowman base for stability.
Info :
Attach snowflakes and icicle drops last so you can check balance. Trim any stray yarn and do a final shaping pass, squeezing the spiral gently to even coil spacing. Hang and admire—if one side droops, add a small hidden weight inside the lower tail to rebalance.
This hanging winter spiral brings a touch of handmade magic to any room — soft blue coils, tiny cheerful snowmen and sparkling icicles create a cozy holiday centerpiece. Each stitch contributes to a sculptural, whimsical scene that catches light and warms the heart. Enjoy assembling the details and personalizing colors, then hang your creation proudly! 🧶❄️✨