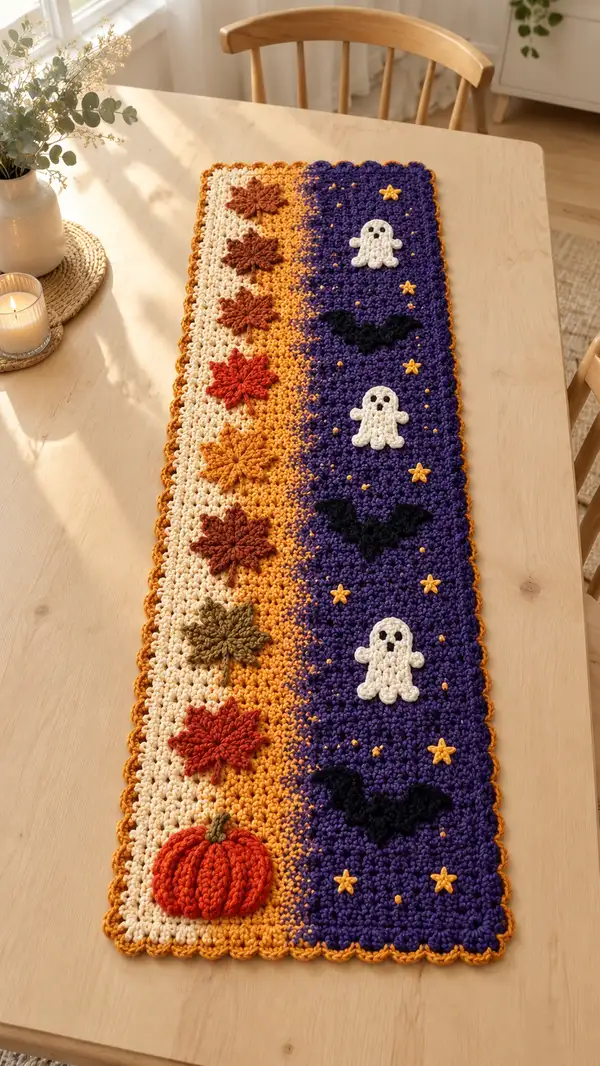
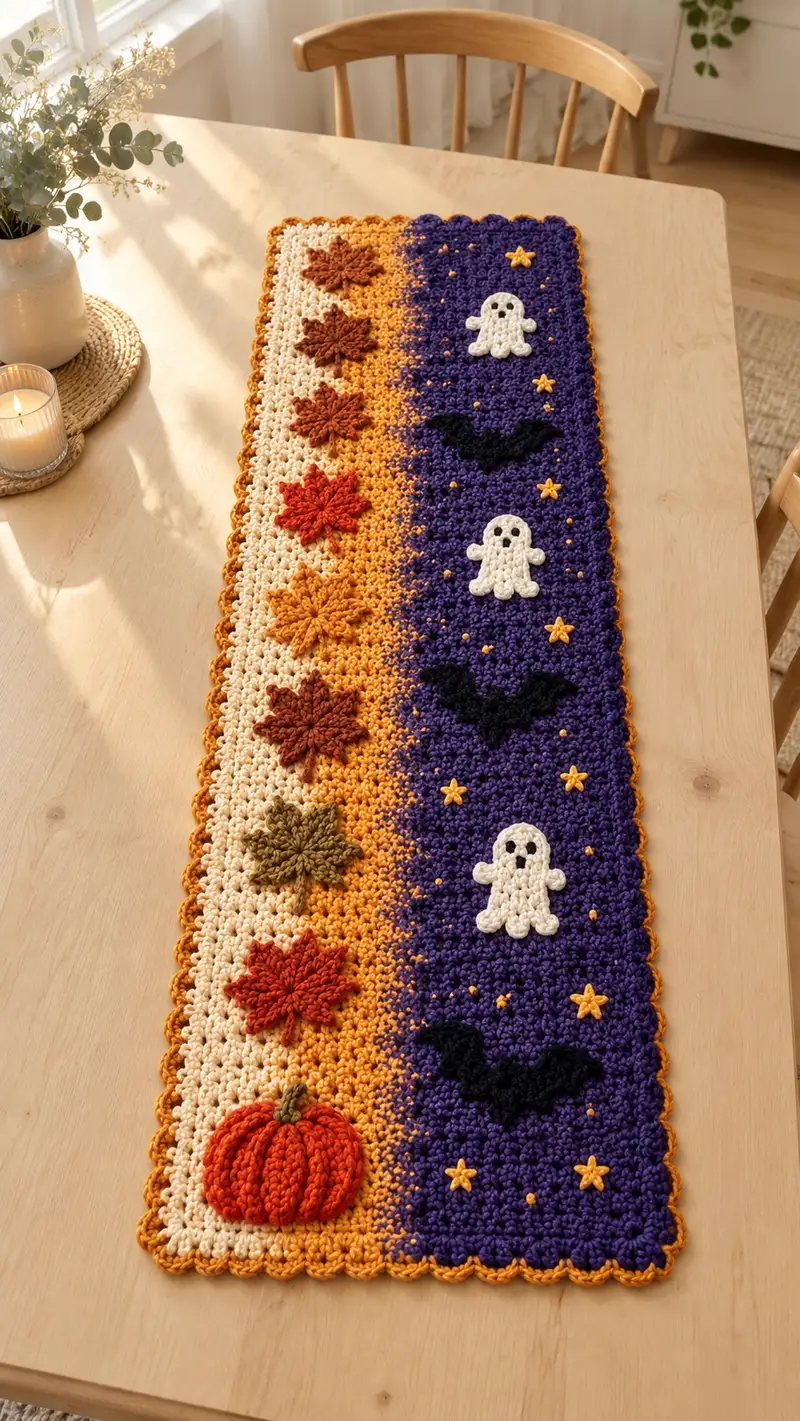
A cozy, long table runner combining autumn leaves and Halloween motifs in a textured cluster stitch. This seasonal runner features a warm left panel of cream, gold and leaf appliques and a deep purple right panel with ghosts, bats and tiny star accents. Finished with a scalloped edge in pumpkin orange, it adds handmade charm to any dining table or console.
Progress Tracker
0% Complete
— Notes & Special Techniques :
Info :
This runner is worked flat in rows using a compact 3-dc cluster stitch on a foundation chain multiple of 3 plus 1. The left panel is worked in cream transitioning to golden yellow/orange to create a gradient. The right panel is worked in a deep purple. Appliques (pumpkin, leaves, ghosts, bats, stars) are crocheted separately and sewn on. Maintain consistent tension throughout; block lightly after finishing for best results.
Info :
Cluster stitch used: 3-dc cluster. To make a 3-dc cluster: yo, insert hook, pull up a loop (3 loops on hook), yo, pull through two loops; repeat into next st twice (you will have 4 loops on hook), yo and pull through all loops to close cluster. Count the cluster as 1 stitch for repeat math.
— Base Panel (Foundation & Cluster Rows) :
Foundation :
Ch 73 (this is 3 x 24 + 1; you will have 24 cluster repeats across + 1 edge stitch). This width makes a long, narrow runner; change chain count by multiples of 3 to make your runner wider or narrower.
Row 1 :
RS: In 2nd ch from hook, sc across first edge ch, ch1, skip next ch and beginning cluster: *make 3-dc cluster across next 3 ch*; rep from * to * 24 times, ending with 1 sc in last ch to maintain edge (24 clusters + 1 edge).
Row 2 :
Ch 1, turn. Sc in first sc edge, ch1, *3-dc cluster in next 3 loops of previous row (work into top of cluster or into chain space as preferred so cluster sits nicely)*; rep to end, sc in last edge st (24 clusters + 1 edge). Work all rows with a turning ch1 for density. Keep RS facing you on odd rows.
Info :
If you prefer a tighter edge, work first and last st of each row as hdc instead of sc. This will create a slightly raised border for applique placement.
Row 3-8 :
Repeat Row 2 in Cream/Ivory (work 6 rows total after the foundation to create the first cream block). Maintain 24 cluster repeats across each row. Place a stitch marker at start of Row 3 and move up each row for easier tracking.
Info :
While working the cream panel, carry the next color (golden yellow) up the side on the wrong side if you plan to create a smooth gradient later; otherwise cut and weave ends for clearer stripes.
Row 9-14 :
Change to Golden Yellow (Info: change color at end of Row 8 by pulling through with new color in final sl st). Work 6 rows of cluster stitch in golden yellow to form the mid gradient. (24 clusters + 1 edge each row)
Info :
Create a soft gradient: during Rows 13-14 alternate cluster colors across the row in small groups (see mixture instructions below). For example, in a single row: *2 clusters in golden, 1 cluster in purple* repeat to begin soft blending between panels when you are ready to merge into purple.
Row 15-18 :
Change to Pumpkin Orange for 4 rows (this builds a brighter stripe to transition to purple). Work cluster stitch rows as before. (24 clusters + 1 edge)
Info :
To create the speckled transition seen in the photo, on Row 17 alternate single clusters in purple in a random spaced pattern across the orange row (for example: make clusters 1-3 in orange, cluster 4 in purple, clusters 5-7 orange, cluster 8 purple etc.). This produces small purple speckles on the orange band.
Row 19-26 :
Change to Deep Purple. Work 8 rows in purple to form the dark night-sky panel. (24 clusters + 1 edge per row). These eight rows form the first purple section where appliques will be attached later. Place temporary pins where you plan to attach ghosts and bats so you remember placement.
Info :
When changing between large color blocks, fasten off or carry yarn on WS, making sure floats are caught every 2-3 stitches to keep the wrong side tidy. For longer floats, cut and weave to avoid snagging.
Row 27-34 :
Repeat the cream → golden → orange → purple block sequence down the length of the runner. For this pattern, repeat the color block group twice to create the long runner: work Rows 3-26 twice more (making ~56 rows so far). Keep counting rows using a row counter or notebook so appliques align symmetrically.
Info :
This runner in the photo appears to have roughly three repeating motif bands vertically. Adjust your repeats to reach desired length. The sample length finished at approximately 30-36 inches; add more repeats to lengthen the runner.
Row 35-60 :
Continue repeating the striping sequence, adding speckles and random purple-dotted clusters on the golden/orange band as desired, until you have reached the total desired runner length (the sample uses approximately 60 rows total of clusters across the full runner; continue until satisfied). Always maintain 24 cluster repeats across each row plus 1 edge stitch.
Info :
When you reach the section where appliques will be sewn, stop and pin them in place on the RS to check spacing. This is easiest when the panel is still unblocked, as you can adjust tension to align motifs.
— Pumpkin Applique (Make 1 large pumpkin) :
Info :
Work the pumpkin in Pumpkin Orange. This is a slightly domed applique worked in joined rounds and finished with surface ridges for the ribs of the pumpkin. Use a 3.5mm hook for tighter stitches. Stuff lightly for dimension.
Round 1 :
Make magic ring, 6 sc into ring. Tighten (6)
Round 3 :
(1 sc, inc) x 6 (18)
Round 4 :
(2 sc, inc) x 6 (24)
Round 5 :
(3 sc, inc) x 6 (30)
Info :
Begin shaping the dome: these increase rounds form the pumpkin base. Stuff lightly at the end of Round 5 to give the pumpkin a gentle plumpness. You will add surface ridges later with either slip-stitch lines or yarn-over embroidery.
Round 6 :
1 sc in each st around (30)
Round 7 :
Work 2 rounds of 1 sc in each st to firm the shape (30)
Round 8 :
(3 sc, dec) x 6 (24) — begin shallow decreases to round the top slightly
Round 9 :
(2 sc, dec) x 6 (18)
Round 10 :
(1 sc, dec) x 6 (12)
Round 11 :
6 dec (6) — do not fasten off; leave tail for sewing
Info :
Stuff firmly through the opening before finishing Round 11. Close the remaining hole and weave tail through remaining stitches to secure. Add surface ribs by using a strand of darker orange and sewing 6 evenly spaced lines from top to bottom, pulling slightly to form ridges. Sew a small stem in dark brown with 6 sc in magic ring, 2 rounds of sc, fasten off and attach to top center of pumpkin.
— Maple Leaf Appliques (Make 6 leaves in assorted colors) :
Info :
Leaves are made flat and worked in rows. Use a slip-stitch join at the base to form the leaf stem. Colors: rust, burnt orange, olive, deep brown, and two shades of red. Each leaf measures roughly 2.5 - 3 inches across in worsted weight.
Leaf Round 1 :
Ch 7. Row 1: sc in 2nd ch from hook and in next 4 ch (5 sc), ch1, turn. (5)
Leaf Row 2 :
2 sc in first st, hdc in next, dc in next, hdc in next, 2 sc in last (creates a pointed tip). Ch1, turn. (7)
Leaf Row 3 :
Sc2tog across first two sts to create slight indentation, sc across middle sts, sc2tog across last two sts — creates center dip (5)
Leaf Row 4 :
Repeat Row 2 in reverse to mirror the other half: 2 sc in first, hdc, dc, hdc, 2 sc in last. Fasten off leaving a long tail for sewing (7)
Leaf Row 5 :
Fold leaf in half lengthwise and use surface slip stitch with the long tail to create the central vein and a worked stem tail. Weave tail to WS and secure. Block gently to open shape.
Info :
Sew leaves spaced about 2 inches apart along the cream/golden band, staggering colors for visual interest. Use pins to confirm placement before sewing.
— Small Ghost Applique (Make 3) :
Info :
Ghosts are worked in white in joined rounds for a small, slightly ruffled base with little arms. They are lightweight and require no stuffing. Use black embroidery for eyes and mouth after attaching to panel.
Round 1 :
Make magic ring, 6 sc into ring (6)
Round 3 :
(1 sc, inc) x6 (18)
Round 4 :
Work 2 rounds of 1 sc around (18)
Round 6 :
Begin shaping ruffle: *sc in next 2 sts, 3 dc in next st* repeat around to make scalloped base (this forms the ghost skirt). Count approx 6 scallops depending on placement.
Round 7 :
Ch1, turn. In RS, work reverse single crochets in top loops only to firm top edge for sewing. Fasten off leaving long tail.
Info :
Using black yarn, embroider two small eyes and a small round mouth near the top center of the ghost; keep expression friendly and spaced evenly. Attach ghosts in staggered vertical positions on purple panel.
— Bat Appliques (Make 3) :
Info :
Bats are worked flat in black in simple winged shapes; keep them thin so they sit flat against the textured background. Use firmer tension to avoid curling.
Round 1 :
Ch 11. Row 1: sc in 2nd ch from hook, sc across (10). Ch1, turn. (10)
Row 2 :
Sc in next 3, hdc, dc, hdc, sc in last 3 (10) — this creates a central arch.
Row 3 :
Fold and attach wing points: sc2tog across first two sts, ch3, sl st into center arch, ch3, sc2tog across last two sts. Fasten off leaving tail for sewing. Shape wings by sewing small darts at inner wing points.
Info :
Place bats alternating with ghosts on purple panel. Pin, then sew using black yarn with small hidden stitches to keep profile sharp against the textured background.
— Star Appliques (Small & Large) :
Star Small :
Ch 6, join to form ring. Round: *Ch 3, sl st into ring, ch1, sc into ring* rep 5 times to create 5 points. Fasten off and weave ends. Use bright yellow for small stars. (5 points)
Star Large :
Ch 8, join. Round: *Ch 4, sl st into ring, ch1, hdc into ring* rep 5 times to make larger points. Fasten off and attach sparsely across purple panel.
Info :
Small yellow french knots or single crochet dots (worked in bright yellow) can be added around appliques to mimic tiny glowing sparks—create these by bringing yarn up through RS and making a small knot by wrapping yarn twice around needle and pulling tight.
— Attachment & Spacing Info :
Info :
Use the photo as a guide: the cream/gold vertical strip occupies roughly 1/3 of the runner width (left third), the purple night-sky occupies right 2/3. Place the pumpkin at the short end corner of the cream band. Stagger 6 leaves vertically along the cream column, leaving roughly 1.5-2 inches between them. On the purple side, arrange ghost, bat and star groupings roughly centered in each purple block, pinning and stepping back to view spacing before sewing.
Info :
Sew appliques using yarn needle and a length of the applique color to make invisible stitches; secure ends on the WS and weave in for several centimeters to keep them secure during washing and use.
— Scalloped Border :
Info :
Once all appliques are sewn, finish the runner with a scalloped border in pumpkin orange to frame the piece. Work around the entire rectangle with even spacing for scallops. Use RS facing.
Round 1 :
Attach pumpkin orange yarn with sl st at a corner. Work 1 round of sc evenly around edge, placing 3 sc in each corner to maintain square shape. Keep 1 sc per cluster edge stitch (approx 49-52 sc per long side depending on final blocking).
Round 2 :
Ch 1, *skip 2 sc, 5 dc in next sc, skip 2 sc, sl st in next sc* repeat around to create scallops. At corners work 5 dc into corner sc for even turning. Fasten off and weave in ends. This creates a neat scalloped edge similar to the photo.
Info :
Block the finished runner lightly to straighten and even out stitches. Use steam blocking or wet blocking depending on fiber content of yarn. Pin scallops evenly while drying for crisp edges.
— Finishing Touches :
Info :
Weave all ends to the wrong side and trim. Ensure appliques are firmly attached. If small gaps show under appliques, use a few invisible stitches along the applique edge to anchor them. Optional: add a small dab of fabric glue under the center of larger appliques to prevent shifting in transit or during washing.
Info :
Final measurement tip: After blocking, check runner length and width; if border scallop tightens the edge too much, add an extra round of sc in a matching color before scallops to widen slightly.
This autumn-Halloween runner brings seasonal charm to the table with a delightful mix of warm leaves, a plump pumpkin and playful night-sky critters. The textured cluster stitch and dimensional appliques create a handcrafted statement piece that feels cozy and festive. I hope making it brings you the same joy it gives sitting on your table — a perfect seasonal centerpiece! 🧶🎃🍂