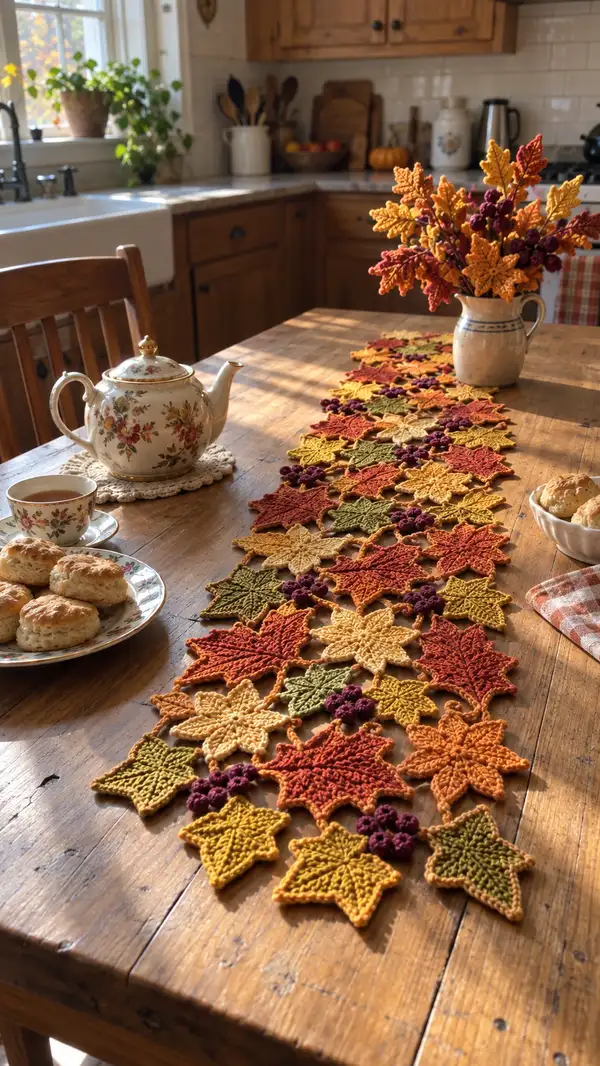
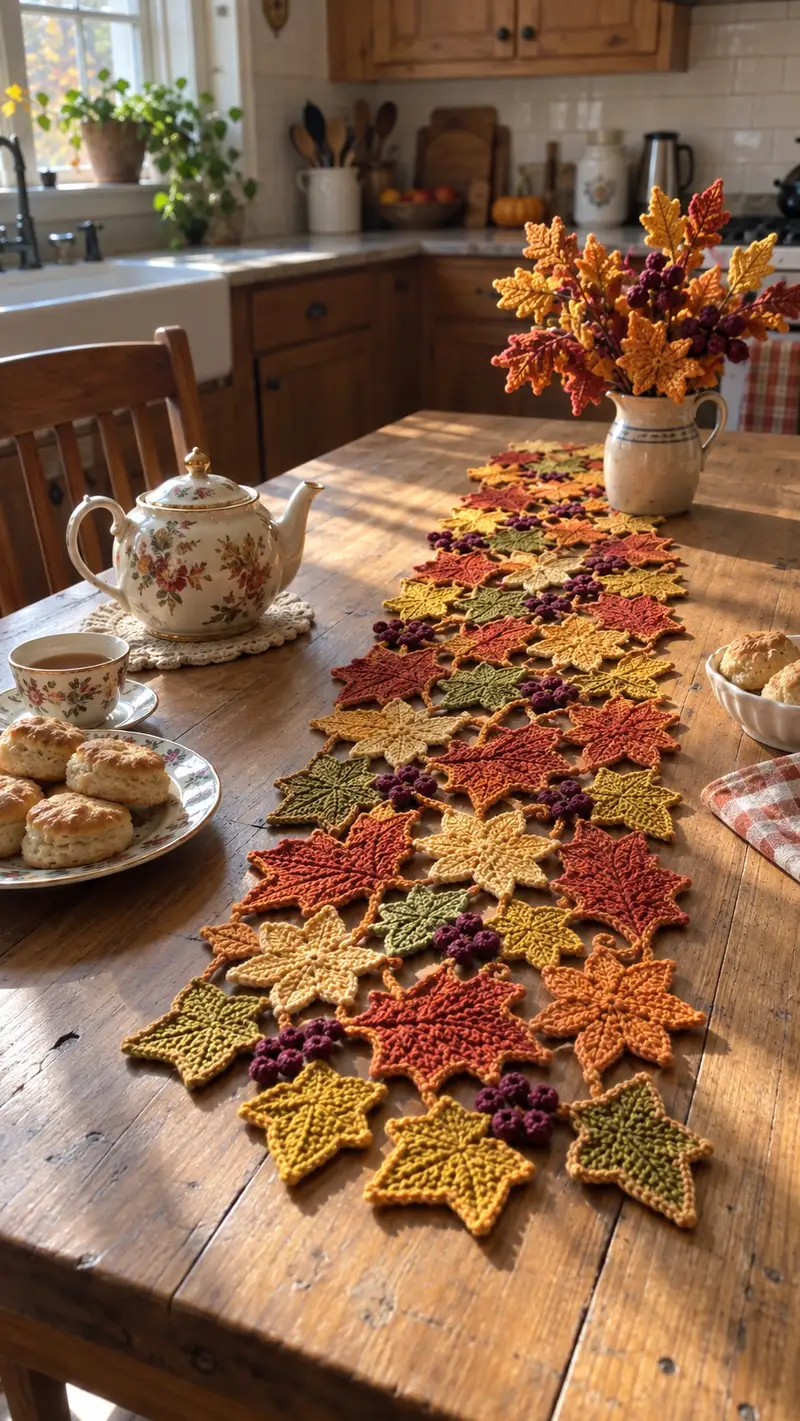
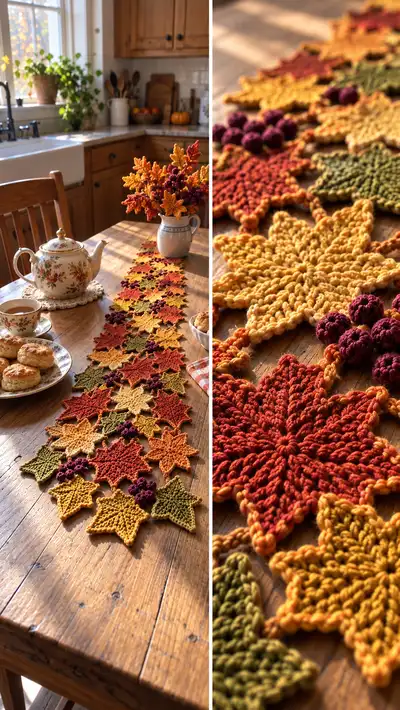
Create a warm, vintage-inspired autumn table runner made from linked crochet leaf motifs, tiny ivy stars, and clustered berry bobbles. This pattern uses rich fall tones—mustard, rust, olive, and plum—to form a long, organic runner perfect for seasonal decorating. Each motif is crocheted flat, joined with simple chains and slip-stitch joins, and finished with a delicate scalloped edging. A thoughtful project that showcases texture and color for a cozy table display.
Progress Tracker
0% Complete
— Overview :
Info :
This pattern builds the runner from repeat motifs: Large Maple Leaf, Small Maple Leaf, Little Ivy Star, and Berry Clusters. Make motifs individually, block them flat, then join with short decorative chains and slip-stitch joins. The sequence and color placement are fully customizable. This pattern gives instructions for one large leaf, one small leaf, one ivy star, one berry cluster, and a joining / edging scheme—you will repeat these elements to achieve the full runner.
— Large Maple Leaf :
Round 1 :
mr, 8 sc into magic ring (8)
Round 3 :
(1 sc, inc) x 8 (24)
Round 4 :
(2 sc, inc) x 8 (32)
Round 5 :
(3 sc, inc) x 8 (40)
Round 6 :
(4 sc, inc) x 8 (48)
Round 7 :
1 sc in each st (48)
Info :
Place a stitch marker at the first stitch of Round 7 to define the start of a repeat of 8 segments. You will create 8 petal bases around this center; marker helps you find the beginning of each petal.
Round 8 :
*ch6, sl st into next st* around to form 8 loops (no change to center stitch count - this round forms 8 loops used as petal foundations)
Info :
Loop round: when you ch6 and sl st into next base stitch you are creating an outward loop on which a petal will be worked. Keep loops evenly tensioned; if a loop is too tight the petal will pull inward.
Round 9 :
Work petals into each ch6 loop: sl st into loop, ch1 (counts as turning), 1 sc, 1 hdc, 3 dc, 1 hdc, 1 sc, sl st to base (work this sequence into each of the 8 loops, resulting in 8 petals; petal total ~56 stitches placed on loops)
Round 10 :
Rotate to the front of each petal and work 1 sc in the top of each petal stitch across: (for each petal: sc into the base of petal top, sc into adjacent post) - this creates a small ridge across each petal (approx 56 sc total)
Info :
This is the first texture round: work into the tops of the petals and into the base circle to make a crisp junction. If stitches look loose, use a smaller hook for these rounds only to tighten texture.
Round 11 :
*(ch3, sl st into third ch to form a small picot at petal tip), sl st into next petal base* repeat for all 8 petals creating a decorative tip (no base stitch increase)
Round 12 :
Join around petals by working 1 sc in each join stitch along petal bases to pull the petals closer to the center (approx 48 sc equivalent gathered around center)
Info :
At this stage the leaf has 8 pronounced lobes. Block the motif flat before moving on to add vein texture so the raised stitches will be even after finishing.
Round 13 :
Change to main leaf color if you used a contrast for petal tops. FPdc around alternate central stitches to begin raised vein lines: *FPdc around next base st, sc next st* repeat across the center (total will match base, approx 48 raised posts)
Round 14 :
Between each FPdc of previous round work an sc to stabilize: 1 sc between each FPdc (48)
Round 15 :
To emphasize the central vein on 4 main points: on every other petal front post group work 2 FPdc in same base stitch to make a slightly higher ridge (this creates four taller ridges positioned evenly)
Info :
You should now have textured vein ridges radiating from the center. Use a contrasting brown thread very sparingly if you want delicate veins by overlaying thin embroidery stitches along these FPdc ridges.
Round 16 :
Work a finishing round: 1 sc in each st around the entire motif, including around petal tips and connections (count will vary depending on how you stitched petals but expect around 88-96 sc - this round smooths the edges)
Round 17 :
Edge scallop round: *sl st into next 2 sts, (3 sc, picot) in next st, sl st next 2 sts* repeat around to create gentle scalloped petal edges. End with sl st to join
Info :
Fasten off and weave in ends. Press lightly when blocking to flatten petal centers but keep the picot tips slightly three-dimensional. Expected finished diameter: approximately 4.5-5.5 inches depending on tension and yarn.
— Small Maple Leaf :
Round 1 :
mr, 6 sc into magic ring (6)
Round 3 :
(1 sc, inc) x 6 (18)
Round 4 :
(2 sc, inc) x 6 (24)
Round 5 :
1 sc in each st (24)
Round 6 :
*ch5, sl st into next st* around to form 6 loops (this creates six small lobes)
Round 7 :
Work petal into each ch5 loop: sl st into loop, sc, hdc, dc, hdc, sc, sl st to base (repeat x6; petal stitches ~6 per petal, ~36 total)
Info :
Small leaves are quick and designed to tuck between large leaves. Block small leaves flat immediately for consistent size.
Round 8 :
1 sc around base to tidy join (approx 24 sc)
Round 9 :
Small scallop: *sl st next st, (3 sc in next st), sl st next st* repeat around to make slight lobed edge. Fasten off and weave in ends.
Info :
Finished small leaf measures roughly 2.25-3 inches across depending on yarn and tension.
— Little Ivy Star (small 5-point leaf) :
Round 1 :
mr, 5 sc into magic ring (5)
Round 3 :
(1 sc, inc) x 5 (15)
Round 4 :
Work 5 short points: *ch6, sl st into next base stitch* x5 creating five loops
Round 5 :
Into each loop work sl st, sc, hdc, dc, hdc, sc, sl st (repeat x5) - results in five tidy points (approx 30 petal stitches)
Info :
Ivy stars are used to fill negative space and give an organic look. They are small and quick - make many while you have your color palette out.
Round 6 :
Work 1 sc around to tidy base and create a small edge, fasten off (approx 15 sc)
Round 7 :
Optional: With contrasting thread embroider a thin vein from center out along each point using surface slip-stitches.
Info :
Use these stars to connect larger leaves or to visually separate clusters; their size should remain consistent so plan layout before joining.
— Berry Cluster (make cluster of five small berries) :
Berry - Round 1 :
mr, 6 sc into magic ring (6)
Berry - Round 2 :
inc around (12)
Berry - Round 3 :
(1 sc, inc) x 6 (18)
Berry - Round 4 :
Work 1 round of bobble-ish texture: *(yo, insert, pull up loop)x3, yo and draw through all loops on hook to create bobble*, sl st to next st - repeat bobble 6 times creating a textured ring (this round produces a tight textured berry surface)
Berry - Round 5 :
Dec round: (1 sc, dec) x 6 (12)
Berry - Round 6 :
6 dec (6) - finish with small opening. Fasten off leaving short tail, weave through last round to close if needed. Make 3-5 berries and sew them together closely to form a compact cluster of berries (we used clusters of 4-5 in the sample)
Info :
When assembling the berries into a cluster, use short tail ends and a mattress stitch or backstitch to join the berry bases to one another tightly. Keep clusters small, about 1-1.25 inches across.
— Connector Chain & Joining Motif :
Round 1 :
Work a decorative chain connector: ch30 (or longer/shorter for spacing), sc into second ch from hook and along chain back forming a tiny cord (approx 28 sc) - repeat for the length you need between motifs
Info :
Connectors are made in a coordinating color (we used a warm brown/orange that reads as a neutral). Chains create airy negative space. Keep connector length consistent between joins for a neat runner.
Round 2 :
Joining technique (slip-stitch join-as-you-go): Lay the next motif next to a placed motif, align petal tips and sl st through both motifs at regular intervals (every 3-4 sts) to create a secure but flexible join. When joining chain connectors, slip-stitch chain ends under a petal tip or into the base round of the motif.
Info :
Pin motifs in their final positions on a blocking board before joining to ensure even spacing and angle. Work joins on the right side for neater visible joins, and avoid tight stitching that pulls motifs out of shape.
Round 3 :
To create staggered layered layout: join one large leaf to two small leaves at its sides, add an ivy star between large leaf tips, and attach a berry cluster near the center where seams meet. Use 6-8 slip stitches per contact point to anchor motifs securely.
Info :
Plan your runner layout on a table: alternate color placement to avoid clumping same-color leaves together. Photograph layout or take notes so you can recreate arrangement if interrupted.
— Edging & Final Scallop :
Round 1 :
Once all motifs are joined into your desired runner length, work a unifying border along the outer edges: 1 sc evenly around entire perimeter, working 2 sc in corners or exposed points (st count varies by runner length)
Round 2 :
Scalloped border: *(skip 1 st, 5 dc in next st, skip 1 st, sl st in next st)* repeat around. This creates small shell scallops framing the motifs.
Round 3 :
Optional tightening round: 1 sc around edging to tidy scallops and secure join ends. Fasten off and weave in all tails. Light steam-block the runner into final shape, pinning points and scallops gently to open them.
Info :
Because the runner stretches across a table it benefits from gentle blocking; do not over-stretch leaves—just open the points so they sit flat and even.
— Pattern Repeat & Sizing Guidance :
Info :
To achieve the pictured table runner length (approximately 60-72 inches): make 18 large leaves, 18-24 small leaves, 12 ivy stars and 12-16 berry clusters, and join them in an alternating staggered pattern across two or three columns depending on your width preference. For a shorter runner of about 36 inches, reduce repeats proportionally (for example: 8 large leaves, 8 small leaves, 6 ivy stars, 6 clusters).
Info :
Repeat motifs exactly to keep the runner balanced. Count motif repeats as you lay them out and take photo reference as you progress so color distribution remains pleasing.
— Finishing Touches :
Info :
Weave in all ends on the wrong side of the runner so the right side stays clean. Use a small amount of matching yarn to tack down any raised bits that might flip up. For extra weight and stability, sew small hidden fabric or driftwood beads under the runner at intervals to help it stay centered on the table.
Info :
If you plan to launder the runner, choose machine-washable yarn and test one motif first. Hand washing and laying flat to dry is safest to preserve crisp edges and colors.
Info :
Pattern yields flexible design—feel free to substitute cotton for a crisper drape or acrylic for easy care; modify hook size by 0.25-0.5 mm to maintain motif sizes.
This autumn leaf table runner brings the softness and color of the season into your home with handcrafted charm. Each leaf and berry cluster is a small celebration of texture and hue, sewn together to create a flowing, organic centerpiece you can be proud of. 🧶 Arrange it long and lean or shorten it for a cozy pumpkin vignette—this design makes a heartfelt handmade gift or a warm addition to your own table. Happy stitching and may every stitch add a little more autumn warmth to your home! 🍂✨