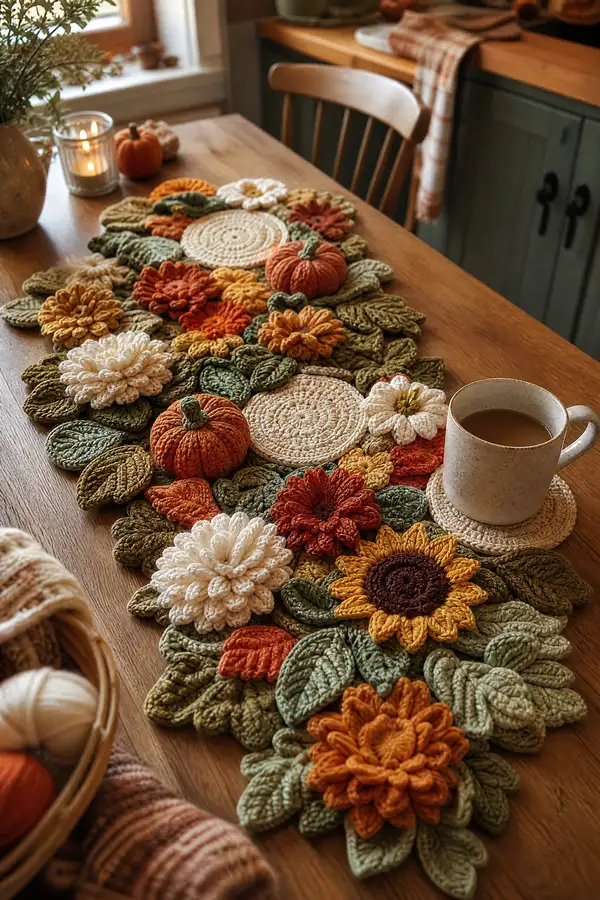
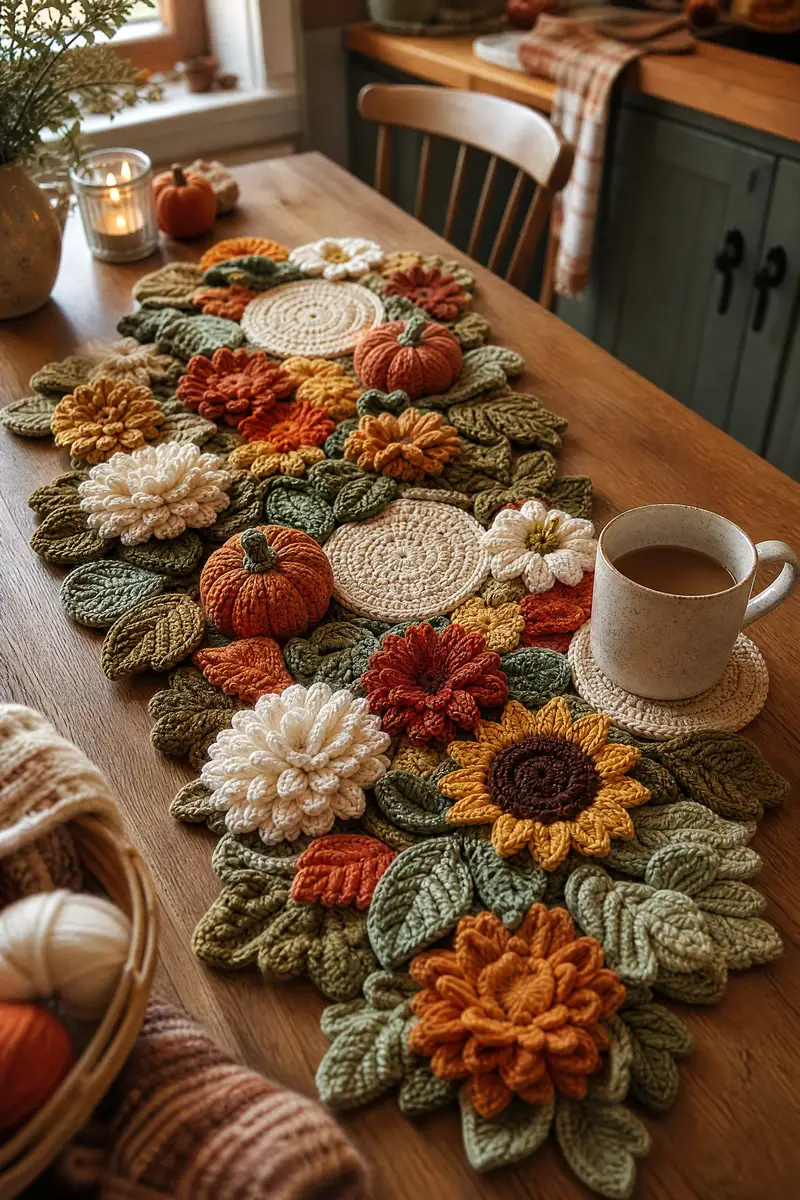
A cozy, textured table runner inspired by autumn mums, pumpkins and layered leaves. This pattern combines circular coasters, 3D pumpkins, layered chrysanthemums and sculpted leaves in warm fall tones. Use worsted weight yarn and basic stitches with textured puff and bobble techniques to assemble a stunning seasonal centerpiece. Perfect for decorating a dining table, sideboard, or as a thoughtful handmade gift.
Progress Tracker
0% Complete
— Notes & Gauge :
Info :
Gauge isn't critical for this decorative runner, but a sample 10 cm circle worked in sc with 4.0 mm hook should be approximately 22 sts in round 8. Work tightly for textured motifs so backing doesn't show through.
Info :
Worked in modular motifs: Round/coaster discs, leaves, three flower types (chrysanthemum, layered mum, sunflower), small 3D pumpkins and various filler flowers. Pieces are joined by whip stitch and crocheted join rows. Follow color suggestions or substitute for your palette.
— Foundation Circle Coaster (make multiple) :
Round 1 :
6 sc in magic ring (6)
Round 3 :
(1 sc, inc) x 6 (18)
Round 4 :
(2 sc, inc) x 6 (24)
Round 5 :
(3 sc, inc) x 6 (30)
Info :
Change to cream or chosen disc color now if desired. Keep tension even to avoid ruffles.
Round 6 :
1 sc in each st (30)
Round 7 :
(4 sc, inc) x 6 (36)
Round 8 :
1 sc in each st (36)
Round 9 :
(5 sc, inc) x 6 (42)
Round 10 :
1 sc in each st (42)
Round 11 :
Work 1 round sc BLO (42) to create a subtle rim (42)
Info :
Fasten off and weave in ends. Slight blocking with steam will flatten disc for joining. Make at least 6-8 of these for larger runner layout.
— Large Leaf Motif (Make 24-32 leaves total in two green shades) :
Round 1 :
Ch 10, sc in 2nd ch from hook, sc 7, 3 sc in last ch, continue working on opposite side of chain, sc 7, 2 sc in last ch (ends meet) (~20 sts total)
Round 2 :
Ch 1, turn, 2 sc in first st, sc in next 7, (2 sc, ch1, 2 sc) in center tip for point, sc in next 7, 2 sc in last st (24)
Round 3 :
Ch 1, 1 sc in first 2 sts, hdc in next 4, dc in next 6 (tip area), dc dec over next 2 sts, hdc in next 4, sc in last 2 (24)
Round 4 :
Ch 1, sc BLO in each st around to create leaf ridge (24)
Round 5 :
Ch 1, sc around working 2 sc in center tip to form stronger point (26)
Round 6 :
Ch 1, BLO sc around (26)
Round 7 :
Work a decorative vein row: ch 1, *sl st 3, ch 2, sl st 3* across center top to create ribbing; fasten off (leaves will measure approx 9-10 cm)
Info :
Alternate leaf sizes by starting with ch 8 for small leaves (reduce counts accordingly) and ch 12 for larger. Use two shades of green and alternate placement for depth.
— Simple Petal Flower (Daisy style) :
Round 1 :
6 sc in magic ring (6)
Round 2 :
Inc in each st (12)
Round 3 :
(1 sc, inc) x 6 (18)
Round 4 :
Ch 2, *(3 dc all in same st), sl st in next st* around to make 6 petals. Fasten off and weave in ends.
Info :
Use mustard or cream for petals, brown or rust for small centers. Make many small daisies to fill gaps.
— Sunflower (Center disc + Petals) :
Center Round 1 :
6 sc in magic ring (6)
Center Round 2 :
6 inc (12)
Center Round 3 :
(1 sc, inc) x 6 (18)
Center Round 4 :
(2 sc, inc) x 6 (24)
Center Round 5 :
Sl st to next st and change to dark brown. Ch 1, 1 sc in each st around (24)
Petal Round 1 :
Change to yellow/gold. *Ch 3, (3 tr) in next st, ch 3, sl st in same st* repeat around to create 12 petals (24 sts base)
Info :
Make 3-4 sunflowers of different sizes: a larger center disc (work two more increase rounds before petal round) and smaller ones with fewer increases. Slightly coil petals with steam for a lifelike look.
— Chrysanthemum / Layered Mum (Large puff petal flower) :
Round 1 :
6 sc in magic ring (6)
Round 3 :
(1 sc, inc) x 6 (18)
Round 4 :
(2 sc, inc) x 6 (24)
Info :
Start puff petal rounds now. Use a slightly larger hook or looser tension for puff stitches so petals sit up nicely.
Round 5 :
Ch 1, *(yo, insert hook, pull up loop) 4 times in same st, yo and draw through all loops, ch 1, sl st in next st* repeat around to make 24 short puff petals. Fasten off color if doing layered palette.
Round 6 :
Attach contrast color behind petals: Sl st behind each petal into the base round, ch 2, *(5 dc cluster in base, sl st in next st)* repeat around to form back row of petals (24 clusters)
Round 7 :
Ch 2, in the gap between previous clusters work 3 tr, sl st to form second outer layer of upright petals. Fasten off and weave ends.
Round 8 :
Optional: Work a final decorative round around petal bases sc around in BLO to create a neat underside (48)
Info :
For extra fullness, make two slightly different sized chrysanthemum layers and sew them together staggered so petals nest between each other.
— Layered Mum with Puff Loops (Alternate chunky mum) :
Round 3 :
(1 sc, inc) x 6 (18)
Round 4 :
(2 sc, inc) x 6 (24)
Round 5 :
Make looped petals: *ch 6, sl st back into same st, sl st into next st* around to create 24 loops. Fasten off and change color for top loops.
Round 6 :
Attach top color behind loops and make cluster puff: *(yo, insert hook, pull up loop) 5 times in base, yo and draw through all loops, sl st in next st* around. Fasten off and shape loops outward.
Info :
These layered mums are great focal pieces—make 2-3 large and several medium-sized to place visually along runner center.
— Small Textured Flower (Filler) :
Round 2 :
Inc in each st (12)
Round 3 :
Ch 2, *2 dc in next st, ch 1* around to create 12 small petals, sl st to join. Fasten off (12 petals)
Info :
Make many of these in mustard, rust and cream to fill gaps and create color transitions between large motifs.
— 3D Pumpkin (Small, make 3-4) :
Round 3 :
(1 sc, inc) x 6 (18)
Round 4 :
(2 sc, inc) x 6 (24)
Round 5 :
(3 sc, inc) x 6 (30)
Round 6-8 :
1 sc in each st around (30)
Info :
Switch to pumpkin orange yarn now. Start stuffing lightly after round 7. Use small amounts of fiberfill gradually.
Round 9 :
(3 sc, dec) x 6 (24)
Round 10 :
(2 sc, dec) x 6 (18)
Round 11 :
(1 sc, dec) x 6 (12)
Round 12 :
6 dec (6) - leave long tail, finish stuffing firmly and close opening. Do NOT fasten off yet; you will create pumpkin ribs next.
Info :
To create ribs, use surface slip stitch or gather stitches with yarn: thread yarn around pumpkin vertically in 6-8 evenly spaced lines and pull gently to create ribbed segments. Secure ends at top and bottom tightly and weave in.
Round 13 :
Make a 6-8 stitch stem: with green, ch 5, sl st back along chain, fasten off leaving tail; sew stem to top center. Add small knit-like curl if desired.
Info :
For larger pumpkins, start increasing longer (add rounds 5-7 with more increases) and use more ribs to keep proportion.
— Pumpkin Ribbing Option (Surface Crochet) :
Round 1 :
With yarn threaded on tapestry needle, insert at top center and bring down to bottom center, wrap around base and up to top, repeat for 6-8 evenly spaced ribs. Tie off at top and weave ends.
Info :
Pull gently when tightening ribs to shape pumpkin. Use a blunt knitting needle to push stuffing into ribs for crisp valleys.
— Connecting Fillers and Small Leaves :
Round 1 :
Make small leaves: ch 6, sc 5 back along chain, 3 sc in last ch, sc 5 back other side, fasten off (small leaf approx 4-5 cm)
Round 2 :
Make small spiraled roses: ch 26, sc in 2nd ch and across, then roll strip and whip stitch into coil to secure; tack to runner where needed.
Info :
Use small filler pieces to bridge gaps — these are essential to create the flowing organic edge of the runner.
— Layout & Joining Strategy :
Info :
Arrange all motifs on a flat surface in your desired runner shape before joining. Alternate large mums and discs, tuck pumpkins within clusters, and layer leaves under flower bases. Pin securely before sewing.
Joining Round 1 :
Option A: Whip stitch join — place two motifs right sides together and whip stitch around 8-12 stitches to secure. Option B: Crochet join — hold motifs wrong sides together and sc through both edges, placing 1 sc in each st around to join seams.
Joining Round 2 :
To create a continuous runner edge, crochet a joining chain between two discs: attach yarn to disc A, ch 6, join to disc B with sl st, then sc around both motifs to secure. Repeat between clusters to build runner length.
Info :
For best results use whip stitch for 3D pumpkins so seams remain flat and sturdy; use crochet join for flat motifs to create decorative ridged seams.
— Decorative Edge & Final Crochet Border :
Round 1 :
Once all motifs are joined into desired runner shape, work a single crochet border around entire assembled piece: sc evenly around edges, placing 3 sc in each concave edge to keep runner flat.
Round 2 :
Work a shell border for a finished look: *skip 2 sc, 5 dc in next sc, skip 2 sc, sl st* repeat around. Fasten off and weave in ends.
Info :
Edge rounds can be worked in a contrasting moss green or neutral cream for a refined finish. Block lightly after finishing to flatten joins and shape runner silhouette.
— Assembly Order Suggestion :
Info :
Arrange in repeating clusters: two discs, one large chrysanthemum, one sunflower, 2-3 layered mums and one pumpkin, with leaves framing each cluster. Repeat cluster to fit table length. Leave slight irregularity to mimic natural clusters.
Round 1 :
Sew pumpkins into cluster centers first, then attach large mums around them, placing discs as anchors. Add sunflower and daisies for contrast, and tuck leaves last.
Info :
When sewing, use small mattress or slip stitch-style stitches for nearly invisible joins. Reinforce pumpkins with extra stitches to secure weight.
— Blocking & Finishing :
Info :
Pin each flat motif on blocking board to desired shape. Steam lightly without soaking. Carefully flatten 3D pumpkins on base only if needed. Once dry, stitch edges together permanently and work final border.
Info :
Weave in all tails using yarn needle; for a neat finish trim close to fabric and tuck ends into stitches. Spray lightly with fabric starch or use a light spray starch for a firmer runner if desired.
— Pattern Variations & Scaling :
Info :
To make a longer runner add extra clusters and discs. To make a placemat instead, make a central larger disc (add 2-3 increase rounds) and surround with 6-8 mums and leaves.
Info :
To change scale: use DK yarn and 3.5 mm hook for a smaller delicate runner, or bulky yarn with 5.0-6.0 mm hook for thick chunky look—adjust motif count to table size.
— Final Tips :
Info :
Work in small batches: crochet all discs first, then leaves, then flowers, then pumpkins. This production-line approach makes assembly easier and keeps color palettes consistent across motifs.
Info :
Keep sample motif as a reference for stitch counts and size while making multiples so that all motifs remain consistent in scale.
This autumn table runner brings cozy farmhouse charm to your table with layered mums, pumpkins and sculpted leaves. Each motif is handcrafted and assembled to create a lush, textured centerpiece you'll be proud to display. The patterns invite creativity — mix colors, scale motifs or add seasonal accents to match your decor. Enjoy the slow work of crochet and savor each stitch as your runner takes shape. 🍁🧶