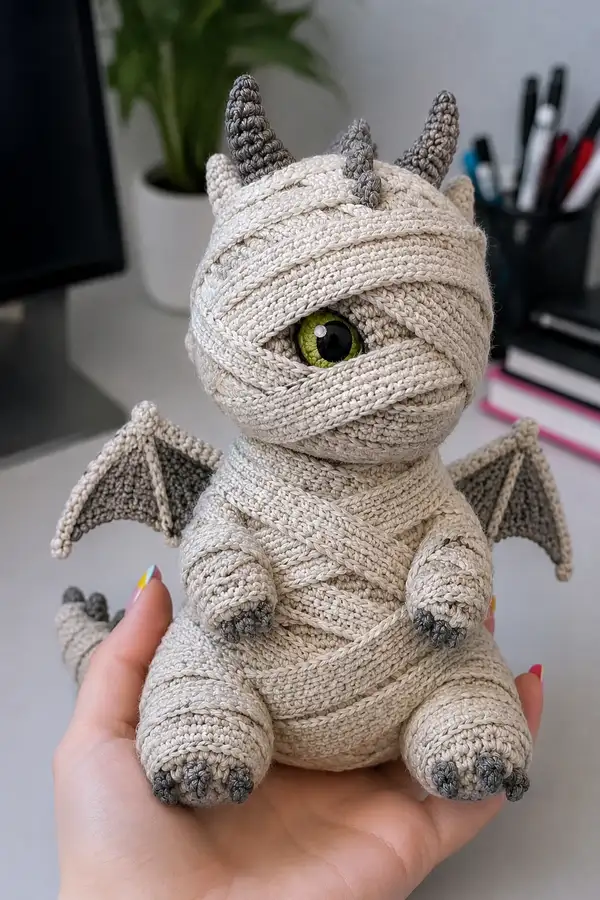
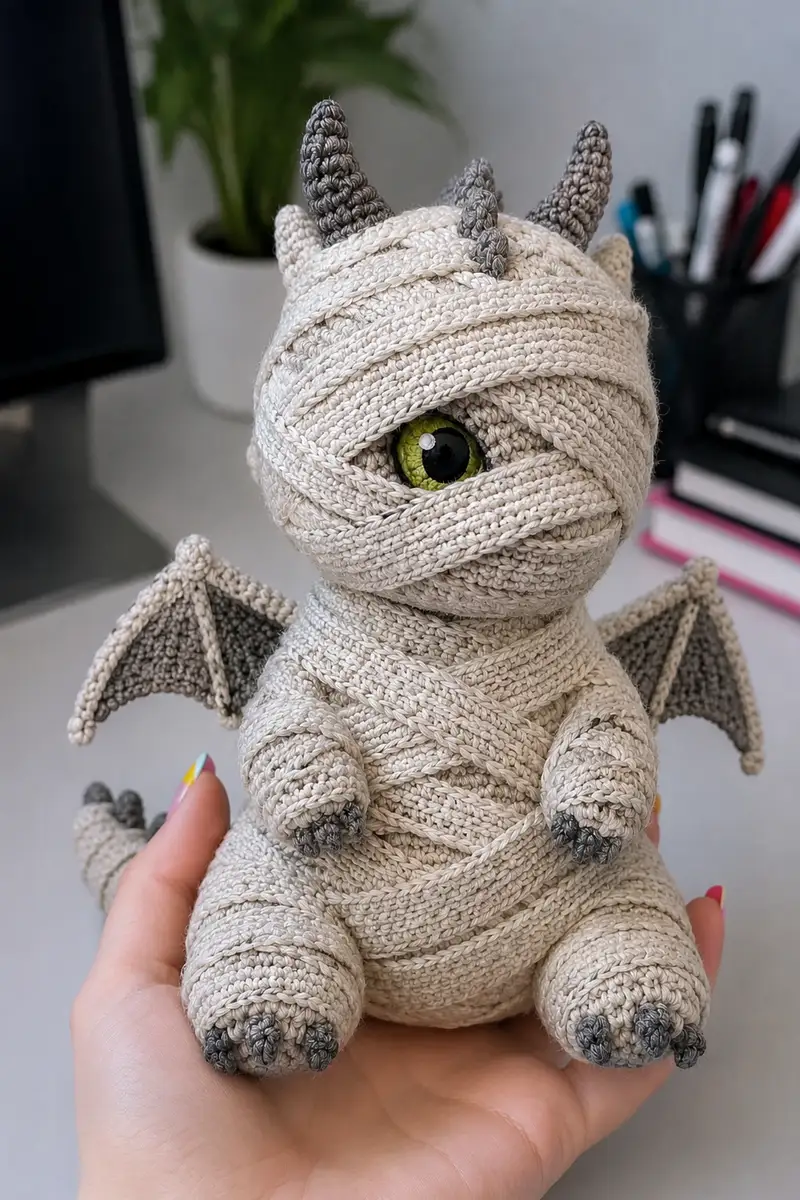
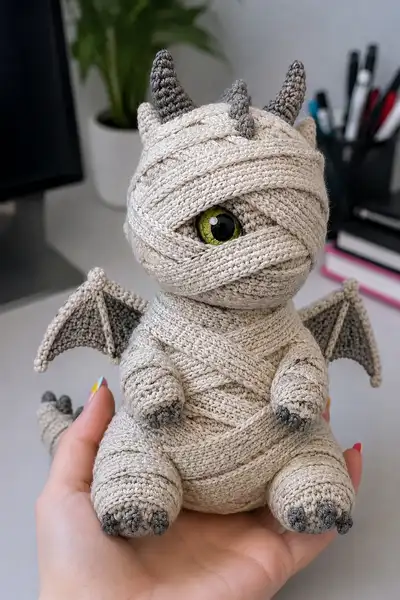
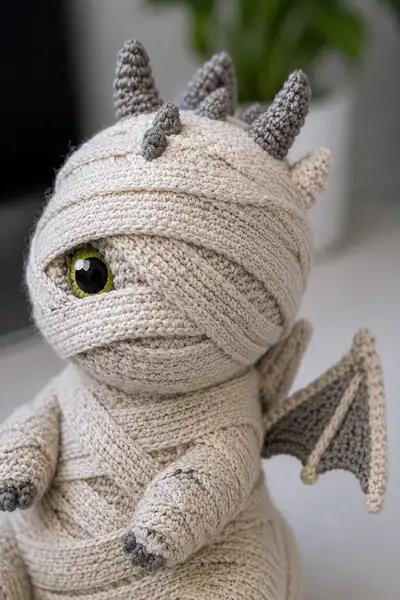
Make a snuggly, whimsical mummy-dragon amigurumi wrapped in textured bandage strips with one curious peeking eye. This plush combines soft neutral yarns with contrasting grey claws, horns and wing membranes for a playful Halloween or year-round companion. The pattern guides you through head, body, limbs, wings, tail, spikes and layered bandage strips so you can create a heavy-wrapped, very tactile dragon with great personality.
Progress Tracker
0% Complete
— Head :
Round 1 :
6 sc in magic ring (6)
Round 3 :
(1 sc, 1 inc) x 6 (18)
Round 4 :
(2 sc, 1 inc) x 6 (24)
Round 5 :
(3 sc, 1 inc) x 6 (30)
Round 6 :
(4 sc, 1 inc) x 6 (36)
Round 7 :
(5 sc, 1 inc) x 6 (42)
Round 8 :
(6 sc, 1 inc) x 6 (48)
Round 9 :
(7 sc, 1 inc) x 6 (54)
Round 10 :
(8 sc, 1 inc) x 6 (60)
Info :
The head is worked in continuous rounds in main cream color; use a stitch marker to mark the first stitch of each round. At this size the head becomes a large, bully rounded shape that will accommodate a 10mm safety eye nicely. If using a smaller eye, adjust placement later. Keep tension consistent for a dense fabric so stuffing does not show through.
Round 11-16 :
1 sc in each st (60)
Info :
Work even rounds to build head height. Decide eye placement now — position the eye slightly off-center so it will peek from beneath bandage layers. For reference, place eye between rounds 13 and 14, about 10-12 stitches from the center front to create a slightly side-glanced look.
Round 17-20 :
1 sc in each st (60)
Info :
Before continuing, test-fit the safety eye. If using an applique or embroidered iris, place a small felt disk inside to stiffen the eye area. When you are satisfied mark the location and remove the marker to continue crocheting; the eye will be secured later through the bandage layers for a wrapped look.
Round 21 :
(7 sc, 1 dec) x 6 (54)
Round 22 :
(6 sc, 1 dec) x 6 (48)
Info :
Begin decreasing gradually to shape the face. Start stuffing lightly now — add fiberfill in small amounts and compress gently for a smooth surface. Make the forehead rounded but not overstuffed so bandage strips will sit smoothly across the head.
Round 23 :
(5 sc, 1 dec) x 6 (42)
Round 24 :
1 sc in each st (42)
Round 25 :
(4 sc, 1 dec) x 6 (36)
Info :
At this point the eye will be resting between rounds 12-15 internally; attach safety eye washer now if you want the eye secured before further decreases. If you prefer to secure later for a better wrapped effect, hold off and instead sew the eye to the head after making bandage strips — but be careful: moving the eye after stuffing is harder.
Round 26 :
(3 sc, 1 dec) x 6 (30)
Round 27 :
(2 sc, 1 dec) x 6 (24)
Round 28 :
(1 sc, 1 dec) x 6 (18)
Info :
Start stuffing the rest of the head firmly now. For a heavy wrapped mummy look leave the head slightly firmer than the body so bandage strips will stay on top without slipping. Distribute stuffing evenly and push fill into the eye socket area carefully to avoid distorting the eye placement.
Round 29 :
1 sc in each st (18)
Round 30 :
1 sc in each st (18)
Info :
Do not close the head completely — leave the round 30 opening live to sew the head to the body later. Fasten off leaving a long tail for sewing. If you plan to add inner support for the eye (felt disk) insert now and position securely before final sewing to body.
— Eye & Eye Socket :
Info :
This dragon has one peeking safety eye in contrasting green; choose an 8-10mm eye depending on the scale. To create a realistic peeking effect, crochet a small eye socket disk and secure the eye from the inside, then overlay bandage strips so only part of the eye is revealed.
Round 1 :
With main color: 6 sc in magic ring (6)
Round 3 :
1 sc in each st (12)
Info :
Flatten disk and insert behind the eye placement. Push fiberfill behind disk to create a slightly recessed socket. Secure safety eye through both head fabric and socket disk for stability. If using an embroidered iris, embroider on felt circle and sew to disk before placing inside head.
— Body :
Round 1 :
6 sc in magic ring (6)
Round 3 :
(1 sc, 1 inc) x 6 (18)
Round 4 :
(2 sc, 1 inc) x 6 (24)
Round 5 :
(3 sc, 1 inc) x 6 (30)
Round 6 :
(4 sc, 1 inc) x 6 (36)
Round 7 :
(5 sc, 1 inc) x 6 (42)
Round 8 :
(6 sc, 1 inc) x 6 (48)
Round 9 :
(7 sc, 1 inc) x 6 (54)
Round 10 :
(8 sc, 1 inc) x 6 (60)
Info :
The body starts large so it forms a stout belly that supports the head. Work in continuous rounds and mark the beginning of each round. If you prefer the body a little narrower, stop increases at round 9. The sample used 60 sts at widest point to create a plush, rounded base that sits well.
Round 11-16 :
1 sc in each st (60)
Info :
At round 12 decide where you'll attach legs — legs are sewn to the bottom front of the body between rounds 2 and 6 starting from the base. Mark these attachment rounds now for easier alignment later. If you want the dragon to lean slightly back, place legs a bit further back on the body.
Round 17 :
(7 sc, 1 dec) x 6 (54)
Round 18 :
(6 sc, 1 dec) x 6 (48)
Round 19-22 :
1 sc in each st (48)
Info :
Begin stuffing the body from the bottom up. Stuff firmly near the base to create a stable sitting posture but leave the seam area around the neck slightly softer to allow a smoother join with the head. Add fiberfill in small pieces and knead to shape the belly evenly without visible lumps.
Round 23 :
(3 sc, 1 dec) x 8 (40)
Round 24 :
(2 sc, 1 dec) x 8 (32)
Round 25 :
1 sc in each st (32)
Round 26 :
(1 sc, 1 dec) x 8 (24)
Round 27 :
1 sc in each st (24)
Round 28 :
1 sc in each st (24)
Round 29 :
1 sc in each st (24)
Round 30 :
1 sc in each st (24)
Info :
Stop stuffing the body when there is still room to sew the head down into the neck opening. The body opening should be left slightly wide (24 sts) to accept the head's 18-st neck — you will use sewing to attach tightly and shape the joint. Fasten off leaving a long tail for sewing the head in place.
— Legs (Make 2) :
Round 1 :
6 sc in magic ring (6)
Round 3 :
(1 sc, 1 inc) x 6 (18)
Round 4-6 :
1 sc in each st (18)
Info :
These rounds form the foot sole; stuff the foot firmly, especially toward the front to create a rounded toe area. Mark the front center stitch for nail placement. The feet will be sewn to the body around rounds 2-4 on the bottom front of the body so place them symmetrically.
Round 7 :
(2 sc, 1 dec) x 4 + (1 sc) x 2 (14)
Round 8 :
1 sc in each st (14)
Round 9 :
(1 sc, 1 dec) x 4 + (1 sc) x 2 (10)
Round 10-12 :
1 sc in each st (10)
Info :
Switch to contrast grey yarn for the claw tips and toe area before round 13. Carry the main color up inside the foot if you want a seamless transition, or fasten off and join grey for a clear color break. Stuff toes firmly and shape them individually by pinching and adding a small amount of stuffing to each toe area.
Round 13 :
Change to grey yarn. 1 sc in each st (10)
Round 14 :
(1 sc in next 2 st, 1 inc) x 3 + 1 sc (13)
Round 15 :
1 sc in each st (13)
Round 16 :
(2 sc, 1 dec) x 3 + 1 sc (10)
Round 17 :
1 sc in each st (10)
Round 18 :
Fasten off leaving long tail for sewing; shape toe area and finish stuffing if needed
Info :
Sew legs to the bottom of the body using the long tail and mattress stitch or whip stitch. Position each leg symmetrically about 6-8 stitches from each side of the center front. Reinforce attachment with extra passes if the toy will be handled frequently.
— Arms (Make 2) :
Round 1 :
6 sc in magic ring (6)
Round 3 :
(1 sc, 1 inc) x 6 (18)
Round 4-7 :
1 sc in each st (18)
Info :
Stuff hands firmly in small amounts, especially the rounded palm. Mark the front center for nail/claw details. Arms on this dragon are short and chubby; keep them proportionate to legs. Attach later to body between rounds 14-18 for a natural placement at chest height.
Round 8 :
(2 sc, 1 dec) x 4 + (1 sc) x 2 (14)
Round 9-10 :
1 sc in each st (14)
Round 11 :
(1 sc, 1 dec) x 4 + (1 sc) x 2 (10)
Round 12 :
1 sc in each st (10)
Info :
Change to grey yarn for claw tips at round 13 for a small contrast on the fingertips. You can leave the arm all in main color and embroider claws later, but crocheted claws hold up better and match the other grey details.
Round 13 :
Change to grey yarn. 1 sc in each st (10)
Round 14 :
(1 sc in next 2 st, 1 inc) x 3 + 1 sc (13)
Round 15 :
1 sc in each st (13)
Round 16 :
(2 sc, 1 dec) x 3 + 1 sc (10)
Round 17 :
Fasten off leaving long tail for sewing
Info :
For stronger arms you can insert a short piece of floral wire before stuffing to allow gentle posing. Fold wire ends inward or wrap in yarn to avoid sharp edges. Sew arms to body using long tail and pin before sewing to ensure even placement and angle.
— Wings (Make 2) :
Round 1 :
With grey yarn: 6 sc in magic ring (6)
Round 3 :
(1 sc, 1 inc) x 6 (18)
Round 4 :
1 sc in each st (18)
Round 5 :
(3 sc, 1 inc) x 4 + (2 sc) (22)
Info :
Wings are worked as a curved triangular membrane with a border. After building a rounded base with rounds above, we will flatten and shape the wing by working short rows in BLO to create ribbed membrane veins, then outline with a contrasting cream edging.
Round 6 :
1 sc in each st (22)
Round 7 :
Change to main cream color. 1 sc in each st BLO (22)
Round 8 :
1 sc in each st BLO (22)
Round 9 :
Fold wing flat and create membrane ridge: sl st to next 11 sts, ch1, turn and work 11 sc across (11)
Round 10 :
Ch1, turn, 1 sc in each st across (11)
Round 11 :
Attach cream edging around wing: 1 sc evenly around entire edge, placing 3 sc in each point to keep shape (approx. 36)
Info :
Pin wings to body before sewing. The membrane should sit with the cream edging visible and the grey membrane slightly inset. Use the cream-colored ridge to simulate the bones of the wing and sew through the body side to secure. Reinforce the seam so wings do not droop.
Round 12 :
Fasten off leaving long tail for sewing
— Horns & Spikes (Make 4 horns and 3 small spikes) :
Horn Round 1 :
With grey yarn: 6 sc in magic ring (6)
Horn Round 3 :
(1 sc, 1 inc) x 6 (18)
Horn Round 4 :
1 sc in each st (18)
Horn Round 5 :
(2 sc, 1 inc) x 6 (24)
Info :
Horns are little cones worked in the round. Slight increases help create a tapered base; after this round we will decrease gradually to a closed tip. Stuff lightly and shape so cones point upward when attached to the head.
Horn Round 6 :
(3 sc, 1 dec) x 6 (18)
Horn Round 7 :
(2 sc, 1 dec) x 6 (12)
Horn Round 8 :
(1 sc, 1 dec) x 6 (6)
Horn Round 9 :
6 sc (6) - stuff and shape tip
Horn Round 10 :
Fasten off leaving long tail for sewing
Info :
Make 4 horns for the head (two larger lateral horns and two smaller center spikes). Place one small spike in the center front of the head and two larger horns toward the back. Use pins to adjust angle then sew firmly. Reinforce base of each horn with a few extra passes of yarn to make them durable.
— Tail :
Round 1 :
6 sc in magic ring (6)
Round 3 :
(1 sc, 1 inc) x 6 (18)
Round 4-7 :
1 sc in each st (18)
Round 8 :
(2 sc, 1 dec) x 4 + (1 sc) x 2 (14)
Round 9 :
1 sc in each st (14)
Round 10 :
Change to grey yarn. 1 sc in each st (14)
Round 11 :
(1 sc, 1 dec) x 4 + (1 sc) x 2 (10)
Round 12 :
1 sc in each st (10). Fasten off leaving a long tail for sewing
Info :
Tail attaches to the back bottom of the body. For a curled look tack the tail to the body in two or three places to create a spiral. Insert a short piece of wire inside the tail before stuffing if you want a poseable curl; be sure to wrap wire ends in tape or yarn.
— Bandage Strips (Make 20-30 strips of varying lengths) :
Info :
The wrapped mummy look is created by many narrow bandage strips. These are worked flat in rows of sc to resemble long crochet tape. Use the main cream color for most strips and vary lengths from 8 to 40 stitches to get a layered, random effect. Make 20-30 strips total and some very short accent strips for small face details.
Strip Small (approx length 8) :
Ch 9, sc in 2nd ch from hook and across (8). Fasten off leaving long tail for sewing.
Strip Medium (approx length 16) :
Ch 17, sc in 2nd ch from hook and across (16). Fasten off leaving long tail for sewing.
Strip Long (approx length 30) :
Ch 31, sc in 2nd ch from hook and across (30). Fasten off leaving long tail for sewing.
Strip Extra Long (approx length 40) :
Ch 41, sc in 2nd ch from hook and across (40). Fasten off leaving long tail for sewing.
Info :
To make the bandage edges look worn and textural, after making the strips with sc rows, you can work a sl st or hdc border along one long side only. Another method is to use 1 sc in each st BLO for the last row to create a subtle ridge. Make a mix of BLO and standard sc strips for the layered look visible in the sample.
Applying Strips :
Use the long tails to sew strips around head, body and limbs in overlapping layers. Wrap strips around the head leaving a small eye gap; stitch ends on the inside to hide tails. Criss-cross strips naturally and vary angles — the randomness is what makes the effect realistic.
Info :
Wrap more strips around the lower body and belly to give the dragon a bundled, stitched-up look. Leave small gaps around neck and wing bases for a believable layered effect. Use pins to preview the layout before sewing everything in place. When securing strips stitch at the ends and at a few points along the center to prevent slipping.
— Claws & Nail Details :
Claw Round 1 :
With dark grey yarn: 3 sc in magic ring (3)
Claw Round 2 :
1 sc in each st (3) - fasten off leaving short tail
Info :
Sew small 3-stitch claws to the ends of feet and hands. The sample has three tiny claws per foot and hand. Use small blunt-tip needle and make sure claws sit together as a pad to look like toes. Add embroidered lines if desired for extra definition.
— Assembly & Finishing Touches :
Info :
Before final assembly block the large pieces by gently wetting and shaping if your yarn allows. This makes bandage strips lie flatter and helps with symmetry. Use pins and a bowl to test how the finished piece will sit and which angles are most pleasing for horns, wings and tail.
Attach Head :
Pin head to body opening and distribute stitches evenly around neck circumference. Use mattress stitch and the long tail from the body to sew head down securely, pulling evenly so the head sits flush against the bandage layers. Make sure the eye remains visible through the bandage gap and adjust strips if needed.
Attach Legs :
Position legs at the bottom front of the body, spaced evenly from center. Sew legs to rounds 2-6 of the body using long tails; reinforce with extra passes through the base of the foot and body to make the legs sturdy.
Attach Arms :
Sew arms to the sides of the body at chest height (approximately rounds 14-18). Make sure arms are angled slightly forward to give a natural hugging posture. Reinforce seams for durability.
Attach Wings :
Sew wing bases into the body just below the shoulder area so membranes sit naturally outward. Use the cream edging as the visible seam and tack a few internal stitches to shape the wing bones.
Attach Tail :
Sew tail securely to the back bottom center of the body, tacking at a few points to make the curl hold. If you inserted wire, bend into a pleasing curl and tack to the body to hold the shape.
Attach Horns & Spikes :
Position spikes along top of head and horns toward the rear. Sew firmly through the head and into the neck seam for extra strength. If desired, add a small dab of fabric glue to the base before sewing to prevent rotation.
Wrap Bandage Strips :
Layer bandage strips over the head, chest, shoulders and belly to recreate the wrapped mummy look. Sew the strips' ends on the inside where possible; stitch through a few stitches along the strip's length to anchor it to the body so the layers do not shift over time.
Final Embellishments :
Weave in any loose tails and trim. Add a small embroidered mouth or nostril lines if desired using dark grey. Brush the yarn edges on a cotton-blend to soften the bandage edges slightly if you prefer a frayed look.
Info :
Once fully assembled, step back and adjust any bandage layers or stuffing lumps by removing a few stitches, repositioning the strip, and resewing. The layered effect looks best when some thicker and some thinner strips cross at interesting angles.
Finishing this big mummy dragon is such a joy — every stitched bandage strip adds personality and texture! I love how the single peeking eye brings so much expression, and the little grey horns and claws give a perfect contrast. This creature makes a cozy seasonal friend or quirky shelf companion. 🧶👀✨ Share your finished dragon and enjoy the smiles it brings!