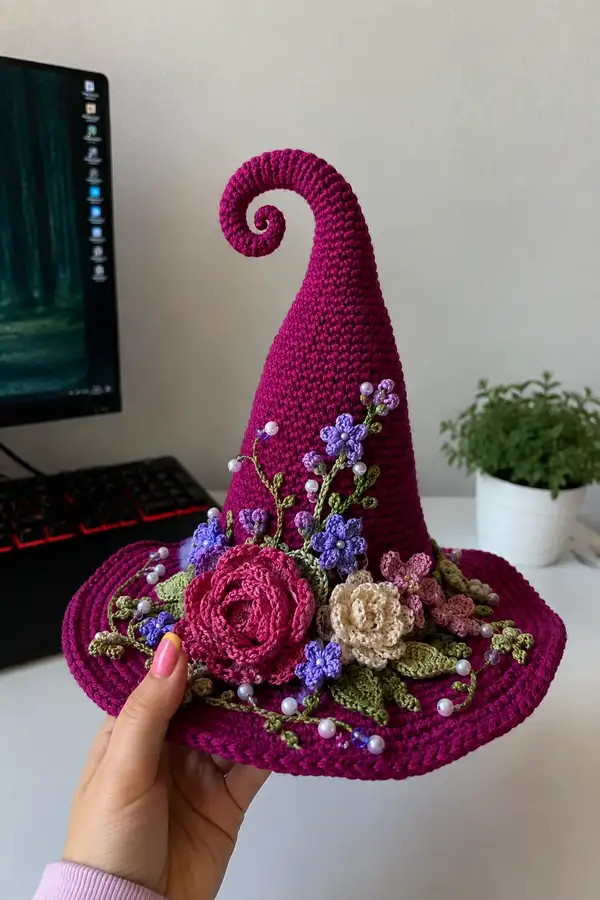
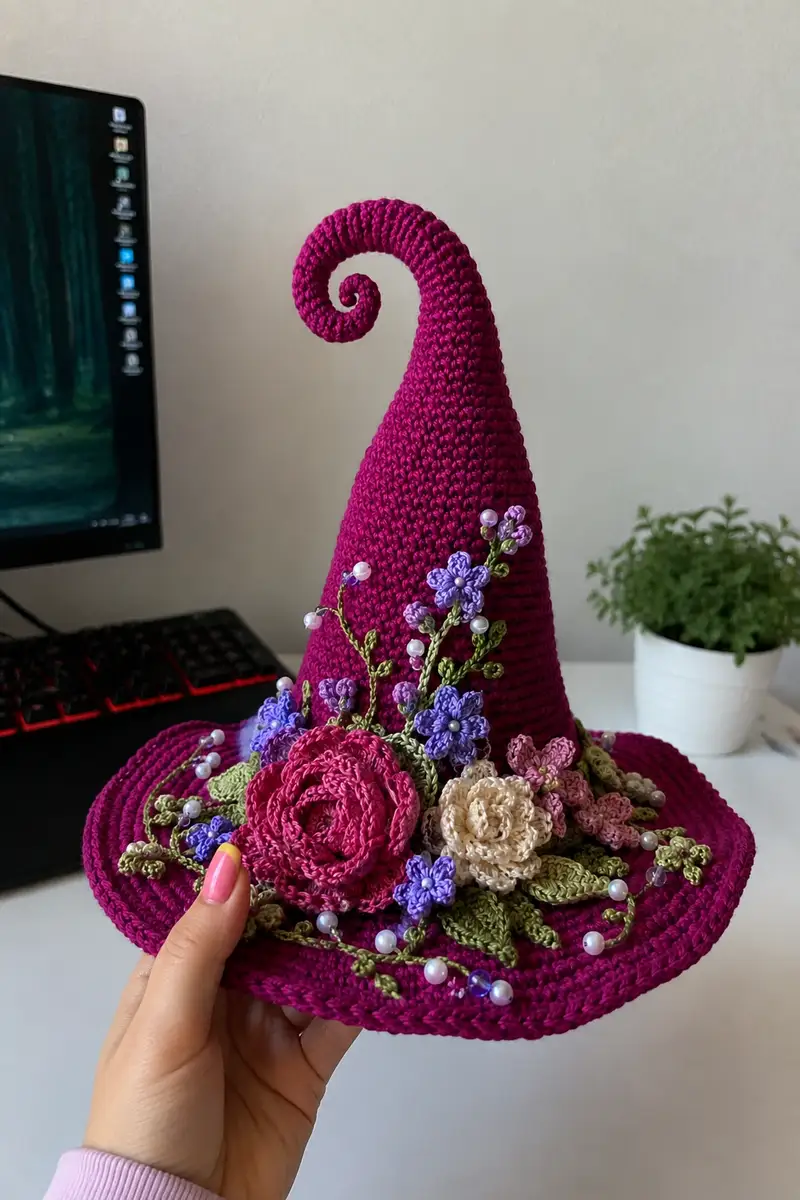
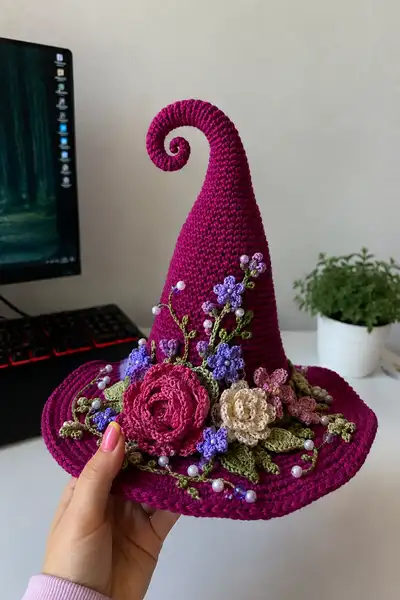
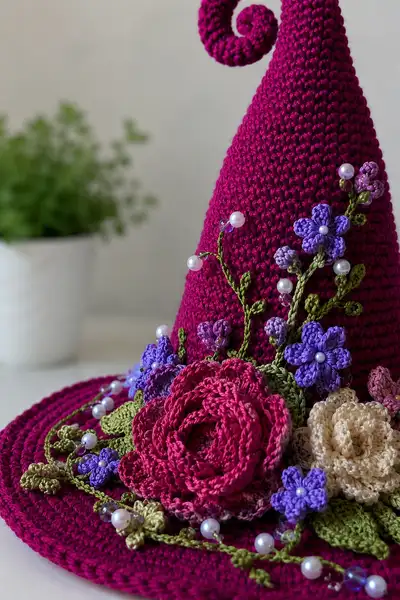
A dramatic tall witch hat worked in a rich magenta yarn with a whimsical curled tip and a generously wide brim. The brim and cone are embellished with layered crochet roses, tiny violet blossoms, delicate green leaves, bead-accented vines and pearl highlights. Detailed shaping creates the elegant spiral and sturdy brim so the hat keeps its form on display or for costume use.
Progress Tracker
0% Complete
— Cone (main hat cone, top-down) :
Round 1 :
6 sc in magic ring (6)
Round 3 :
(1 sc, 1 inc) x 6 (18)
Round 4 :
(2 sc, 1 inc) x 6 (24)
Round 5 :
(3 sc, 1 inc) x 6 (30)
Round 6 :
(4 sc, 1 inc) x 6 (36)
Info :
We are working top-down to create a long slender cone. Keep tension steady; use a stitch marker to mark round start. If you want an even taller cone, work additional even rounds before continuing increases.
Round 7 :
(5 sc, 1 inc) x 6 (42)
Round 8 :
(6 sc, 1 inc) x 6 (48)
Round 9 :
(7 sc, 1 inc) x 6 (54)
Round 10 :
(8 sc, 1 inc) x 6 (60)
Info :
At this stage the cone is beginning to reach a diameter suitable for the cone base. If you want a narrower base, stop increases at 54 sts. The photo shows a fairly wide base so we increase to 60 sts here.
Round 11 :
(9 sc, 1 inc) x 6 (66)
Round 12 :
(10 sc, 1 inc) x 6 (72)
Round 13-20 :
1 sc in each st (72)
Info :
Work even rounds to build the height of the cone. The hat in the photo has a tall cone — continue for 8 rounds (13-20) to gain vertical height. Use these rounds to check fit and proportion visually.
Round 21 :
1 sc in each st (72)
Round 22 :
1 sc in each st (72)
Round 23-26 :
1 sc in each st (72)
Info :
If you prefer a slightly tapered cone, begin working alternating rounds of small decreases every 8-10 stitches; for the pictured shape the cone tapers only slightly and then curves into a spiral tip, so maintain 72 sts here.
Round 27 :
1 sc in each st (72)
Round 28 :
1 sc in each st (72)
Info :
Stop when cone reaches approximately 28-32 cm from tip to brim if using worsted weight yarn; adjust rounds 13-28 as needed to reach desired length. This pattern assumes a tall point like the photo (approx 30 cm before the brim).
Round 29 :
1 sc in each st (72)
Round 30 :
1 sc in each st (72)
Info :
At the next set of rounds we will shape the top to culminate in the spiral tip attachment. Fasten off leaving a 30-40 cm tail for joining the spiral tip securely. Do not cut the yarn for the brim; we will continue from the base to start the brim later.
— Spiral Tip (worked separately then sewn to cone apex) :
Round 1 :
6 sc in magic ring (6)
Round 3 :
(1 sc, 1 inc) x 6 (18)
Round 4 :
(2 sc, 1 inc) x 6 (24)
Round 5 :
(3 sc, 1 inc) x 6 (30)
Info :
The spiral tip is a tapered tube that will be shaped into a curl. We first create a short tube then narrow it so it can be sewn to the cone apex and rolled into a spiral. Keep fabric tight for a defined curl.
Round 6 :
1 sc in each st (30)
Round 7 :
1 sc in each st (30)
Round 8 :
(3 sc, 1 dec) x 6 (24)
Round 9 :
1 sc in each st (24)
Round 10 :
(2 sc, 1 dec) x 6 (18)
Round 11 :
1 sc in each st (18)
Round 12 :
(1 sc, 1 dec) x 6 (12)
Round 13 :
1 sc in each st (12)
Round 14 :
(1 sc, 1 dec) x 4, sc 4 (8)
Round 15 :
1 sc in each st (8)
Round 16 :
6 dec around (3)
Info :
Leave a long tail (approx 40 cm) to sew the spiral tip to the cone. If you want a wired spiral for extra hold, insert a thin craft wire through the center of the spiral before closing completely and bend it to desired curl shape.
Round 17 :
Fasten off leaving long tail. Fold and stitch along the long edge to form an elongated tube if needed, then stuff lightly (or insert wire) before shaping into a spiral and sewing to the cone apex. Sew securely through several rounds to anchor the spiral to the cone.
— Brim (worked from cone base outward in rounds) :
Info :
Attach yarn at cone base stitch. We will now work outward to shape the brim. The brim must be slightly stiff to hold its form; work tight single crochet and consider adding a round of slip stitch or hdc in BLO to create a firm edge. For a more rigid brim, later slip in a nylon or twine reinforcement between rounds or work a hidden wire into the edge.
Round 1 (Brim Round 1) :
Join yarn to any stitch at base of cone, ch1, 1 sc in same st, 1 sc in next 5 sts, (inc) around until you have added 12 increases evenly spaced to create a gentle flare; if starting from 72 sts this yields 84 sts after even distribution (72 + 12 = 84)
Round 2 :
1 sc in each st (84)
Round 3 :
(6 sc, 1 inc) x 12 (96)
Round 4 :
1 sc in each st (96)
Info :
Keep the brim flat by alternating increase rounds with even rounds. The photo shows a softly wavy brim; the increase pattern above gently flares the brim. Adjust increases (fewer increases = smaller brim; more increases = wavier brim).
Round 5 :
(7 sc, 1 inc) x 12 (108)
Round 6 :
1 sc in each st (108)
Round 7 :
(8 sc, 1 inc) x 12 (120)
Round 8 :
1 sc in each st (120)
Round 9 :
(9 sc, 1 inc) x 12 (132)
Round 10 :
1 sc in each st (132)
Info :
For the pictured wide brim, we continue increasing until the brim measures approx 17-20 cm from the inner edge to outer edge. The example rounds above lead to a broad brim; if your fabric is more dense, you may need fewer increase rounds.
Round 11 :
(10 sc, 1 inc) x 12 (144)
Round 12 :
1 sc in each st (144)
Round 13 :
(11 sc, 1 inc) x 12 (156)
Round 14 :
1 sc in each st (156)
Info :
If your brim becomes too floppy, add a round of slip stitch in BLO to create a denser border: 1 sl st in each st BLO around. Alternatively work hdc rounds to thicken the edge.
Round 15 :
1 sc in each st (156)
Round 16 :
1 sc in each st (156)
Round 17 :
(BLO ridge) 1 sc in each st BLO (156)
Info :
Create the brim lip by working 2-3 final rounds of tight single crochet or hdc. You can also add a last round of slip stitch to define and stiffen the edge. If adding beads later to the brim edge, leave loops for attaching.
Round 18 :
1 sc in each st (156)
Round 19 :
1 sc in each st (156)
Round 20 :
Fasten off and weave in ends. Use pins to shape brim into desired form and steam-block lightly if necessary to make it sit flat.
— Base Reinforcement (optional, hidden rounds) :
Info :
If you want a rigid brim that will hold sculpted curves, cut a circle of thin plastic or interfacing slightly smaller than brim outer diameter and insert it between two brim rounds before finishing. Alternatively run thin wire into the outermost round and secure ends within the hat brim seam.
— Large Rose (Make 1, layered rose seen at brim front) :
Round 1 :
Ch 40, sl st to form a ring (or make mr alternative), ch1
Round 2 :
Row: sc in each ch across (40) — this creates a long strip which will be worked into petals
Info :
The large rose is made by creating a long strip of sc and then working petals along one edge to create a spiraled rosette. The strip length can be adjusted for larger or smaller roses.
Round 3 :
Turn and along one long edge: *(skip 1 sc, 5 dc in next sc, skip 1 sc, sl st in next sc)* repeat across to end to form petals (approx 10 petals depending on length)
Round 4 :
Fasten off leaving a long tail. Starting at one end, roll the strip tightly so petals overlap and sew through base as you roll to secure the rosette. Adjust petal placement so the rosette looks full like photo.
Info :
For extra depth, make two strips of slightly different lengths and stack one on top of the other offset, then stitch together to create a layered rose (photo shows a deep pink layered rose for added fullness).
— Cream Rose (Make 1, smaller layered rose) :
Round 1 :
Ch 30, sc in each ch across (30)
Round 2 :
*(skip 1 sc, 5 dc in next sc, skip 1 sc, sl st in next sc)* repeat across to create petals (approx 7-8 petals)
Round 3 :
Fasten off leaving long tail. Roll and stitch coil to form rose. Make a second shorter strip for inner petals if you want tighter center.
Info :
Use a slightly thinner hook (3.0mm) for these small roses for a denser finish to mimic the delicate cream rose in the photo.
— Small Violet Flowers (Make 6-10) :
Round 1 :
Make mr, ch1, 6 sc in mr, pull tight and join with sl st (6)
Round 2 :
Ch2 (counts as hdc), *(2 dc, ch2, sl st in next st)* repeat around to form 6 petals. Fasten off and leave tail for sewing. Add a small bead or french knot center.
Info :
These tiny five- or six-petal flowers are worked quickly and sewn into clusters. Use tones of purple and lavender for the multi-tonal look. Sew a small pearl in the center for a classic finish like the photo.
— Tiny Buds (Make 8-12) :
Round 1 :
Make mr, 5 hdc in mr, pull tight (5)
Round 2 :
1 sc in each st (5). Fasten off leaving long tail for sewing. Slightly shape into a bud and stitch into clusters.
Info :
Buds are used to form vertical sprays and fill spaces between larger flowers. Work several in two shades for depth.
— Leaves (Make 10-14) :
Round 1 :
Ch 8, sc in second ch from hook, hdc in next, dc in next 2, hdc in next, sc in last; turn to work along opposite side of chain: sc, hdc, dc2, hdc, sc. Join with sl st to first sc. Fasten off leaving tail for sewing.
Info :
Leaf sizes vary; for the photo use a mix of 8-ch and 12-ch leaves. Work some leaves in BLO on last round to create a ribbed texture if desired for realistic veins.
— Twisted Vines with Beads (Make several lengths) :
Round 1 :
Using olive green, ch 40 (or desired length). Insert beads onto yarn at intervals before you begin to stitch the vine: thread beads on the yarn tail so they slide into place as you crochet.
Round 2 :
Row: sc in 2nd ch from hook and each ch across (39). As you reach positions for beads, slide bead into place and secure with a small stitch or french knot to prevent sliding.
Round 3 :
Fasten off leaving long tail. Twist the chain gently, or braid two chains together for a thicker vine look. Sew vines onto brim and cone, winding around flowers as shown.
Info :
For the pearl accents, alternate faux pearls and clear glass beads spaced irregularly. The beads in the photo are pinned within the vine clusters and sewn through several times to secure.
— Assembly & Embellishment (Sewing and placement) :
Info :
Layout all flowers, leaves and vines on the brim before sewing. Pin each piece in place and view from multiple angles. The photo composition shows a focal large rose slightly off-center at the front brim, a cream rose to its side, small violets filling vertical space climbing the cone, and vines wrapping across the brim and up the cone.
Step 1 :
Position the large rose near the front brim edge around brim rounds 8-12 of outer edge. Pin firmly. Use long tail to sew the rose base to the brim through several layers for security.
Step 2 :
Place cream rose adjacent to large rose and offset slightly toward the cone base; sew with small whip stitches through the coaster of petals to anchor.
Step 3 :
Sew clusters of small violet flowers climbing the cone: start at brim seam and space them upward along cone rounds 6-18 (relative to cone top as assembled), stitch centers securely and add a tiny pearl to each center.
Step 4 :
Lay vines to connect clusters and add beads: sew the vine strands onto the brim and cone, reinforce bead positions by stitching over the bead holes and through the yarn base multiple times; use fabric glue sparingly under beads if necessary.
Info :
Be mindful of the weight of motifs; larger dense roses should be sewn through the brim with extra passes to prevent sagging. Use additional backing stitches under each large motif for reinforcement.
Step 5 :
Sew leaves around flower clusters, tucking edges under petals and anchoring at the leaf base. Add a few tiny buds on short vine lengths to create vertical interest against the cone body.
Step 6 :
Attach the spiral tip: position the spiral at the cone apex and hand-sew through several rounds on the cone and the spiral for a secure join. If using wire inside the spiral, hide wire ends within the cone by sewing them into the inner seam region so they don't poke through.
Info :
Final finishing: weave in all tails on the inside, trim threads and lightly steam-block the hat while pinned on a hat form or bowl to set the brim shape. Add extra pearl clusters using a single thread for a delicate necklace effect across the brim.
— Additional Decorative Techniques & Variations :
Info :
To create ombre roses, use two colors in the strip and join on the fly. For a softer look use sport-weight yarn and a smaller hook. For a sturdier wearable hat add a hidden base of thin buckram or interfacing glued and stitched between two brim rounds.
Note :
The hat pictured uses dense single crochet throughout to present a neat fabric to which small motifs can be sewn without gaping. If your tension is loose, go down one hook size or add a lining to reduce visible holes when beads are sewn on.
This magenta spiral witch hat brings together sculptural shaping and delicate floral embroidery for a dramatic finished piece. Each stitch contributes to a whimsical silhouette crowned by layered roses and pearl-sprinkled vines. The careful combination of dense fabric and airy embellishments makes it both sturdy and romantic. Enjoy assembling each motif — it’s deeply rewarding to watch the design come to life! 🌸✨