— Cat Head (Make 6) :
Round 1 :
6 sc in magic ring (6)
Round 3 :
(1 sc, inc) x 6 (18)
Round 4 :
1 sc in each st (18)
Round 5 :
(2 sc, inc) x 6 (24)
Info :
Make the head flat and slightly oval by adding a couple of back-and-forth extra stitches on one side: on round 6 add two extra sc in a row on the top side to create a forehead that sits under the hat brim.
Round 6 :
Work 1 sc in next 6 sts, 2 sc in next st, 2 sc in next st, 1 sc in next 14 sts (26)
Round 7 :
1 sc in each st (26)
Round 8 :
(3 sc, dec) x 6 + 2 sc extra at top (20)
Round 9 :
1 sc in each st (20)
Info :
Embroider the eyes and whiskers now while head is flat: use bright green yarn for two small eye discs and bright orange for the nose and whiskers. Alternatively sew on tiny safety eyes before embroidering if using them.
Round 10 :
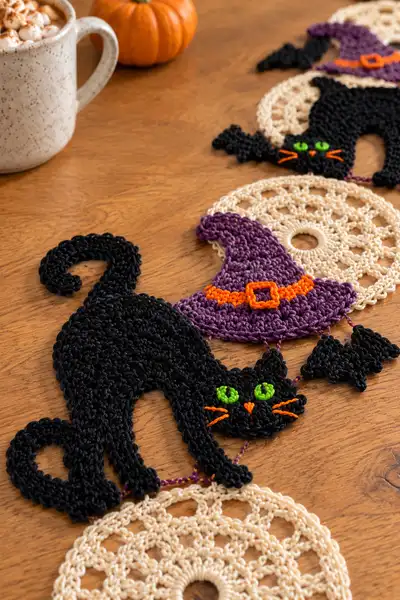
Fasten off leaving long tail for sewing. Position head on the front edge of the cat body, centered under the arched back. Sew in place using mattress stitch, taking care to align eyes and nose.
— Cat Eye Applique (Make 12 small discs, 2 per head) :
Round 1 :
6 sc in magic ring (6)
Round 3 :
sl st to close small center and fasten off leaving a long tail for sewing (12)
Info :
Sew two discs onto the head: place about 4 stitches apart depending on head width. Use neon green yarn for the discs and add a small black stitch for the pupil if desired.
— Witch Hat Motif (Make 6) :
Info :
The witch hat is a flat triangular-brim motif worked in purple with an orange belt and buckle detail. Work the hat brim wide enough to sit slightly over the cat head when attached.
Round 1 :
ch 6, join with sl st to form loop, ch 2 (counts as first hdc)
Round 2 :
Work 12 hdc into loop, join with sl st (12)
Round 3 :
ch 2, hdc in same st, 2 hdc in each st around (24)
Round 4 :
ch 2, (hdc in next 2 sts, 2 hdc in next st) x 6 (32)
Info :
Rounds 2-4 create a rounded brim center. We now begin working outward to form an oval brim then shape the cone by decreasing and working treble combinations for the point.
Round 5 :
1 hdc in each st (32)
Round 6 :
1 hdc in next 6 sts, (ch 4, skip 2 sts, sc in next st) x 6 around to create scalloped brim, 1 hdc around rest (32)
Round 7 :
Switch to purple; 1 hdc in each st (32)
Round 8 :
ch 3, dc in next 4 sts, dc2tog across next 2 sts to begin cone shaping, ch 1, turn work to work short rows up cone (cone will be worked in partial rounds)
Round 9 :
Along cone: ch 2, 10 dc across cone top row, sl st back to base (10)
Round 10 :
ch 2, dc in next 8 sts (8)
Info :
Use these short rows to taper the cone. If you prefer a taller hat, add an extra short row of dc between each decrease. Keep the brim wide enough to overlap the head just slightly.
Round 11 :
ch 2, dc in next 6 sts (6)
Round 12 :
ch 2, dc in next 4 sts (4)
Round 13 :
ch 2, dc in next 2 sts (2)
Round 14 :
Fasten off purple leaving tail for sewing cone to brim. Switch to orange yarn and embroider a narrow belt across just above the brim: using sc surface stitch, create a row of orange across the hat base and then make a small square buckle by surface stitching a tiny rectangle and filling the center with purple thread.
Info :
Block the hat flat with the brim pinned to keep shape. Sew the hat onto the cat head so the brim rests slightly over the forehead and the cone tilts to one side for a jaunty look.
— Full Moon Doily (Make 6) :
Info :
The full-moon doily is worked in cream cotton with openwork rounds to create a delicate round motif. Block each doily to a consistent diameter before assembly for a neat runner.
Round 1 :
6 sc in magic ring (6)
Round 3 :
(1 sc, inc) x 6 (18)
Round 4 :
(2 sc, inc) x 6 (24)
Round 5 :
ch 3, *skip 1 st, dc, ch 1* around creating 12 dc-ch1 loops, join (24 loops)
Round 6 :
Into each dc-ch1 loop: (sc, hdc, 3 dc, hdc, sc) to form picot petals (12 petals)
Round 7 :
1 sc in each petal ridge around (60)
Round 8 :
ch 4, *sl st into next sc, ch 4* repeat around to create lacy ring (12 loops)
Round 9 :
Into each ch-4 loop: (1 sc, 1 hdc, 3 dc, 1 hdc, 1 sc) (12 petals enlarged)
Round 10 :
1 sc in each st around to tidy edge (approximately 96)
Info :
After round 10, block doily to desired size. Pin evenly into a circular shape and steam or spray with water and let dry so that every moon is consistent in diameter.
— Bat Motif (Make 12 small bats) :
Info :
These small bats are little winged silhouettes worked flat in black and joined between cat and hat motifs. They are small and quick to make.
Round 1 :
6 sc in magic ring (6)
Round 3 :
1 sc in next 4 sts, (ch 4, skip 2 sts, 1 sc) across to create wing scallops, 1 sc across rest (12)
Round 4 :
Work around scallops with sc to define wings, create 3 small peaks per wing by sc2tog at wing tips (12)
Round 5 :
Fasten off leaving tail for sewing. Flatten wings, slightly curve the edges by working a round of sl st around the outer wing edges.
Info :
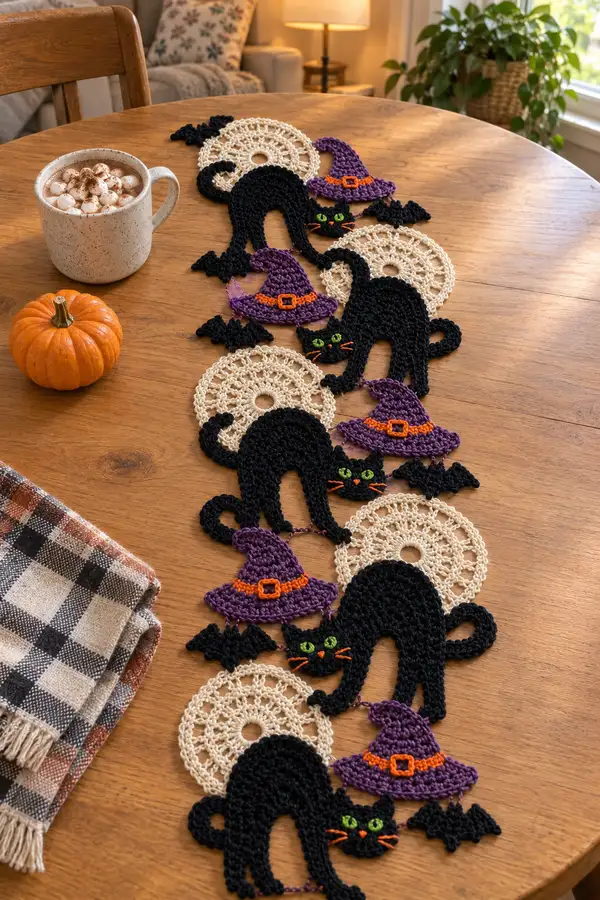
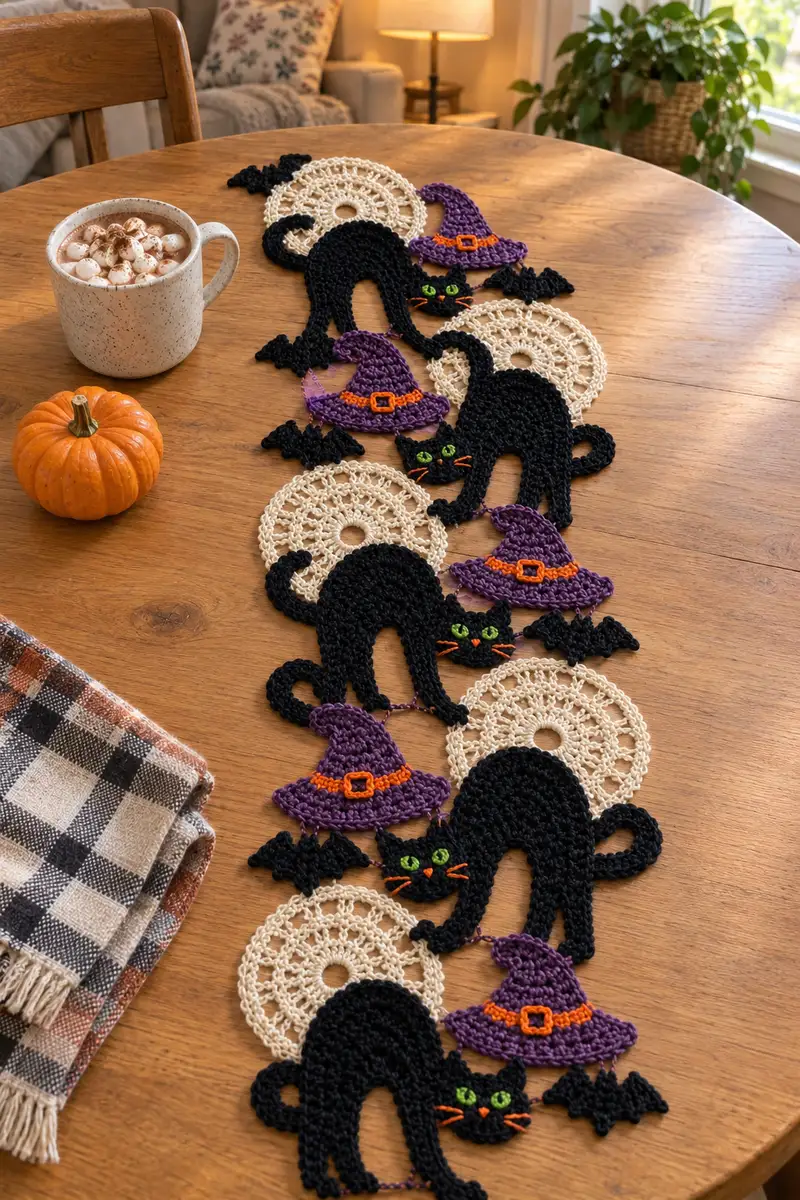
Position bats clustered between hats and cats as shown in the photo; they act as little connectors and visual interest. Sew securely via the center body of the bat to the runner join cord.
— Runner Connector Chain & Edging :
Info :
Motifs are connected with a decorative double-strand chain using purple and a metallic/sempurple contrast thread (or the same purple); you can use a simple chain-stitched cord or crocheted chains worked and then sewn between motifs. The sample uses a thin double chain to join each motif pair with short lengths of chain and small picot points under hats.
Step 1 :
Measure desired runner length and lay motifs in design order. Starting at one end, join first doily to cat by making a decorative chain of approximately 12 ch with purple yarn and slip-stitching ends to the motif edges. Repeat between every adjacent pair as in the photos.
Step 2 :
For extra stability, use a small whipstitch to sew chain ends to motif backs so connections remain flat and secure under tableware.
Info :
Work chains slightly taut (not tight) to keep motifs sitting flat without puckering. If you prefer a more airy runner, increase chain length to add space between motifs.
— Finishing & Surface Embroidery :
Info :
Embroider cat eyes with bright green yarn: using a satin or small circular satin stitch, fill each eye disc. Add a tiny black stitch for the pupil if desired. Embroider nose as a small orange triangle and add three whiskers on each side with an orange stranded chain stitch.
Step 1 :
Sew hat onto head: place brim to overlap forehead by 2-3 stitches and use small neat whip stitches in purple to secure. Weave in hat tails on the back.
Info :
After all motifs are joined, block the entire runner lightly on your table surface with pins and a damp cloth to encourage motifs to lay flat. Avoid heavy steaming on mercerized cotton to protect color saturation.
Step 2 :
Weave in all ends on the back side, trim close, and secure with a dab of fabric glue if pieces will get frequent use.
Info :
If you want an alternate layout, make extra sets and stagger cats and hats diagonally for a fuller runner; the modular motif approach allows plenty of creative rearrangement.
This playful Halloween table runner brings together lacy moons, prancing black cats, jaunty witch hats, and tiny bats for a seasonal centerpiece you can be proud of. The modular motifs let you customize length and layout, making it perfect for any table. Each stitch adds a little charm and character — enjoy the process and the delightful result! 🎃🧶