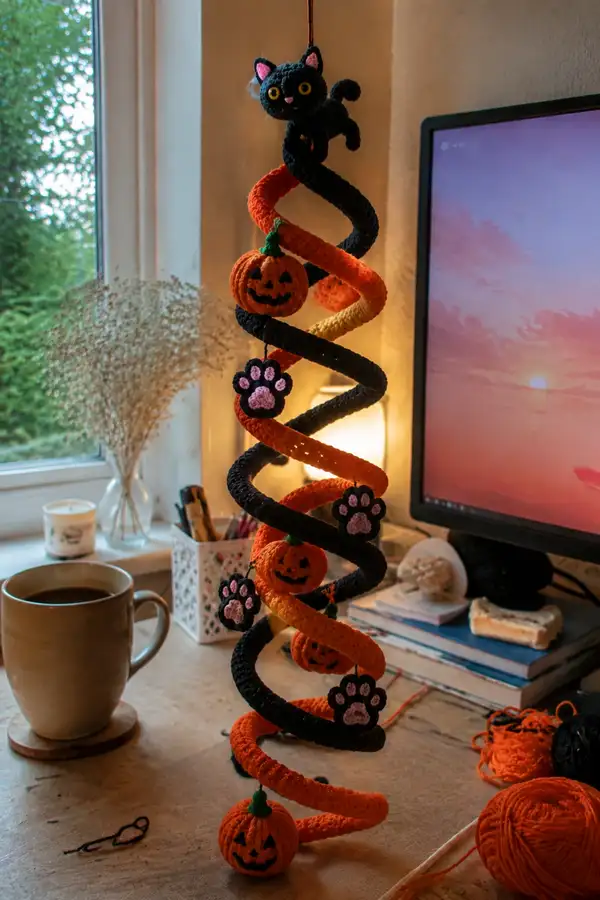
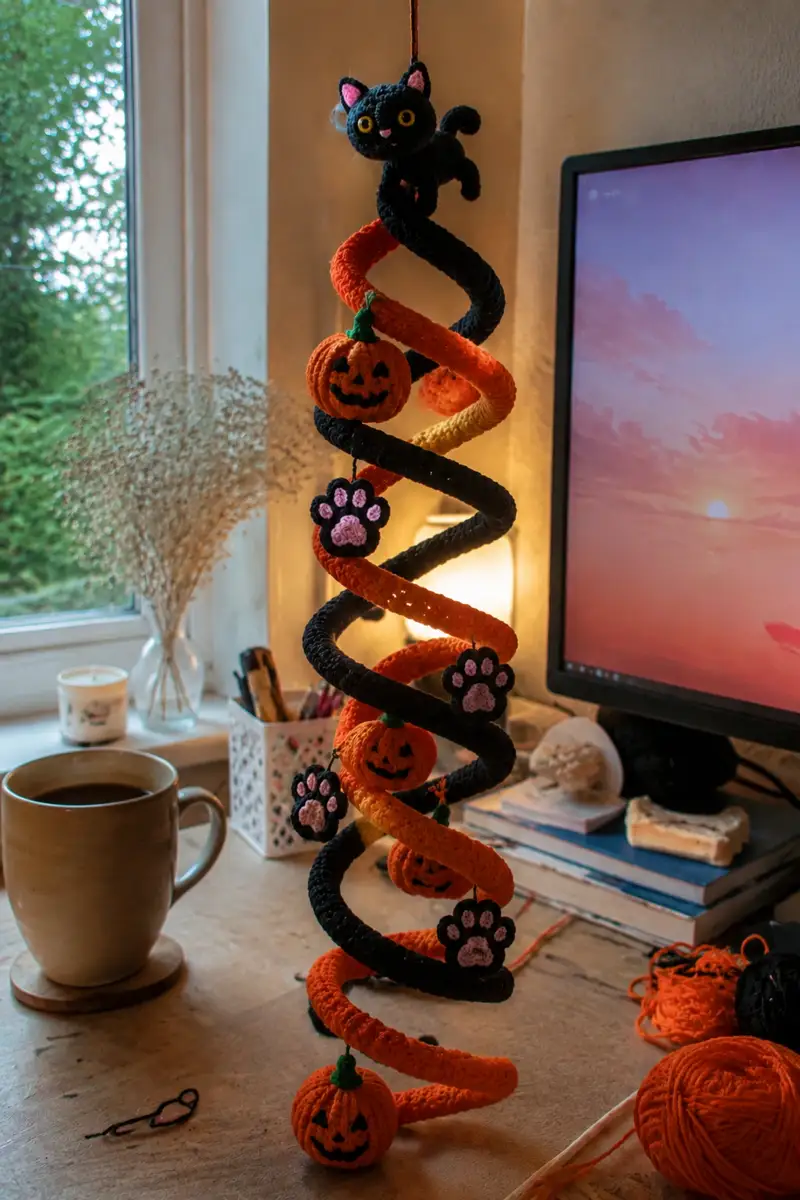
Make a twisted Halloween spiral garland featuring a playful black cat topper, crocheted jack-o-lanterns and cute paw charms. Alternating black and orange spirals wrap around a flexible core to create a standing spiral or hanging mobile. Full step-by-step instructions include tubular coil construction, 3D pumpkins with carved faces, layered paw motifs, and a little cat amigurumi perched at the top.
Progress Tracker
0% Complete
— Materials and Prep :
Info :
Before you begin, prepare two lengths of flexible wire or a spiral plastic core to act as the support for the coils. Each wire should be slightly longer than the finished spiral so you can tuck ends into the tubes. For a freestanding spiral, use a thicker base tube inside the bottom coil for stability. Work in continuous rounds (spiral crochet) unless stated otherwise. Use stitch markers to mark round starts. All amigurumi pieces are worked in single crochet unless specified. Gauge is not critical but should produce a firm fabric so stuffing does not show.
— Cat Topper - Head :
Round 1 :
6 sc in magic ring (6)
Round 3 :
(1 sc, inc) x 6 (18)
Round 4 :
(2 sc, inc) x 6 (24)
Round 5 :
(3 sc, inc) x 6 (30)
Round 6 :
(4 sc, inc) x 6 (36)
Round 7 :
(5 sc, inc) x 6 (42)
Round 8 :
(6 sc, inc) x 6 (48)
Round 9-12 :
1 sc in each st (48)
Info :
When working rounds 9-12 keep your tension even so the head walls are stable. These rounds establish the face height. If using safety eyes, plan placement around rounds 12-14.
Round 13-14 :
1 sc in each st (48)
Info :
Place safety eyes between rounds 13-14 approximately 6-8 stitches apart for an alert, wide-eyed expression. If embroidering eyes use a small satin stitch or French knots at the same position.
Round 15 :
(6 sc, dec) x 6 (42)
Round 16 :
(5 sc, dec) x 6 (36)
Info :
Begin stuffing the head firmly but not rock hard. Add small amounts of fiberfill and distribute evenly with a stuffing tool or blunt pencil. Stuff more in the forehead area to keep the shape rounded.
Round 17 :
(4 sc, dec) x 6 (30)
Round 18 :
(3 sc, dec) x 6 (24)
Round 19 :
(2 sc, dec) x 6 (18)
Round 20 :
(1 sc, dec) x 6 (12)
Info :
Fasten off leaving a long tail for sewing. Finish stuffing the head through the opening, adjust shape, then use the tail to sew the opening closed with a yarn needle. Weave tail through the inside to hide and trim.
— Cat Topper - Ears (Make 2) :
Round 1 :
4 sc in magic ring (4)
Round 3 :
(1 sc, inc) x 4 (12)
Round 4 :
(2 sc, inc) x 4 (16)
Round 5 :
1 sc in each st (16)
Round 6 :
(2 sc, dec) x 4 (12)
Round 7 :
1 sc in each st (12)
Round 8 :
Fold ear flat, sc through both layers across the base 6 sc, fasten off leaving tail for sewing
Info :
Sew ears to top of the head spaced 10-12 stitches apart and angle them slightly forward for a curious look. Use small whip stitches and hide tails inside the head.
— Cat Topper - Body :
Round 1 :
6 sc in magic ring (6)
Round 3 :
(1 sc, inc) x 6 (18)
Round 4 :
(2 sc, inc) x 6 (24)
Round 5 :
(3 sc, inc) x 6 (30)
Round 6 :
(4 sc, inc) x 6 (36)
Round 7-12 :
1 sc in each st (36)
Info :
The body is short and squishy; rounds 7-12 define the torso. If you want a slightly longer body add extra even rounds here. Keep the top opening wide enough to attach to the head later.
Round 13 :
(4 sc, dec) x 6 (30)
Round 14 :
(3 sc, dec) x 6 (24)
Round 15 :
Begin stuffing body moderately (24)
Round 16 :
(2 sc, dec) x 6 (18)
Round 17 :
(1 sc, dec) x 6 (12)
Info :
Fasten off leaving a long tail for sewing to the head. Flatten the neck opening slightly and sew the head to the top of the body using ladder stitch. Make sure the front of the head lines up with the body center.
— Cat Topper - Arms (Make 2) :
Round 1 :
6 sc in magic ring (6)
Round 3 :
(1 sc, inc) x 6 (18)
Round 4-6 :
1 sc in each st (18)
Info :
Arms are slender; stuff the paw end firmly with a small amount of fiberfill and leave the shoulder area unstuffed for easier sewing. You can add a small piece of wire inside if you want poseable arms.
Round 7 :
(2 sc, dec) x 4, then 2 sc (14)
Round 8-12 :
1 sc in each st (14)
Round 13 :
(1 sc, dec) x 4, then 2 sc (10)
Round 14 :
1 sc in each st (10)
Round 15 :
Fasten off leaving tail for sewing, lightly stuff paw, do not overstuff shoulder (10)
Info :
Sew arms to the sides of the body aligned with rounds 8-10 of the body. Use small secure stitches and shape the seam so arms curve naturally toward the front.
— Cat Topper - Legs (Make 2) :
Round 1 :
6 sc in magic ring (6)
Round 3 :
(1 sc, inc) x 6 (18)
Round 4 :
(2 sc, inc) x 6 (24)
Round 5-8 :
1 sc in each st (24)
Info :
Legs are slightly thicker to allow the cat topper to sit. Stuff the foot area firmly and leave the top slightly less filled so you can sew into the lower body opening.
Round 9 :
(2 sc, dec) x 6 (18)
Round 10-12 :
1 sc in each st (18)
Round 13 :
(1 sc, dec) x 6 (12)
Round 14 :
1 sc in each st (12)
Round 15 :
Fasten off leaving tail for sewing. Stuff foot firmly then sew legs to underside of body spaced evenly at the base. (12)
— Cat Topper - Tail :
Round 1 :
6 sc in magic ring (6)
Round 3 :
(1 sc, inc) x 6 (18)
Round 4 :
1 sc in each st (18)
Round 5-24 :
1 sc in each st (18)
Info :
Work the tail as a long tube (rounds 5-24 here represent 20 rounds of length). If you want a longer or curlier tail, continue even rounds until you reach the desired length; insert a thin wire for poseable effect before stuffing. Stuff lightly so the tail can curve.
Round 25 :
(1 sc, dec) x 6 (12)
Info :
Leave a long tail to sew the tail to the back of the body around the lower back area. If you added wire, tuck the wire end inside the tail and secure with a few stitches before closing.
— Pumpkin Ornament (Make 4) :
Round 1 :
6 sc in magic ring (6)
Round 3 :
(1 sc, inc) x 6 (18)
Round 4 :
(2 sc, inc) x 6 (24)
Round 5 :
(3 sc, inc) x 6 (30)
Round 6 :
(4 sc, inc) x 6 (36)
Round 7-10 :
1 sc in each st (36)
Info :
These even rounds build the pumpkin's midsection. To create the characteristic ribbing, later we will add surface slip-stitch ridges or use a contrasting yarn to work front-post stitches from top to bottom after shaping.
Round 11 :
(4 sc, dec) x 6 (30)
Round 12 :
(3 sc, dec) x 6 (24)
Info :
Start stuffing the pumpkin firmly and evenly through the top opening. For a plump pumpkin, stuff slightly firmer than a plush toy so the surface holds ridges well.
Round 13 :
(2 sc, dec) x 6 (18)
Round 14 :
(1 sc, dec) x 6 (12)
Info :
Fasten off leaving a long tail. Close the pumpkin opening and weave in the tail. To define segments, use a length of doubled yarn and a yarn needle to pull vertical lines from top to bottom at 6-8 even intervals to make ribs. Alternatively, use surface slip stitch with a contrasting color to outline ridges.
Stem :
Using green yarn: ch 6, hdc in 2nd ch from hook and across (5), sl st to join. Work 3 rounds in the round around the little tube and fasten off leaving tail to sew. Sew stem onto the top center of pumpkin and embroider a small curled vine if desired.
Face :
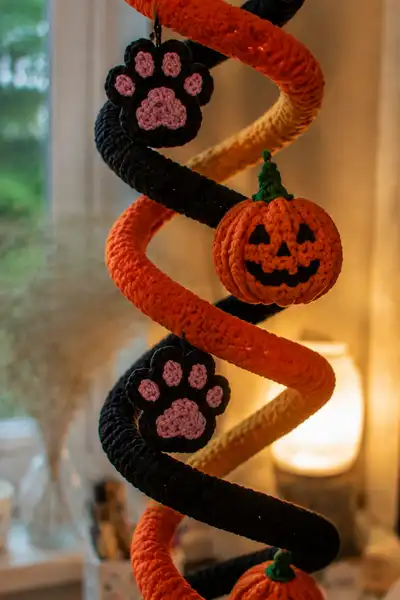
Use black embroidery yarn to satin-stitch a jack-o-lantern face: two triangles for eyes and a triangle nose, plus a jagged smile. Alternatively, crochet a small black applique and sew on. Secure embroidery threads on the inside and knot.
— Paw Charm (Make 4) :
Inner paw pad - small center :
Round 1: 6 sc in magic ring (6)
Round 3 :
(1 sc, inc) x 6 (18)
Info :
This small oval will act as the central paw pad in a light pink. Fasten off leaving tail for sewing to the larger black backing.
Outer paw shape :
Round 1: 6 sc in magic ring (6)
Round 3 :
(1 sc, inc) x 6 (18)
Round 4 :
1 sc in each st (18)
Round 5 :
Make four small toe pads: For each toe pad ch 3, sc across (2), join to outer with sl st; or crochet small MR 4 sc then fasten off and sew to outer circle as toes. Space evenly along the top of the outer circle.
Round 6 :
Sew the pink inner pad and the four pink toes onto the black outer backing using matching thread. Fasten off and weave tails. Add a small loop of black yarn on top to hang the charm.
Info :
Block each paw charm flat by pinning to a board and spritzing with water if you want very flat charms for consistent hanging. Alternately, leave them slightly padded for a plush look.
— Spiral Tube Construction (Make 2 long tubes: Black and Orange) :
Info :
The two long tubes are the core of the spiral. Each tube is crocheted as a continuous round tube around a magic ring base then worked in even rounds to a long length. After finishing, insert a flexible wire or the spiral plastic core into the tube and shape it into a helix. The tubes pictured alternate black and orange; you can also make a gradient by switching colors every 10-20 rounds.
Round 1 :
6 sc in magic ring (6)
Round 3 :
(1 sc, inc) x 6 (18)
Round 4 :
(2 sc, inc) x 6 (24)
Round 5 :
(3 sc, inc) x 6 (30)
Round 6 :
(4 sc, inc) x 6 (36)
Round 7-80 :
1 sc in each st (36)
Info :
Rounds 7-80 are a long even tube. Adjust the number of rounds to achieve the desired length of your spiral. For the photographed spiral, approximately 74-84 even rounds per tube were used to get the tall helix. Work in a continuous spiral; use a removable stitch marker to track every 10 rounds. After completing the tube, fasten off leaving a long tail for closing the ends around the inserted wire.
Round 81 :
(4 sc, dec) x 6 (30)
Round 82 :
(3 sc, dec) x 6 (24)
Round 83 :
(2 sc, dec) x 6 (18)
Round 84 :
(1 sc, dec) x 6 (12)
Info :
Leave a long tail. Gently open seam and insert flexible wire. If using two wires for twin-core support, insert both and position inside the tube center. Push wire ends in beyond the base so they are not exposed. With the tail, gather and sew the tube end closed around the wire to keep it fixed. Repeat for the second tube in the alternate color.
— Gradient / Color-change Notes for Spirals :
Info :
To create the orange-to-yellow gradient visible in the photo, change yarn color every 10-15 rounds. When changing color, do so at the end of the round: join the new color with the final pull-through of the last sc. Carry unused yarn loosely along the inside of the tube, crocheting over it where possible to avoid long floats. Alternatively, fasten off and weave ends in if you prefer neater inside work.
— Assembly of Spiral and Ornaments :
Info :
After both tubes are complete and wires are inserted, twist them together into a helix by bending the wire cores. The orange tube is wrapped around the black core in alternating turns to achieve the spiral. Secure the top ends together by wrapping yarn and stitching through both tubes' ends and the cat's base so the topper sits firmly.
Info :
Attach pumpkins and paw charms by sewing or hanging on short black yarn loops. Space them evenly around the helix so it balances. Use a lightweight thread loop or jewelry jump ring if you want them detachable.
— Extra Decorative Details :
Info :
For extra texture, work back-loop-only rows at intervals to create subtle ridges on the tube. On pumpkins, consider working surface slip stitch lines down the sides to make sharper ridges. For paw charms, add a small scalloped border by working a round of (sl st, ch1, sl st) around the outer edge to make them more defined.
— Finishing Touches :
Info :
Weave in all tails neatly and trim. Use small drops of fabric glue to secure any loose embroidery. If the spiral is to hang, add a central loop at the very top made of braided yarn or a sewn loop anchored through both tube ends and the cat's head top. If freestanding, make sure the bottom coil encloses a short rigid base piece for balance.
This Halloween spiral garland is such a fun project to make and display — the playful cat topper and dangling pumpkins add so much character! Each crocheted component builds into a cheerful seasonal accent that you can hang or let stand as a decorative spiral. Enjoy the assembly and creative finishing touches, and be proud of your handmade seasonal decor. 🧶🎃🐾