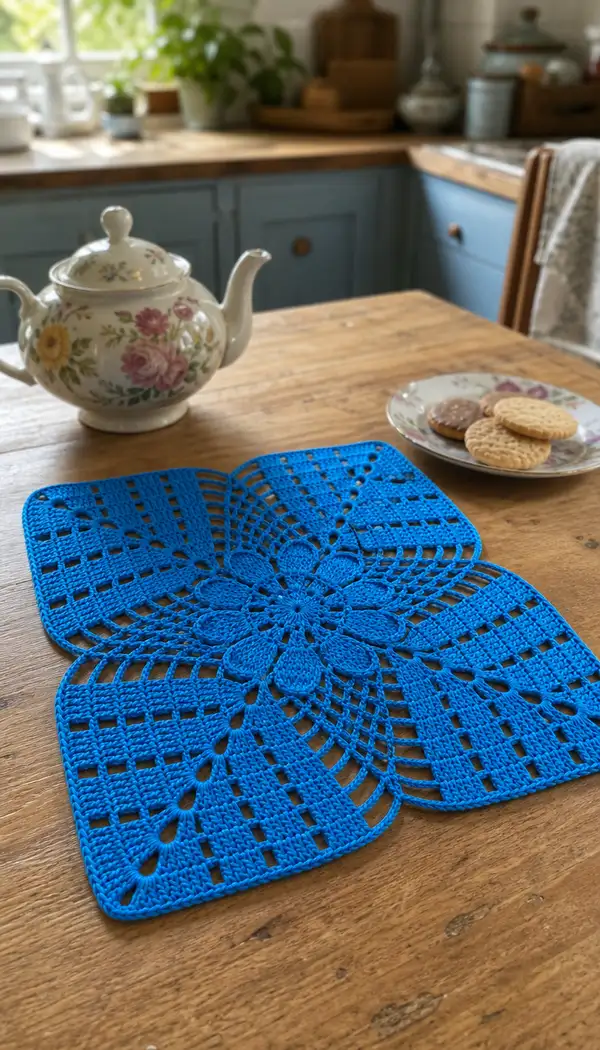
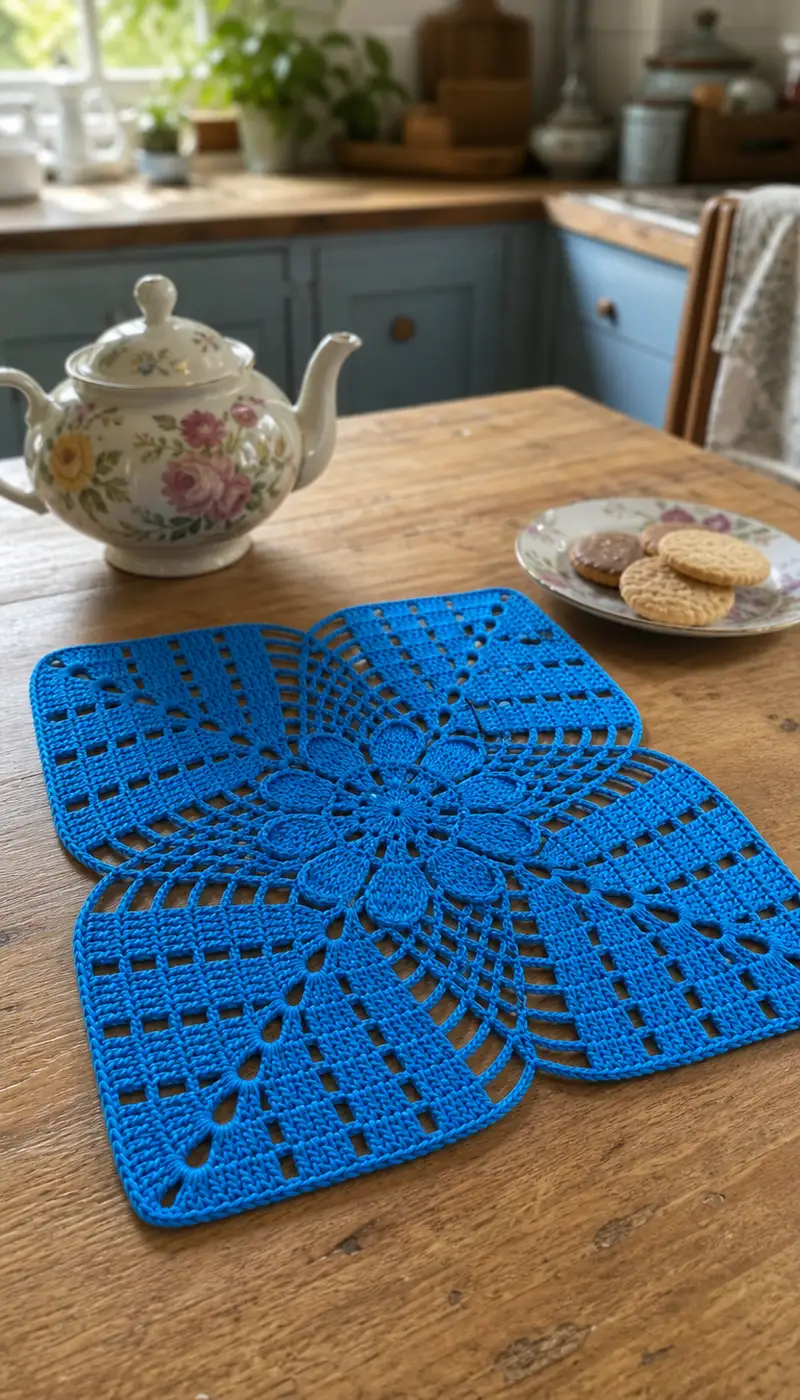
A bright blue floral square placemat featuring a central layered flower that radiates into four rounded square lobes. Worked flat in a combination of clusters, chain-spaces and double crochet grids, this placemat has an elegant openwork texture and a neat rounded corner border. Perfect for a kitchen table accent, tea service or to dress up everyday surfaces.
Progress Tracker
0% Complete
— Notes and Gauge :
Info :
This placemat is worked flat in continuous rounds (no turning) and is built from a central flower motif into four extended square lobes. Gauge is not critical but affects final size: with DK/sport cotton and a 3.5mm hook the finished placemat measures approximately 32cm (12.5in) square from tip to tip (after blocking). If you change yarn weight or hook size, check your gauge and expect the final dimensions to scale proportionally.
— Center Flower Motif :
Round 1 :
8 sc in magic ring, pull ring tight (8)
Round 2 :
Inc in each st around (16)
Round 3 :
(1 sc, inc) x 8 (24)
Round 4 :
(2 sc, inc) x 8 (32)
Round 5 :
(3 sc, inc) x 8 (40)
Info :
At this stage counts are multiples of 8 to form the base for 8 petal anchors. Keep stitches even; use a stitch marker at the first stitch of the round and move it up each round.
Round 6 :
(4 sc, inc) x 8 (48)
Round 7 :
(5 sc, inc) x 8 (56)
Round 8 :
(6 sc, inc) x 8 (64)
Info :
Round 8 creates 8 even segments of 8 sts each (64 sts total). These segments are anchors for the petal loops. Keep this segmentation in mind — you will treat each 8-st segment as one petal anchor zone.
Round 9 :
*Ch7, sk next 7 sts, sc in next st* repeat from * to * around (8 ch-7 loops, 8 sc anchors)
Info :
Chain loops create tall teardrop spaces for petal formation. Count loops around: you should have 8 evenly spaced ch-7 loops. If your piece cups, loosen tension in the chain loops slightly.
Round 10 :
Work into each ch-7 loop as follows: [sc, hdc, 6 dc, hdc, sc] into the loop, then sc into the anchor sc between loops — repeat around (8 petal clusters; 8 sc anchors remain)
Round 11 :
1 sc into each sc and into the top of the last stitch of each petal cluster to join evenly around (64)
Info :
At the end of Round 10-11 the petals will be three-dimensional; gently shape each petal with your fingers. If petals flatten, you can add a shallow row of slip stitches in the base to help them lift.
Round 12 :
(2 sc, 1 inc) x 16 (80)
Round 13 :
1 sc in each st (80)
Round 14 :
*Dc3tog cluster made over next 5 sts (see cluster note), ch3, sk 3 sts, sc in next st; rep from * around (8 clusters, 8 ch-3 spaces, 8 sc anchors)
Info :
Cluster note: Dc3tog cluster means: yarn over, insert, pull up loop, yarn over pull through 2 (leave 2 loops), repeat into following stitch until you have 4 loops on hook then yarn over and pull through all to complete cluster. These clusters create a raised petal ridge that transitions the center to the lobe spokes.
Round 15 :
Work 1 sc in each sc anchor and in each ch-3 space (work: sc in ch-3, next sc across cluster top) — this evens the round and prepares for extending spokes (64 sc equivalents around)
Round 16 :
*(Ch4, sk 3 sts, dc in next 4 sts) x 2 across each petal zone to create two short fan arches; sl st into next anchor sc; rep from * around (8 fan pairs)
Round 17 :
1 sc in each visible stitch or space to create a tidy round (count approximately 80 across; adjust to lie flat)
Info :
Check the center with a flat surface. If it begins to ripple upward, add one even round of sc (as in Round 17) but use a slightly smaller hook to pull it flat before moving to quadrant extension rounds. Begin planning where the quadrants will split: four pairs of petals will form each lobe quadrant.
Round 18 :
Mark four opposite anchors (every 16 sts) to divide the motif into quarters; 1 sc in each st around to finish center foundation (approx 80)
Info :
Place stitch markers at the quarter points — these markers will be reference points for building the four square lobes. Keep markers in place and move them up each round of quadrant construction to maintain symmetry.
— Quadrant Lobe Foundation (Work 4 identical quadrants; each quadrant is worked separately but in the same continuous round flow) :
Info :
You will now build each of the four lobes by working a long series of rounds that extend the motif outward. Work continuously around the piece; when instructions say 'repeat for each quadrant', work the specified sequence into the next quadrant before moving on. Keep the quarter stitch markers handy and move them as you progress. We will expand each quadrant in alternating rounds to maintain flatness and even growth.
Round 19 :
*In quadrant 1: ch3 (counts as dc), dc in next 7 sts across quadrant (8 dc across); at the quarter marker, ch2 and turn into next quadrant sequence; Rep similar 8-dc across each quadrant so you end this round with 32 dc across the four quadrants and ch-2 separation at each quarter marker (total counted stitches vary by method; treat as 4 groups of 8 dc)
Info :
This round begins the rectangular/dc grid that appears in each lobe in the finished placemat. The technique is to build repeated dc columns separated by chain spaces to create the rectangular windowed look.
Round 20 :
Working into dc groups and between groups, ch4 at the corner area and dc into each of the next 8 sts of the quadrant, creating an unobtrusive corner; rep for each quadrant to form the first outer row of dc columns (work evenly)
Round 21 :
1 sc in each dc and ch across the full round to tidy and compress the row (count ~128 sts overall if working 32 dc groups into 4 quadrants — adjust to lie flat)
Info :
From this point forward you will begin alternating solid dc rows and windowed rows formed by sets of dc and chain spaces. This alternation is what creates the bold rectangular grid sections seen in the photo. Keep stitch counts per quadrant consistent: each quadrant will typically add 8 dc columns every two rounds (one full dc round + one windowed round).
Round 22 :
*Dc3, ch3, sk 3 dc, dc3 across first quadrant; at the quarter marker make (dc3, ch3) as corner chain; rep for each quadrant* — results in 4 window sections per quadrant (counts by groups: 4 window groups x 4 quadrants)
Round 23 :
1 sc in each dc and 1 sc in each ch-3 space to even the fabric (count matches prior alternating round; each quadrant will have an equal number of sc positions)
Info :
When creating long rows of dc columns you may notice a slight cupping or ruffling effect. To correct, add an extra sc evenly spaced in the longest convex side or remove a sc in concave growth. The aim is to keep the quadrant edges straight and square when viewed from the center.
Round 24 :
*Dc5 across the next quadrant row to lengthen columns (work 5 dc into each column area), ch3 at separation; repeat for each quadrant, keeping corners as ch-3 with an extra dc in the corner stitch to encourage a rounded square corner* (work evenly)
Round 25 :
1 sc in each st across to compress and tidy the work (this keeps the grid crisp) (approx count will increase each quadrant round by 32 sts)
Info :
Continue repeating the pair of rounds (a windowed/dc column designer round followed by a sc tidy round) to build the rectangular grid out to the desired lobe size. The pictured placemat shows roughly nine full pairs of these alternating rounds per quadrant beyond the center, but your row count will depend on how large you want the lobe to be. Below we provide an extended sequence to reach a similar scale.
Round 26 :
*Dc3, ch3, sk 3 dc, dc3 across quadrant; rep for each quadrant (window repeat)
Round 27 :
1 sc in each st and ch-space to tidy (work evenly across all quadrants)
Round 28 :
*Dc5 in each designated column area to lengthen columns, ch3 at separators; rep around*
Round 29 :
1 sc in each st and ch-space (tidy round)
Info :
At this stage you have built a couple of alternating grid rows. Continue the same pair of rounds (windowed pattern then tidy sc) and you will slowly grow the quadrants outward in a square-lobe shape. Check after every two pairs that the piece lies flat; if the outer edges flare, reduce the dc count in the lengthening rounds by 1 or add an extra sc in the tidy round.
Round 30 :
*Dc3, ch3, sk 3 dc, dc3 across quadrant; rep for each quadrant (window repeat)*
Round 31 :
1 sc in each st and ch-space (tidy round)
Round 32 :
*Dc5 across each column area, ch3 at separators; rep for each quadrant*
Round 33 :
1 sc in each st and ch-space (tidy round)
Info :
If you prefer a more open look like the photo, keep the ch-3 separators. For a denser fabric reduce ch-3 to ch-1 or replace with dc pairs. Make adjustments consistently across all four quadrants.
Round 34 :
*Dc3, ch3, sk 3 dc, dc3 across quadrant; rep for each quadrant*
Round 35 :
1 sc in each st and ch-space (tidy round)
Round 36 :
*Dc5 across each column area, ch3 at separators; rep for each quadrant*
Round 37 :
1 sc in each st and ch-space (tidy round)
Info :
At this point count the number of full column pairs you have in the quadrant. The pictured piece has roughly 8-10 vertical column blocks per quadrant (after expansion). Continue alternation until your quadrant reaches roughly 9cm (3.5in) from the center marker to the outer edge if aiming to match the sample size.
Round 38 :
*Dc3, ch3, sk 3 dc, dc3 across quadrant; rep for each quadrant*
Round 39 :
1 sc in each st and ch-space (tidy round)
Round 40 :
*Dc5 across each column area, ch3 at separators; rep for each quadrant*
Round 41 :
1 sc in each st and ch-space (tidy round)
Info :
If you are tracking your rounds, you are now ~41 rounds into the work. Each quadrant is growing in matched pairs of rounds. For the pictured scale we will continue with an extended sequence of these pairs to reach a similar overall dimension. Keep the piece flat by checking progression and using a slightly tighter or looser hook if necessary.
Round 42 :
*Dc3, ch3, sk 3 dc, dc3 across quadrant; rep for each quadrant*
Round 43 :
1 sc in each st and ch-space (tidy round)
Round 44 :
*Dc5 across each column area, ch3 at separators; rep for each quadrant*
Round 45 :
1 sc in each st and ch-space (tidy round)
Round 46 :
*Dc3, ch3, sk 3 dc, dc3 across quadrant; rep for each quadrant*
Round 47 :
1 sc in each st and ch-space (tidy round)
Info :
You may now be approaching the size seen in the photos. If you want a larger placemat, continue the same alternation to build more rows. If you want a smaller coaster-style piece, stop after fewer repeats. The next section will begin shaping the rounded corners and finishing the outer border.
Round 48 :
*Dc5 across each column area, ch3 at separators; rep for each quadrant*
Round 49 :
1 sc in each st and ch-space (tidy round)
Round 50 :
*Dc3, ch3, sk 3 dc, dc3 across quadrant; rep for each quadrant*
Round 51 :
1 sc in each st and ch-space (tidy round)
Info :
Begin assessing corner round shaping now: in the photographed piece the corners are softly rounded rather than sharp. To obtain rounded corners, when you reach the quadrant corner transition work a small semicircular fan made of [sc, hdc, dc3, hdc, sc] across the corner ch gap in place of straight dc columns for two to three paired rounds. Below the pattern will instruct specific corner fan sequences every 6 rounds to shape the corner.
Round 52 :
At each quadrant corner work: [sc, hdc, 3 dc, hdc, sc] into the corner ch-3 space to begin rounding the corner; continue standard window or column stitches across quadrant faces; repeat for each quadrant
Round 53 :
1 sc in each stitch and ch-space to tidy (work evenly)
Round 54 :
Return to standard column lengthening: *Dc5 across columns, ch3 separators; rep for each quadrant*
Round 55 :
1 sc in each st and chspace (tidy round)
Info :
Repeat the corner fan every 6 rounds as you continue outward: this creates rounded corners that echo the photo. If you desire more pronounced rounded corners, increase the fan to [sc, hdc, 5 dc, hdc, sc] for an even broader curve.
Round 56 :
*Dc3, ch3, sk 3 dc, dc3 across quadrant; rep for each quadrant*
Round 57 :
1 sc in each st and chspace (tidy round)
Round 58 :
Work a second corner fan to continue corner rounding: [sc, hdc, 3 dc, hdc, sc] into each corner space; then continue window/column pattern for quadrant faces
Round 59 :
1 sc in each st and ch-space (tidy round)
Info :
At later stages your outer edges will approximate a square with softly rounded corners. Count across each quadrant face to ensure symmetry — each quadrant should have the same number of column blocks and ch-3 spaces. If one side is shorter, add an extra dc column pair on that side to match.
Round 60 :
*Dc5 across each column area, ch3 separators; rep for each quadrant*
Round 61 :
1 sc in each st and ch-space (tidy round)
Round 62 :
*Dc3, ch3, sk 3 dc, dc3 across quadrant; rep for each quadrant*
Round 63 :
1 sc in each st and ch-space (tidy round)
Info :
If you are trying to reproduce the exact photo size, stop when the overall width across the two opposite outer lobes measures about 32cm (12.5in) before starting final edging. Otherwise, stop earlier for a smaller placemat or continue for a larger mat. Remember that blocking will add a small amount to the dimensions.
Round 64 :
Work one more cycle of windowed round: *Dc3, ch3, sk 3 dc, dc3 across quadrant; rep for each quadrant*
Round 65 :
1 sc in each st and ch-space (tidy round)
Round 66 :
Begin edging preparation: *1 hdc in each dc for two rounds across quadrant faces, and work [sc, hdc, sc] into corner fan tops to compress corners; rep for each quadrant*
Round 67 :
Continue knitting down the edging: 1 sc in each st across, placing an extra sc at each transition from quadrant face to corner to keep corners smooth (work evenly)
Info :
These hdc and sc rounds help compress the outermost dc columns and establish a neat, strong edge foundation for the final rounded border. If your outermost columns are taller, consider working an additional hdc round to level the edge before the final slip-stitch rounding.
Round 68 :
Edge round A: *Sc 2, skip 1, sc 3 into next shell area to create slight scalloping at the corner; continue sc evenly along sides with sc in each st* (work evenly around)
Round 69 :
Edge round B: *BLO: 1 sc in each st BLO across (this creates a subtle ridge); in corner shells work (sc, ch2, sc) to keep corner gentle*
Info :
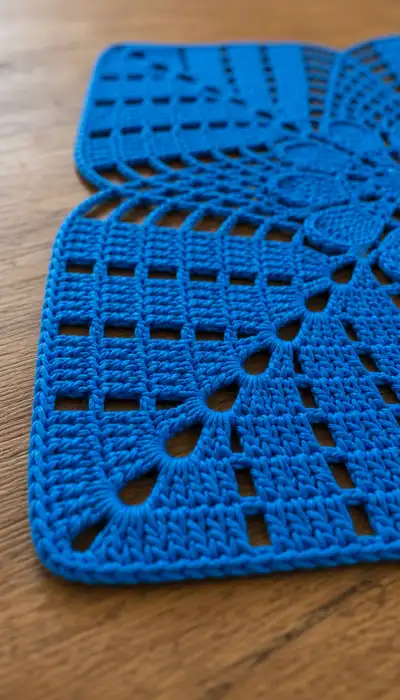
The BLO round produces the neat braided ridge visible along the placemat edge in the photo. Work this round with a slightly smaller hook (2.75-3.25mm) if you want a crisper border ridge. Move stitch markers at quadrant corners through these rounds to maintain perfect alignment.
Round 70 :
Final rounded border preparatory round: 1 sc in each st and 3 sc in corner fan tops to round corners (work evenly)
Round 71 :
Final edging round: *[sc, sl st, ch2, sl st, sc] into the top of the corner fan to form a rounded corner finish; along straight edges work sc in each st, placing sl st in every 10th st to slightly tighten the edge and keep it flat*
Info :
For the pictured rounded corner, the final decorative stretch uses low-profile slip stitches and small ch-2 picots to soften the corner. If you prefer a lacy scallop, replace the corner motif with [sc, hdc, 3 dc, hdc, sc].
Round 72 :
Finish with a tidy slip-stitch join: sl st into next st, fasten off and weave in ends securely with yarn needle
Info :
Weave in all tails along the back of the placemat through several stitches for security. Use a folded section of the piece as a guide to keep visible front-side tidy. When all ends are woven, block the placemat to final dimensions (wet block or steam block depending on yarn care). Pin gently into shape with rounded corners to match the sample.
— Decorative Petal Relief (Optional Raised Detailing) :
Info :
If you want extra raised petal relief as visible in the central flower of the photo, work surface slip stitches and short puff stitches along petal edges. The following rounds are optional and may be done immediately after Round 11 or after Round 18 depending on how pronounced you want them.
Round 73 :
Surface: Using the right side, work a round of surface single crochet outlining each petal edge, placing 12 surface sc per petal to accentuate the petal wrinkle (8 petals)
Round 74 :
Optional puff accent: In the base chain of each petal (the ch-7 loop), make 3 mini puffs across the base [yarn over, insert, pull up loop] x 3 leaving loops on hook then pull through all loops and ch1 to secure — repeat 3 times per petal to create a row of small puff bumps
Info :
Use these relief techniques sparingly if you plan to wash the placemat frequently; puffs can be flattened slightly during laundering. They are good for accent pieces and for matching the textured center seen in the photo.
— Final Blocking & Finishing :
Info :
Wet-block the finished placemat to shape: pin out the rounded corners and outer edges on a blocking mat or towel, ensuring symmetry between quadrants. Allow to dry fully. If you use spray starch for a crisper look, apply after the piece is dry and press lightly; avoid high heat. For daily use consider a moderate pressing to keep the edge tidy.
Info :
Optional: For extra durability, run a line of clear fabric glue along the back edge before drying — test glue on a scrap first. Always label wash instructions if gifting: machine washable if yarn allows, preferably in a delicates bag on gentle cycle and flat dried.
Info :
Final check: ensure all ends are woven and edges are even. If the placemat still shows slight waviness after blocking, unpin and reblock adjusting the tension of the pins slightly until satisfied.
This bright blue floral placemat is a delightful way to brighten your table and practice texture-building stitches. The layered flower center combined with a structured grid of dc windows creates a balance of detail and clean lines. Whether for everyday tea or a special setting, this piece is a satisfying project that finishes quickly and blocks beautifully. 🧶 Add a matching set in different colors for seasonal decor or gifts — enjoy the process and the pretty finished result! 🌼✨