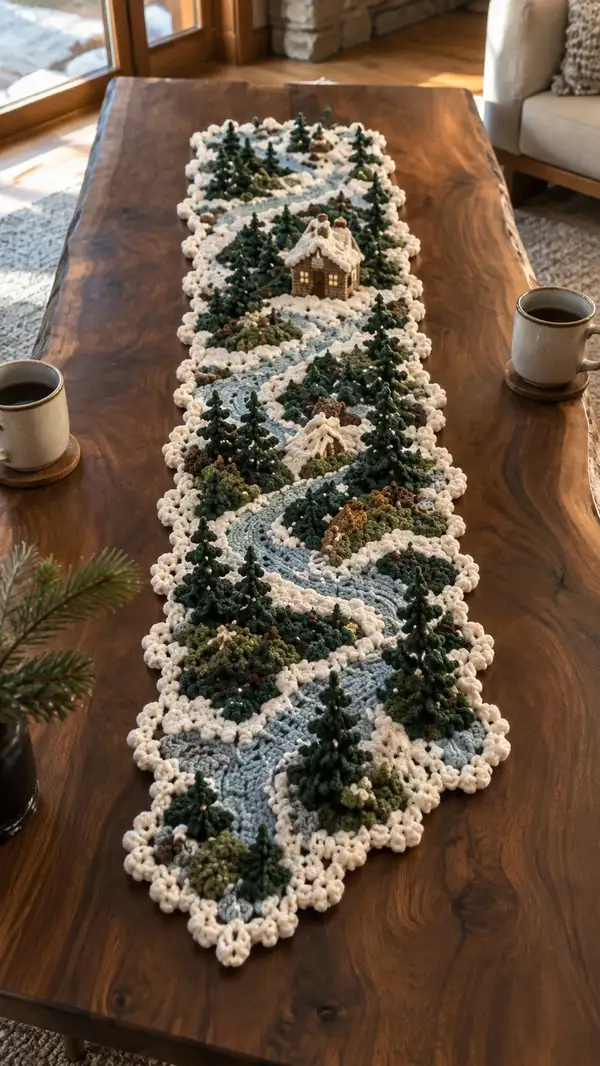
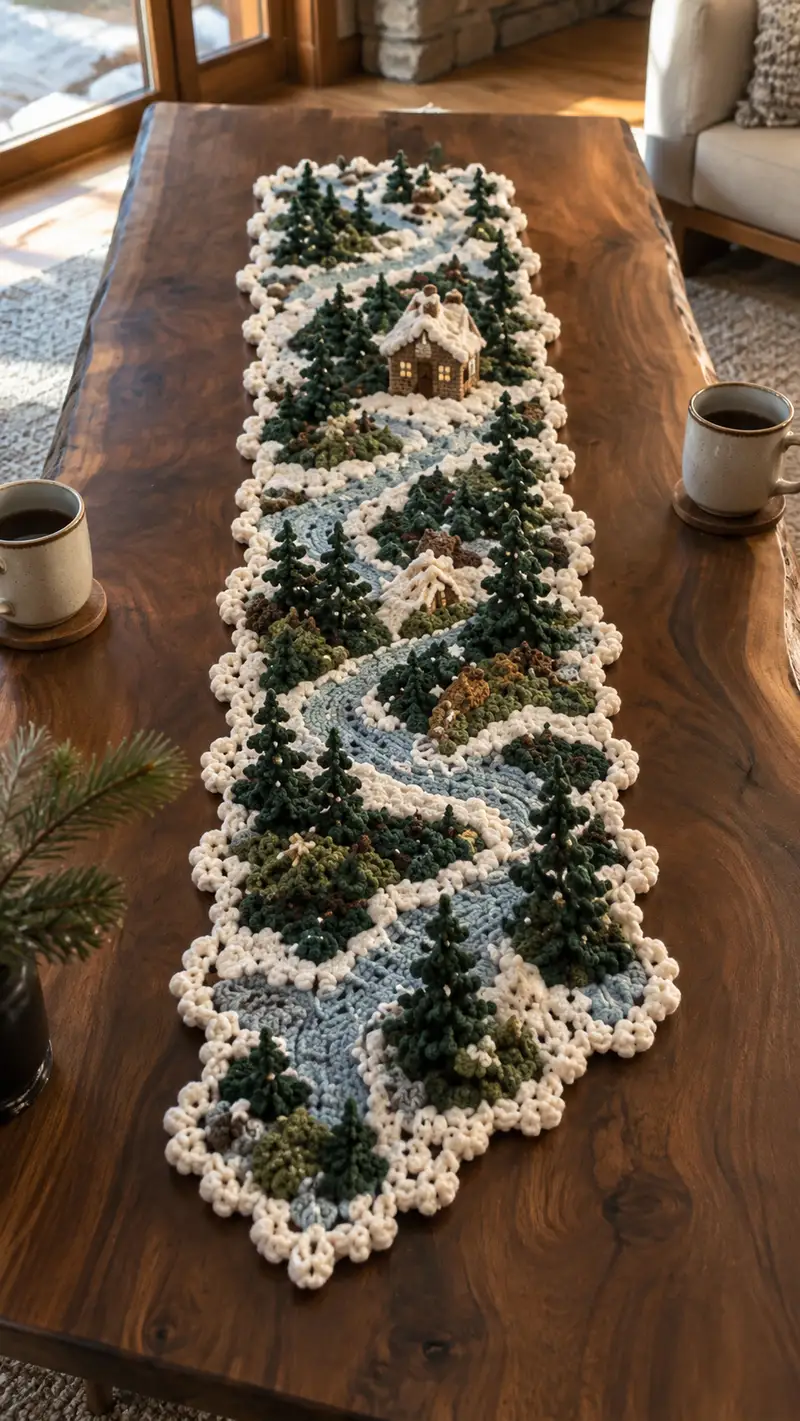
Create a charming winter landscape table runner featuring a winding icy river, clustered evergreen trees, tiny snowy hills and a cozy cabin in soft blue, ivory and forest greens. This textured, decorative runner uses bobble clusters, popcorns and layered applique trees for a three-dimensional scenic effect, perfect as a seasonal centerpiece. The pattern uses worsted-weight yarn and standard crochet techniques with step-by-step instructions for motifs and assembly. Enjoy stitching an heirloom-quality, cozy table accent.
Progress Tracker
0% Complete
— Materials and Notes :
Info :
This pattern is worked in joined rounds and rows to create an organic rectangular runner approximately 12-14 inches wide and 48-52 inches long depending on tension and number of repeated motif sections. Use a 5.0mm hook for the base panel for the pictured gauge. Work bobbles and popcorn clusters looser than base stitches so they puff. You may substitute similar worsted yarns; keep fiber type consistent for texture.
— Base Panel (Sky Blue Riverbed) :
Round 1 :
Ch 60, join with sl st to first ch to work in rounds, or join making a loop that is slightly flexible. Work 1 sc in each ch around (60)
Round 2 :
Ch 1, 1 sc in same st, 1 sc in next 7 sts, inc, rep across until last 2 sts, 1 sc in last 2 sts (approx 68) — this set of increases eases the strip into a gentle oval shape; adjust by spacing increases evenly
Round 3 :
Ch 1, 1 sc in each st around (68)
Round 4 :
Ch 1, 1 sc in next 9 sts, inc — repeat across to follow previous increase distribution (approx 76)
Round 5 :
Ch 1, 1 sc in each st around (76)
Info :
At this stage the foundation width for the central runner is set. If you prefer a narrower runner, omit the second increase round. Keep a stitch marker at the start of each round to track your counts and maintain shape.
Round 6 :
Ch 2 (counts as hdc), hdc in next 2 sts, *dc in next 2, hdc in next 3* rep around to create slight texture (76)
Round 7 :
Ch 1, 1 sc in each st around (76)
Round 8 :
Ch 1, *1 sc in next 10, inc* rep around (approx 84)
Round 9 :
Ch 1, 1 sc in each st around (84)
Round 10 :
Ch 1, 1 sc BLO in each st around to create a subtle ridge separating river area (84)
Round 11-16 :
Ch 1, 1 sc in each st around (84)
Info :
Begin to plan river placement. The river will be created by working a separate curving strip that overlays this base and is attached as you go. Mark the center line where you intend the river to flow using stitch markers or removable pins placed approximately 6-8 sts apart to guide later attachment.
Round 17 :
Ch 1, *1 sc in next 12, inc* around (approx 92)
Round 18 :
Ch 1, 1 sc in each st around (92)
Round 19 :
Ch 1, *1 sc in next 6, pop (popcorn) in next st, 1 sc in next 6* rep around (92) — pop instructions: work 5 dc in same st, remove hook, reinsert into first dc and pull loop through to close popcorn
Round 20 :
Ch 1, 1 sc between each popcorn and in all other sts to stabilize (92)
Round 21-26 :
Ch 1, 1 sc in each st around (92)
Info :
If your runner will be longer than one repeat, continue additional rounds in multiples of 6 sts to maintain edge symmetry. The pictured runner has 6 repeated landscape panels joined in single fabric; continue base until you reach desired length minus the border allowance.
Round 27 :
Ch 1, *1 sc in next 14, inc* around (approx 100)
Round 28-32 :
Ch 1, 1 sc in each st around (100)
Round 33 :
Ch 1, 1 sc in next 5, dec — repeat to shape slight taper for ends if desired (approx 92)
Round 34-36 :
Ch 1, 1 sc in each st around (92)
Info :
At this point the base panel is a stable canvas. Add long tail for joining the river later. If your runner is shorter than desired, add 2-4 rounds of even sc before adding the river and border elements.
— River Channel (worked separately then attached) :
Info :
The river is worked as a long irregular strip in Sky Blue that will be appliqued along a meandering path. Work the strip as a long oval shape with waves that will overlap the base. Keep one edge straight enough to allow easier sewing; the other edge can be scalloped for interest.
Round 1 :
With Sky Blue, make mr, 6 sc in mr (6)
Round 3 :
(1 sc, inc) × 6 (18)
Round 4 :
(2 sc, inc) × 6 (24)
Round 5 :
(3 sc, inc) × 6 (30)
Round 6 :
1 sc in each st (30)
Round 7 :
Ch 2, *dc, ch1, dc in same st* across to create a scalloped flowing edge on one side only. Work 1 sc on the other side to keep it straighter
Round 8 :
1 sc in each st across the straighter side and 1 sc in each dc/ch sp on scalloped side to stabilize (30)
Round 9 :
Ch 1, *1 sc in next 4, pop in next st* rep across scalloped side to add tiny ice chunks (6-7 pops) (30)
Round 10 :
Ch 1, 1 sc in each st (30)
Round 11-14 :
Repeat rounds 7-10 to extend the strip length. As you work, occasionally add a slight outward increase by doing (1 sc in next 2, inc) to form subtle widening sections that will sit under cluster hills (final count varies with length)
Info :
Make the river strip to approximately the length of the runner minus 6 inches so there are natural entry and exit points for the river. When positioning, leave 1/2-3/4 inch gap to the border to allow the raised ivory snow to frame the river.
Round 15 :
Fasten off leaving a long tail for mattress stitch attachment. Block lightly if desired to settle scallops so they sit flat on the base panel.
— Snow Border (Ivory textured scalloped frame) :
Round 1 :
With Ivory, attach at corner or start of runner edge with sl st, ch 3 (counts as dc), *skip 2 sts, 5 dc in next st (shell), skip 2 sts, sl st in next st* repeat around to create a large shell edging. For straight edges, space shells evenly approx every 6-8 sts.
Round 2 :
Ch 1, 1 sc in each st and in the top of each shell to anchor (approx 100-120 depending on base width)
Round 3 :
Ch 1, *pop in next st, 2 sc in next 3 sts* repeat around to create snowy bobbles nestled between shells
Round 4 :
Ch 1, 1 sc in each st to stabilize and create a soft ridge (count remains)
Round 5 :
Ch 1, *sc2tog, 3 sc in next shell top, sc2tog* repeat to round the shells slightly and finish edge neatly
Info :
This thick snow border frames the whole runner and gives a raised barrier that helps the river and clusters to sit visually within the scene. If you prefer a flatter edge, omit the popcorns and use a single-round shell with a plain sc anchoring round.
— Pine Tree Applique (Make 18-22 assorted sizes) :
Info :
Trees are made from stacked cone layers using a small hook (4.0mm) in forest green (deep) and olive (lighter) colors. Each cone is worked in rounds of decreasing stitch counts so they stack like tiers. Make several sizes: small (4 tiers), medium (6 tiers), large (8 tiers). For best results, make more small ones and fewer large ones to match the photo density.
Small Tree - Round 1 :
With Forest Green, mr, 6 sc in mr (6)
Small Tree - Round 2 :
Inc 6 (12)
Small Tree - Round 3 :
(1 sc, inc) × 6 (18)
Small Tree - Round 4 :
Ch 2, rotate and work 1 hdc in each st around (18) — this forms the base cone tier
Small Tree - Round 5 :
Change to Olive green for tip highlight. Sl st across to where you want the next tier. Work 1 sc, *skip 1 st, 3 dc in next st, skip 1 st, 1 sc* rep to create cluster points (approx 6 clusters)
Small Tree - Round 6 :
Fold the tier slightly and seam at base by working sl st around the bottom edge to hold cone shape. Fasten off leaving long tail for sewing to base (cone height approx 1.5 inches)
Info :
For small trees, stack two such cones: make one slightly smaller nested on top of the other. Use long tail to sew tiers together from inside to hold shape. For a denser look, tuck a small dab of fiberfill inside lower cone before closing.
Medium Tree - Round 1 :
mr, 6 sc in mr (6)
Medium Tree - Round 2 :
Inc 6 (12)
Medium Tree - Round 3 :
(1 sc, inc) × 6 (18)
Medium Tree - Round 4 :
(2 sc, inc) × 6 (24)
Medium Tree - Round 5 :
Ch 2, 1 hdc in each st around (24)
Medium Tree - Round 6 :
Switch to Olive, *1 sc, skip 1, 3 dc in next st, skip 1* across to make decorative points (approx 8 clusters)
Medium Tree - Round 7 :
Ch 1, 1 sc evenly around, then fold and seam bottom edge with sl st to hold cone (24)
Medium Tree - Round 8 :
Repeat a smaller cone (Rounds 1-4 scaled down by one round each) and stack on top using yarn to sew tiers together, finishing with a single sc as trunk base
Info :
For large trees, increase tiers to 8-10 rounds before creating the decorative cluster round. Insert a short length of floral wire inside the trunk if you want to position trees upright; fold the wire's end back and wrap with yarn to avoid sharp points. Trees should be sewn onto the runner through the base seam using long tails.
— Cluster Hills and Rocks :
Hill Cluster A - Round 1 :
With Olive, mr, 6 sc in mr (6)
Hill Cluster A - Round 2 :
Inc 6 (12)
Hill Cluster A - Round 3 :
(1 sc, inc) × 6 (18)
Hill Cluster A - Round 4 :
1 sc in each st around (18)
Hill Cluster A - Round 5 :
Ch 1, *bp (bobble) in next st, 2 sc in next 2* rep around to add snowy tufted texture (18)
Hill Cluster A - Round 6 :
Fasten off leaving tail for sewing; for a puffier hill insert very small amount of fiberfill before closing (optional)
Rock Accent - Round 1 :
With Brown, mr, 6 sc in mr (6)
Rock Accent - Round 2 :
Inc 6 (12)
Rock Accent - Round 3 :
1 sc in each st around (12) Fasten off leaving tail
Info :
Arrange hill clusters and rocks in groups of 2-4 for natural composition. Sew them down first then place trees around the edges to hide sewing tails and anchor the scene. Use darker brown for rock highlights and embroider tiny lines to suggest crevices.
— Cabin (Make 1 focal cabin) :
Cabin Walls - Round 1 :
With Brown, ch 10, join to work in rounds to form a small rectangle base. Round 1: 1 sc in each ch across (10)
Cabin Walls - Round 2 :
Ch 1, turn work, 1 sc in each st across (10)
Cabin Walls - Round 3-12 :
Repeat Row 2 to build walls (10 sts × 12 rows) or until walls measure approx 1.75 inches high. Fasten off leaving long tail for sewing seams and attaching roof
Cabin Roof - Round 1 :
With Ivory, ch 22. Row 1: 1 sc in 2nd ch from hook and across (21)
Cabin Roof - Round 2 :
Ch 1, turn, 1 sc in each st (21)
Cabin Roof - Round 3 :
Ch 1, *1 sc in next 8, dec* rep twice to form slight roof slope (19)
Cabin Roof - Round 4-7 :
Ch 1, 1 sc in each st across (19) Finish by folding roof in half lengthwise and joining outer edges with sl st to create a peaked roof. Add popcorns of Ivory along ridge to simulate snow accumulation.
Cabin Assembly :
Sew the long edges of the wall rectangle together to form box. Insert small amount of fiberfill if you want a plump cabin. Sew roof to top of walls centering windows and ensure roof ridge sits slightly off-center to show chimney. Embroider door and window panes with contrasting lighter yarn and add tiny brown bobbles for chimney stacks.
Info :
Embellish windows by stitching a lighter colour inside and adding tiny beads or French knots to simulate glowing lights. Sew cabin to base panel at desired position, anchoring through the base fabric with long tail for stability.
— Assembling Scene and Attaching Pieces :
Round 1 :
Lay the base panel flat and position the river strip along the marked center flow. Pin river in place ensuring scalloped edge faces up towards the snow border. Match the river length to create gentle S curves similar to photo.
Round 2 :
Attach the river with a mattress stitch using the long tail from the river strip: insert needle under the base panel loops and through the river edge loops, stitching every 3-4 stitches to create a secure invisible join. Work from one end to the other. Fasten off and weave tails.
Round 3 :
Pin hill clusters and rock accents in groups along the river banks. Leave spaces for trees and the cabin. Once satisfied with composition, baste them using long running stitches or small whip stitches; then sew securely with matching yarn for each element.
Round 4 :
Arrange pine trees in clusters: place larger trees near the cabin and mid-runner, smaller trees towards the ends to create perspective. Use long tails and a yarn needle to sew through the base panel stitches and tree base seam firmly. Add one or two stitches through the trunk to anchor.
Round 5 :
Sew cabin at chosen focal point slightly off-center. Use small backstitches through the bottom of the cabin and the base panel to secure. Add a few snow popcorns around the cabin base to blend it into the scene.
Info :
Keep pieces slightly raised where you want more dimension; minimize pulling down when sewing to maintain 3D height. If adding wired trees, ensure wire ends are fully enclosed and sewn down so they do not catch or poke the table surface.
— Final Finishing and Edge Sewing :
Round 1 :
Once all appliques are sewn and tails are woven in, give the runner a gentle steam block or pin to shape. Smooth shells and popcorns so they sit uniformly. Avoid pressing directly onto bobbles to preserve texture.
Round 2 :
Weave in all remaining tails by threading them through several stitches across the back of the work; trim ends close. If any shells or popcorns are loose, tack them from the back with an extra knot and weave the tail in.
Round 3 :
Optional: Add a polyester batting layer and sew it lightly to the back if you desire a padded runner. Make small even stitches through the back only to avoid visible seam lines.
Info :
For durability, consider sewing a felt backing to the runner with slipstitch around the border, trimming felt to match the scalloped edge carefully. This helps protect furniture and keeps the runner flat during use.
— Variation and Customizing Notes :
Info :
Change color palette for different seasons: warm browns and oranges for autumn, pastel shades for spring. To scale the runner larger or smaller, add or subtract base panel rounds and make more or fewer river strip repeats. Use heavier acrylic yarn and larger hooks for chunky texture or lighter yarn for a delicate look.
Info :
If you want to sew the runner in modular panels for transport, divide the base into equal-length panels and attach river and appliques to each panel before joining them with invisible mattress stitch. This also makes storage simpler.
This Blue Ivory Winter Forest Table Runner brings an enchanting miniature landscape to your home, combining textured stitches and layered appliques for a delightful winter centerpiece. Each bobble, tree and shell-edge is an opportunity to add personality and warmth to your table setting. I hope stitching this runner becomes a relaxing, rewarding seasonal ritual that you return to year after year. Happy crocheting and may your home feel cozier with every stitch! 🧶❄️