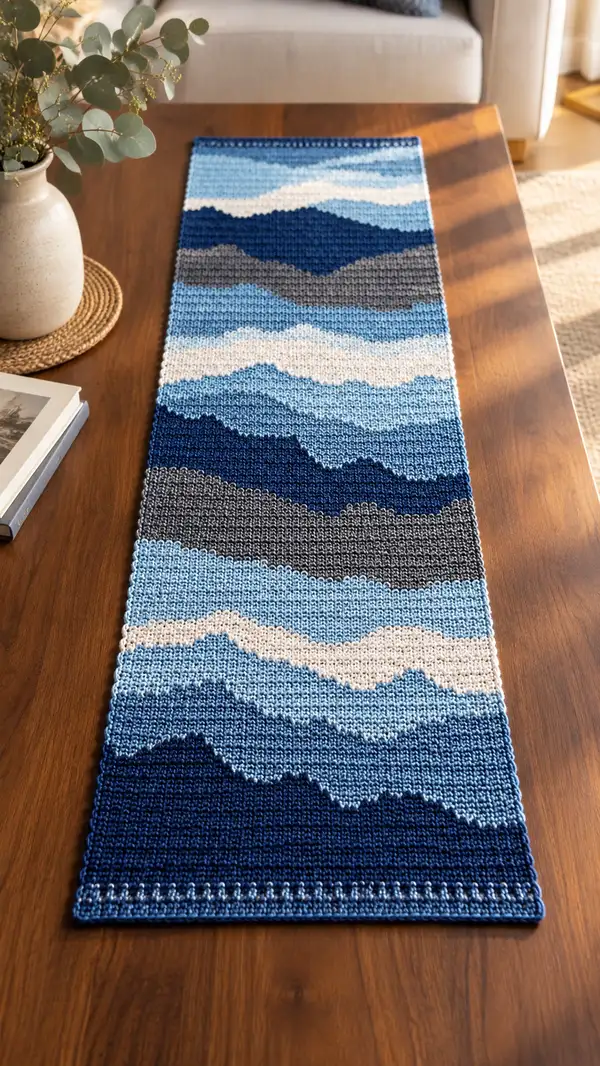
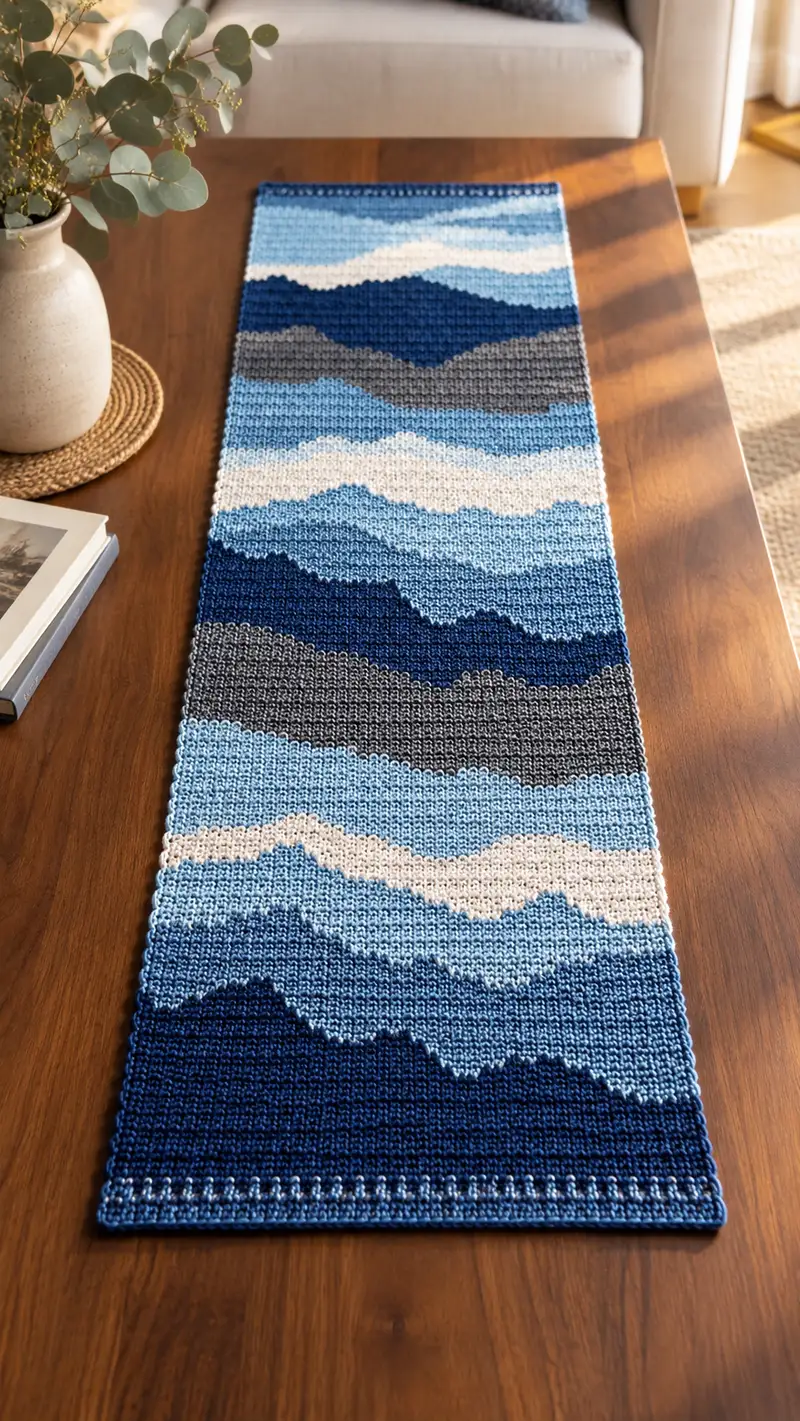
Create a calming, modern mountain-scape table runner worked in single crochet color blocks. This rectangular runner uses layered blue, navy, grey and cream tones to form stylized mountain silhouettes. The textured rows and neat scalloped edge give a polished look that sits beautifully on a wooden table. Suitable for living room, entryway, or as a thoughtful handmade gift.
Progress Tracker
0% Complete
— Materials & Gauge :
Info :
Gauge: 5 sc = 1" (2.5 cm) on 4.0mm hook, but gauge is flexible for a table runner. Finished sample measures approximately 12" (30 cm) wide by 48" (122 cm) long. Stitch counts and row counts below assume a foundation width of 100 sc. Adjust foundation chain in multiples of 10 to scale width.
Info :
Technique overview: Work tapestry-style single crochet in rows using short color segments organized in 10-stitch vertical columns. Carry unused yarn behind your work for short distances, twisting with the working yarn at color joins to secure floats. Change color on the final yarn-over of the previous stitch to ensure a clean join.
— Foundation & Set-Up :
Row 1 :
With Color C1 (Navy), ch 101. Sc in 2nd ch from hook and each ch across—100 sc (100). Turn.
Info :
From Row 1 onward all rows contain 100 sc. Count out stitch groups as 10 columns of 10 sc each (10 x 10 = 100). When the pattern instructs e.g. (10 sc C1, 20 sc C3...), those numbers refer to consecutive single crochet stitches using that color across the row.
— Main Panel : (Row-by-row color map, 140 rows) :
Overview :
The runner is mapped on a virtual grid of 10 columns (left to right) each column = 10 sc. Each row lists the color for each column. Colors: C1 = Navy (deep), C2 = Deep Blue, C3 = Medium Denim, C4 = Sky Blue, C5 = Light Blue, C6 = Grey, C7 = Cream/Ivory. Carry yarn behind short stretches and twist at color changes.
Info :
Rows 1-140 are worked flat, turning at the end of each row. Always change color by completing the last yarn-over of the previous sc with the next yarn color. Use slip knot technique or join color directly; weave ends and/or catch floats every few rows for neatness.
Row 2 :
(10 sc C1, 10 sc C1, 10 sc C1, 10 sc C1, 10 sc C1, 10 sc C1, 10 sc C1, 10 sc C1, 10 sc C1, 10 sc C1) (100) — solid Navy base. Turn.
Row 3 :
(10 sc C1, 10 sc C1, 10 sc C1, 10 sc C2, 10 sc C2, 10 sc C2, 10 sc C1, 10 sc C1, 10 sc C1, 10 sc C1) (100). Turn.
Row 4 :
(10 sc C1, 10 sc C1, 10 sc C2, 10 sc C2, 10 sc C3, 10 sc C2, 10 sc C2, 10 sc C1, 10 sc C1, 10 sc C1) (100). Turn.
Row 5 :
(10 sc C1, 10 sc C2, 10 sc C2, 10 sc C3, 10 sc C3, 10 sc C3, 10 sc C2, 10 sc C2, 10 sc C1, 10 sc C1) (100). Turn.
Info :
Tip: When changing colors between columns, twist the new color around the old on the wrong side to anchor floats. For carries longer than 8 stitches, fasten off and rejoin the color to avoid bulky floats.
Row 6 :
(10 sc C2, 10 sc C2, 10 sc C3, 10 sc C3, 10 sc C3, 10 sc C3, 10 sc C3, 10 sc C2, 10 sc C2, 10 sc C2) (100). Turn.
Row 7 :
(10 sc C2, 10 sc C3, 10 sc C3, 10 sc C3, 10 sc C4, 10 sc C3, 10 sc C3, 10 sc C3, 10 sc C2, 10 sc C2) (100). Turn.
Row 8 :
(10 sc C3, 10 sc C3, 10 sc C3, 10 sc C4, 10 sc C4, 10 sc C4, 10 sc C3, 10 sc C3, 10 sc C3, 10 sc C3) (100). Turn.
Row 9 :
(10 sc C3, 10 sc C3, 10 sc C4, 10 sc C4, 10 sc C4, 10 sc C4, 10 sc C4, 10 sc C3, 10 sc C3, 10 sc C3) (100). Turn.
Info :
Eye placement equivalent: there are no eyes—this Info is used to remind about yarn management. We recommend weaving ends every 6-8 rows to avoid too many small tails at the end of the project.
Row 10 :
(10 sc C3, 10 sc C4, 10 sc C4, 10 sc C4, 10 sc C5, 10 sc C4, 10 sc C4, 10 sc C4, 10 sc C3, 10 sc C3) (100). Turn.
Row 11 :
(10 sc C4, 10 sc C4, 10 sc C4, 10 sc C5, 10 sc C5, 10 sc C5, 10 sc C4, 10 sc C4, 10 sc C4, 10 sc C4) (100). Turn.
Row 12 :
(10 sc C4, 10 sc C4, 10 sc C5, 10 sc C5, 10 sc C6, 10 sc C5, 10 sc C5, 10 sc C5, 10 sc C4, 10 sc C4) (100). Turn.
Row 13 :
(10 sc C4, 10 sc C5, 10 sc C5, 10 sc C6, 10 sc C6, 10 sc C6, 10 sc C5, 10 sc C5, 10 sc C4, 10 sc C4) (100). Turn.
Info :
Grey (C6) and Cream (C7) give contrast for mid-range ridgelines. When working a grey or cream segment adjacent to dark navy, be mindful to keep the tension even so the light color does not pucker.
Row 14 :
(10 sc C5, 10 sc C5, 10 sc C6, 10 sc C6, 10 sc C6, 10 sc C6, 10 sc C6, 10 sc C5, 10 sc C5, 10 sc C5) (100). Turn.
Row 15 :
(10 sc C5, 10 sc C6, 10 sc C6, 10 sc C6, 10 sc C7, 10 sc C6, 10 sc C6, 10 sc C6, 10 sc C5, 10 sc C5) (100). Turn.
Row 16 :
(10 sc C6, 10 sc C6, 10 sc C6, 10 sc C7, 10 sc C7, 10 sc C7, 10 sc C6, 10 sc C6, 10 sc C6, 10 sc C6) (100). Turn.
Row 17 :
(10 sc C6, 10 sc C7, 10 sc C7, 10 sc C5, 10 sc C5, 10 sc C5, 10 sc C7, 10 sc C7, 10 sc C6, 10 sc C6) (100). Turn.
Info :
Alternate: If you prefer slightly softer contrasts, replace C7 (Cream) with a very pale blue to blend more with blues instead of stark cream. This will alter the visual 'highlight' effect.
Row 18 :
(10 sc C7, 10 sc C7, 10 sc C5, 10 sc C5, 10 sc C4, 10 sc C5, 10 sc C5, 10 sc C7, 10 sc C7, 10 sc C7) (100). Turn.
Row 19 :
(10 sc C7, 10 sc C5, 10 sc C5, 10 sc C4, 10 sc C4, 10 sc C4, 10 sc C5, 10 sc C5, 10 sc C7, 10 sc C7) (100). Turn.
Row 20 :
(10 sc C5, 10 sc C5, 10 sc C4, 10 sc C4, 10 sc C3, 10 sc C4, 10 sc C4, 10 sc C5, 10 sc C5, 10 sc C5) (100). Turn.
Info :
By alternating segments across rows you’ll build jagged peaks that step diagonally across the grid. For a smoother slope, change one column at a time in successive rows; for more jagged peaks, change blocks of two columns at a time.
Row 21 :
(10 sc C5, 10 sc C4, 10 sc C4, 10 sc C3, 10 sc C3, 10 sc C3, 10 sc C4, 10 sc C4, 10 sc C5, 10 sc C5) (100). Turn.
Row 22 :
(10 sc C4, 10 sc C4, 10 sc C3, 10 sc C3, 10 sc C2, 10 sc C3, 10 sc C3, 10 sc C4, 10 sc C4, 10 sc C4) (100). Turn.
Row 23 :
(10 sc C4, 10 sc C3, 10 sc C3, 10 sc C2, 10 sc C2, 10 sc C2, 10 sc C3, 10 sc C3, 10 sc C4, 10 sc C4) (100). Turn.
Row 24 :
(10 sc C3, 10 sc C3, 10 sc C2, 10 sc C2, 10 sc C1, 10 sc C2, 10 sc C2, 10 sc C3, 10 sc C3, 10 sc C3) (100). Turn.
Info :
At about 1/3 length you’ll see a darker mid-range band forming. If you want a more subtle band, shift one column left or right every other row instead of two columns at once to soften the slope.
Row 25 :
(10 sc C3, 10 sc C2, 10 sc C2, 10 sc C1, 10 sc C1, 10 sc C1, 10 sc C2, 10 sc C2, 10 sc C3, 10 sc C3) (100). Turn.
Row 26 :
(10 sc C2, 10 sc C2, 10 sc C1, 10 sc C1, 10 sc C1, 10 sc C1, 10 sc C1, 10 sc C2, 10 sc C2, 10 sc C2) (100). Turn.
Row 27 :
(10 sc C2, 10 sc C1, 10 sc C1, 10 sc C1, 10 sc C7, 10 sc C1, 10 sc C1, 10 sc C1, 10 sc C2, 10 sc C2) (100). Turn.
Row 28 :
(10 sc C1, 10 sc C1, 10 sc C1, 10 sc C7, 10 sc C7, 10 sc C7, 10 sc C1, 10 sc C1, 10 sc C1, 10 sc C1) (100). Turn.
Info :
Rows 25-30 form a narrow pale ridge (C7) that mimics a lighter cloud or snowcap. If you prefer a more extensive band, extend the C7 across adjacent columns for additional rows.
Row 29 :
(10 sc C1, 10 sc C1, 10 sc C7, 10 sc C7, 10 sc C7, 10 sc C7, 10 sc C7, 10 sc C1, 10 sc C1, 10 sc C1) (100). Turn.
Row 30 :
(10 sc C1, 10 sc C7, 10 sc C7, 10 sc C7, 10 sc C5, 10 sc C7, 10 sc C7, 10 sc C7, 10 sc C1, 10 sc C1) (100). Turn.
Row 31 :
(10 sc C7, 10 sc C7, 10 sc C5, 10 sc C5, 10 sc C5, 10 sc C5, 10 sc C5, 10 sc C7, 10 sc C7, 10 sc C7) (100). Turn.
Info :
If you are tracking color yarn usage, note that C7 will be used as short highlights across multiple rows; weave in ends from these frequent short joins as you go for tidiness.
Row 32 :
(10 sc C7, 10 sc C5, 10 sc C5, 10 sc C5, 10 sc C4, 10 sc C5, 10 sc C5, 10 sc C5, 10 sc C7, 10 sc C7) (100). Turn.
Row 33 :
(10 sc C5, 10 sc C5, 10 sc C5, 10 sc C4, 10 sc C4, 10 sc C4, 10 sc C5, 10 sc C5, 10 sc C5, 10 sc C5) (100). Turn.
Row 34 :
(10 sc C5, 10 sc C4, 10 sc C4, 10 sc C4, 10 sc C3, 10 sc C4, 10 sc C4, 10 sc C4, 10 sc C5, 10 sc C5) (100). Turn.
Row 35 :
(10 sc C4, 10 sc C4, 10 sc C4, 10 sc C3, 10 sc C3, 10 sc C3, 10 sc C4, 10 sc C4, 10 sc C4, 10 sc C4) (100). Turn.
Info :
After Row 35 you are approximately 1/3 down the runner. Check width and patter alignment. If your fabric is narrowing or widening, adjust tension or check that you are not accidentally skipping or adding stitches at row ends.
Row 36 :
(10 sc C4, 10 sc C3, 10 sc C3, 10 sc C3, 10 sc C2, 10 sc C3, 10 sc C3, 10 sc C3, 10 sc C4, 10 sc C4) (100). Turn.
Row 37 :
(10 sc C3, 10 sc C3, 10 sc C3, 10 sc C2, 10 sc C2, 10 sc C2, 10 sc C3, 10 sc C3, 10 sc C3, 10 sc C3) (100). Turn.
Row 38 :
(10 sc C3, 10 sc C2, 10 sc C2, 10 sc C2, 10 sc C1, 10 sc C2, 10 sc C2, 10 sc C2, 10 sc C3, 10 sc C3) (100). Turn.
Row 39 :
(10 sc C2, 10 sc C2, 10 sc C2, 10 sc C1, 10 sc C1, 10 sc C1, 10 sc C2, 10 sc C2, 10 sc C2, 10 sc C2) (100). Turn.
Info :
At row transitions where dark and light colors meet, gently pull the lighter yarn to even tension if it pulls tighter than dark yarn. Small adjustments while crocheting save time on blocking later.
Row 40 :
(10 sc C2, 10 sc C1, 10 sc C1, 10 sc C1, 10 sc C7, 10 sc C1, 10 sc C1, 10 sc C1, 10 sc C2, 10 sc C2) (100). Turn.
Row 41 :
(10 sc C1, 10 sc C1, 10 sc C1, 10 sc C7, 10 sc C7, 10 sc C7, 10 sc C1, 10 sc C1, 10 sc C1, 10 sc C1) (100). Turn.
Row 42 :
(10 sc C1, 10 sc C1, 10 sc C7, 10 sc C7, 10 sc C5, 10 sc C7, 10 sc C7, 10 sc C1, 10 sc C1, 10 sc C1) (100). Turn.
Row 43 :
(10 sc C7, 10 sc C7, 10 sc C5, 10 sc C5, 10 sc C5, 10 sc C5, 10 sc C5, 10 sc C7, 10 sc C7, 10 sc C7) (100). Turn.
Info :
This central section often contains the most color changes. If you’re making a second runner to match, write down the sequence of rows and color placements or take a photo to replicate accurately.
Row 44 :
(10 sc C7, 10 sc C5, 10 sc C5, 10 sc C5, 10 sc C4, 10 sc C5, 10 sc C5, 10 sc C5, 10 sc C7, 10 sc C7) (100). Turn.
Row 45 :
(10 sc C5, 10 sc C5, 10 sc C4, 10 sc C4, 10 sc C3, 10 sc C4, 10 sc C4, 10 sc C5, 10 sc C5, 10 sc C5) (100). Turn.
Row 46 :
(10 sc C5, 10 sc C4, 10 sc C4, 10 sc C3, 10 sc C3, 10 sc C3, 10 sc C4, 10 sc C4, 10 sc C5, 10 sc C5) (100). Turn.
Row 47 :
(10 sc C4, 10 sc C4, 10 sc C3, 10 sc C3, 10 sc C2, 10 sc C3, 10 sc C3, 10 sc C4, 10 sc C4, 10 sc C4) (100). Turn.
Info :
At this midpoint you can decide if you want to replicate the top half of the pictured runner exactly or mirror it for symmetry. The instructions here represent a single composition; mirror rows 1-47 for a symmetrical runner if desired.
Row 48 :
(10 sc C4, 10 sc C3, 10 sc C3, 10 sc C2, 10 sc C2, 10 sc C2, 10 sc C3, 10 sc C3, 10 sc C4, 10 sc C4) (100). Turn.
Row 49 :
(10 sc C3, 10 sc C3, 10 sc C2, 10 sc C2, 10 sc C1, 10 sc C2, 10 sc C2, 10 sc C3, 10 sc C3, 10 sc C3) (100). Turn.
Row 50 :
(10 sc C3, 10 sc C2, 10 sc C2, 10 sc C1, 10 sc C1, 10 sc C1, 10 sc C2, 10 sc C2, 10 sc C3, 10 sc C3) (100). Turn.
Row 51 :
(10 sc C2, 10 sc C2, 10 sc C1, 10 sc C1, 10 sc C1, 10 sc C1, 10 sc C1, 10 sc C2, 10 sc C2, 10 sc C2) (100). Turn.
Info :
Rows 48-52 begin a gradual descent back into mid-tones. Maintain neat floats and trim or weave in ends once color segments exceed 10 stitches to avoid trailing yarn on the WS.
Row 52 :
(10 sc C2, 10 sc C1, 10 sc C1, 10 sc C1, 10 sc C7, 10 sc C1, 10 sc C1, 10 sc C1, 10 sc C2, 10 sc C2) (100). Turn.
Row 53 :
(10 sc C1, 10 sc C1, 10 sc C1, 10 sc C7, 10 sc C7, 10 sc C7, 10 sc C1, 10 sc C1, 10 sc C1, 10 sc C1) (100). Turn.
Row 54 :
(10 sc C1, 10 sc C1, 10 sc C7, 10 sc C7, 10 sc C5, 10 sc C7, 10 sc C7, 10 sc C1, 10 sc C1, 10 sc C1) (100). Turn.
Row 55 :
(10 sc C7, 10 sc C7, 10 sc C5, 10 sc C5, 10 sc C5, 10 sc C5, 10 sc C5, 10 sc C7, 10 sc C7, 10 sc C7) (100). Turn.
Info :
Repeat the same color management tips: change colors only on last yarn-over, and keep carried floats short. If you are new to tapestry crochet, practice the technique on a small swatch first.
Row 56 :
(10 sc C7, 10 sc C5, 10 sc C5, 10 sc C5, 10 sc C4, 10 sc C5, 10 sc C5, 10 sc C5, 10 sc C7, 10 sc C7) (100). Turn.
Row 57 :
(10 sc C5, 10 sc C5, 10 sc C4, 10 sc C4, 10 sc C3, 10 sc C4, 10 sc C4, 10 sc C5, 10 sc C5, 10 sc C5) (100). Turn.
Row 58 :
(10 sc C5, 10 sc C4, 10 sc C4, 10 sc C3, 10 sc C3, 10 sc C3, 10 sc C4, 10 sc C4, 10 sc C5, 10 sc C5) (100). Turn.
Row 59 :
(10 sc C4, 10 sc C4, 10 sc C3, 10 sc C3, 10 sc C2, 10 sc C3, 10 sc C3, 10 sc C4, 10 sc C4, 10 sc C4) (100). Turn.
Info :
Check your runner length as you go. If you want a shorter runner, stop after a desired number of rows and begin edging. If you want a longer runner, add more rows repeating bands or creating mirrored repeats of the chart sections.
Row 60 :
(10 sc C4, 10 sc C3, 10 sc C3, 10 sc C2, 10 sc C2, 10 sc C2, 10 sc C3, 10 sc C3, 10 sc C4, 10 sc C4) (100). Turn.
Row 61 :
(10 sc C3, 10 sc C3, 10 sc C2, 10 sc C2, 10 sc C1, 10 sc C2, 10 sc C2, 10 sc C3, 10 sc C3, 10 sc C3) (100). Turn.
Row 62 :
(10 sc C3, 10 sc C2, 10 sc C2, 10 sc C1, 10 sc C1, 10 sc C1, 10 sc C2, 10 sc C2, 10 sc C3, 10 sc C3) (100). Turn.
Row 63 :
(10 sc C2, 10 sc C2, 10 sc C1, 10 sc C1, 10 sc C1, 10 sc C1, 10 sc C1, 10 sc C2, 10 sc C2, 10 sc C2) (100). Turn.
Info :
Rows 60-63 begin mirroring earlier bands; if you prefer a non-repeating design, tweak which columns you change to create entirely new peak shapes across the width.
Row 64 :
(10 sc C2, 10 sc C1, 10 sc C1, 10 sc C1, 10 sc C7, 10 sc C1, 10 sc C1, 10 sc C1, 10 sc C2, 10 sc C2) (100). Turn.
Row 65 :
(10 sc C1, 10 sc C1, 10 sc C1, 10 sc C7, 10 sc C7, 10 sc C7, 10 sc C1, 10 sc C1, 10 sc C1, 10 sc C1) (100). Turn.
Row 66 :
(10 sc C1, 10 sc C1, 10 sc C7, 10 sc C7, 10 sc C5, 10 sc C7, 10 sc C7, 10 sc C1, 10 sc C1, 10 sc C1) (100). Turn.
Row 67 :
(10 sc C7, 10 sc C7, 10 sc C5, 10 sc C5, 10 sc C5, 10 sc C5, 10 sc C5, 10 sc C7, 10 sc C7, 10 sc C7) (100). Turn.
Info :
At this point the runner is approaching full length. Continue checking for accidental stitch increases at the ends of rows; a small slip into turning chain can add stitches over many rows.
Row 68 :
(10 sc C7, 10 sc C5, 10 sc C5, 10 sc C5, 10 sc C4, 10 sc C5, 10 sc C5, 10 sc C5, 10 sc C7, 10 sc C7) (100). Turn.
Row 69 :
(10 sc C5, 10 sc C5, 10 sc C4, 10 sc C4, 10 sc C3, 10 sc C4, 10 sc C4, 10 sc C5, 10 sc C5, 10 sc C5) (100). Turn.
Row 70 :
(10 sc C5, 10 sc C4, 10 sc C4, 10 sc C3, 10 sc C3, 10 sc C3, 10 sc C4, 10 sc C4, 10 sc C5, 10 sc C5) (100). Turn.
Row 71 :
(10 sc C4, 10 sc C4, 10 sc C3, 10 sc C3, 10 sc C2, 10 sc C3, 10 sc C3, 10 sc C4, 10 sc C4, 10 sc C4) (100). Turn.
Info :
If you are making this runner as a table centerpiece, plan your darkest and lightest bands so they fall beneath decorative items or where they will show; the image places deep navy at both ends for anchoring the design.
Row 72 :
(10 sc C4, 10 sc C3, 10 sc C3, 10 sc C2, 10 sc C2, 10 sc C2, 10 sc C3, 10 sc C3, 10 sc C4, 10 sc C4) (100). Turn.
Row 73 :
(10 sc C3, 10 sc C3, 10 sc C2, 10 sc C2, 10 sc C1, 10 sc C2, 10 sc C2, 10 sc C3, 10 sc C3, 10 sc C3) (100). Turn.
Row 74 :
(10 sc C3, 10 sc C2, 10 sc C2, 10 sc C1, 10 sc C1, 10 sc C1, 10 sc C2, 10 sc C2, 10 sc C3, 10 sc C3) (100). Turn.
Row 75 :
(10 sc C2, 10 sc C2, 10 sc C1, 10 sc C1, 10 sc C1, 10 sc C1, 10 sc C1, 10 sc C2, 10 sc C2, 10 sc C2) (100). Turn.
Info :
Almost there — begin mentally preparing to finish with a neat border. Border rounds will use the same hook; for a tighter edge you can swap to the 3.5mm hook just for edging rounds.
Row 76 :
(10 sc C2, 10 sc C1, 10 sc C1, 10 sc C1, 10 sc C7, 10 sc C1, 10 sc C1, 10 sc C1, 10 sc C2, 10 sc C2) (100). Turn.
Row 77 :
(10 sc C1, 10 sc C1, 10 sc C1, 10 sc C7, 10 sc C7, 10 sc C7, 10 sc C1, 10 sc C1, 10 sc C1, 10 sc C1) (100). Turn.
Row 78 :
(10 sc C1, 10 sc C1, 10 sc C7, 10 sc C7, 10 sc C5, 10 sc C7, 10 sc C7, 10 sc C1, 10 sc C1, 10 sc C1) (100). Turn.
Row 79 :
(10 sc C7, 10 sc C7, 10 sc C5, 10 sc C5, 10 sc C5, 10 sc C5, 10 sc C5, 10 sc C7, 10 sc C7, 10 sc C7) (100). Turn.
Info :
Before beginning final rows, weave in all long tails and tidy the wrong side so the border will sit flat and neat; this is the most visible edge when displayed on a table.
Row 80 :
(10 sc C7, 10 sc C5, 10 sc C5, 10 sc C5, 10 sc C4, 10 sc C5, 10 sc C5, 10 sc C5, 10 sc C7, 10 sc C7) (100). Turn.
Row 81 :
(10 sc C5, 10 sc C5, 10 sc C4, 10 sc C4, 10 sc C3, 10 sc C4, 10 sc C4, 10 sc C5, 10 sc C5, 10 sc C5) (100). Turn.
Row 82 :
(10 sc C5, 10 sc C4, 10 sc C4, 10 sc C3, 10 sc C3, 10 sc C3, 10 sc C4, 10 sc C4, 10 sc C5, 10 sc C5) (100). Turn.
Row 83 :
(10 sc C4, 10 sc C4, 10 sc C3, 10 sc C3, 10 sc C2, 10 sc C3, 10 sc C3, 10 sc C4, 10 sc C4, 10 sc C4) (100). Turn.
Info :
Rows 80-85 repeat earlier midrange bands to tie the composition together. If you are noticing minor wave in the fabric, blocking will correct it at the end. Continue to keep float lengths short.
Row 84 :
(10 sc C4, 10 sc C3, 10 sc C3, 10 sc C2, 10 sc C2, 10 sc C2, 10 sc C3, 10 sc C3, 10 sc C4, 10 sc C4) (100). Turn.
Row 85 :
(10 sc C3, 10 sc C3, 10 sc C2, 10 sc C2, 10 sc C1, 10 sc C2, 10 sc C2, 10 sc C3, 10 sc C3, 10 sc C3) (100). Turn.
Row 86 :
(10 sc C3, 10 sc C2, 10 sc C2, 10 sc C1, 10 sc C1, 10 sc C1, 10 sc C2, 10 sc C2, 10 sc C3, 10 sc C3) (100). Turn.
Row 87 :
(10 sc C2, 10 sc C2, 10 sc C1, 10 sc C1, 10 sc C1, 10 sc C1, 10 sc C1, 10 sc C2, 10 sc C2, 10 sc C2) (100). Turn.
Info :
At about 2/3 length, begin planning your terminal color band. The photographed runner anchors ends with dark navy; begin to reintroduce C1 as you near the last 10-12 rows.
Row 88 :
(10 sc C2, 10 sc C1, 10 sc C1, 10 sc C1, 10 sc C7, 10 sc C1, 10 sc C1, 10 sc C1, 10 sc C2, 10 sc C2) (100). Turn.
Row 89 :
(10 sc C1, 10 sc C1, 10 sc C1, 10 sc C7, 10 sc C7, 10 sc C7, 10 sc C1, 10 sc C1, 10 sc C1, 10 sc C1) (100). Turn.
Row 90 :
(10 sc C1, 10 sc C1, 10 sc C7, 10 sc C7, 10 sc C5, 10 sc C7, 10 sc C7, 10 sc C1, 10 sc C1, 10 sc C1) (100). Turn.
Row 91 :
(10 sc C7, 10 sc C7, 10 sc C5, 10 sc C5, 10 sc C5, 10 sc C5, 10 sc C5, 10 sc C7, 10 sc C7, 10 sc C7) (100). Turn.
Info :
Near the end of the runner you will repeat darker bands as in the beginning so both ends harmonize. Monitor yarn usage of C1 and C2 to ensure you have enough to finish the last band.
Row 92 :
(10 sc C7, 10 sc C5, 10 sc C5, 10 sc C5, 10 sc C4, 10 sc C5, 10 sc C5, 10 sc C5, 10 sc C7, 10 sc C7) (100). Turn.
Row 93 :
(10 sc C5, 10 sc C5, 10 sc C4, 10 sc C4, 10 sc C3, 10 sc C4, 10 sc C4, 10 sc C5, 10 sc C5, 10 sc C5) (100). Turn.
Row 94 :
(10 sc C5, 10 sc C4, 10 sc C4, 10 sc C3, 10 sc C3, 10 sc C3, 10 sc C4, 10 sc C4, 10 sc C5, 10 sc C5) (100). Turn.
Row 95 :
(10 sc C4, 10 sc C4, 10 sc C3, 10 sc C3, 10 sc C2, 10 sc C3, 10 sc C3, 10 sc C4, 10 sc C4, 10 sc C4) (100). Turn.
Info :
Rows 92-95 echo earlier midrange shapes, helping the composition read as layered mountain ranges. Keep going—you are nearly finished.
Row 96 :
(10 sc C4, 10 sc C3, 10 sc C3, 10 sc C2, 10 sc C2, 10 sc C2, 10 sc C3, 10 sc C3, 10 sc C4, 10 sc C4) (100). Turn.
Row 97 :
(10 sc C3, 10 sc C3, 10 sc C2, 10 sc C2, 10 sc C1, 10 sc C2, 10 sc C2, 10 sc C3, 10 sc C3, 10 sc C3) (100). Turn.
Row 98 :
(10 sc C3, 10 sc C2, 10 sc C2, 10 sc C1, 10 sc C1, 10 sc C1, 10 sc C2, 10 sc C2, 10 sc C3, 10 sc C3) (100). Turn.
Row 99 :
(10 sc C2, 10 sc C2, 10 sc C1, 10 sc C1, 10 sc C1, 10 sc C1, 10 sc C1, 10 sc C2, 10 sc C2, 10 sc C2) (100). Turn.
Info :
Rows 96-99 set up the final dark anchoring band. If you are mirroring the top, you will now move into solid or largely dark navy rows for the final 6-8 rows.
Row 100 :
(10 sc C2, 10 sc C1, 10 sc C1, 10 sc C1, 10 sc C7, 10 sc C1, 10 sc C1, 10 sc C1, 10 sc C2, 10 sc C2) (100). Turn.
Row 101 :
(10 sc C1, 10 sc C1, 10 sc C1, 10 sc C7, 10 sc C7, 10 sc C7, 10 sc C1, 10 sc C1, 10 sc C1, 10 sc C1) (100). Turn.
Row 102 :
(10 sc C1, 10 sc C1, 10 sc C7, 10 sc C7, 10 sc C5, 10 sc C7, 10 sc C7, 10 sc C1, 10 sc C1, 10 sc C1) (100). Turn.
Row 103 :
(10 sc C7, 10 sc C7, 10 sc C5, 10 sc C5, 10 sc C5, 10 sc C5, 10 sc C5, 10 sc C7, 10 sc C7, 10 sc C7) (100). Turn.
Info :
As you near the final rows, prepare any spare yarn to ensure matching dark band color is present for the last 6-8 rows. Finish all weaving-ins up to this point if convenient.
Row 104 :
(10 sc C7, 10 sc C5, 10 sc C5, 10 sc C5, 10 sc C4, 10 sc C5, 10 sc C5, 10 sc C5, 10 sc C7, 10 sc C7) (100). Turn.
Row 105 :
(10 sc C5, 10 sc C5, 10 sc C4, 10 sc C4, 10 sc C3, 10 sc C4, 10 sc C4, 10 sc C5, 10 sc C5, 10 sc C5) (100). Turn.
Row 106 :
(10 sc C5, 10 sc C4, 10 sc C4, 10 sc C3, 10 sc C3, 10 sc C3, 10 sc C4, 10 sc C4, 10 sc C5, 10 sc C5) (100). Turn.
Row 107 :
(10 sc C4, 10 sc C4, 10 sc C3, 10 sc C3, 10 sc C2, 10 sc C3, 10 sc C3, 10 sc C4, 10 sc C4, 10 sc C4) (100). Turn.
Info :
Now shift into the final solid anchor rows by increasing the number of navy columns each row until all columns are C1. This creates the deep band at the runner ends.
Row 108 :
(10 sc C4, 10 sc C3, 10 sc C3, 10 sc C2, 10 sc C2, 10 sc C2, 10 sc C3, 10 sc C3, 10 sc C4, 10 sc C4) (100). Turn.
Row 109 :
(10 sc C3, 10 sc C3, 10 sc C2, 10 sc C2, 10 sc C1, 10 sc C2, 10 sc C2, 10 sc C3, 10 sc C3, 10 sc C3) (100). Turn.
Row 110 :
(10 sc C3, 10 sc C2, 10 sc C2, 10 sc C1, 10 sc C1, 10 sc C1, 10 sc C2, 10 sc C2, 10 sc C3, 10 sc C3) (100). Turn.
Row 111 :
(10 sc C2, 10 sc C2, 10 sc C1, 10 sc C1, 10 sc C1, 10 sc C1, 10 sc C1, 10 sc C2, 10 sc C2, 10 sc C2) (100). Turn.
Info :
Rows 109-111 move you firmly into the darker endband. If you’d like more visual weight at the ends, add additional rows of C1 after Row 120 below until you reach desired darkness.
Row 112 :
(10 sc C2, 10 sc C1, 10 sc C1, 10 sc C1, 10 sc C7, 10 sc C1, 10 sc C1, 10 sc C1, 10 sc C2, 10 sc C2) (100). Turn.
Row 113 :
(10 sc C1, 10 sc C1, 10 sc C1, 10 sc C7, 10 sc C7, 10 sc C7, 10 sc C1, 10 sc C1, 10 sc C1, 10 sc C1) (100). Turn.
Row 114 :
(10 sc C1, 10 sc C1, 10 sc C7, 10 sc C7, 10 sc C5, 10 sc C7, 10 sc C7, 10 sc C1, 10 sc C1, 10 sc C1) (100). Turn.
Row 115 :
(10 sc C7, 10 sc C7, 10 sc C5, 10 sc C5, 10 sc C5, 10 sc C5, 10 sc C5, 10 sc C7, 10 sc C7, 10 sc C7) (100). Turn.
Info :
With about 25 rows remaining you should now prepare for edging — you will be working sc around all 4 sides. Have C1 (Navy) ready for the edge rounds to match the sample photo; you can also choose a contrasting color for a statement border.
Row 116 :
(10 sc C7, 10 sc C5, 10 sc C5, 10 sc C5, 10 sc C4, 10 sc C5, 10 sc C5, 10 sc C5, 10 sc C7, 10 sc C7) (100). Turn.
Row 117 :
(10 sc C5, 10 sc C5, 10 sc C4, 10 sc C4, 10 sc C3, 10 sc C4, 10 sc C4, 10 sc C5, 10 sc C5, 10 sc C5) (100). Turn.
Row 118 :
(10 sc C5, 10 sc C4, 10 sc C4, 10 sc C3, 10 sc C3, 10 sc C3, 10 sc C4, 10 sc C4, 10 sc C5, 10 sc C5) (100). Turn.
Row 119 :
(10 sc C4, 10 sc C4, 10 sc C3, 10 sc C3, 10 sc C2, 10 sc C3, 10 sc C3, 10 sc C4, 10 sc C4, 10 sc C4) (100). Turn.
Info :
Work the last 20 rows continuing to reduce color transitions until you have a balanced dark band at the end. End on a solid color row (C1) to attach a clean, even border.
Row 120 :
(10 sc C4, 10 sc C3, 10 sc C3, 10 sc C2, 10 sc C2, 10 sc C2, 10 sc C3, 10 sc C3, 10 sc C4, 10 sc C4) (100). Turn.
Row 121 :
(10 sc C3, 10 sc C3, 10 sc C2, 10 sc C2, 10 sc C1, 10 sc C2, 10 sc C2, 10 sc C3, 10 sc C3, 10 sc C3) (100). Turn.
Row 122 :
(10 sc C3, 10 sc C2, 10 sc C2, 10 sc C1, 10 sc C1, 10 sc C1, 10 sc C2, 10 sc C2, 10 sc C3, 10 sc C3) (100). Turn.
Row 123 :
(10 sc C2, 10 sc C2, 10 sc C1, 10 sc C1, 10 sc C1, 10 sc C1, 10 sc C1, 10 sc C2, 10 sc C2, 10 sc C2) (100). Turn.
Row 124 :
(10 sc C2, 10 sc C1, 10 sc C1, 10 sc C1, 10 sc C1, 10 sc C1, 10 sc C1, 10 sc C1, 10 sc C2, 10 sc C2) (100). Turn.
Row 125 :
(10 sc C1, 10 sc C1, 10 sc C1, 10 sc C1, 10 sc C1, 10 sc C1, 10 sc C1, 10 sc C1, 10 sc C1, 10 sc C1) (100). Turn. — Solid Navy row started.
Row 126 :
(100 sc C1) (100). Turn.
Row 127 :
(100 sc C1) (100). Turn.
Row 128 :
(100 sc C1) (100). Turn.
Info :
Work 3-5 solid Navy rows to anchor the runner ends. For a deeper endband, increase to 6-8 rows. End on a right-side row if you prefer the final border to be added from the RS.
Row 129 :
(100 sc C1) (100). Turn.
Row 130 :
(100 sc C1) (100). Turn.
Row 131 :
(100 sc C1) (100). Turn.
Row 132 :
(100 sc C1) (100). Turn.
Info :
Fasten off after last row and weave in ends on the wrong side. Prepare to work border rounds around entire runner. Use same color C1 for a cohesive edge or C2 for a subtle contrast.
— Border & Edging :
Border Round 1 :
With RS facing and C1, join with sl st to any corner. Ch 1, work 1 sc in same corner st, continue sc evenly along the long side working 100 sc across the row-end, working 3 sc in each corner stitch to keep corners flat; continue along the opposite long side and across the other short ends—total perimeter sc = 2*(100)+2*(end sts) approx 204 sc depending on exact corner counts. Join with sl st to first sc. (Work evenly, keeping approximately same number of sc on long sides as row count.)
Info :
To keep the border even, place 1 sc in each row-end at the short sides and 1 sc in each stitch along long sides. Adjust corner increases (2-3 sc in corner) to avoid puckering.
Border Round 2 :
Ch 1, sc in each st around working 3 sc in each corner st. Join with sl st. This creates a neat framed edge. (If you prefer a tighter edge, work this round with 3.5mm hook.)
Border Round 3 (Scallop/Picot Finish) :
For a decorative scalloped edge: *sc in next st, ch 3, sl st into the sc just worked (creates shallow picot), sc in next 4 sts; rep from * around, working extra scs in corners as needed. Join, fasten off and weave ends. Alternatively work (sk 1 st, 5 dc in next st, sk 1 st, sl st) for a larger scallop.
Info :
For the runner in the photo, a small picot-like scallop yields a crisp, subtle finish. You can test the edge on a scrap first to choose the look you prefer.
— Finishing :
Info :
Weave in all ends on the wrong side, trimming flush. Use tapestry needle to stitch tails into adjoining stitches to secure. For any long floats you carried, darn them across the wrong side if necessary to prevent snagging.
Blocking :
Lightly wet-block the runner: pin to shape on blocking mat or clean towel, smoothing edges and aligning corners square. Gently steam or spritz with water and leave to dry fully. This evens row tension and flattens the runner to professional look.
Info :
Final care: machine wash cold gentle cycle if yarn label permits, or hand wash. Reshape while damp and lay flat to dry to preserve shape and colors.
Troubleshooting :
If sides ripple, check tension and block more aggressively; if ends pull in, add an extra border round of sc to even the edge.
Finishing this runner is so rewarding — all those color changes come together into a calm, layered mountain scene that feels both modern and cozy. The neat single crochet fabric is durable and the scalloped edge gives a polished, handmade touch. Place it on your table and enjoy the way the blues pop against wood grain. 🧶💙✨