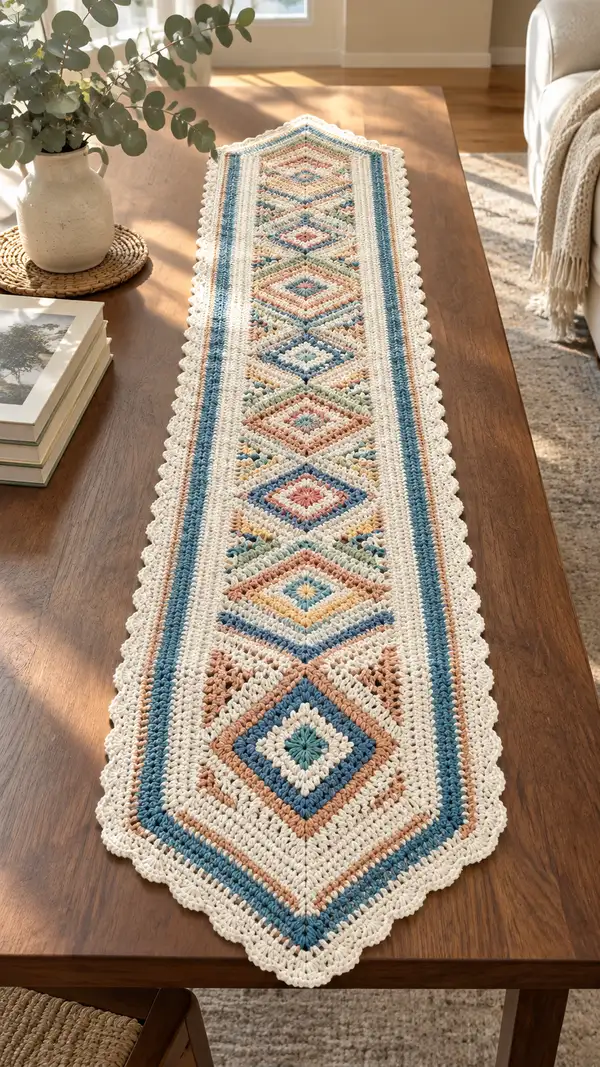
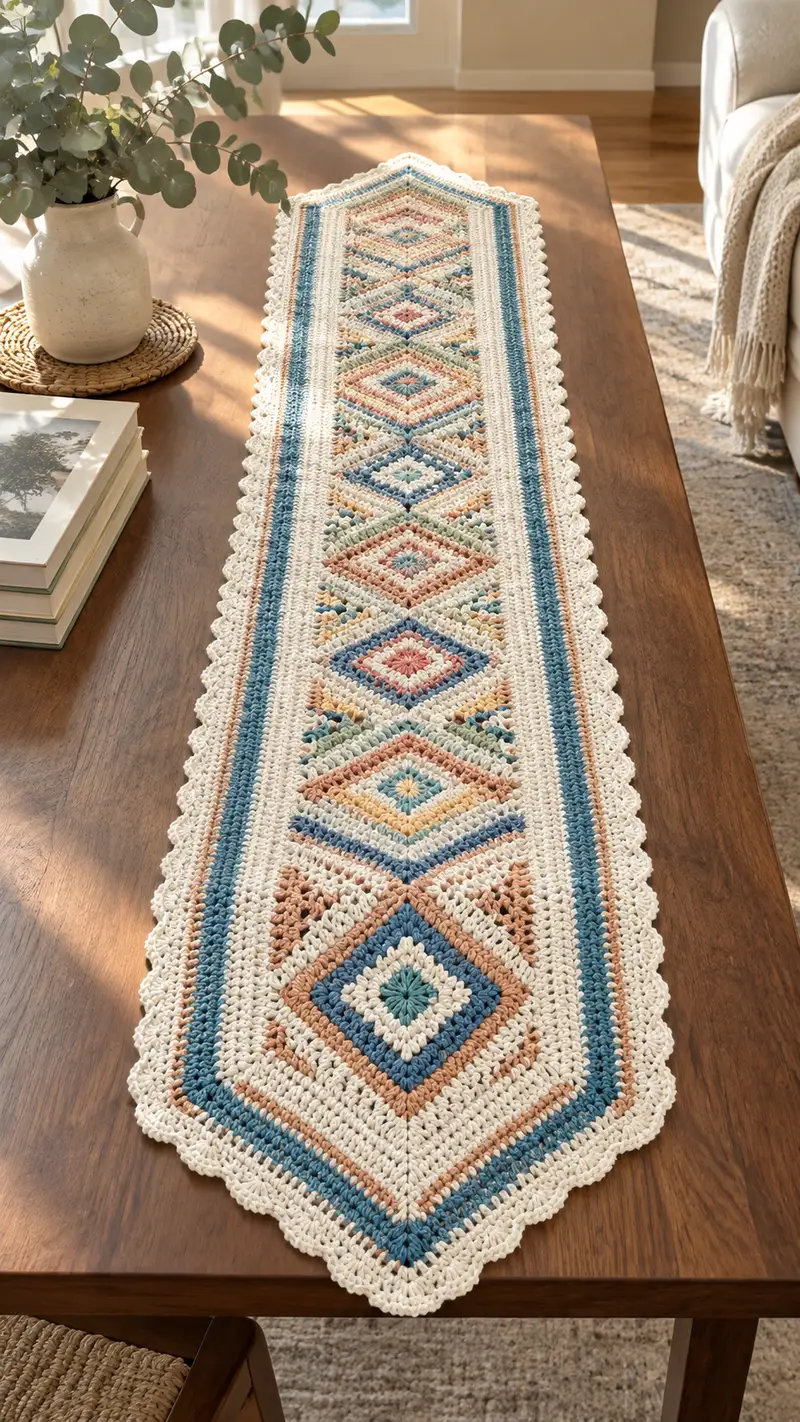
Create a long boho-inspired table runner featuring a central diamond motif strip, soft scalloped edges, and warm muted colors. This pattern uses textured stitches and strategic color changes to recreate the layered diamond look seen in the photo. Worked flat in rows with repeated motif panels, it's perfect for a decorative dining or console table centerpiece.
Progress Tracker
0% Complete
— Notes & Gauge :
Info :
This runner is worked flat in rows. Gauge in pattern (textured stitch pattern): 14 stitches and 12 rows = 10 cm in pattern using 4.0 mm hook. Adjust hook size to obtain gauge. Width as written (after blocking) = approximately 28cm (11") across the body (not including scallop edging). Length of sample runner = 120 rows of motif = ~140 cm (55"). You can lengthen or shorten by adding or removing motif repeats of 12 rows.
Info :
Abbreviations and cluster stitch: cl = dc3tog cluster worked as: yarn over, insert, yarn over, pull up loop (3 loops on hook), yarn over, insert next stitch, yarn over, draw up loop (5 loops), yarn over, insert next stitch, yarn over, draw up loop (7 loops), yarn over and pull through all 7 loops, ch1 to close cluster if pattern indicates. Count cluster as one stitch when instructed.
— Foundation Chain & Base Border :
Round 1 :
Using Cream (MC), ch 121. (This chain establishes width: 121 ch = 11 motif repeats of 11 sts each.)
Round 2 :
Row 1 (RS): 1 dc in 4th ch from hook (counts as dc), 1 dc in each remaining ch across. Turn. (121 dc)
Round 3 :
Row 2 (WS): ch 2 (does not count as st), 1 dc in each st across. Turn. (121 dc)
Info :
Work two solid rows of dc in cream to stabilize foundation. Use a stitch marker in first st of each RS row to mark the start and maintain count easily. If your chain is too loose switch to a 3.75 mm hook for foundation then change to 4.0 mm for the body.
— Establishing the Center Band (Rows 3-10) :
Round 4 :
Row 3 (RS): with MC (Cream) ch2, dc in next 2 sts, *fpdc around next st, bpdc around next st; rep from * across until last 3 sts, dc in next 2 sts, dc in top of turning ch. Turn. (121 sts: fpdc and bpdc count as 1 each)
Round 5 :
Row 4 (WS): ch2, dc in each st across in back loops only (BLO) to create a subtle ridge. Turn. (121 dc)
Round 6 :
Row 5 (RS): ch2, dc in next 3 sts, *(dc3tog cluster centered over next 3 sts) in row below using cluster technique for texture at motif centre; dc in next 4 sts; rep from * across until last 4 sts, dc in next 3 sts, dc in top of turning ch. Turn. (121 sts; count clusters as 1)
Round 7 :
Row 6 (WS): ch2, dc in each st across. Turn. (121 dc)
Info :
These beginning rows create a stable band to anchor the diamond motifs. The fpdc/bpdc alternating row will give vertical texture lines that frame each diamond repeat across the width. Place markers at each group-of-11-stitch boundary if you like to visualize motif divisions (mark at sts 1,12,23,...121).
Round 8 :
Row 7 (RS): ch2, work starburst detail row as follows: *in motif block of 11 sts work: [dc1, ch1, fpdc, ch1, dc1] centered over block; then skip to next block; rep across; end with dc to fill edge sts. Turn. (121 sts pattern held)
Round 9 :
Row 8 (WS): ch2, dc in each st across. Turn. (121 dc)
Round 10 :
Row 9 (RS): ch2, dc in first 6 sts, *[3 dc in next st, ch2, 3 dc in same st (shell made on single st to mimic small diamond center)] skip next 9 sts to align center shells along length, rep across; finish with dc to last 6 sts. Turn. (121 sts)
Info :
At the center of each 11-st motif repeat we will be building a vertical diamond shape over the following 12 rows. The shell clusters here serve as the starting accent and help anchor color placement. This is a good point to change to an accent color for the next texture row if you prefer. Carry unused colors along the WS neatly or work bobbins for each repeat if making many color switches.
— Diamond Motif Sequence (Primary motif repeat = 12 rows) :
Info :
Each diamond motif along the length is worked across the same 121-st foundation but creates vertical motifs by a 12-row repeat. Use Color A = Teal, Color B = Rust, Color C = Mustard, Color D = Sage, and MC = Cream. The following 12-row sequence forms one vertical diamond unit. Repeat this 12-row sequence for each diamond stacked along the runner length. Stitch counts remain 121 in every row; textures and color changes form the diamonds.
Round 11 :
Row 10 (RS) - Motif Row 1: Change to Color A (Teal) at the last possible moment; ch2, dc in first 5 sts (edge band), *in motif repeat (11-st block) work: [2 dc, ch1, cl (dc3tog cluster) centered on st 6 of block, ch1, 2 dc] across each 11-st block; finish with dc in last 5 sts. Turn. (121 sts)
Round 12 :
Row 11 (WS): With Color A (Teal), ch2, dc in each st across. Turn. (121 dc)
Round 13 :
Row 12 (RS): Change to MC (Cream), ch2, dc in first 5 sts, *[work fpdc around the two center sts of each 11-st block, creating raised vertical posts that frame the cluster], dc in remaining of block; rep across; finish with dc in last 5 sts. Turn. (121 sts)
Round 14 :
Row 13 (WS): With MC, ch2, dc in each st across. Turn. (121 dc)
Info :
These fpdc posts will form the outline of the diamond on subsequent rows. Keep posts neat by inserting hook around post from front to back and completing dc normally. Use the stitch markers at block boundaries to ensure clusters land centered in each 11-st block.
Round 15 :
Row 14 (RS): Change to Color B (Rust). Ch2, dc in first 5 sts; *over each 11-st block work shaping row: dc2, ch1, dc1 in next st (offset to begin slanted edge), ch1, dc2; rep across; finish with dc in last 5 sts. Turn. (121 sts)
Round 16 :
Row 15 (WS): With Color B, ch2, dc in each st across. Turn. (121 dc)
Round 17 :
Row 16 (RS): Change to Color C (Mustard). Ch2, dc in first 4 sts, *[in each 11-st block work: (dc1, fpdc around post from Row 13, dc1) to make the next diagonal ridge], then dc in remaining sts of block; finish with dc in last 4 sts. Turn. (121 sts)
Round 18 :
Row 17 (WS): With Color C, ch2, dc in each st across. Turn. (121 dc)
Info :
Alternate RS textured rows with WS plain dc rows to keep the panel flat while preserving texture. Each 2-row set (pattern row + plain row) helps build the vertical diamond shape while keeping overall stitch count consistent.
Round 19 :
Row 18 (RS): Change to Color D (Sage). Ch2, dc in first 5 sts, *in each 11-st block work: cl (dc3tog cluster) over center of block, ch2, then dc1 each side to start the widening part of the diamond; rep across; finish with dc in last 5 sts. Turn. (121 sts)
Round 20 :
Row 19 (WS): With Color D, ch2, dc in each st across. Turn. (121 dc)
Round 21 :
Row 20 (RS): Switch to MC (Cream): ch2, dc in first 6 sts, *[work 3-dc shell (3 dc in one st) over the place where the cluster sits to broaden the diamond], dc in next 7 sts; rep across; finish with dc in last 6 sts. Turn. (121 sts)
Round 22 :
Row 21 (WS): With MC ch2, dc across. Turn. (121 dc)
Info :
Rows 10-21 (Rows 11-22 in total sequence) together form the lower half of one diamond unit; you will now begin the mirror shaping to close the diamond. Maintain color order or swap colors for variety. Repeat the 12-row motif sequence but mirror colors for the closing half if desired to create the stacked diamond look.
Round 23 :
Row 22 (RS): With Color B (Rust), ch2, dc in first 5 sts; *work mirror of Row 14: dc2, ch1, dc1 (offset to close diagonal), ch1, dc2 across each 11-st block; finish with dc in last 5 sts. Turn. (121 sts)
Round 24 :
Row 23 (WS): With Color B, ch2, dc across. Turn. (121 dc)
Round 25 :
Row 24 (RS): With Color A (Teal), ch2, dc in first 5 sts, *[work fpdc and bpdc reversed from earlier rows to emphasize diamond edges: bpdc then fpdc across the pair of posts made earlier], finish with dc in last 5 sts. Turn. (121 sts)
Round 26 :
Row 25 (WS): With Color A, ch2, dc across. Turn. (121 dc)
Info :
One 12-row motif unit = Rows 10-21. For a long runner like the photo, work 10–12 repeats of this 12-row sequence (120–144 rows). The diamonds will stack point-to-point because the sequence is mirrored every other motif; to reproduce the sample stacked look, repeat the 12-row sequence exactly and then on the next motif reverse the color order for contrast.
Round 27 :
Row 26 (RS): Repeat Row 10 (motif Row 1) but change to desired accent color for a different diamond row (you can swap Teal for Rust). Ch2, work cluster-centered rows as before. Turn. (121 sts)
Round 28 :
Row 27 (WS): dc across in MC. Turn. (121 dc)
Round 29 :
Row 28 (RS): Repeat Row 12 texture (fpdc row) using MC. Turn. (121 sts)
Round 30 :
Row 29 (WS): dc across. Turn. (121 dc)
Info :
Continue repeating the 12-row motif sequence (Rows 10-21) along the full length. For the pictured runner, repeat the motif 10 times for a final total of 120 motif rows in the central strip (plus initial 10 establishing rows and final border rows). Always finish each motif row with a WS plain dc row to keep work flat.
Round 31-120 :
Rows 30-119: Continue working motif repeats. Each motif = 12 rows as established. Record color order for each motif repeat to alternate teal/rust/mustard/sage accents as pictured. Maintain 121 stitches per row. (121 sts each row)
Info :
After completing the desired number of motif repeats and reaching your target runner length, end on a WS row of plain MC dc. Count total rows to ensure symmetry: the runner pictured uses 10 establishing rows + 10 motif repeats (12 rows each = 120) + 8 finishing border rows = ~138 total rows. Adjust as needed to fit your table.
— End Shaping (Create Pointed Ends) :
Round 121 :
Row 120 (RS): With MC, ch2, dc across entire row as established. Turn. (121 dc)
Round 122 :
Row 121 (WS) - Begin shaping: ch2, dc in first 6 sts, dc2tog over next 4 sts, dc in next 8 sts, *dc2tog over next 4 sts, dc in next 8 sts; rep across until last 6 sts, dc in last 6 sts. (Each dc2tog reduces the center runs to begin tapering.) Count will reduce: calculate carefully: For each dc2tog you reduce 1 stitch. If you do 10 dc2togs total across row you will lose 10 sts: new count 111. Turn.
Round 123 :
Row 122 (RS): ch2, dc across in MC maintaining pattern where possible; after each dc2tog of previous row make a dc cluster to blend shaping. Turn. (111 sts)
Round 124 :
Row 123 (WS): ch2, dc in first 6 sts, *dc2tog over next 4 sts, dc in next 6 sts; rep across; finish with dc in last 6 sts. Turn. (If you reduced another 6 sts total new count ~105 sts)
Info :
Shaping the ends requires small reductions over 4-6 rows to form the point. Reduce symmetrically across the width so the diamond centers align and the point remains centered. Try on a swatch first to see how many reductions create a point of desired length. The counts above are examples — always count stitches and trim if needed.
Round 125 :
Row 124 (RS): ch2, dc across adjusting to reductions from previous row to keep texture lines centered. Turn. (approx 105 sts)
Round 126 :
Row 125 (WS): Repeat reduction row: ch2, dc across with dc2tog placements moved closer until you have created a tapered end that forms a shallow point. Typical runner end will require 4-6 reducing rows symmetrical both sides. Final small center wedge will be shaped in last rows. (approx 95-101 sts depending on your shaping)
Round 127 :
Row 126 (RS): ch2, dc across finishing the point, then fasten off leaving long tail for edge stitches. At the opposite end of runner repeat the same shaping sequence so that both ends are symmetrically pointed. Count carefully to ensure both ends mirror each other.
Info :
If you prefer blunt ends rather than pointed, simply maintain the full width and work border rounds without reductions. The pictured runner features pointed ends which are created by small symmetrical decreases over 4-6 rows at each end after completing motif repeats.
— Main Border (Establish Edge Band before Scallop) :
Round 128 :
With MC (Cream) and RS facing, join yarn at one long side edge. Work 1 sc evenly along the side edge for each row end (approx 138 sc along side depending on total rows). Turn the runner and repeat sc along opposite edge on return to form a neat side band. The sc rows around the perimeter stabilize the edge for scallop work.
Round 129 :
Continue working 2 full rounds of sc in MC around entire perimeter, placing (3 sc, ch2, 3 sc) in each corner gap to allow turning. After second sc round, join with sl st to starting sc and fasten off if desired. (Perimeter count varies with length.)
Info :
This sc border evens up the edges and creates a base row for the scalloped edging. If your long edges are slightly uneven due to post stitches, block the runner lightly before adding scallops to ensure smooth scallop placement.
— Scalloped Edge (Final Decorative Border) :
Round 130 :
With MC (Cream) join yarn. Scallop Row: *skip 2 sc, 5 dc in next sc (shell made of 5 dc), skip 2 sc, sl st in next sc; rep around entire perimeter. In corners work a slightly larger shell of 7 dc to flatten corner. Join with sl st to first shell and fasten off. This creates the delicate scalloped edge like pictured.
Round 131 :
Optional: Repeat scallop row for a fuller edge if desired: *sl st in top of next shell, ch2, 3 dc in center of shell, ch2, sl st in top of same shell; rep to create baby scallops on top of shells. Fasten off and weave ends. Block to shape scallops evenly.
Info :
For the pictured runner the scallop was made with a single shell row that creates a gentle, open scalloped edge. Blocking after the scallop row is important to open and even the shells for a professional finish.
— Finishing & Weaving Ends :
Info :
Weave all yarn tails into the back of the work using a yarn needle. For carried colors change over on WS where possible and weave in the floats every 4-6 sts to avoid long floats. Light blocking: dampen runner and pin to measured rectangle with scalloped edges pulled into arcs. Allow to dry fully for crisp scallops and even diamonds.
Info :
Pressing? Do not iron directly. Use steam or a damp cloth on low heat to gently block without flattening texture. For heavier stabilization add a light spray starch if desired but test on a scrap first.
— Sizing & Customization :
Info :
To lengthen the runner: add additional repeats of the 12-row motif sequence. Each 12-row motif adds approximately 12 cm (4.5") to length depending on gauge and blocking. To widen the runner: adjust foundation chain in multiples of 11 sts (11 sts = one motif across). For a narrow version, use fewer motif repeats across and along the length.
Finishing this table runner feels like giving your table a warm handmade hug. The stacked diamond medallions and soft scalloped edge combine to create a balanced, textured centerpiece you can be proud to display. Block and trim with care, then style it with a vase or seasonal decor — it truly transforms any table. 🧶✨ Your patience and careful colorwork will reward you with a heirloom-quality accent that brings cozy charm to your home. Happy stitching! 🌿